一、前言
- 原子化服务是鸿蒙的一大特性,在服务中心可以看见许多以卡片形式呈现的原子化服务,这些服务体积小,能够快速部署到手机上实现功能,达到免安装的效果。

- 同样的,原子化服务另外一种呈现方式就是基于华为分享的,例如A同学希望分享他在京东上看到的一件商品,他可以通过华为分享将该服务页面快速迁移到B同学的手机上,而B同学的手机上并没有安装京东,也能看到呈现画面。
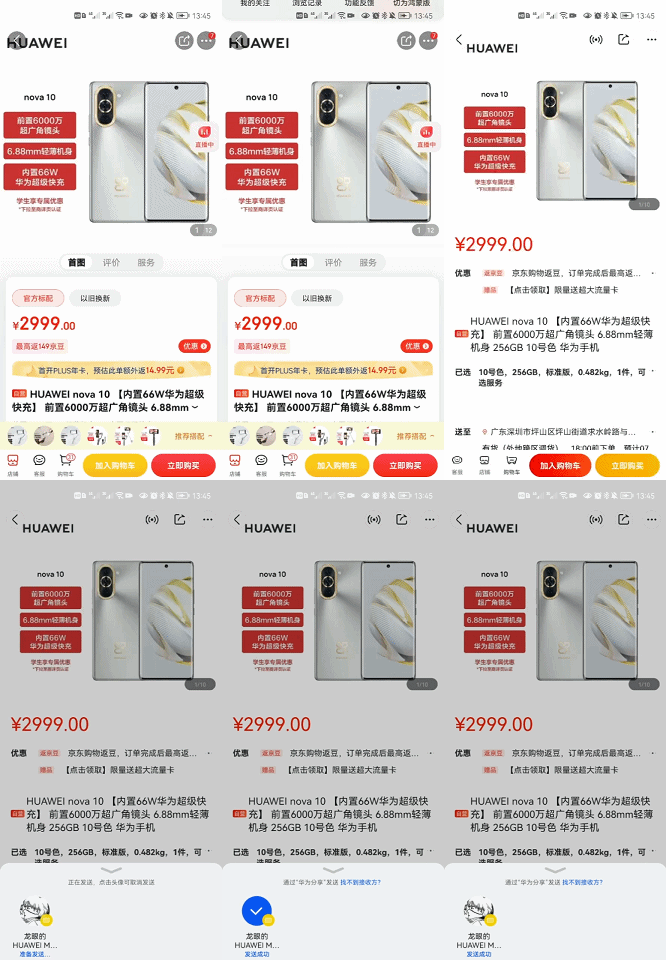
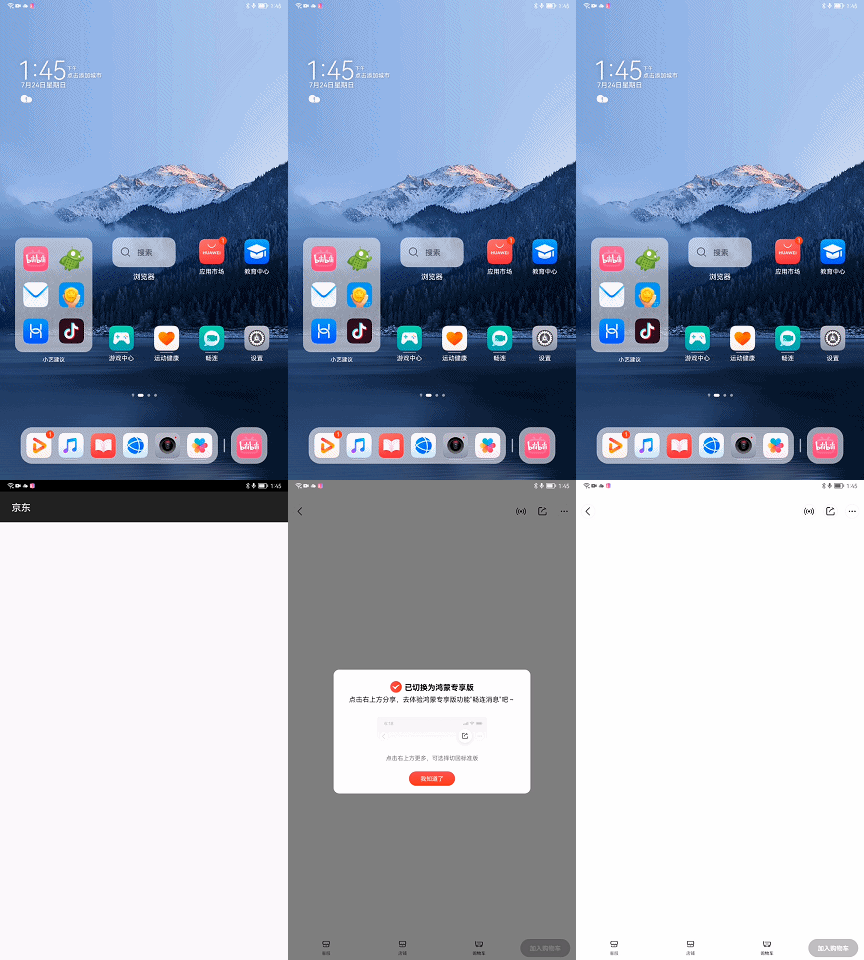
这里不知道是网络还是应用出现了BUG,总之就没显示出来画面,不过问题不大。接下来我们亲自用案例实现,这个案例首先实现华为分享分享服务,同时要发布测试态原子化服务,这样我们的应用才能够在服务中心以卡片形式呈现,并且实现免安装。
二、原子化服务分享
1、华为分享
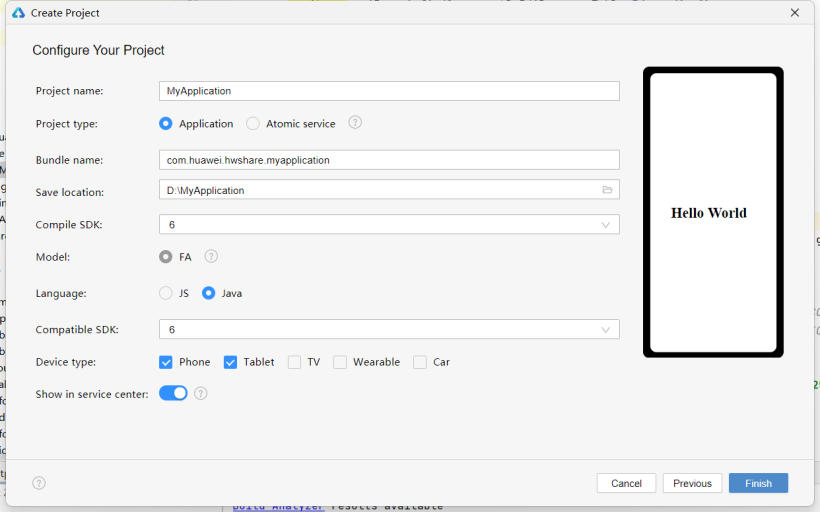
本案例在最新版本的Deveco上进行编写,我们需要建立携带原子化服务的JAVA工程,注意是JAVA工程,由于该功能目前还未迁移到JS上,我们需要用JAVA进行编写,同时勾选在服务中心显示。
具体的华为分享原理,其实就是两端在一个组网近场内,一端封装好要分享的数据通过华为分享传输给另一端。快速传输,免安装的体验感一是数据量小,二是华为分享本身过硬的技术两者结合带来的。多余不在赘述,详情参看官网文档,接入华为分享。
2、接入华为分享
(1)创建IDL接口
我们在JAVA同级目录下,创建两个idl接口:
- IHwShareCallback
- IHwShareService
注意idl接口存放路径一定要是com/huawei/hwshare/third
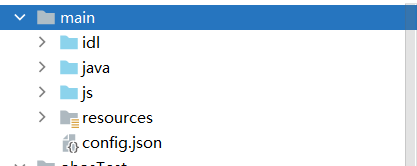
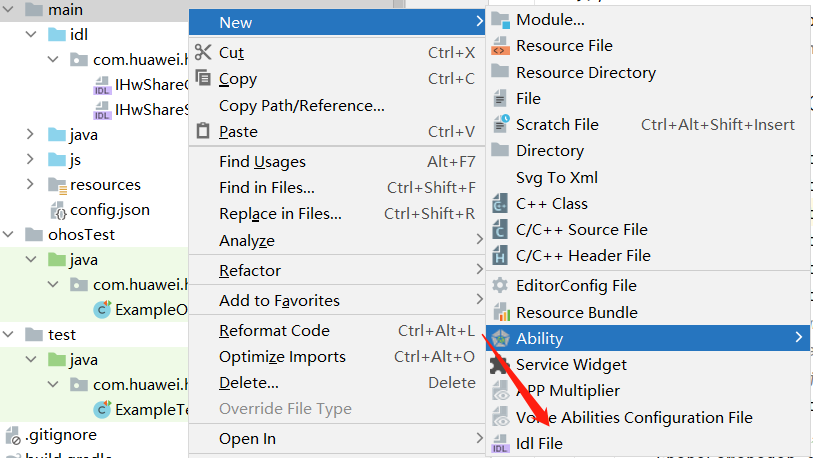
(2)实现接口
- IHwShareCallback
interface com.huawei.hwshare.third.IHwShareCallback {
    [oneway] void notifyState([in] int state);
}
- IHwShareService
sequenceable ohos.interwork.utils.PacMapEx;
interface com.huawei.hwshare.third.IHwShareCallback;

interface com.huawei.hwshare.third.IHwShareService {
    int startAuth([in] String appId, [in] IHwShareCallback callback);
    int shareFaInfo([in] PacMapEx pacMapEx);
}
3、ShareFaManager类
用于管理分享方与华为分享的连接通道和数据交互,建议不要DIY,DIY空间少,容易出错,直接参考官方文档。
import com.huawei.hwshare.third.HwShareCallbackStub;
import com.huawei.hwshare.third.HwShareServiceProxy;
import ohos.aafwk.ability.IAbilityConnection;
import ohos.aafwk.content.Intent;
import ohos.app.Context;
import ohos.bundle.ElementName;
import ohos.eventhandler.EventHandler;
import ohos.eventhandler.EventRunner;
import ohos.interwork.utils.PacMapEx;
import ohos.rpc.IRemoteObject;
import ohos.rpc.RemoteException;
import ohos.hiviewdfx.HiLog;
import ohos.hiviewdfx.HiLogLabel;
public class ShareFaManager {
private static final HiLogLabel LABEL_LOG = new HiLogLabel(3, 0xD000F00, "ShareFa");
private static final String LOG_FORMAT = "%{public}s: %{public}s";
public static final String HM_FA_ICON = "ohos_fa_icon";
public static final String HM_FA_NAME = "ohos_fa_name";
public static final String HM_ABILITY_NAME = "ohos_ability_name";
public static final String HM_BUNDLE_NAME = "ohos_bundle_name";
public static final String SHARING_FA_TYPE = "sharing_fa_type";
public static final String SHARING_THUMB_DATA = "sharing_fa_thumb_data";
public static final String SHARING_CONTENT_INFO = "sharing_fa_content_info";
public static final String SHARING_EXTRA_INFO = "sharing_fa_extra_info";
private static final String TAG = "ShareHmFaManager";
private static final String SHARE_PKG_NAME = "com.huawei.android.instantshare";
private static final String SHARE_ACTION = "com.huawei.instantshare.action.THIRD_SHARE";
private static final long UNBIND_TIME = 20*1000L;
private Context mContext;
private String mAppId;
private PacMapEx mSharePacMap;
private static ShareFaManager sSingleInstance;
private HwShareServiceProxy mShareService;
private boolean mHasPermission = false;
private EventHandler mHandler = new EventHandler(EventRunner.getMainEventRunner());
private final IAbilityConnection mConnection = new IAbilityConnection() {
public void onAbilityConnectDone(ElementName elementName, IRemoteObject iRemoteObject, int i) {
HiLog.error(LABEL_LOG, LOG_FORMAT, TAG, "onAbilityConnectDone success.");
mHandler.postTask(()->{
mShareService = new HwShareServiceProxy(iRemoteObject);
try {
mShareService.startAuth(mAppId, mFaCallback);
} catch (RemoteException e) {
HiLog.error(LABEL_LOG, LOG_FORMAT, TAG, "startAuth error.");
}
});
}
public void onAbilityDisconnectDone(ElementName elementName, int i) {
HiLog.info(LABEL_LOG, LOG_FORMAT, TAG, "onAbilityDisconnectDone.");
mHandler.postTask(()->{
mShareService = null;
mHasPermission = false;
});
}
};
private Runnable mTask = () -> {
if (mContext != null && mShareService != null) {
mContext.disconnectAbility(mConnection);
mHasPermission = false;
mShareService = null;
}
};
private final HwShareCallbackStub mFaCallback = new HwShareCallbackStub("HwShareCallbackStub") {
public void notifyState(int state) throws RemoteException {
mHandler.postTask(()->{
HiLog.info(LABEL_LOG, LOG_FORMAT, TAG, "notifyState: " + state);
if (state == 0) {
mHasPermission = true;
if (mSharePacMap != null) {
shareFaInfo();
}
}
});
}
};
/**
* 单例模式获取ShareFaManager的实例对象
*
* @param context 程序Context
* @return ShareFaManager实例对象
*/
public static synchronized ShareFaManager getInstance(Context context) {
if (sSingleInstance == null && context != null) {
sSingleInstance = new ShareFaManager(context.getApplicationContext());
}
return sSingleInstance;
}
private ShareFaManager(Context context) {
mContext = context;
}
private void shareFaInfo() {
if (mShareService == null) {
return;
}
if (mHasPermission) {
HiLog.info(LABEL_LOG, LOG_FORMAT, TAG, "start shareFaInfo.");
try {
mShareService.shareFaInfo(mSharePacMap);
mSharePacMap = null;
} catch (RemoteException e) {
HiLog.error(LABEL_LOG, LOG_FORMAT, TAG, "shareFaInfo error.");
}
}
// 不使用时断开
mHandler.postTask(mTask, UNBIND_TIME);
}
/**
* 用于分享服务
*
* @param appId 开发者联盟网站创建原子化服务时生成的appid
* @param pacMap 服务信息载体
*/
public void shareFaInfo(String appId, PacMapEx pacMap) {
if (mContext == null) {
return;
}
mAppId = appId;
mSharePacMap = pacMap;
mHandler.removeTask(mTask);
shareFaInfo();
bindShareService();
}
private void bindShareService() {
if (mShareService != null) {
return;
}
HiLog.error(LABEL_LOG, LOG_FORMAT, TAG, "start bindShareService.");
Intent intent = new Intent();
Operation operation = new Intent.OperationBuilder()
.withDeviceId("")
.withBundleName(SHARE_PKG_NAME)
.withAction(SHARE_ACTION)
.withFlags(Intent.FLAG_NOT_OHOS_COMPONENT)
.build();
intent.setOperation(operation);
mContext.connectAbility(intent, mConnection);
}
}
4、简单案例
这里我们编写一个简单案例,MainAbilitySlice实现的是从相册里面挑选一张照片,作为卡片信息分享出去,用于介绍要分享的内容给被分享者。
(1) 效果

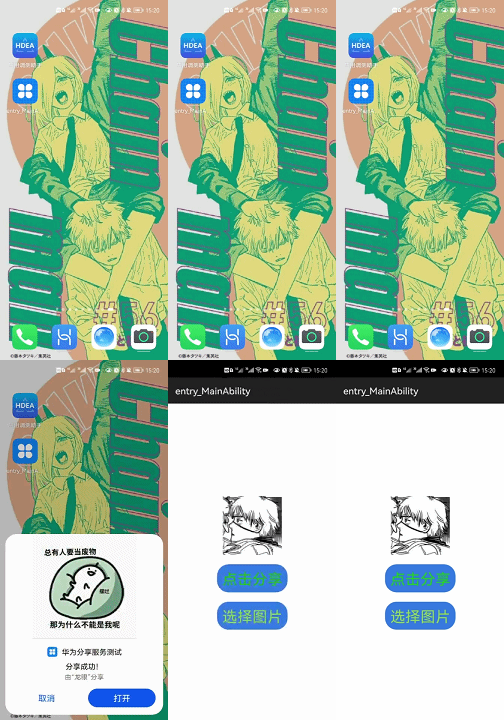
但是这里必须两端都装了该HAP包才能实现,还不满足免安装的效果,必须得至少将原子化服务发布到测试态,后文将会详细介绍。
(2)实现
具体的样式不在这里给出,请参考附件,附上核心代码。
唯一需要主要的是,里面用到的APPID,是在AGC控制台上创建相应项目应用时得到的APPID,可在AGC控制台,我的项目中找到。
package com.huawei.hwshare.third.slice;
import com.huawei.hwshare.third.MainAbility;
import com.huawei.hwshare.third.ResourceTable;
//import com.huawei.hwshare.third.ShareFaManager;
import com.huawei.hwshare.third.ShareFaManager;
import ohos.aafwk.ability.AbilitySlice;
import ohos.aafwk.ability.DataAbilityHelper;
import ohos.aafwk.content.Intent;
import ohos.aafwk.content.Operation;
import ohos.agp.components.Button;
import ohos.agp.components.Component;
import ohos.agp.components.Image;
import ohos.global.resource.NotExistException;
import ohos.global.resource.RawFileDescriptor;
import ohos.interwork.utils.PacMapEx;
import ohos.media.image.ImagePacker;
import ohos.media.image.ImageSource;
import ohos.media.image.PixelMap;
import ohos.media.photokit.metadata.AVStorage;
import ohos.utils.net.Uri;
import java.io.*;
public class MainAbilitySlice extends AbilitySlice {
private static final int imgRequestCode = 1001;
//核心: 显示分享的图片
private Image photo;
private Uri uri;
private byte [] picByte;
InputStream resource;
private Image cardimage;
public void onStart(Intent intent) {
super.onStart(intent);
super.setUIContent(ResourceTable.Layout_ability_main);
Button btn = (Button) findComponentById(ResourceTable.Id_btn);
Button btn1 = (Button) findComponentById(ResourceTable.Id_btn1);
cardimage = (Image) findComponentById(ResourceTable.Id_cardimg1);
btn1.setClickedListener(new Component.ClickedListener() {
public void onClick(Component component) {
selectPhoto();
}
});
photo = (Image) findComponentById(ResourceTable.Id_photo);
btn.setClickedListener(new Component.ClickedListener() {
/*华为分享功能的核心代码*/
public void onClick(Component component) {
/*数据包*/
PacMapEx pacMap = new PacMapEx();
/*分享的服务类型 默认为0 当前也仅支持0*/
pacMap.putObjectValue(ShareFaManager.SHARING_FA_TYPE, 0);
/*分享服务的包名,必选参数*/
pacMap.putObjectValue(ShareFaManager.HM_BUNDLE_NAME, getBundleName());
/*额外的信息 非必选*/
pacMap.putObjectValue(ShareFaManager.SHARING_EXTRA_INFO, "原子化服务分享");
/*分享的服务的Ability类名,必选参数*/
pacMap.putObjectValue(ShareFaManager.HM_ABILITY_NAME, MainAbility.class.getName());
/*卡片展示的服务介绍信息,必须参数*/
pacMap.putObjectValue(ShareFaManager.SHARING_CONTENT_INFO, "分享成功!");
/*卡片展示服务介绍图片,最大长度153600,必选参数。*/
pacMap.putObjectValue(ShareFaManager.SHARING_THUMB_DATA, picByte);
// byte[] iconImg = getResourceBytes(ResourceTable.Media_icon);
/*服务图标 非必选参数*/
//pacMap.putObjectValue(com.huawei.hwshare.third.ShareFaManager.HM_FA_ICON, iconImg);
// pacMap.putObjectValue(com.huawei.hwshare.third.ShareFaManager.HM_FA_ICON, iconByte);
/*卡片展示的服务名称*/
pacMap.putObjectValue(ShareFaManager.HM_FA_NAME, "华为分享服务测试");
// 第一个参数为appid,在华为AGC创建原子化服务时自动生成。
ShareFaManager.getInstance(MainAbilitySlice.this).shareFaInfo("942536802034526976", pacMap);
}
});
}
private byte[] getResourceBytes(int resId) {
ByteArrayOutputStream outStream = null;
try {
resource = getResourceManager().getResource(resId);
outStream = new ByteArrayOutputStream();
byte[] buffer = new byte[1024];
int len;
while ((len = resource.read(buffer)) != -1) {
outStream.write(buffer, 0, len);
}
outStream.close();
resource.close();
return outStream.toByteArray();
} catch (IOException | NotExistException e) {
// HiLog.error(TAG, "get resource occurs io exception!");
} finally {
if (resource != null) {
try {
resource.close();
} catch (IOException e) {
// HiLog.error(TAG, "close input stream occurs io exception!");
}
}
if (outStream != null) {
try {
resource.close();
} catch (IOException e) {
// HiLog.error(TAG, "close output stream occurs io exception!");
}
}
}
return null;
}
//选择图片
private void selectPhoto() {
//调起系统的选择来源数据视图
Intent intent = new Intent();
Operation opt=new Intent.OperationBuilder().withAction("android.intent.action.GET_CONTENT").build();
intent.setOperation(opt);
intent.addFlags(Intent.FLAG_NOT_OHOS_COMPONENT);
intent.setType("image/*");
startAbilityForResult(intent, imgRequestCode);
}
/*选择图片回调*/
protected void onAbilityResult(int requestCode, int resultCode, Intent resultData) {
if(requestCode==imgRequestCode && resultData!=null)
{
//被选择的图片的uri地址
String img_uri=resultData.getUriString();
//定义数据能力帮助对象
DataAbilityHelper helper=DataAbilityHelper.creator(getContext());
//定义图片来源对象
ImageSource imageSource = null;
//选择的Img对应的Id
String img_id=null;
/*
*如果是选择文件则getUriString结果为dataability:///com.android.providers.media.documents/document/image%3A437,其中%3A437是":"的URL编码结果,后面的数字就是image对应的Id
*/
/*
*如果选择的是图库则getUriString结果为dataability:///media/external/images/media/262,最后就是image对应的Id
*/
//判断是选择了文件还是图库
if(img_uri.lastIndexOf("%3A")!=-1){
img_id = img_uri.substring(img_uri.lastIndexOf("%3A")+3);
}
else {
img_id = img_uri.substring(img_uri.lastIndexOf('/')+1);
}
//获取图片对应的uri,前缀是content,替换成对应的dataability前缀
uri=Uri.appendEncodedPathToUri(AVStorage.Images.Media.EXTERNAL_DATA_ABILITY_URI,img_id);
try {
//读取图片
FileDescriptor fd = helper.openFile(uri, "r");
//RawFileDescriptor rfd = helper.openRawFile(uri,"r");
imageSource = ImageSource.create(fd, null);
//创建位图
PixelMap pixelMap = imageSource.createPixelmap(null);
//组件显示选择的图片
photo.setPixelMap(pixelMap);
picByte = new byte[153600];
//打包图片
ImagePacker packer = null;
try{
packer= ImagePacker.create();
ImagePacker.PackingOptions packingOptions = new ImagePacker.PackingOptions();
//图片格式信息
packingOptions.format = "image/jpeg";
//图片质量
packingOptions.quality = 90;
//打包
packer.initializePacking(picByte, packingOptions);
packer.addImage(pixelMap);
//完成打包
packer.finalizePacking();
}finally {
packer.release();
}
} catch (Exception e) {
e.printStackTrace();
} finally {
if (imageSource != null) {
imageSource.release();
}
}
}
}
public void onActive() {
super.onActive();
}
public void onForeground(Intent intent) {
super.onForeground(intent);
}
}
三、测试原子化服务
1、手动签名
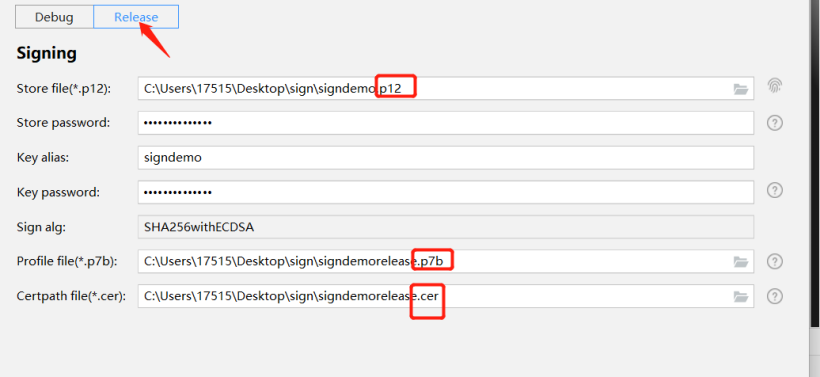
首先我们对工程进行手动签名,得到.cer和.p12文件,这里不再赘述手动签名。
手动签名。
2、申请原子化服务
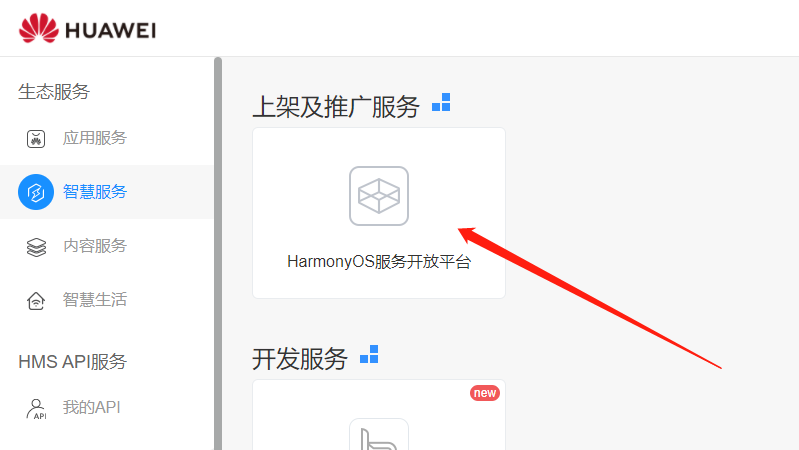
- 进入华为开发者联盟,进入管理中心,点击智慧服务,进入HarmonyOS服务开放平台。
3、创建服务

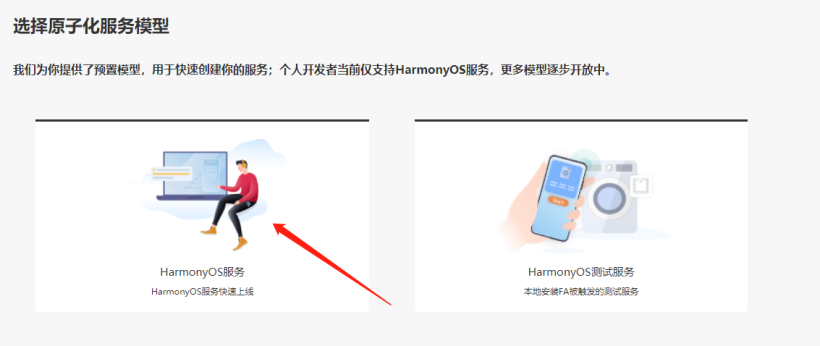
箭头所指,填工程包名即可,其他自拟,点击确定。

至此,服务创建完成,接下来配置服务。
4、申请证书
这里要申请两个证书,.csr和.p7b.
(1)申请.csr证书
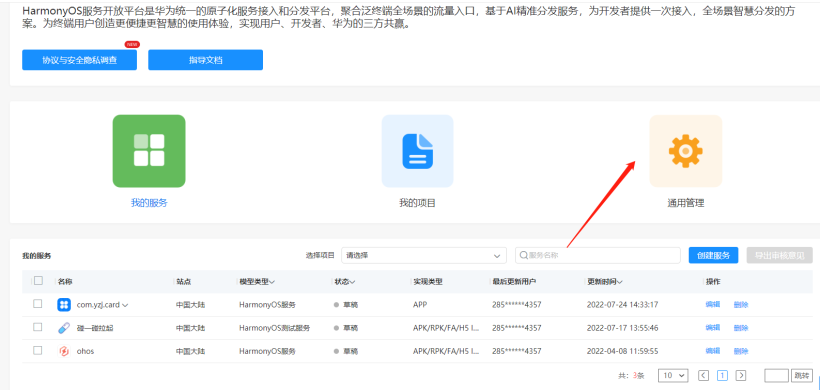

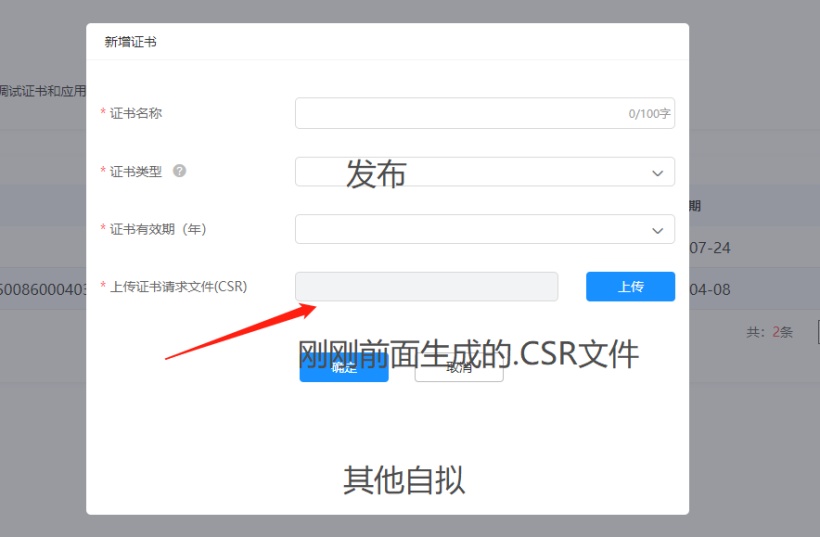
申请完证书后,记得点击下载,我们会获得一个.cer证书。

(2)申请.p7b证书
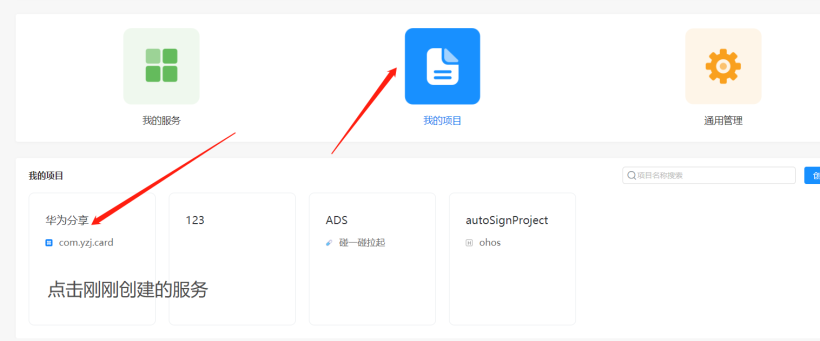

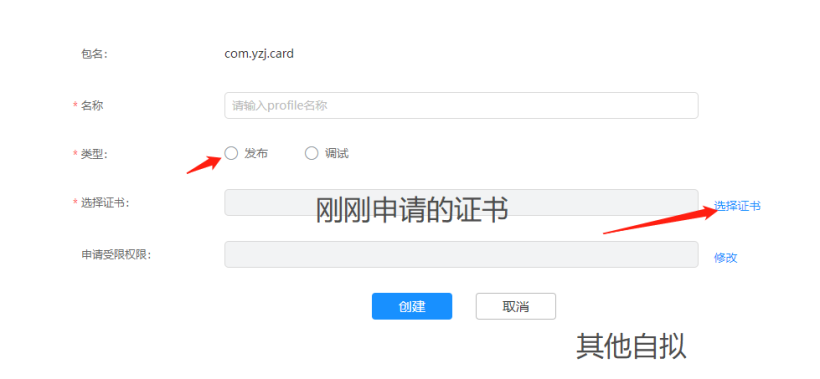
申请完后一定记得点击下载,我们会获得.p7b证书。
 。
。
至此,我们手上有.p12,.p7b,.cer,.csr四种证书,这里非常重要!
5、工程签名
这里用到刚刚申请好的证书,在release一栏进行签名,不是debug哦!
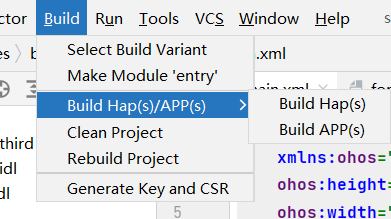
接着编译整个工程,是build APP,不是build hap哦!
这样,我们就获得了APP包!
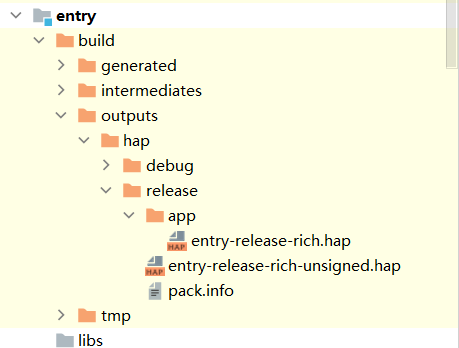
到这里,我们就能够理解实现原子化服务为啥要APP包,说白了还是把APP上传服务器,用的时候再下载,只不过体积小,实现了无感安装的过程!
6、发布为测试态
我们回到刚刚的服务平台,继续配置服务。
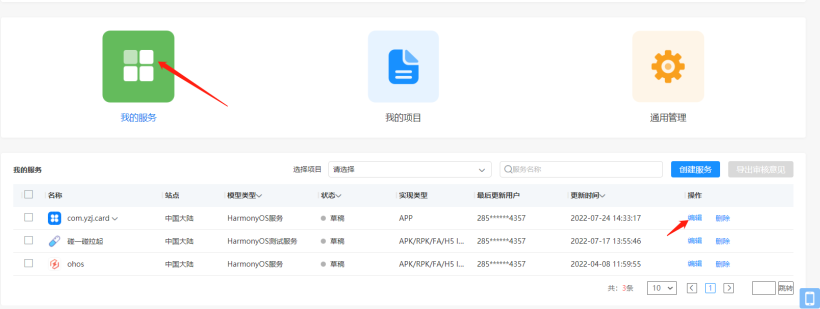
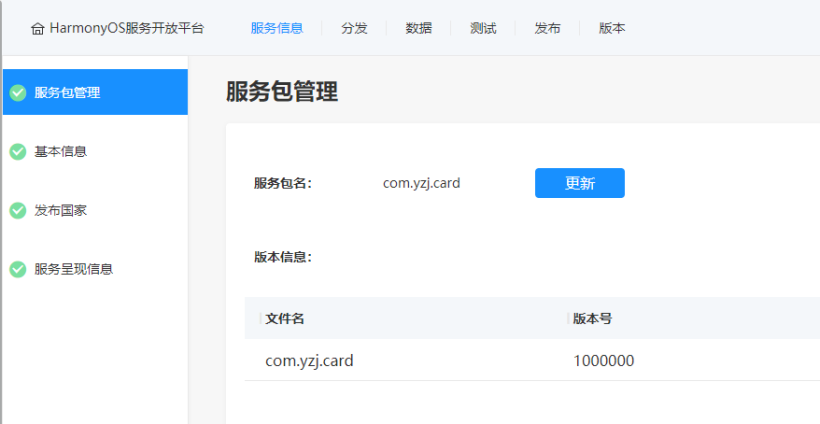
(1)上传APP包
上传刚刚编译好的APP包,这里由于我已经上传过了,界面稍微不一样,总之就是有个按钮上传就完事了。
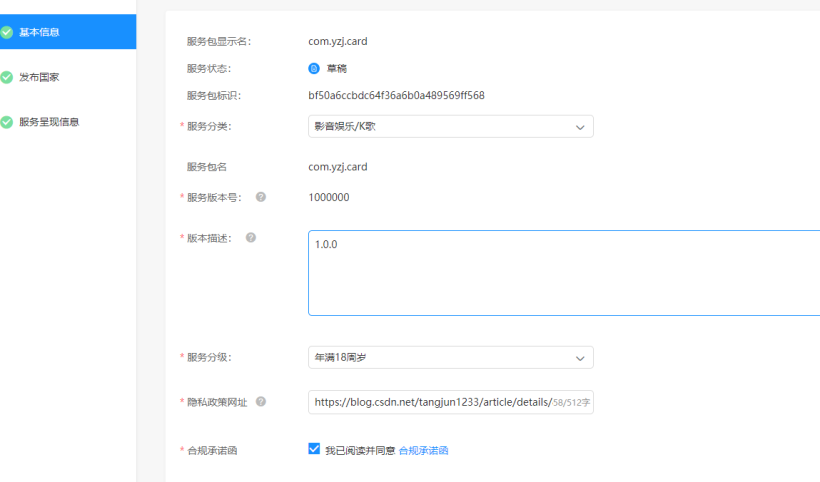
(2)其余信息
其余信息大部分自拟,如果是要最终实现发布的话,要涉及到很多证书或者专利,如果是只是为了简单测试,就可以像我这样(乱填)填一些信息就行了,关键的在后面。
(3)分发
这里提供了几种找到该服务的方式,这里根据个人情况探索即可。

(4)测试
这里才是第二重要的地方了,我们需要添加测试设备。
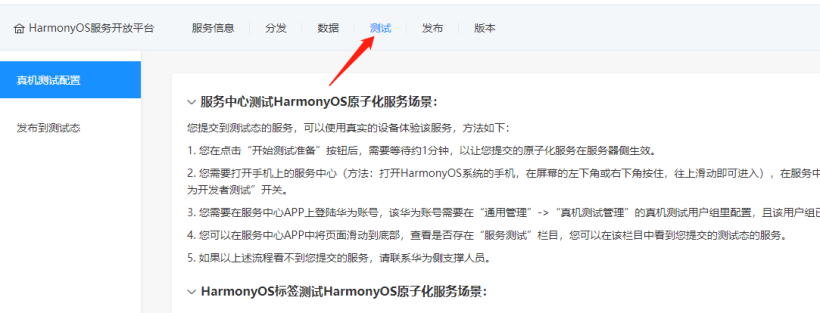

新增一个组别,信息自拟。

点击查看,添加测试设备的手机号


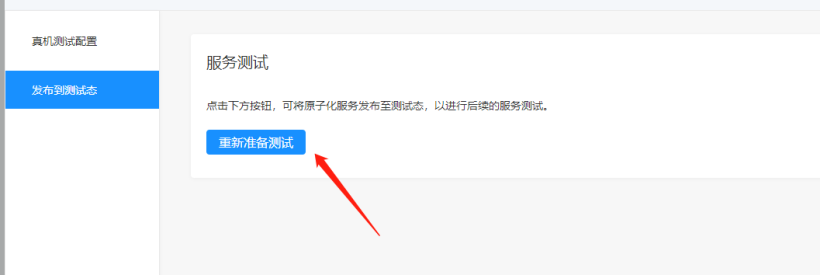
最后返回到测试界面,点击保存。

最最最后,发布为测试态。
 。
。
四、结果
完成前文所有步骤后,稍等5-10分钟,大概就能在测试设备的服务中心看到我们制作的原子化服务了。从屏幕右下角往屏幕中心划,可呼出服务中心,注意看图。
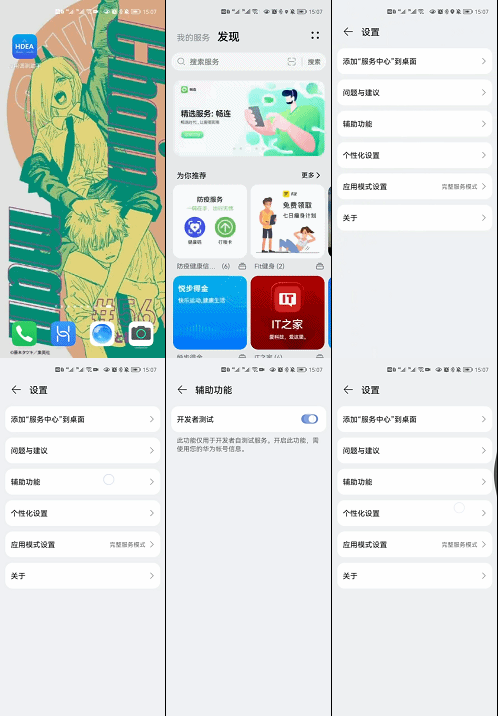


至此,我们真正实现了免安装功能。


