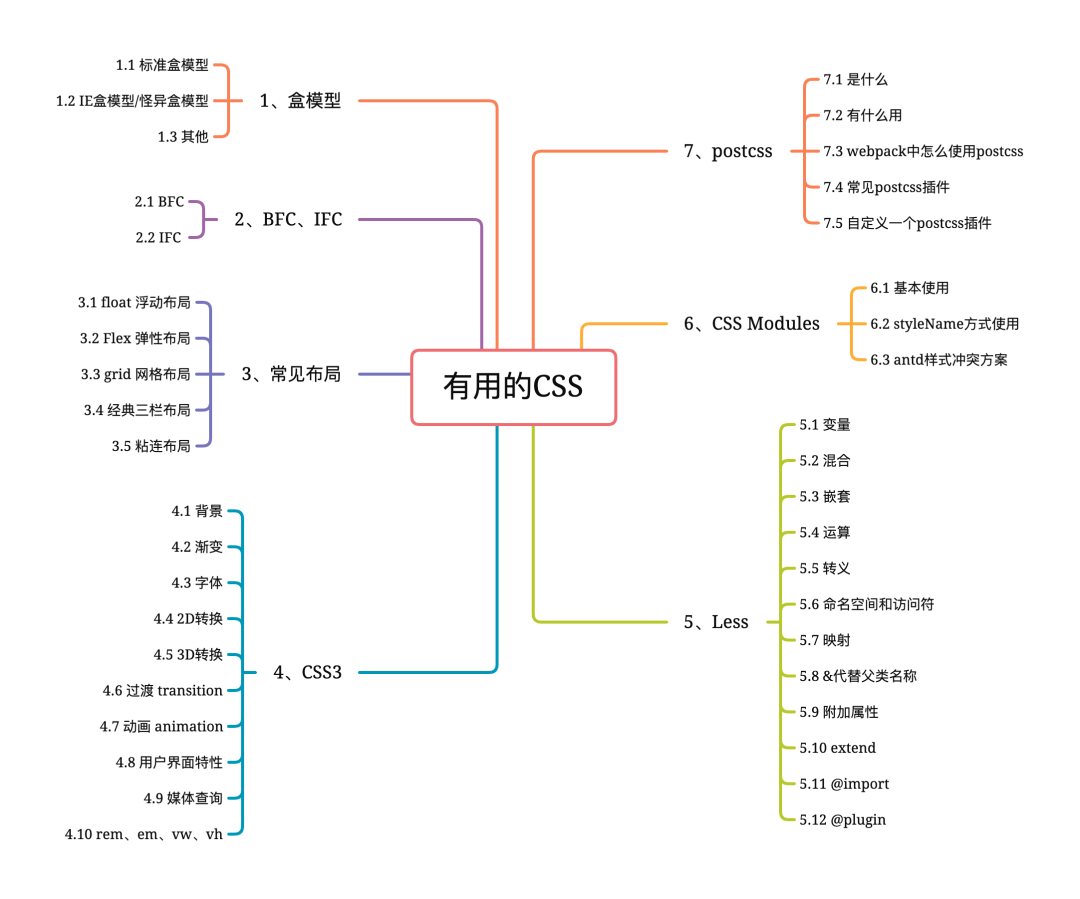
1.盒模型(两种)
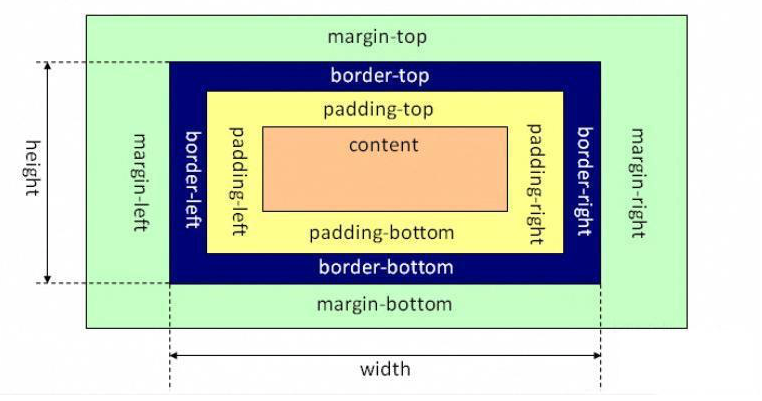
content + padding + border + margin
1.1 标准盒模型
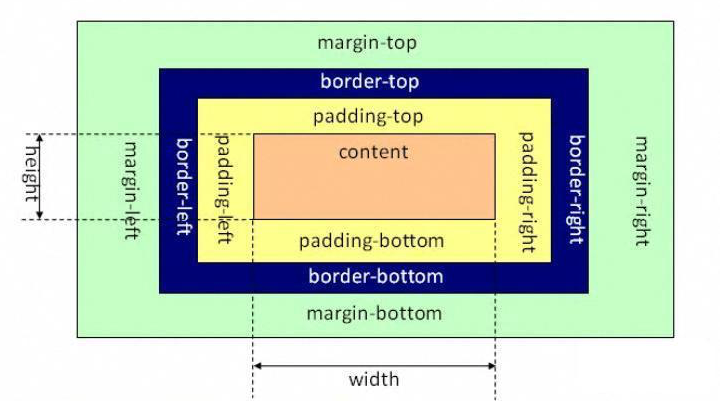
1.2 IE盒模型/怪异盒模型
1.3 其他
box-sizing: 'border-box' | 'content-box';IE默认border-box,其他浏览器默认content-box。此属性用以改变盒模型宽高的计量方式
outline位于边框边缘的外围,可起到突出元素的作用。
不属于盒模型的一部分,不占空间(这样不会导致浏览器渲染时出现reflow或是repaint)
颜色outline-color、线条样式outline-style、线条宽度outline-width
outline有可能是非矩形的(火狐浏览器下)
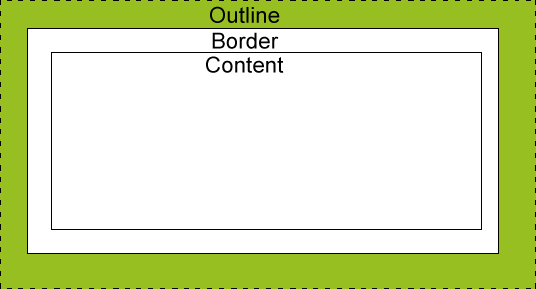
- outline-offset
outline内圈与border外圈的偏移 - box-shadow盒模型阴影,位于
border外面
<style>
  p.one {
    width: 200px;
    height: 200px;
    padding: 20px;
    border:10px solid yellow;
    margin:20px;
    background-color: pink;
    outline-style:solid;
    outline-width:10px;
    outline-color: green;
    outline-offset:10px;
    box-shadow:10px 10px 10px red;
  }
</style>
<body>
  <p class="one">This is some text in a paragraph.</p>
</body>
效果:

2.BFC、IFC
2.1 BFC - Block format context(块级格式化上下文)
具有BFC特性的元素可以看作是隔离了的独立容器,容器里面的元素不受外部元素影响。
BFC特性:
- BFC内部的BOX会垂直方向,一个一个放置。
- box处置方向之间距离,由margin决定,属于同一个BFC内的连个相邻BOX的margin会重叠。如:第一个容器设置下外边距为100px , 第一个容器下面的第二个容器设置上外边距为200px。当出现这种情况时,2个容器之间距离只有200px.
- BFC的区域不会与float box发生重叠。如 :自适应两栏布局
- 计算BFC的高度时,浮动元素也参与计算。如:浮动造成的高度塌陷
- BFC就是页面上的一个独立容器,容器里面的元素不会影响到外面的元素
- 每个元素的margin box的左边会与包含块border box的左边相接触(对于从左到右的格式化,否则相反),即使存在浮动也会如此。
触发BFC条件:
- display属性值为inline-block、table-cell、flex
- float属性不为none
- position属性值为absolute、fixed
- overflow属性值不为visible
常见的利用BFC解决问题:
- margin塌陷
- 自适应布局(float+overflow)
- 清除浮动
2.2 IFC - inline format context (内联格式化上下文)
IFC特性:
- 水平方向根据direction依次布局。
- 不会在元素前后换行。
- 受white-space属性的影响。
- margin/padding 在竖直方向无效,水平方向有效的。
- white/height 对非替换行内元素无效,宽度由元素内容决定。(替换元素在下面解释)
- 非替换行内元素的行框高由line-height决定而替换行内元素的行框高则是由height,padding,border,margin决定
- 浮动或者绝对定位会转化为block
- vertical-align属性生效
触发条件:
- display为inline或者行内元素
3.常见布局
3.1 float 浮动布局
浮动属性本来是为了实现网页中文本环绕图片的效果而引入的一种布局模型。因为其有用的特性而常常用于页面布局(自适应布局)。
- 特性:浮动的元素脱离文档流,依次从左至右(float:left;) / 从右至左(float:right)排开直至其margin接触包含块的padding或者遇到其他浮动元素。但是因为其脱离文档流所以父元素的高度不会被其撑开(清除浮动/BFC解决)
- 清除浮动方案:
clear: both
.wrapper::after {
  clear: both;
  content: '';
  display: block;
}
BFC (这里可以有多种方式,不再一一列举)
.wrapper {
  overflow: auto
}
利用float自适应布局:
两栏
.left {
  float: left;
  width: 30%;
}
.right {
  float: right;
  width: 70%;
}
三栏
<style>
  div {
    height: 100vh;
  }
  .left {
    float: left;
    width: 10%;
    background-color: plum;
    margin-top: -100vh;
  }
  .right {
    float: right;
    width: 20%;
    background-color: rosybrown;
    margin-top: -100vh;
  }
  .middle {
    margin: 0 20% 0 10%;
  }
</style>

<body>
  <div>
    <div class="middle"></div>
    <div class="left"></div>
    <div class="right"></div>
  </div>
</body>
3.2 Flex 弹性布局
Flexible Box"弹性布局",用来为盒状模型提供最大的灵活性。不过设为 Flex 布局以后,子元素的float、clear和vertical-align属性将失效。
flex容器的属性:
- flex-direction(主轴方向):row | row-reverse | column | column-reverse;
- flex-wrap(换行):nowrap | wrap | wrap-reverse
- flex-flow(方向&换行的简写): || ;
- justify-content(主轴对齐方式):flex-start | flex-end | center | space-between | space-around;
- align-items(交叉轴对齐方式):flex-start | flex-end | center | baseline | stretch;
- align-content(多轴对齐方式):flex-start | flex-end | center | space-between | space-around | stretch;
flex容器内项目属性:
- order(排序:小 -> 大):0 ;
- flex-grow(剩余空间放大):0 ;
- flex-shrink(空间不足缩小):1 ;
- flex-basis(占据至少空间):auto ;
- flex(放大、缩小、空间的简写):0 1 auto [ ];
- align-self(交叉轴对齐方式):auto | flex-start | flex-end | center | baseline | stretch;
利用flex布局:
- 题库/b端组件选择题选项的布局(根据实际占用大小计算flex-basis)
- 水平垂直居中
3.3 grid 网格布局
将网页划分成一个个网格,可以任意组合不同的网格,做出各种各样的布局。
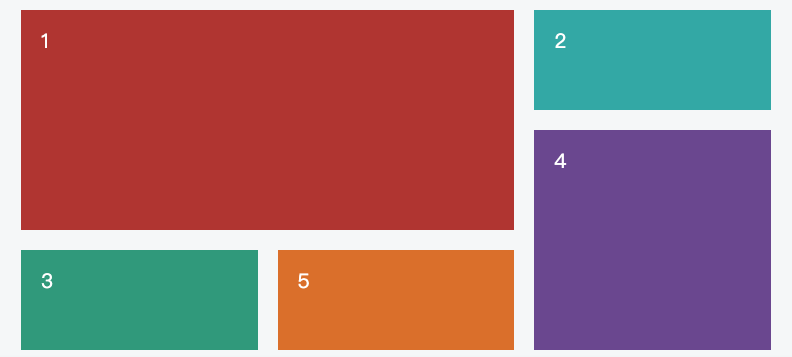
容器属性:
- display: grid | inline-grid;
- grid-template-columns(列宽度):[多列用空格隔开]
- grid-template-rows(行高度):[多行用空格隔开]
// 带有网格线名字
grid-template-columns: [c1] 100px [c2] 100px [c3] auto [c4];
grid-template-rows: [r1] 100px [r2] 100px [r3] auto [r4];
- grid-row-gap(行间距):
- grid-column-gap(列间距):
- grid-gap(行列间距): ;
- grid-template-areas(区域划分):区域的命名会影响到网格线。每个区域的起始网格线,会自动命名为区域名-start,终止网格线自动命名为区域名-end。
- grid-template(简写):
- grid-auto-flow(排列方式):row | column; (跟dense关键字:尽可能紧密填满)
- justify-items(水平对齐方式): start | end | center | stretch;
- align-items(垂直对齐方式): start | end | center | stretch;
- place-items(垂直、水平对齐方式): ;
- justify-content(水平位置): start | end | center | stretch | space-around | space-between | space-evenly;
- align-content(垂直位置): start | end | center | stretch | space-around | space-between | space-evenly;
- place-content(水平垂直位置):
- grid-auto-columns(浏览器自动创建的多余网格列宽)
- grid-auto-rows (浏览器自动创建的多余网格行高)
一些关键字和函数:
repeat(n, length)函数:重复;
grid-template-columns: repeat(3, 33.33%);
//重复三次 33.33%
auto-fill关键字:自动填充;
grid-template-columns: repeat(auto-fill, 100px);
//自动填充,直到容器不能放置更多的列
fr关键字:片段(可理解为份数);
grid-template-columns: 100 1fr 2fr;
//一行被分为100px,剩余部分分为3份,分别占1,2的比例
minmax()函数:长度范围;
grid-template-columns: 1fr 1fr minmax(100px, 1fr);
//最后一列列宽不小于100px,不大于1fr。
auto关键字;
grid-template-columns: 100px auto 100px;
项目属性:
- grid-column-start(左边框所在的垂直网格线):number
- grid-column-end(右边框所在的垂直网格线):number
- grid-column(首尾垂直网格线): /
- grid-row-start属性:上边框所在的水平网格线
- grid-row-end属性:下边框所在的水平网格线
- grid-row(首位水平网格线): /
/ 1号项目的左边框是第二根垂直网格线,右边框是第四根垂直网格线。
.item-1 {
  grid-column-start: 2;
  grid-column-end: 4;
}
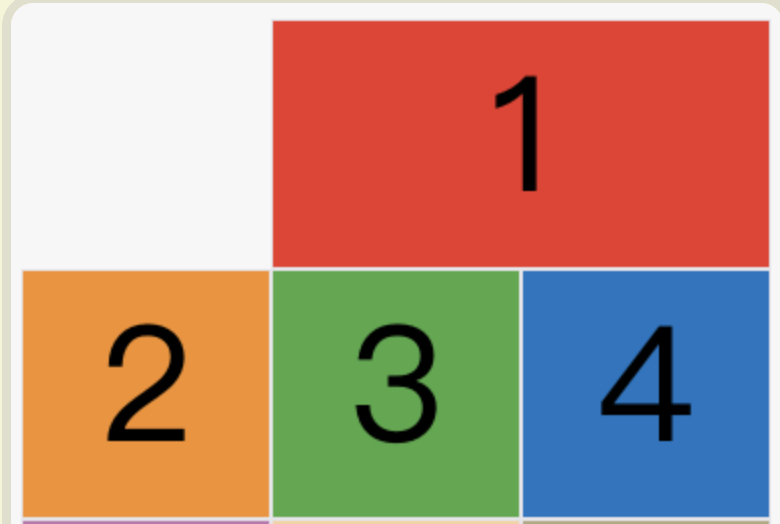
span关键字:跨越
grid-column-start: span 2;// 跨越两个网格
- grid-area(指定项目放在哪一个区域):<grid-template-areas> |<row-start> /<column-start> /<row-end> /<column-end>;
- justify-self(单元格水平位置,覆盖justify-items的值):start |end |center |stretch;
- align-self(单元格垂直位置,覆盖align-items的值):start |end |center |stretch;
- place-self(单元格垂直水平位置简写):<align-self>、<justify-self>;
举个例子:
- 下面这个布局实现:紫色内容区域保持粉色容器内整体居中

<style>
  .wrapper {
    display: grid;
    background-color: pink;
    width: 30%;
    padding: 8px 0;
    margin: 0 auto;

    grid-template-columns: repeat(auto-fill, 30px);

    grid-row-gap: 8px;
    grid-column-gap: 8px;

    justify-items: center;
    align-items: center;

    /* 内容区域相对于grid容器的位置,设置center可以保证左右两边保持同样的间距 */
    justify-content: center;
  }

  .wrapper > div {
    width: 30px;
    height: 30px;
    background-color: plum;
    border-radius: 50%;
  }
</style>

<body>
  <div class="wrapper">
    <div class="item1"></div>
    <div class="item2"></div>
    <div class="item3"></div>
    <div class="item4"></div>
    <div class="item5"></div>
    <div class="item6"></div>
    <div class="item7"></div>
    <div class="item8"></div>
    <div class="item9"></div>
    <div class="item10"></div>
    <div class="item11"></div>
    <div class="item1"></div>
    <div class="item2"></div>
    <div class="item3"></div>
    <div class="item4"></div>
    <div class="item5"></div>
    <div class="item6"></div>
    <div class="item7"></div>
    <div class="item8"></div>
    <div class="item9"></div>
    <div class="item10"></div>
    <div class="item11"></div>
    <div class="item1"></div>
    <div class="item2"></div>
    <div class="item3"></div>
    <div class="item4"></div>
    <div class="item5"></div>
    <div class="item6"></div>
    <div class="item7"></div>
    <div class="item8"></div>
    <div class="item9"></div>
</div>
- 略复杂的布局
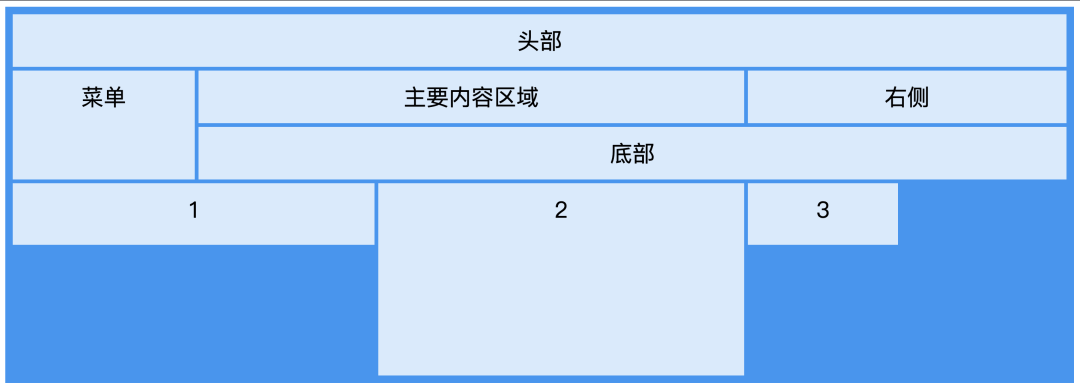
<style>
  .item1 { grid-area: header; }
  .item2 { grid-area: menu; }
  .item3 { grid-area: main; }
  .item4 { grid-area: right; }
  .item5 { grid-area: footer; }
  .item6 {
    grid-column: 1 / 3;
  }
  .item7 {
    grid-column: 3 / 5;
    grid-row: 4 / 7;
  }
  .grid-container {
    display: grid;
    grid:
      'header header header header header header'
      'menu main main main right right'
      'menu footer footer footer footer footer';
    grid-gap: 5px;
    background-color: #2196F3;
    padding: 10px;
    /* 浏览器自动创建的多余网格行高 */
    grid-auto-rows: 82px;
  }

  .grid-container > div {
    background-color: rgba(255, 255, 255, 0.8);
    text-align: center;
    padding: 20px 0;
    font-size: 30px;
    line-height: 30px;
  }
</style>

<body>
  <div class="grid-container">
    <div class="item1">头部</div>
    <div class="item2">菜单</div>
    <div class="item3">主要内容区域</div>
    <div class="item4">右侧</div>
    <div class="item5">底部</div>
    <div class="item6">1</div>
    <div class="item7">2</div>
    <div class="item8">3</div>
  </div>
</body>
3.4 经典三栏布局
三栏布局有时候需要一些特性,比如:
- 需要更重要的部分先展示;
- 两边固定中间自适应。
可以参考下面两种常见的布局实现方式。
- 圣杯布局
<style>
  body {
    min-width: 550px;
    font-weight: bold;
    font-size: 20px;
  }

  #header, #footer {
    background: rgba(29, 27, 27, 0.726);
    text-align: center;
    height: 60px;
    line-height: 60px;
  }
  #footer {
    clear: both;
  }

  #container {
    /* 使用padding留出两边的宽度 */
    padding-left: 200px;
    padding-right: 150px;
    overflow: hidden;
  }

  #container .column {
    /* 左右两边通过相对定位向两边移动 */
    position: relative;
    float: left;
    text-align: center;
    height: 300px;
    line-height: 300px;
  }

  #center {
    width: 100%;
    background: rgb(206, 201, 201);
  }

  #left {
    width: 200px;
    right: 200px;
    margin-left: -100%;
    background: rgba(95, 179, 235, 0.972);
  }

  #right {
    width: 150px;
    margin-left: -150px;
    right: -150px;
    background: rgb(231, 105, 2);
  }
</style>

<body>
  <div id="header">#header</div>
  <div id="container">
    <div id="center" class="column">#center</div>
    <div id="left" class="column">#left</div>
    <div id="right" class="column">#right</div>
  </div>
  <div id="footer">#footer</div>
</body>
- 双飞翼布局
<style>
  header {
    height: 100px;
    background-color: pink;
  }
  .first,.second,.third {
    height: 100px;
    float: left;
  }
  /* 用这个div把主内容包起来之后,主内容就可使用margin空出两边的区域了 */
  .first {
    width: 100%;
    background-color: purple;
  }
  .content {
    margin: 0 100px;
  }
  .second {
    width: 100px;
    background-color: red;
    /* margin-left为负是子元素相对于父元素的最右侧位置 */
    margin-left: -100%;
  }
  .third {
    width: 100px;
    background-color: grey;
    margin-left: -100px;
  }
  .footer {
    height: 120px;
    background-color: pink;
    clear: both;
  }
</style>

<body>
  <header></header>
  <div class="first">
    <div class="content"></div>
  </div>
  <div class="second"></div>
  <div class="third"></div>
  <div class="footer"></div>
</body>
圣杯和双飞翼的区别: 双飞翼给中间块套了一个容器,通过设置该容器内部的中间块margin属性从而使中间块两侧的内容不被左右块遮挡。
3.5 粘连布局
粘连布局如下图所示,当main区域内容较少时,停留在底部。当内容较多时,紧跟在main后面。
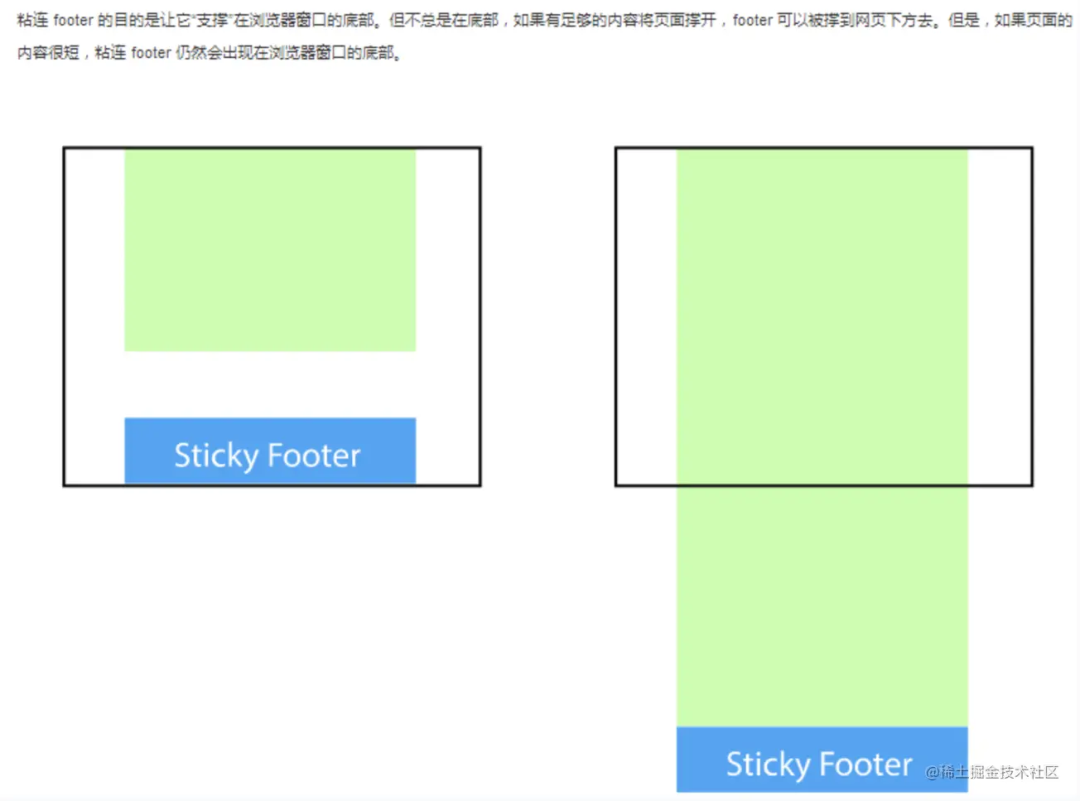
示例:min-height + margin-top
<style>
  html, body {
    height: 100%;
    margin: 0;
  }
  #wrap{
    width: 100%;
    min-height: 100%;
  }
  /*内容区需要让出一部分区域,防止内容被盖住*/
  #main{
    background-color: pink;
    padding-bottom: 30px;
  }
  /* wrap包裹内容的最小高度是100%,此时将footer的部分通过margin-top拉上去30px。 */
  #footer{
    width: 100%;
    height: 30px;
    background-color: yellow;
    margin-top: -30px;
  }
</style>

<body>
  <div id="wrap">
    <div id="main">
      main<br/>
      main<br/>
    </div>
  </div>
  <div id="footer"></div>
</body>
4.CSS3
4.1 背景
- background-image(图片):
- background-size(大小):
- background-origin(定位区域): padding-box | border-box | content-box
- background-clip(绘制区域-裁剪): padding-box | boreder-box | content-box
如下示例(background-origin和background-clip的区别)
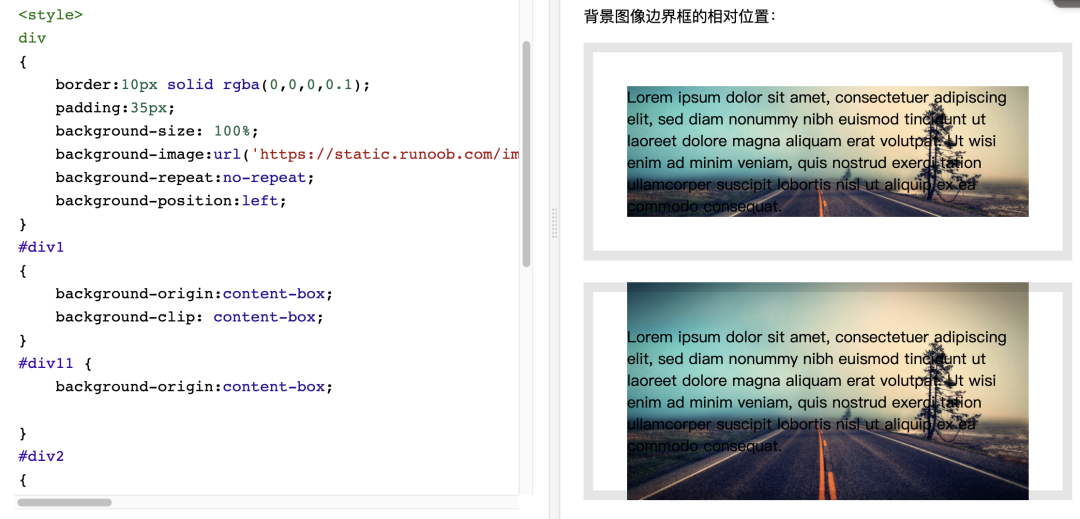
<style>
  div {
    border:10px solid rgba(0,0,0,0.1);
    padding:35px;
    background-size: 100%;
    background-image:url('https://static.runoob.com/images/demo/demo2.jpg');
    background-repeat:no-repeat;
    background-position:left;
  }
  #div1 {
    background-origin:content-box;
    background-clip: content-box;
  }
  #div11 {
    background-origin:content-box;

  }
</style>

<body>
  <p>背景图像边界框的相对位置:</p>
  <div id="div1">
    Lorem ipsum dolor sit amet, consectetuer adipiscing elit, sed diam nonummy nibh euismod tincidunt ut laoreet dolore magna aliquam erat volutpat. Ut wisi enim ad minim veniam, quis nostrud exerci tation ullamcorper suscipit lobortis nisl ut aliquip ex ea commodo consequat.
  </div>


  <div id="div11">
    Lorem ipsum dolor sit amet, consectetuer adipiscing elit, sed diam nonummy nibh euismod tincidunt ut laoreet dolore magna aliquam erat volutpat. Ut wisi enim ad minim veniam, quis nostrud exerci tation ullamcorper suscipit lobortis nisl ut aliquip ex ea commodo consequat.
  </div>
</body>
4.2 渐变
语法:background-image: <渐变函数(direction, color-stop1, color-stop2, ...)>
- linear-gradient
background-image: linear-gradient(angle, color-stop1, color-stop2);
- repeating-linear-gradient(后面的百分比指的是距离起始的位置)
background-image: repeating-linear-gradient(red, yellow 10%, green 20%);
- radial-gradient(内到外椭圆-默认,circle | ellipse)
background-image: radial-gradient(shape size at position, start-color, ..., last-color);
- repeating-radial-gradient(后面的百分比指距离中心的位置)
background-image: repeating-radial-gradient(red, yellow 10%, green 15%);
direction: to right | to left | to bottom right | ...
- 标准angle: 0edg:to top; 90edg: to right;
- 旧的标准angle: 0deg: to right; 90edg: to top;
size: closest-side | arthest-side | closest-corner | farthest-corner(从小到大排列)
4.3 字体
@font-face:描述自定义的字体规则,使用方式
/* 定义字体 */
@font-face
{
  /* 定义规则*/
    font-family: myFirstFont;
    src: url(sansation_light.woff);
}
 /* 使用字体 */
div
{
    font-family:myFirstFont;
}
定义规则的属性:
- font-family(自定义字体名字)
- src(自定义字体文件url)
- font-stretch(拉伸字体方式): normal | condensed | ultra-condensed | semi-condensed | extra-expanded | ultra-expanded
- font-style(字体样式): normal | italic | oblique
- font-weight(粗细): normal | bold | 100 ~ 900
- unicode-range(字体支持的UNICODE字符范围):U+0-10FFFF
4.4 2D转换
使用方式:
transform: 转换函数()
transform-origin: 转化位置(x-axis y-axis z-axis)
tips:transform使用后,会导致fixed定位失效
2D转换函数:
- translate(x, y) 平移
- translateX(x) 平移x
- translateY(y) 平移y
- rotate(<angle>) 旋转
- scale(x, y) x、y轴上的缩放比例,默认 y = x
- skew(<angle> [,<angle>]) x、y倾斜角度,默认 y = 0
- matrix(a, b, c, d, tx, ty) 六个参数,包含旋转,缩放,移动(平移)和倾斜功能
matrix( scaleX(), skewY(), skewX(), scaleY(), translateX(), translateY() )
tips:多个函数需要同时使用的时候顺序(先旋转会改变坐标轴方向,位移放在最前面)
transform: translate() rotate() scale()
4.5 3D转换
转换属性:
- transform: 转换函数();
- transform-origin(转化位置): (x-axis y-axis z-axis);
- transform-style(规定被嵌套元素如何在3D空间中显示): flat | preserve-3d
- perspective(规定 3D 元素的透视效果): none |
- perspective-origin(规定 3D 元素的底部位置): x-axis y-axis
- backface-visibility(定义元素在不面对屏幕时是否可见): visible | hidden 转换方法:
- rotateX() 旋转x轴
- rotateY() 旋转y轴
4.6 过渡 transition
元素从一种样式逐渐改变为另一种的效果,是定义一个过程而不是一个状态。
- transition-property(过渡效果的 CSS 属性的名称):none | | all
- transition-duration (过渡时长): 0 | <time: s | ms>
- transition-timing-function(速度曲线): linear | ease | ease-in | ease-out | ease-in-out | cubic-bezier
- transition-delay(延迟过渡时长): 0 | <time: s | ms>
- transition(四个属性的简写)
示例:
<style>
  div {
    width:100px;
    height:100px;
    background:red;
    transition:width 1s linear 2s;
  }

  div:hover {
    width:200px;
  }
</style>

<body>
  <!-- 鼠标移动到 div 元素上,查看过渡效果。等待两秒后才开始 -->
  <p><b>注意:</b>该实例无法在 Internet Explorer 9 及更早 IE 版本上工作。</p>
  <div></div>
</body>
4.7 动画 animation
元素从一种样式逐渐变化为另一种样式的效果,是定义一个过程而不是一个状态,比transition要更加灵活的多,且在使用animation时,transform会失效
@keyframes如何定义animation是怎么变化:
@keyframes <自定义动画名称> {}
定义@keyframes的方式1 (from-to: 两个状态间转换):
@keyframes myfirst {
    from {background: red;/* ... */}
    to {background: yellow;/* ... */}
}
定义@keyframes的方式2 (百分比:多个状态间转换):
@keyframes myfirst {
    0%   {background: red;/* ... */}
    25%  {background: yellow;/* ... */}
    50%  {background: blue;/* ... */}
    100% {background: green;/* ... */}
}
使用自定义的动画:
.animation-ele : {
  animation: myfirst;
}
- animation(简写属性)
- animation-name(动画的名称)
- animation-duration(单次动画时长)
- animation-timing-function(速度曲线): ease
- animation-fill-mode(规定当动画不播放时(当动画完成时,或当动画有一个延迟未开始播放时),要应用到元素的样式): none | forwards | backwards | both | initial | inherit
- animation-delay(延迟开始时长)
- animation-iteration-count(动画播放次数): 1 | | infinite
- animation-direction(是否循环交替反向播放动画): normal | reverse | alternate | alternate-reverse | initial | inherit
- animation-play-state(运行或暂停): running | paused
animation vs transition:
transition | animation | |
触发条件 | 需要 | 不需要 |
播放次数 | 1 | 任意次 |
帧数 | 两帧 | 任意帧 |
<style>
  div {
    width:100px;
    height:100px;
    background:red;
    position:relative;
    animation-name:myfirst;
    animation-duration:5s;
    animation-timing-function:linear;
    animation-delay:2s;
    animation-iteration-count:infinite;
    animation-direction:alternate;
    animation-play-state:running;
  }

  @keyframes myfirst {
    0%   {background:red; left:0px; top:0px;}
    25%  {background:yellow; left:200px; top:0px;}
    50%  {background:blue; left:200px; top:200px;}
    75%  {background:green; left:0px; top:200px;}
    100% {background:red; left:0px; top:0px;}
  }

  @-webkit-keyframes myfirst /* Safari and Chrome */ {
    0%   {background:red; left:0px; top:0px;}
    25%  {background:yellow; left:200px; top:0px;}
    50%  {background:blue; left:200px; top:200px;}
    75%  {background:green; left:0px; top:200px;}
    100% {background:red; left:0px; top:0px;}
  }
</style>

<body>

  <p><b>注意:</b> 该实例在 Internet Explorer 9 及更早 IE 版本是无效的。</p>

  <div></div>

</body>
4.8 用户界面特性
- resize(是否可以由用户调整元素尺寸): none | both | horizontal | vertical 详情 >>
- box-sizing
- outline-offset(轮廓进行偏移):
- appearance(允许使一个元素的外观像一个标准的用户界面元素): normal | icon | window | button | menu | field
4.9 媒体查询
- viewport(视窗) 的宽度与高度
- 设备的宽度与高度
<meta name="viewport" content="width=400" />
<meta
      name="viewport"
      content="width=device-width,initial-scale=0,maximum-scale=1,user-scalable=no"
/>
- 朝向 (智能手机横屏,竖屏)
- 分辨率
4.10 rem、em、vw、vh
- rem: 相对于根元素body字体设置的大小,默认字体大小为16px。(例:1rem = 16px 2rem = 32px)
- em: 相对于父元素字体设置的大小,与rem相似
- vw: 视口宽度(100vw = 100%视口宽度)
- vh: 视口高度(100vh = 100%视口高度)
5.Less - Leaner Style Sheets
Less是CSS的预处理语言,扩展了CSS,增加了诸如变量、混合(mixin)、函数等功能,使得CSS更易制作和维护。
5.1 变量
普通用法: 宽高成比例 aspect-ratio: 16/9;
// 定义变量
@width: 10px;
// 定义变量 + 使用变量
@height: @width + 10px;
// 使用变量
#header {
  width: @width;
  height: @height;
}
进阶:
- 变量定义类名
@my-selector: banner;
// Usage
.@{my-selector} {// 本行被编译为:.banner {
  font-weight: bold;
  line-height: 40px;
  margin: 0 auto;
}
- 变量定义URL
// 图片路径
@images: "../img";
// Usage
body {
  color: #444;
  background: url("@{images}/white-sand.png");
}

// import样式路径
@themes: "../../src/themes";
// Usage
@import "@{themes}/tidal-wave.less";
- 变量定义另一个变量
@primary: green;
@secondary: blue;
.section {
  @color: primary;
  .element {
    color: @@color;// 被编译为:color: green;
  }
}
- 将属性直接视为变量
.widget {
  color: #efefef;
  background-color: $color;// 被编译为:background-color: #efefef;
}
映射
@sizes: {
  mobile: 320px;
  tablet: 768px;
  desktop: 1024px;
}
.navbar {
  display: block;
  @media (min-width: @sizes[tablet]) {
    display: inline-block;
  }
}
5.2 混合
基础用法:
.my-mixin {
  color: black;
}
.my-other-mixin() {
  background: white;
}
.class {
// 注意两个混合方式不同
  .my-mixin();
  .my-other-mixin();
}

// 编译为
.my-mixin {
  color: black;
}
.class {
  color: black;
  background: white;
}
进阶:
- 配合 !important
.important {
  .foo() !important;
  // .foo()中的所有属性都加上!important列在这里
}
- 配合变量
.mixin(@color: black; @margin: 10px; @padding: 20px) {// 与函数相似,用分号隔开,可以有默认值
  color: @color;
  margin: @margin;
  padding: @padding;
}
.class1 {
  .mixin(@margin: 20px; @color: #33acfe);
}
.class2 {
  .mixin(#efca44; @padding: 40px);
}
- 守卫
.mixin(@a) when (lightness(@a) >= 50%) {
  background-color: black;
}
.mixin(@a) when (lightness(@a) < 50%) {
  background-color: white;
}
.mixin(@a) {
  color: @a;
}

.class1 { .mixin(#ddd) }
.class2 { .mixin(#555) }

// 编译为
.class1 {
  background-color: black;
  color: #ddd;
}
.class2 {
  background-color: white;
  color: #555;
}

// 守卫还可以加上
// 1、and关键字拼接模拟&&
// 2、逗号拼接模拟||
// 3、not模拟!
5.3 嵌套
// 让代码结构更加清晰, 与html中嵌套关系一致
#header {
  color: black;
  .navigation {
    font-size: 12px;
  }
  .logo {
    width: 300px;
  }
}

// @media、@supports冒泡:@ 规则会被放在前面,同一规则集中的其它元素的相对顺序保持不变
.component {
  width: 300px;
  @media (min-width: 768px) {
    width: 600px;
    @media  (min-resolution: 192dpi) {
      background-image: url(/img/retina2x.png);
    }
  }
  @media (min-width: 1280px) {
    width: 800px;
  }
}

// 上面冒泡的代码编译为
.component {
  width: 300px;
}
@media (min-width: 768px) {
  .component {
    width: 600px;
  }
}
@media (min-width: 768px) and (min-resolution: 192dpi) {
  .component {
    background-image: url(/img/retina2x.png);
  }
}
@media (min-width: 1280px) {
  .component {
    width: 800px;
  }
}
5.4 运算
// +、-、*、/ 可以对任何数字、颜色或变量进行运算
// 所有操作数被转换成相同的单位,计算的结果以最左侧操作数的单位类型为准
@incompatible-units: 2 + 5px - 3cm; // 结果是 4px
background-color: #112244 + #111; // 结果是 #223355
5.5 转义
~"(min-width: 768px)"
@min768: ~"(min-width: 768px)";
// less3.5开始可以简写为:@min768: (min-width: 768px);
.element {
  // @min768 被编译为(min-width: 768px)
  @media @min768 {
    font-size: 1.2rem;
  }
}
5.6 命名空间和访问符
#bundle() {
  .button {
    display: block;
    border: 1px solid black;
    background-color: grey;
    &:hover {
      background-color: white;
    }
  }
  .tab { ... }
  .citation { ... }
}

// 复用button的内容
#header a {
  color: orange;
  #bundle.button();
  // 还可以书写为 #bundle > .button 形式
  // all do the same thing
  // #outer > .inner();
  // #outer .inner();
  // #outer.inner();
}
5.7 映射 >3.5
#colors() {
  primary: blue;
  secondary: green;
}
.button {
  color: #colors[primary];// 编译为:primary: blue;
  border: 1px solid #colors[secondary];// 编译为:border: 1px solid green;
}
5.8 &代替父类名称
a {
  color: blue;
  &:hover {
  // 如果没有&,将导致:hover规则匹配到<a>内悬停元素的后代选择器
    color: green;
  }
}
//上面被编译为
a {
  color: blue;
}
a:hover {
  color: green;
}

// =======================
.button {
  &-ok {
    background-image: url("ok.png");
  }
  &-cancel {
    background-image: url("cancel.png");
  }
}
//上面被编译为
.button-ok {
  background-image: url("ok.png");
}
.button-cancel {
  background-image: url("cancel.png");
}
.button-custom {
  background-image: url("custom.png");
}
// &&(同一个选择器出现多个&时) -> 第一个&代表父级,第二个&代表父级的父级
5.9 附加属性
// 用逗号拼接属性
.mixin() {
  box-shadow+: inset 0 0 10px #555;
}
.myclass {
  .mixin();
  box-shadow+: 0 0 20px black;
}
// 编译为
.myclass {
  box-shadow: inset 0 0 10px #555, 0 0 20px black;
}

// =========
// 用空格拼接属性
.mixin() {
  transform+_: scale(2);
}
.myclass {
  .mixin();
  transform+_: rotate(15deg);
}
// 编译为
.myclass {
  transform: scale(2) rotate(15deg);
}
5.10 extend
nav ul {
  &:extend(.inline);
  background: blue;
}
.inline {
  color: red;
}

// 被编译为
nav ul {
  background: blue;
}
.inline,
nav ul {
  color: red;
}

// .c:extend(.d all)
// .e:extend(.f, .g) {}
// .some-class:extend(.bucket tr) {} // 扩展bucket > tr
相比于混合的区别在于,可以不用生成更多代码,举个例子
// 混合
.my-inline-block() {
  display: inline-block;
  font-size: 0;
}
.thing1 {
  .my-inline-block;
}
.thing2 {
  .my-inline-block;
}

// 编译为
.thing1 {
  display: inline-block;
  font-size: 0;
}
.thing2 {
  display: inline-block;
  font-size: 0;
}

// =======================
// 扩展
.my-inline-block {
  display: inline-block;
  font-size: 0;
}
.thing1 {
  &:extend(.my-inline-block);
}
.thing2 {
  &:extend(.my-inline-block);
}

// 编译为
.my-inline-block,
.thing1,
.thing2 {
  display: inline-block;
  font-size: 0;
}
5.11 @import
less会根据扩展名不同对导入的文件做不同处理:
@import "foo";      // foo.less is imported
@import "foo.less"; // foo.less is imported
@import "foo.php";  // foo.php imported as a Less file
@import "foo.css";  // statement left in place, as-is
import 参数:
- interface:使用Less文件但不输出
- inline:在输出中包含源文件但不处理它
- less:无论文件扩展名如何,都将文件视为 Less 文件
- css:将文件视为 CSS 文件,无论文件扩展名是什么
- once:只包含一次文件(这是默认行为)
- multiple:多次包含文件
- optional:找不到文件时继续编译
eg:
@import (optional, reference) "foo.less";
5.12 @plugin
导入js插件,添加一些功能和属性:
@plugin "my-plugin"; // 没有扩展名时,自动导入.js文件
定义插件:
// 法一
registerPlugin({
    install: function(less, pluginManager, functions) {
        functions.add('pi', function() {
            return Math.PI;
        });
    }
})

// 法二
module.exports = {
    install: function(less, pluginManager, functions) {
        functions.add('pi', function() {
            return Math.PI;
        });
    }
};

// 如果想要将该节点与其他值相乘或执行其他Less操作,则需要返回一个适当的Less节
// 否则,样式表中的输出就是纯文本(这可能适合您的目的)。
functions.add('pi', function() {
    return new tree.Dimension(Math.PI);
});
使用自定义:
@plugin "my-plugin";
.show-me-pi {
  value: pi();// value: 3.141592653589793;
}
// 作用域
.el-1 {
    @plugin "lib1";
    value: foo();
}
6.CSS Modules
6.1 基本使用
作用:
- 解决冲突
- 显示依赖
- 无默认作用域
没有css modules的情况下,样式是全局的(当类名相同时,样式相互干扰):
// 全局引入方式,所有文件的样式相互影响
import './style.less';
className="element"
添加 css modules后,各个组件仅仅会引用自己import的样式,下面开始介绍如何配置css modules
- 下载相关依赖
npm i css-loader -D
- css-loader 配置:
{
  loader: 'css-loader',
  options: {
    modules: {
      localIdentName: '[local]_[hash:base64:5]'
    }
  }
}
- 使用
// css modules 依赖
import style from './style.less';
class=`${style.element}`
基本效果(类名生成相应的hash)

6.2 styleName方式使用
发现每次引入都需要使用import style from 'xxx'; className={style.title}这样。总是需要多写一个我们不太需要的style,下面介绍另一种方式:
- 引入相关依赖
npm i css-loader -D

# less相关的依赖
npm install less-loader less -D

# 使用编译时CSS模块解析将styleName转换为className
npm i babel-plugin-react-css-modules --save
npm install postcss-less --save-dev
babel-plugin-react-css-modules实现编译时CSS模块解析将styleName转换为className。与react-css-modules相比,babel-plugin-react-css-modules具有更小的性能开销(0-10%vs+50%)和更小的大小占用空间(小于2kb vs 17kb react-css-modules+lodash依赖)
- css loader配置webpack
{
    loader: 'css-loader',
    options: {
        modules: {
            // 将样式文件中类名转化为指定格式
            localIdentName: '[local]-[hash:5]',
        }
    }
},
- .babelrc中配置
"plugins": [
  [
        "react-css-modules",
        {
            // 如果styleName只在其中一个中,则允许多个匿名导入
            "autoResolveMultipleImports": true,
            // 将react dom中类名转化为指定格式
            "generateScopedName": "[local]-[contenthash:5]",
            "filetypes": {
                ".less": {
                    "syntax": "postcss-less"
                }
            }
        }
    ]
]
⚠️ localIdentName和generateScopedName配置的名字要保持一致。(这里有个坑,从css-loader6.2.0使用了新的hash算法,所以导致两者的生成的hash不一致,可以利用generic-names来生成一致的名字)
- 组件中引入样式文件方式
// css modules styleName
import 'style.less';
styleName="element"
基本使用:
- :local
- :global
- :export 将css变量输出到js
- 组合实现复用
.base { /* 所有通用的样式 */ }
.normal {
  composes: base;
  /* normal 其它样式 */
}
6.3 antd样式冲突方案
- 配置文件,修改less文件中类名的前缀
// less-loader配置
{
 loader: 'less-loader',
 options: {
  lessOptions:{
    javascriptEnabled: true,
    modifyVars: {
    // 修改less文件中类名的前缀
      '@ant-prefix': 'mis-cpts__ant',
      '@primary-color': '#C92E33'
    },
  }
}
- 修改html中类名的前缀
<ConfigProvider locale={zhCN} prefixCls="mis-cpts__ant">
 ...
</ConfigProvider>
7.postcss
7.1 是什么
PostCSS 将 CSS 转换为 JavaScript 可以操作的数据结构。这些数据可以由插件理解和转换,然后处理成各种需要的格式。
接收一个 CSS 文件并提供了一个 API 来分析、修改它的规则(通过把 CSS 规则转换成一个抽象语法树的方式)。在这之后,这个 API 便可被许多插件利用来做有用的事情,比如寻错或自动添加 CSS vendor 前缀。
7.2 有什么用
- 可以检查(lint)你的 CSS
- 支持 CSS Variables 和 Mixins
- 编译尚未被浏览器广泛支持的先进的 CSS 语法
- 内联图片
- 模块化css
- css in js
- ...
7.3 webpack中怎么使用postcss
- 依赖于node.js
- 引入postcss
npm install postcss -D
npm install postcss-loader -D
- 引入一些需要的插件
# eg:添加浏览器前缀的插件
npm install autoprefixer -D
- webpack配置loader(ps:可以直接在配置loader的地方配置options也可以添加postcss.config.js配置文件配置options)
{
  loader: 'postcss-loader',
  options: {
    postcssOptions: {
      plugins: [
      // autoprefixer插件:添加了 vendor 浏览器前缀,它使用 Can I Use 上面的数据。
        autoprefixer({
        // 适配99%的浏览器,最新两个版本
          overrideBrowserslist: ['> 1%', 'last 2 versions', 'not ie <= 8'],
        }),
      ]
    },
  },
};
7.4 常见postcss插件
- autoprefixer: 给css属性添加兼容性前缀
- postcss-import: 合并样式
- cssnano: 压缩css代码
- postcss-preset-env: 允许你使用一些新的的css特性
7.5 自定义一个postcss插件
- Root: PostCss处理过的Css,整个处理过程基本上都在围绕着Root,Commont,AtRule,Rule都是它的子节点。
- AtRule: 为带@标识的部分,name为标识名称,params为标识参数。nodes为内部包含的其他子节点,可以是Commont,AtRule,Rule,这让我们可以自定义更多的规则
- Rule: 选择器样式部分,一个选择器代表一个Rule,选择器对应的样式列表nodes为Declaration构造函数
- Declaration: 为Css样式属性,prop为样式属性,value为样式值。可给Rule手动添加样式属性,也可以修改prop,value。
module.exports = (opts = { }) => {
   // 此处可对插件配置opts进行处理
   return {
     postcssPlugin: 'postcss-test', // 插件名字,以postcss-开头
     Once (root, postcss) {
       // 此处root即为转换后的AST,此方法转换一次css将调用一次
     },

    Declaration (decl, postcss) {
     // postcss遍历css样式时调用,在这里可以快速获得type为decl的节点(请参考第二节的AST对象)
    },

    Declaration: {
      color(decl, postcss) {
          // 可以进一步获得decl节点指定的属性值,这里是获得属性为color的值
          // 下面的内容是把字体颜色替换了
          if (decl.value === 'white') {
              decl.value = 'green'
          }
          if (decl.value === 'red') {
              decl.value = 'yellow'
          }
       }
    },

    Comment (comment, postcss) {
     // 可以快速访问AST注释节点(type为comment)
    },

    AtRule(atRule, postcss) {
     // 可以快速访问css如@media,@import等@定义的节点(type为atRule)
    }
  }
}
module.exports.postcss = true
将插件使用到 postcss 配置中?
plugins: [
  // autoprefixer插件:添加了 vendor 浏览器前缀,它使用 Can I Use 上面的数据。
  autoprefixer({
  // 适配99%的浏览器,最新两个版本
    overrideBrowserslist: ['> 1%', 'last 2 versions', 'not ie <= 8'],
  }),
  // 这里的url是自定义的插件的路径,{}是传入插件的参数
  require('../src/tools/test-plugin')({})
]


