今天我就先来和小伙伴们分析下如何使用 seata 中的 at 模式来处理分布式事务。
1. AT 模式原理
整体上来说,AT 模式是两阶段提交协议的演变:
- 一阶段:业务数据和回滚日志记录在同一个本地事务中提交,释放本地锁和连接资源。
- 二阶段则分两种情况:2.1 提交异步化,非常快速地完成。2.2 回滚通过一阶段的回滚日志进行反向补偿。
大致上的逻辑就是上面这样,我们通过一个具体的案例来看看 AT 模式是如何工作的:
假设有一个业务表 product,如下:
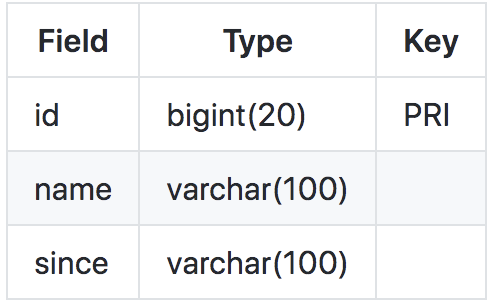
现在我们想做如下一个更新操作:
update product set name = 'GTS' where name = 'TXC';
步骤如下:
一阶段:
- 解析 SQL:得到 SQL 的类型(UPDATE),表(product),条件(where name = 'TXC')等相关的信息。
- 查询前镜像:根据解析得到的条件信息,生成查询语句,定位数据(查找到更新之前的数据)。
- 执行上面的更新 SQL。
- 查询后镜像:根据前镜像的结果,通过主键定位数据。
- 插入回滚日志:把前后镜像数据以及业务 SQL 相关的信息组成一条回滚日志记录,插入到 UNDO_LOG 表中。
- 提交前,向 TC 注册分支:申请 product 表中,主键值等于 1 的记录的 全局锁。
- 本地事务提交:业务数据的更新和前面步骤中生成的 UNDO LOG 一并提交。
- 将本地事务提交的结果上报给 TC。
二阶段:
二阶段分两种情况,提交或者回滚。
先来看回滚步骤:
- 首先收到 TC 的分支回滚请求,开启一个本地事务,执行如下操作。
- 通过 XID 和 Branch ID 查找到相应的 UNDO LOG 记录(这条记录中保存了数据修改前后对应的镜像)。
- 数据校验:拿 UNDO LOG
中的后镜像与当前数据进行比较,如果有不同,说明数据被当前全局事务之外的动作做了修改。这种情况,需要根据配置策略来做处理。 - 根据 UNDO LOG 中的前镜像和业务 SQL 的相关信息生成并执行回滚的语句:update product set name = 'TXC'
where id = 1; - 提交本地事务。并把本地事务的执行结果(即分支事务回滚的结果)上报给 TC。
再来看提交步骤:
- 收到 TC 的分支提交请求,把请求放入一个异步任务的队列中,马上返回提交成功的结果给 TC。
- 异步任务阶段的分支提交请求将异步和批量地删除相应 UNDO LOG 记录。
大致上就是这样一个步骤,思路还是比较清晰的,就是当你要更新一条记录的时候,系统会先根据这条记录原本的内容生成一个回滚日志存入 undo log 表中,将来要回滚的话,就根据 undo log 中的记录去更新数据(反向补偿),将来要是不回滚的话,就删除 undo log 中的记录。
理论看着简单,代码怎么写?我们继续往下看。
2. AT 模式实践
2.1 案例介绍
我们这里举一个商品下单的案例,一共有五个服务,我来和大家稍微解释下:
- eureka:这是服务注册中心。
- account:这是账户服务,可以查询/修改用户的账户信息(主要是账户余额)。
- order:这是订单服务,可以下订单。
- storage:这是一个仓储服务,可以查询/修改商品的库存数量。
- bussiness:这是业务,用户下单操作将在这里完成。
这个案例讲了一个什么事呢?
当用户想要下单的时候,调用了 bussiness 中的接口,bussiness 中的接口又调用了它自己的 service,在 service 中,首先开启了全局分布式事务,然后通过 feign 调用 storage 中的接口去扣库存,然后再通过 feign 调用 order 中的接口去创建订单(order 在创建订单的时候,不仅会创建订单,还会扣除用户账户的余额),在这个过程中,如果有任何一个环节出错了(余额不足、库存不足等导致的问题),就会触发整体的事务回滚。
本案例具体架构如下图:
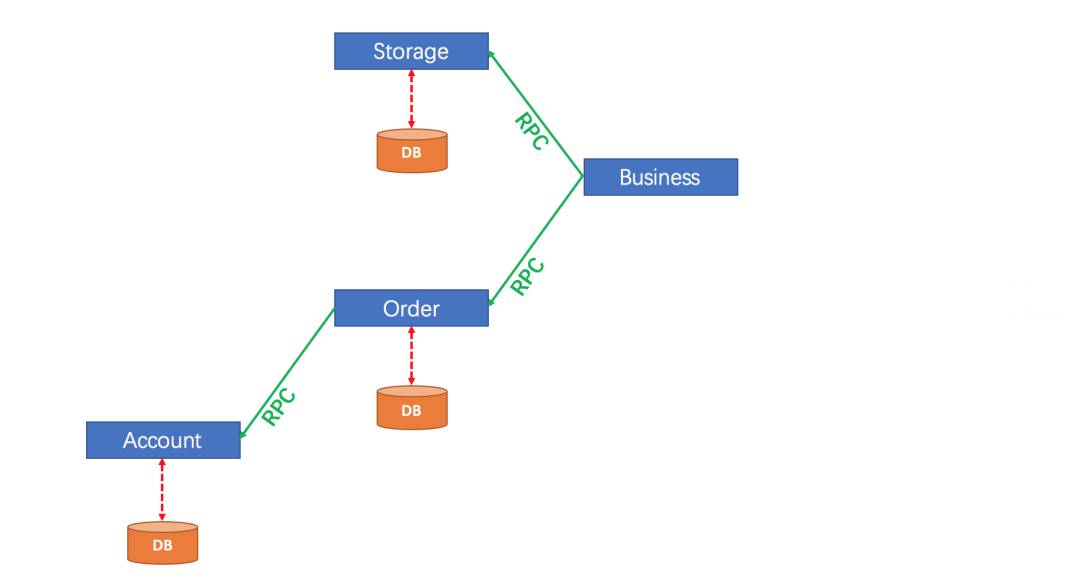
这个案例就是一个典型的分布式事务问题,storage、order 以及 account 中的事务分属于不同的微服务,但是我们希望他们同时成功或者同时失败。
2.2 准备工作
我们先来把 Seata 服务端搭建起来。
Seata 下载地址:
- https://github.com/seata/seata/releases
目前最新版本是 1.4.2,我们就使用最新版本来做。
这个工具在 Windows 或者 Linux 上部署差别不大,所以我这里就直接部署在 Windows 上了,方便一些。
我们首先下载 1.4.2 版本的 zip 压缩包,下载之后解压,然后在 conf 目录中配置两个地方:
(1)首先配置 file.conf 文件
- file.conf 中配置 TC 的存储模式,TC 的存储模式有三种:
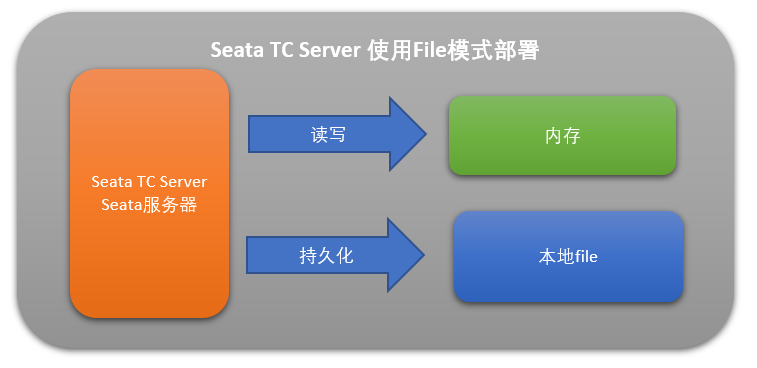
- file:适合单机模式,全局事务会话信息在内存中读写,并持久化本地文件 root.data,性能较高。
- db:适合集群模式,全局事务会话信息通过 db 共享,相对性能差点。
redis:适合集群模式,全局事务会话信息通过 redis 共享,相对性能好点,但是要注意,redis 模式在 Seata-Server 1.3
及以上版本支持,性能较高,不过存在事务信息丢失的风险,所以需要开发者提前配置适合当前场景的 redis 持久化配置。
这里我们为了省事,配置为 file 模式,这样事务会话信息读写在内存中完成,持久化则写到本地 file,如下图:
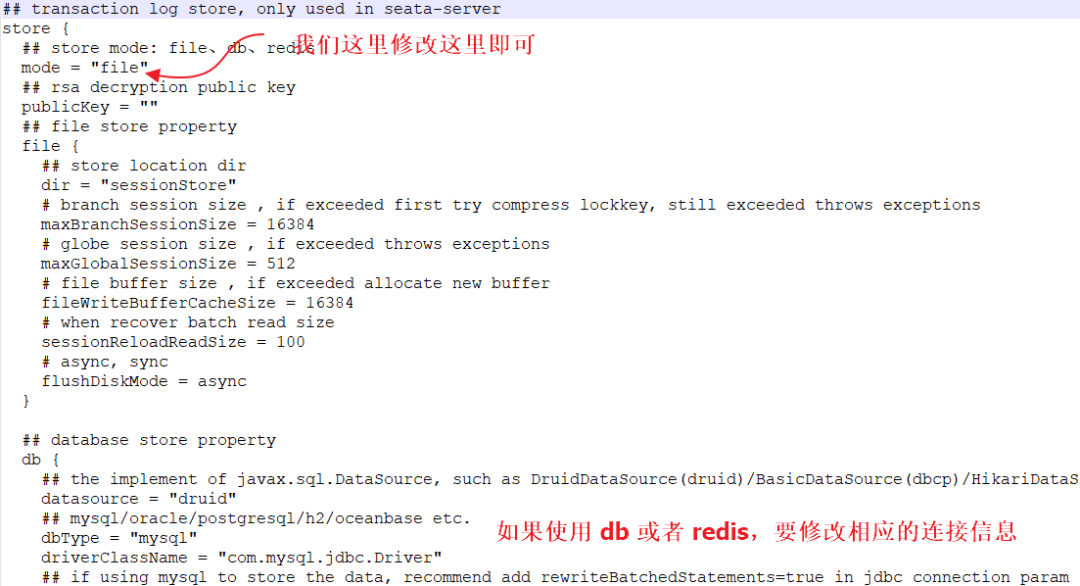
如果配置 db 或者 redis 模式,大家记得填一下下面的相关信息。具体如下图:
题外话
注意,如果使用 db 模式,需要提前准备好数据库脚本,如下(小伙伴们可以直接在公众号江南一点雨后台回复 seata-db 下载这个数据库脚本):
CREATE DATABASE /*!32312 IF NOT EXISTS*/`seata2` /*!40100 DEFAULT CHARACTER SET utf8mb4 COLLATE utf8mb4_0900_ai_ci */ /*!80016 DEFAULT ENCRYPTION='N' */;

USE `seata2`;

/*Table structure for table `branch_table` */

DROP TABLE IF EXISTS `branch_table`;

CREATE TABLE `branch_table` (
  `branch_id` bigint(20) NOT NULL,
  `xid` varchar(128) NOT NULL,
  `transaction_id` bigint(20) DEFAULT NULL,
  `resource_group_id` varchar(32) DEFAULT NULL,
  `resource_id` varchar(256) DEFAULT NULL,
  `branch_type` varchar(8) DEFAULT NULL,
  `status` tinyint(4) DEFAULT NULL,
  `client_id` varchar(64) DEFAULT NULL,
  `application_data` varchar(2000) DEFAULT NULL,
  `gmt_create` datetime(6) DEFAULT NULL,
  `gmt_modified` datetime(6) DEFAULT NULL,
  PRIMARY KEY (`branch_id`),
  KEY `idx_xid` (`xid`)
) ENGINE=InnoDB DEFAULT CHARSET=utf8;

/*Data for the table `branch_table` */

/*Table structure for table `global_table` */

DROP TABLE IF EXISTS `global_table`;

CREATE TABLE `global_table` (
  `xid` varchar(128) NOT NULL,
  `transaction_id` bigint(20) DEFAULT NULL,
  `status` tinyint(4) NOT NULL,
  `application_id` varchar(32) DEFAULT NULL,
  `transaction_service_group` varchar(32) DEFAULT NULL,
  `transaction_name` varchar(128) DEFAULT NULL,
  `timeout` int(11) DEFAULT NULL,
  `begin_time` bigint(20) DEFAULT NULL,
  `application_data` varchar(2000) DEFAULT NULL,
  `gmt_create` datetime DEFAULT NULL,
  `gmt_modified` datetime DEFAULT NULL,
  PRIMARY KEY (`xid`),
  KEY `idx_gmt_modified_status` (`gmt_modified`,`status`),
  KEY `idx_transaction_id` (`transaction_id`)
) ENGINE=InnoDB DEFAULT CHARSET=utf8;

/*Data for the table `global_table` */

/*Table structure for table `lock_table` */

DROP TABLE IF EXISTS `lock_table`;

CREATE TABLE `lock_table` (
  `row_key` varchar(128) NOT NULL,
  `xid` varchar(128) DEFAULT NULL,
  `transaction_id` bigint(20) DEFAULT NULL,
  `branch_id` bigint(20) NOT NULL,
  `resource_id` varchar(256) DEFAULT NULL,
  `table_name` varchar(32) DEFAULT NULL,
  `pk` varchar(36) DEFAULT NULL,
  `gmt_create` datetime DEFAULT NULL,
  `gmt_modified` datetime DEFAULT NULL,
  PRIMARY KEY (`row_key`),
  KEY `idx_branch_id` (`branch_id`)
) ENGINE=InnoDB DEFAULT CHARSET=utf8;
另外还需要注意的是自己的数据库版本信息,改数据库连接的时候按照实际情况修改,Seata 针对 MySQL5.x 和 MySQL8.x 都提供了对应的数据库驱动(在 lib 目录下),我们只需要把驱动改好就行了。
(2)再配置 registry.conf 文件
registry.conf 主要配置 Seata 的注册中心,我们这里采用大家比较熟悉的 Eureka,配置如下:
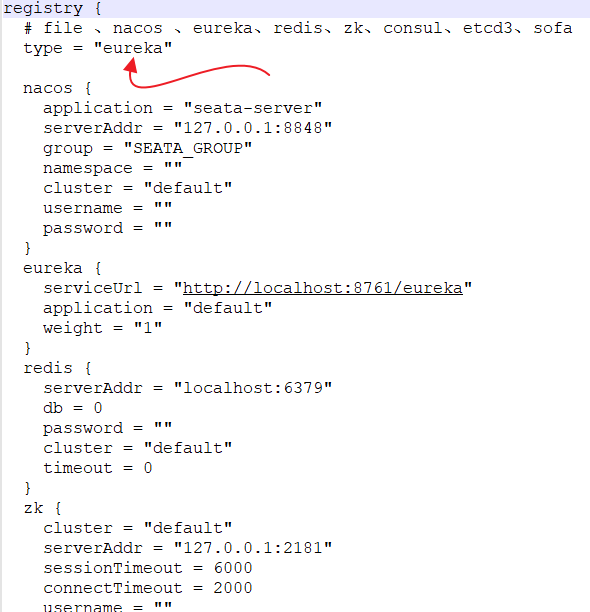
可以看到,支持的配置中心比较多,我们选择 Eureka,选好配置中心之后,记得修改配置中心相关的信息。
OK,现在就配置完成了,但是先别启动,还差一个 Eureka 注册中心。
2.3 工程搭建
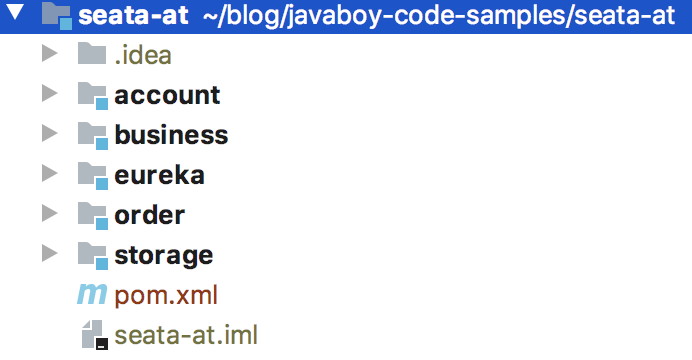
首先我们创建一个名为 seata-at 的 maven 工程,作为我们的 parent 项目,微服务中的各个模块将在这个 maven 中创建。
搞过微服务的小伙伴应该知道 Spring Cloud 体系中有一个让人特别头疼的版本冲突问题,特别是用到一些比较有个性的组件的时候,这个版本冲突特别烦人。我们在 Spring Cloud 中整合 seata 的时候一样也是存在版本冲突问题,一个比较省事的解决办法是使用阿里云提供的 Spring Boot 构建地址,这个地址虽然不能使用目前最新版的 Spring Boot,但是却不存在版本冲突问题。松哥这里就采用这种方案。
eureka
eureka 的创建其实不牵涉版本问题,大家直接创建即可,引入 web 和 eureka server 依赖即可。
business
business 相当于我整个服务的入口,它里边需要用到 seata、feign,不过这里不用直接操作数据库。
创建方式如下,首先选择 Initializr Service URL 地址为 https://start.aliyun.com,如下图:
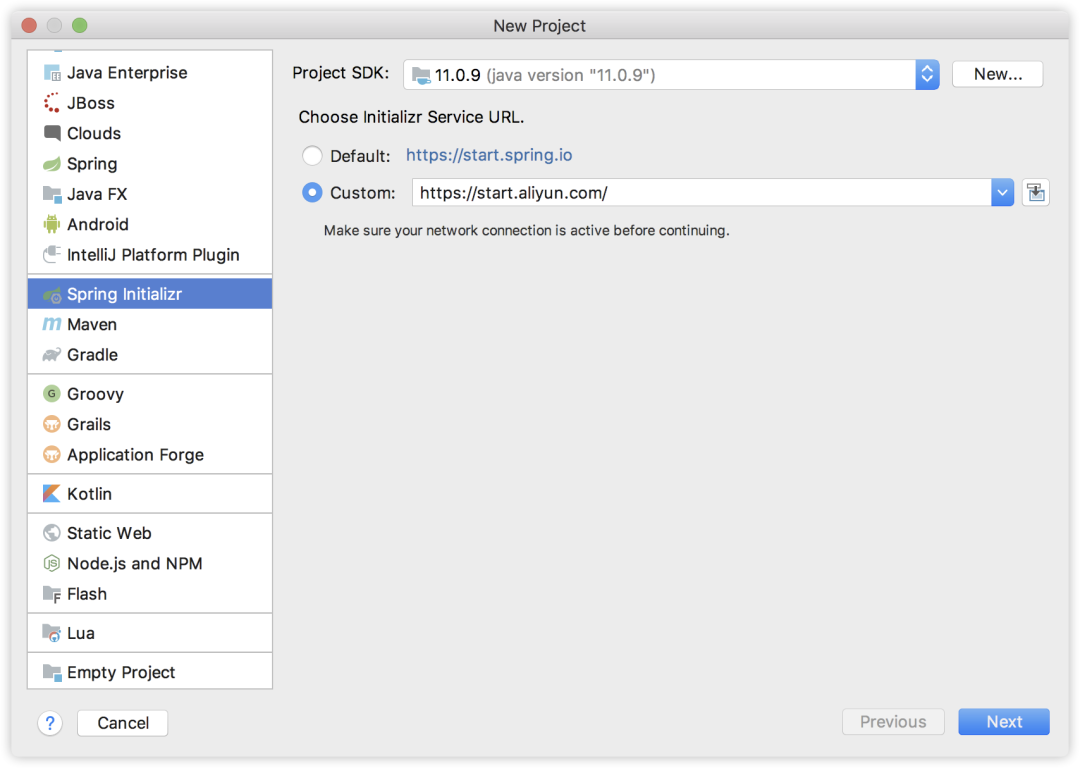
然后选择我们需要的依赖,如下:
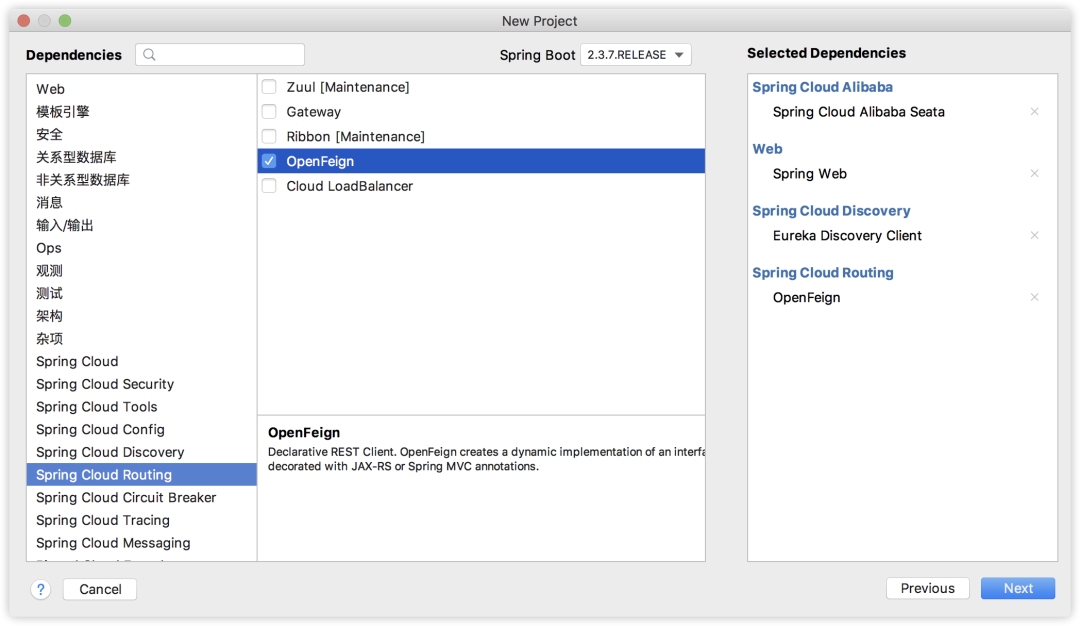
order
接下来创建订单服务,订单服务也是基于 https://start.aliyun.com 地址来创建,相比于 business,订单服务中多了数据库操作依赖:
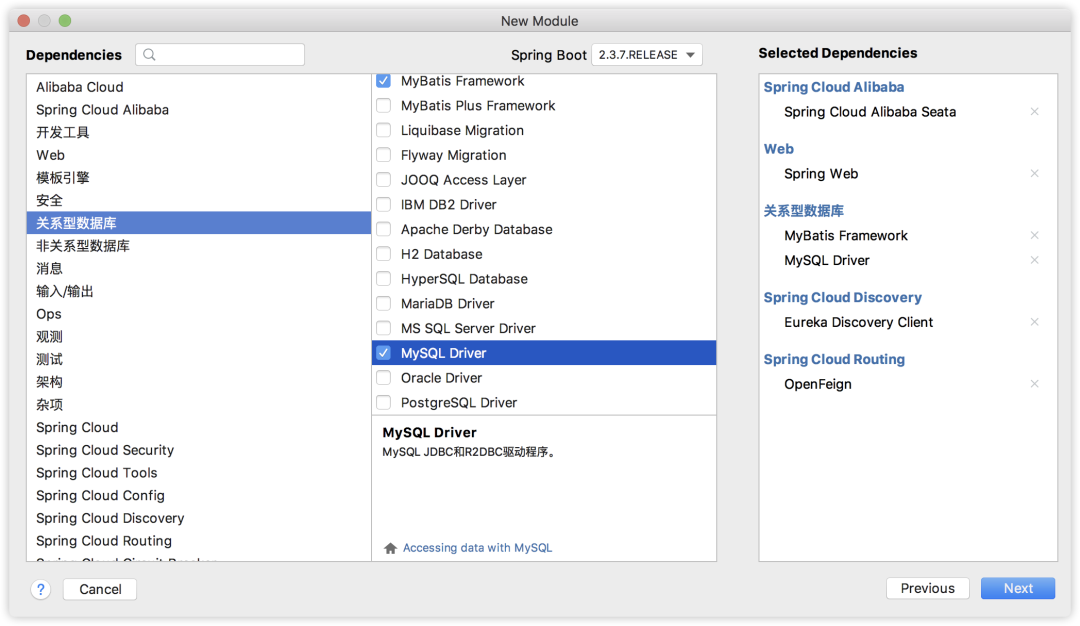
account
同 order 服务的创建,不再赘述。
storage
同 order 服务的创建,不再赘述。
最后创建好的工程结构如下:
2.4 工程配置
eureka
eureka 的配置比较简单,配置两个地方就行了:
application.properties
eureka.client.fetch-registry=false
eureka.client.register-with-eureka=false

server.port=8761
这个 eureka 不仅仅是我们一会微服务的注册地址,也是 seata-server 的注册地址,在 seata-server 的 registry.conf 配置文件中,eureka 的默认端口就是 8761,所以如果你这里不是 8761,那么记得修改一下 seata-server 的 registry.conf 配置文件。
启动类上加一个注解就完事:
@SpringBootApplication
@EnableEurekaServer
public class EurekaApplication {

    public static void main(String[] args) {
        SpringApplication.run(EurekaApplication.class, args);
    }

}
business
business 不用操作数据库,所以配置主要是两方面。
在 seata 的使用过程中,seata-server 相当于是一个协调者的角色,涉及到微服务的服务都需要注册到 seata-server 上,那么这里就涉及到两个配置文件,分别是 file.conf 和 regsitry.conf。
file.conf 主要配置了微服务和 seata-server 之间的一些通信信息啥的,这个文件比较长,小伙伴们文末下载项目源码直接拷贝即可。
registry.conf 则主要描述了一些注册信息,我们这里都是注册到 eureka,所以配置一下注册到 eureka 即可。这个配置文件大家到时候也是直接下载源码拷贝过去就行了。反正这两个配置基本上也都是模版化的,并不需要做过多的修改。
如果需要了解这两个配置文件的详细含义,可以参考这个文档:
- https://seata.io/zh-cn/docs/user/configurations.html
最后再来配置一下 business 的 application.properties:
server.port=1112
spring.application.name=business
eureka.client.service-url.defaultZone=http://localhost:8761/eureka

spring.cloud.alibaba.seata.tx-service-group=my_test_tx_group
前面三行配置好说。第四行配置表示配置事务群组的名称为 my_test_tx_group,也就是 TC 的集群名为 my_test_tx_group,这个名字是在 file.conf 中配置的,这里根据 file.conf 中的配置情况去填写即可。
order
order 中的 file.conf 和 registry.conf 和 business 一致,不再赘述。这里就来看看它的 application.properties:
server.port=1113
spring.application.name=order
eureka.client.service-url.defaultZone=http://localhost:8761/eureka

spring.datasource.username=root
spring.datasource.password=123
spring.datasource.url=jdbc:mysql:///order?serverTimezone=Asia/Shanghai&useSSL=false

spring.cloud.alibaba.seata.tx-service-group=my_test_tx_group
这个是具体的服务,所以要连接 order 数据库。
order 数据库脚本如下:
CREATE TABLE `order_tbl` (
  `id` int(11) NOT NULL AUTO_INCREMENT,
  `user_id` varchar(255) DEFAULT NULL,
  `commodity_code` varchar(255) DEFAULT NULL,
  `count` int(11) DEFAULT '0',
  `money` int(11) DEFAULT '0',
  PRIMARY KEY (`id`)
) ENGINE=InnoDB AUTO_INCREMENT=1 DEFAULT CHARSET=utf8;
account
account 中的 file.conf 和 registry.conf 和 business 一致,不再赘述。这里就来看看它的 application.properties:
server.port=1111
spring.application.name=account
eureka.client.service-url.defaultZone=http://localhost:8761/eureka

spring.datasource.username=root
spring.datasource.password=123
spring.datasource.url=jdbc:mysql:///account?serverTimezone=Asia/Shanghai&useSSL=false

spring.cloud.alibaba.seata.tx-service-group=my_test_tx_group
这个是具体的服务,所以要连接 account 数据库。
account 数据库脚本如下:
CREATE TABLE `account_tbl` (
  `id` int(11) NOT NULL AUTO_INCREMENT,
  `user_id` varchar(255) DEFAULT NULL,
  `money` int(11) DEFAULT '0',
  PRIMARY KEY (`id`)
) ENGINE=InnoDB AUTO_INCREMENT=1 DEFAULT CHARSET=utf8;
storage
storage 中的 file.conf 和 registry.conf 和 business 一致,不再赘述。这里就来看看它的 application.properties:
server.port=1114
spring.application.name=storage
eureka.client.service-url.defaultZone=http://localhost:8761/eureka

spring.datasource.username=root
spring.datasource.password=123
spring.datasource.url=jdbc:mysql:///storage?serverTimezone=Asia/Shanghai&useSSL=false

spring.cloud.alibaba.seata.tx-service-group=my_test_tx_group
这个是具体的服务,所以要连接 storage 数据库。
storage 数据库脚本如下:
CREATE TABLE `storage_tbl` (
  `id` int(11) NOT NULL AUTO_INCREMENT,
  `commodity_code` varchar(255) DEFAULT NULL,
  `count` int(11) DEFAULT '0',
  PRIMARY KEY (`id`),
  UNIQUE KEY `commodity_code` (`commodity_code`)
) ENGINE=InnoDB AUTO_INCREMENT=1 DEFAULT CHARSET=utf8;
另外,由于在分布式事务操作的过程中,会涉及到一个 undo log 表,就是我们前面所说用来保存前后镜像的表,所以,以上三个库,再分别执行如下 SQL,各自添加一个 undo log 表。
CREATE TABLE `undo_log` (
  `id` bigint(20) NOT NULL AUTO_INCREMENT,
  `branch_id` bigint(20) NOT NULL,
  `xid` varchar(100) NOT NULL,
  `context` varchar(128) NOT NULL,
  `rollback_info` longblob NOT NULL,
  `log_status` int(11) NOT NULL,
  `log_created` datetime NOT NULL,
  `log_modified` datetime NOT NULL,
  PRIMARY KEY (`id`),
  UNIQUE KEY `ux_undo_log` (`xid`,`branch_id`)
) ENGINE=InnoDB AUTO_INCREMENT=1 DEFAULT CHARSET=utf8;
2.5 模块开发
account
先来看看 account 模块的开发。
这个模块主要是提供扣款服务,如果扣款的时候没钱了,就抛出一个账户余额不足的异常。
具体操作如下:
首先创建 AccountMapper,为了省事,我这里就不创建 XML 文件了,直接用注解:
@Mapper
public interface AccountMapper {
    @Update("update account_tbl set money=money-#{money} where user_id=#{account}")
    int updateAccount(@Param("account") String account, @Param("money") Double money);

    @Select("select money from account_tbl where user_id=#{account}")
    Double getMoneyByAccount(String account);
}
这里两个方法,一个是扣款,还有一个是查询账户还剩多少钱。
再来看 AccountService:
@Service
public class AccountService {

    @Autowired
    AccountMapper accountMapper;

    public boolean deductAccount(String account, Double money) {
        accountMapper.updateAccount(account, money);
        Double m = accountMapper.getMoneyByAccount(account);
        if (m >= 0) {
            return true;
        }else{
            throw new RuntimeException("账户余额不足");
        }
    }
}
先去扣款,扣款完成后,再去查询账户余额,如果余额小于 0,就抛出异常。
最后再 AccountController 中调用这个 AccountService:
@RestController
public class AccountController {

    @Autowired
    AccountService accountService;

    @PostMapping("/deductAccount")
    public RespBean deductAccount(String account, Double money) {
        if (accountService.deductAccount(account, money)) {
            return RespBean.ok("扣款成功");
        }
        return RespBean.error("扣款失败");
    }
}
这块比较简单,没啥好说的。
order
再来看 order。order 这里就是下订单,下订单之前先扣款,扣款成功的话就添加一条订单记录。所以我们要在 order 服务中通过。
@SpringBootApplication
@EnableEurekaClient
@EnableFeignClients
public class OrderApplication {

    public static void main(String[] args) {
        SpringApplication.run(OrderApplication.class, args);
    }

}
接下来再定义一个 AccountFeign 用来调用 Account 服务:
@FeignClient("account")
public interface AccountFeign {
    @PostMapping("/deductAccount")
    RespBean deductAccount(@RequestParam("account") String account, @RequestParam("money") Double money);
}
再来看看 OrderService:
@Service
public class OrderService {

    @Autowired
    OrderMapper orderMapper;
    @Autowired
    AccountFeign accountFeign;

    public boolean createOrder(String account, String productId, Integer count) {
        //扣款,每件商品 100 块钱
        RespBean respBean = accountFeign.deductAccount(account, count * 100.0);
        int order = orderMapper.createOrder(account, productId, count);
        return order == 1 && respBean.getStatus() == 200;
    }
}
商品价格这里直接硬编码,每件商品 100 块钱,先扣款,扣款成功后添加一条订单记录。
最后在 Controller 中调用这个 OrderService:
RestController
public class OrderController {
    @Autowired
    OrderService orderService;

    @PostMapping("/createOrder")
    public RespBean createOrder(@RequestParam("acount") String account, @RequestParam("count") Integer count, @RequestParam("productId") String productId) {
        if (orderService.createOrder(account, productId, count)) {
            return RespBean.ok("下单成功");
        }
        return RespBean.error("下单失败");
    }
}
storage
再来看 storage 模块,这个就是扣库存的,如下:
@RestController
public class StorageController {

    @Autowired
    StorageService storageService;

    @PostMapping("/deduct")
    public RespBean deduct(@RequestParam("productId") String productId, @RequestParam("count") Integer count) {
        if (storageService.deduct(productId, count)) {
            return RespBean.ok("扣库存成功");
        }
        return RespBean.error("扣库存失败");
    }
}
@Service
public class StorageService {
    @Autowired
    StorageMapper storageMapper;
    public boolean deduct(String productId, Integer count) {
        int deduct = storageMapper.deduct(productId, count);
        int c = storageMapper.getCountByProductId(productId);
        if (c >= 0) {
            return true;
        }
        throw new RuntimeException("库存不足,扣库存失败");
    }
}
扣完库存后检查一下,如果库存总数小于 0,说明库存不足,此时直接抛出异常即可。
business
business 是整个服务的入口,在 business 中调用 order 和 storage 两个服务,并且在 business 中开启全局事务,如果以上三个服务中,有任何一个服务抛出异常,都会导致全局事务回滚,我们来看下 business 中的代码:
@RestController
public class BusinessController {

    @Autowired
    BusinessService businessService;

    @GetMapping("/order")
    public RespBean order(String account, Integer count, String productId) {
        try {
            businessService.purchase(account, count, productId);
            return RespBean.ok("下单成功");
        } catch (Exception e) {
            return RespBean.error(e.getMessage());
        }

    }
}
@Service
public class BusinessService {

    @Autowired
    StorageFeignClient storageFeignClient;
    @Autowired
    OrderFeignClient orderFeignClient;


    @GlobalTransactional
    public void purchase(String account, Integer count, String productId) {
        storageFeignClient.deduce(productId, count);
        orderFeignClient.createOrder(account, count, productId);
    }
}
@FeignClient("order")
public interface OrderFeignClient {
    @PostMapping("/createOrder")
    RespBean createOrder(@RequestParam("acount") String account, @RequestParam("count") Integer count, @RequestParam("productId") String productId);
}
@FeignClient("storage")
public interface StorageFeignClient {
    @PostMapping("/deduct")
    RespBean deduce(@RequestParam("productId") String productId, @RequestParam("count") Integer count);
}
大家注意,seata 中的 at 模式,在经过前面的配置之后,我们在后续使用的时候,现在的工作就非常简单了,只需要在目标方法上添加一个
@GlobalTransactional 注解即可,就是这么 easy。
common
最后我们再提供一个公共模块,这个公共模块被其他所有业务模块所所依赖,在公共模块中我们来处理全局异常:
@RestControllerAdvice
public class GlobalException {
    @ExceptionHandler(RuntimeException.class)
    @ResponseStatus(HttpStatus.INTERNAL_SERVER_ERROR)
    public RespBean runtimeException(RuntimeException e) {
        return RespBean.error(e.getMessage());
    }
}
2.6 测试
最后,我们来简单测试下。
先自己手动给 account 表和 storage 表加几条记录,比如我这里设置 zhangsan 有 10000 块钱:

设置编号为 1111 的商品有 100 件:

然后我们来一个购买,如下:
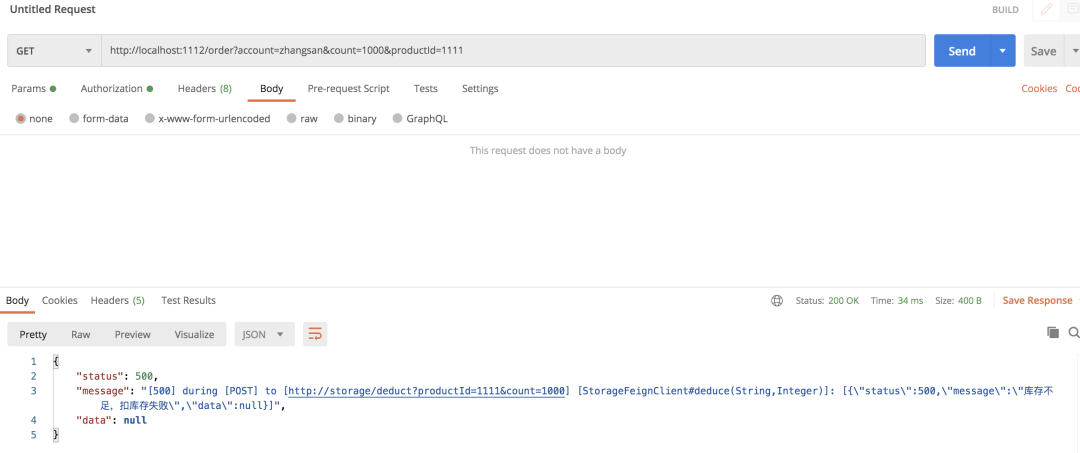
zhangsan 想买 1000 件商品,显然库存不够,购买失败。此时去查看数据库,account 表、order 表 以及 storage 表都已经回滚了。
然后我们也可以修改表,设置 zhangsan 有 1 块钱,然后修改请求,如下:
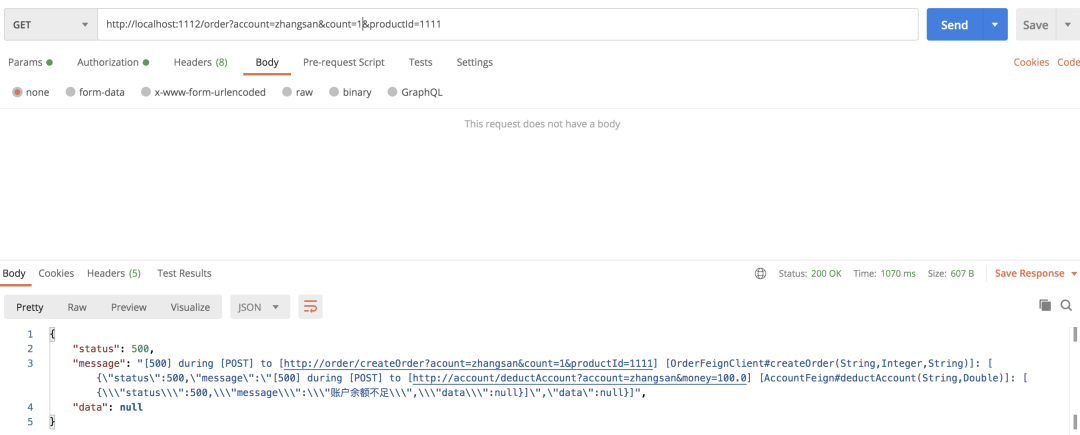
大家看到,此时的异常就是账户余额不足了。
最后我们还是设置 zhangsan 有 10000 块钱,然后来一个正常的测试,如下:
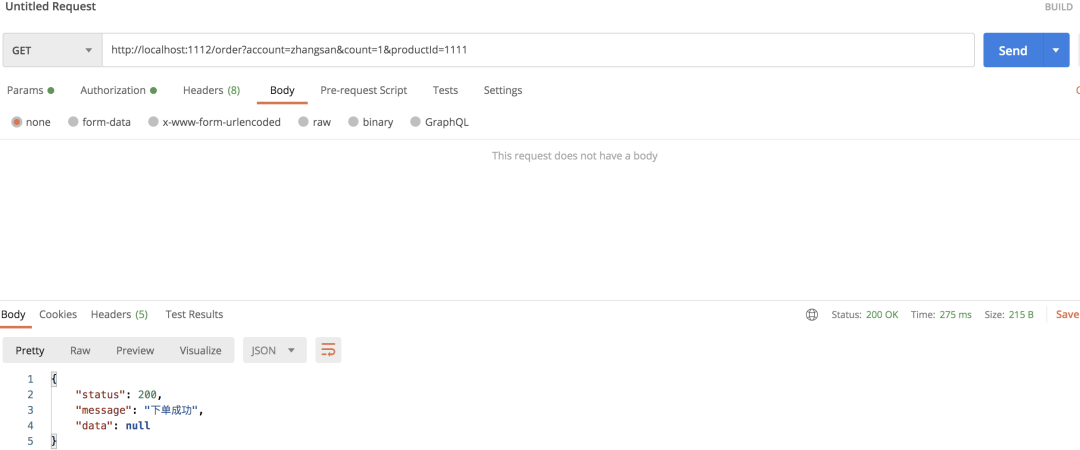
有小伙伴可能会说,咦!没看到 undo log 表的使用呀?其实在分布式事务中,undo log 是发挥了作用的,只是当二阶段执行完毕后,无论是提交还是回滚,都会删除 undo log 表中的记录,所以就没看到 undo log 中的数据了。
如果小伙伴们想看到 undo log 中的数据,那么简单,只需要在 business 的业务方法中 debug,在系统运行的过程中暂停一下,此时打开数据库,就能看到 undo log 表中的数据了。


