
介绍
最近,正在为我司的项目研究基于 Swift 的代码覆盖率检测方案的解决方案,我已经努力尝试并且找到了最佳实践。
在这篇短文中,我将会给你介绍:
- 如何生成 *.profraw 文件并通过命令行测量代码覆盖率
- 如何在 Swift App 项目里调用 C/C++ 方法
- 如何在 Xcode 中测量完整 Swift App 项目的代码覆盖率
使用命令行练习
在我们测量完整 App 项目的代码覆盖率之前,需要创建一个简单的 Swift 源代码文件,并且用命令行生成一个 *.profraw 文件,以便我们学习生成覆盖配置文件的基本工作流程。
创建一个 Swift 文件并包含以下代码:
test()
print("hello")
func test() {
  print("test")
}
func add(_ x: Double, _ y: Double) -> Double {
  return x + y
}
test()
在终端运行以下命令:
swiftc -profile-generate -profile-coverage-mapping hello.swift
传递给编译器的选项 -profile-generate 和 -profile-coverage-mapping 将在编译源码时启用覆盖特性。基于源码的代码覆盖功能直接对 AST 和预处理器信息进行操作。
然后运行输出的二进制文件:
./hello
运行完成之后,在当前目录下执行 ls ,我们会看到这里生成了一个名为 default.profraw 的新文件。该文件由 llvm 生成,为了衡量代码覆盖率,我们必须使用另一个工具 llvm-profdata 来组合多个原始配置文件并同时对其进行索引。
xcrun llvm-profdata merge -sparse default.profraw -o hello.profdata
在终端运行上面的命令行,我们会得到一个名为 hello.profdata 的新文件,它可以显示我们想要的覆盖率报告。我们可以使用 llvm-cov 来显示或生成 JSON 报告。
xcrun llvm-cov show ./hello -instr-profile=hello.profdata
xcrun llvm-cov export ./hello -instr-profile=hello.profdata
现在,我们已经了解了生成快速代码覆盖率报告的基本工作流程。似乎 Swift 基于源码的代码覆盖并没有那么困难。但是,Xcode 中完整的 Swift App 项目的配置与命令行有很大的不同。那我们接着往下看吧!
在 Xcode 中测量 Swift App 项目的代码覆盖率
创建 Swift 项目
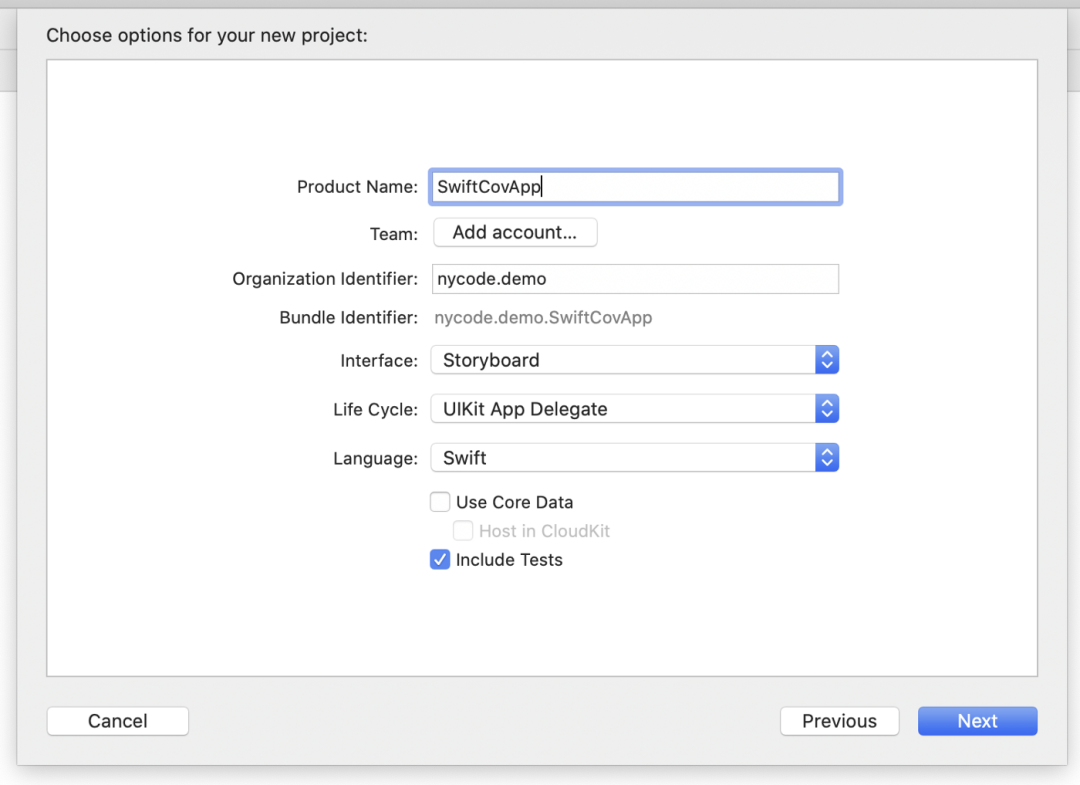
选择 SwiftCovApp target -> Build Settings -> Swift Compiler — Custom Flags。
在 Other Swift Flags 添加 -profile-generate 和 -profile-coverage-mapping 选项:

如果现在尝试编译,我们将会得到以下错误报告:
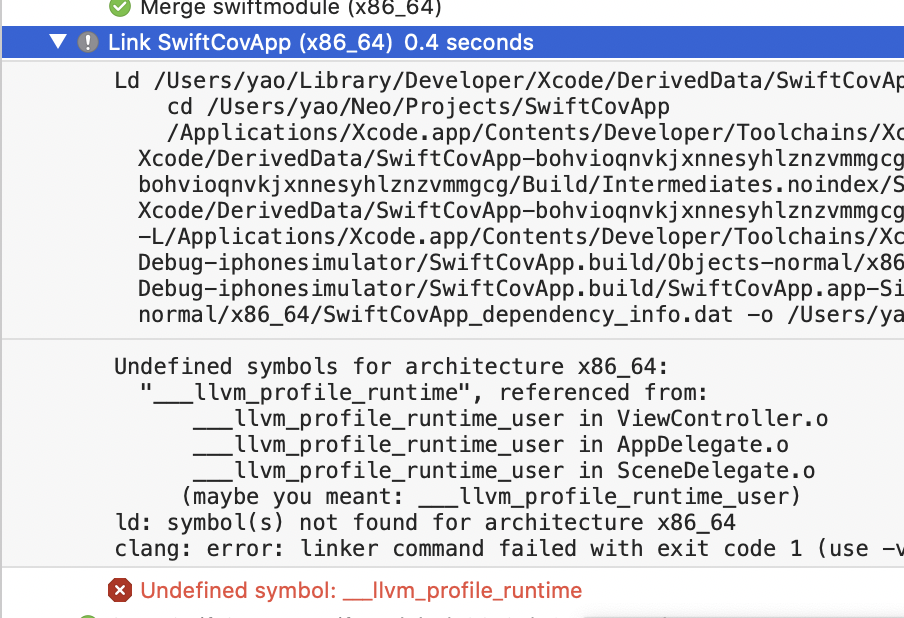
为了解决这个问题,我们必须为所有目标启用代码覆盖率:
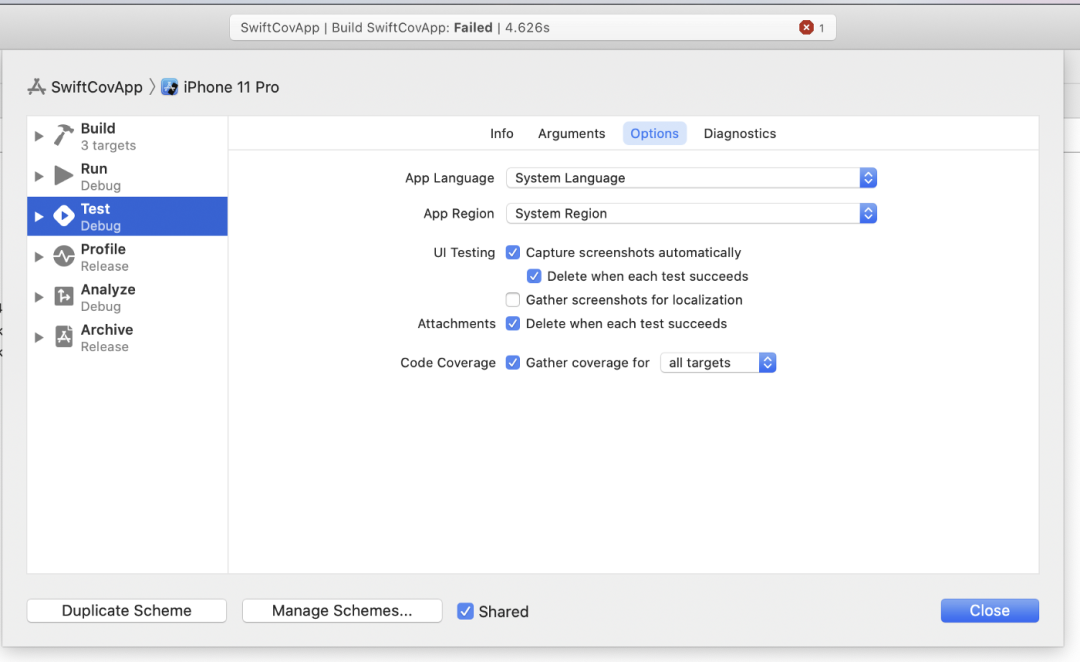
在启用代码覆盖率之后再次运行,项目将会构建成功。
我们了解到,当程序退出时,编译器会将原始配置文件写入 LLVM_PROFILE_FILE 环境变量指定的路径。所以我们应该杀掉 Application 的进程来实现 *.profraw 文件。但是,当我们结束应用程序时,它会在控制台中报错:


虽然我在 Build Settings 中设置了相同的配置,但 Xcode 中的默认环境路径为空。为了解决这个问题,我们必须新建一个头文件,并声明一些 llvm C api 函数供 Swift 调用。
在 Swift 中调用 C/C++ 方法
Swift 是一种基于 C/C++ 的强大语言,它可以直接调用 C/C++ 方法。但是,在我们调用 llvm C/C++ api 之前,我们必须将我们需要的方法导出为一个模块。
首先,创建一个头文件:
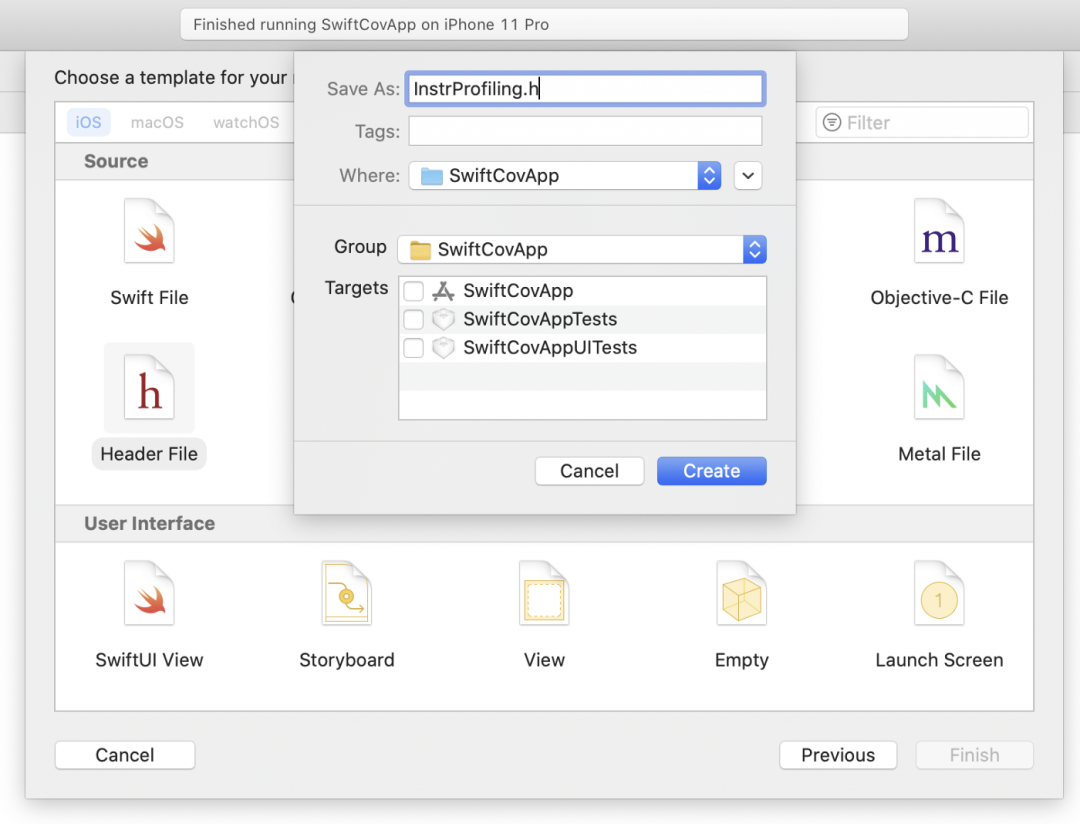
然后,将以下代码复制粘贴到该文件中:
#ifndef PROFILE_INSTRPROFILING_H_
#define PROFILE_INSTRPROFILING_H_int __llvm_profile_runtime = 0;void __llvm_profile_initialize_file(void);
const char *__llvm_profile_get_filename();
void __llvm_profile_set_filename(const char *);
int __llvm_profile_write_file();
int __llvm_profile_register_write_file_atexit(void);
const char *__llvm_profile_get_path_prefix();#endif /* PROFILE_INSTRPROFILING_H_ */
创建一个 module.modulemap 文件并将所有内容导出为一个模块。
//
//  module.modulemap
//
//  Created by yao on 2020/10/15.
//

module InstrProfiling {
    header "InstrProfiling.h"
    export *
}
事实上我们不能直接创建 module.modulemap,首先创建一个 module.c 文件然后重命名为 module.modulemap,它还可以帮助我创建一个 SwiftCovApp-Bridging-Header 文件。
构建项目,然后,我们可以在 Swift 代码中调用 llvm apis。
import UIKit
import InstrProfiling
class ViewController: UIViewController {
    override func viewDidLoad() {
        super.viewDidLoad()
        // Do any additional setup after loading the view.
        print("File Path Prefix: \(String(cString: __llvm_profile_get_path_prefix()) )")
        print("File Name: \(String(cString: __llvm_profile_get_filename()) )")
        let name = "test.profraw"
        let fileManager = FileManager.default

        do {
            let documentDirectory = try fileManager.url(for: .documentDirectory, in: .userDomainMask, appropriateFor:nil, create:false)
            let filePath: NSString = documentDirectory.appendingPathComponent(name).path as NSString
            __llvm_profile_set_filename(filePath.utf8String)
            print("File Name: \(String(cString: __llvm_profile_get_filename()))")
            __llvm_profile_write_file()
        } catch {
         print(error)
        }
    }
}
构建并启动 App,我们将在控制台中看到原始配置文件路径。

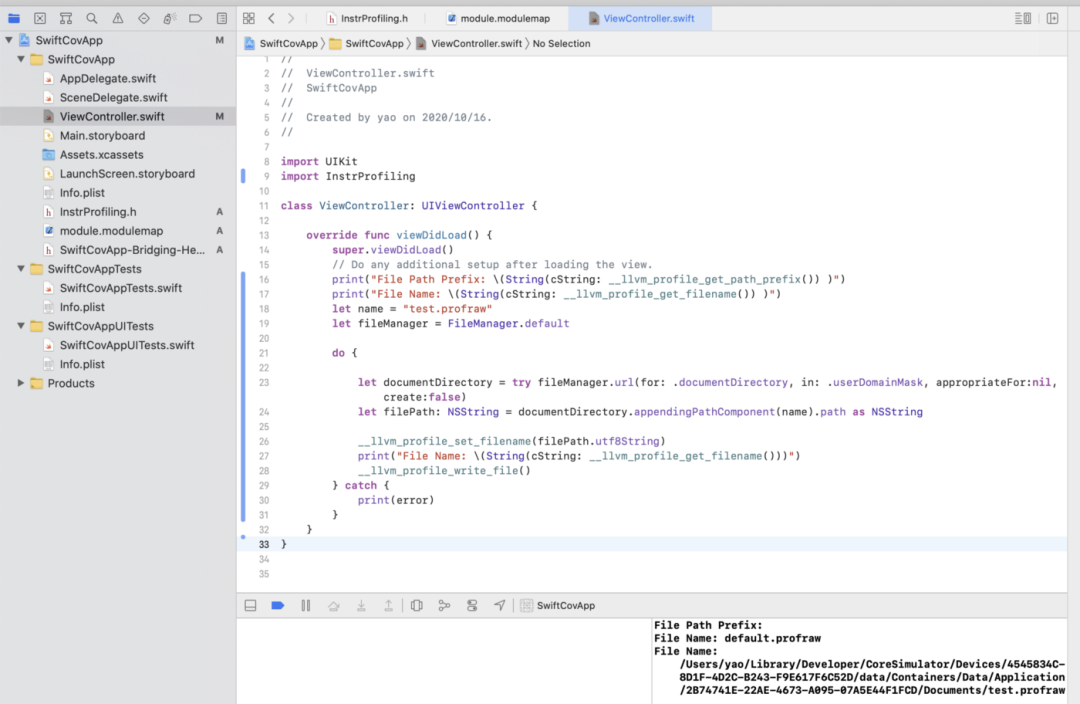
最后,我们得到了需要的原始配置文件!🎉
我们可以复制这个文件和 Swift App 项目中的 Mach-O(二进制文件)到 temp 目录下,这样我们就可以检查配置文件是否可以生成正确的报告。
创建一个新的 Swift 文件:
import Foundation
struct BasicMath {
    static func add(_ a: Double, _ b: Double) -> Double {
     return a + b
 }
    var x: Double = 0
    var y: Double = 0
    func sqrt(_ x: Double, _ min: Double, _ max: Double) -> Double {
     let q = 1e-10
     let mid = (max + min) / 2.0

        if fabs(mid * mid - x) > q {
            if mid * mid < x {
                return sqrt(x, mid, max)
            } else if mid * mid > x {
                return sqrt(x, min, mid)
            } else {
                return mid
            }
        }
     return mid
    }
    func sqrt(_ x: Double) -> Double {
     sqrt(x, 0, x)
    }
}
在 ViewController.swift 中调用 __llvm_profile_write_file 之前调用 sqrt。然后,构建并运行。
print("√2=\(BasicMath().sqrt(2))")
__llvm_profile_write_file()
在命令行中运行以下命令:
mkdir TestCoverage
cd TestCoverage
cp /Users/yao/Library/Developer/CoreSimulator/Devices/4545834C-8D1F-4D2C-B243-F9E617F6C52D/data/Containers/Data/Application/6AEFAB1B-DA52-4FAF-9B27-3D47A898E55C/Documents/test.profraw .
cp /Users/yao/Library/Developer/Xcode/DerivedData/SwiftCovApp-bohvioqnvkjxnnesyhlznzvmmgcg/Build/Products/Debug-iphonesimulator/SwiftCovApp.app/SwiftCovApp .
ls
xcrun llvm-profdata merge -sparse test.profraw -o test.profdata
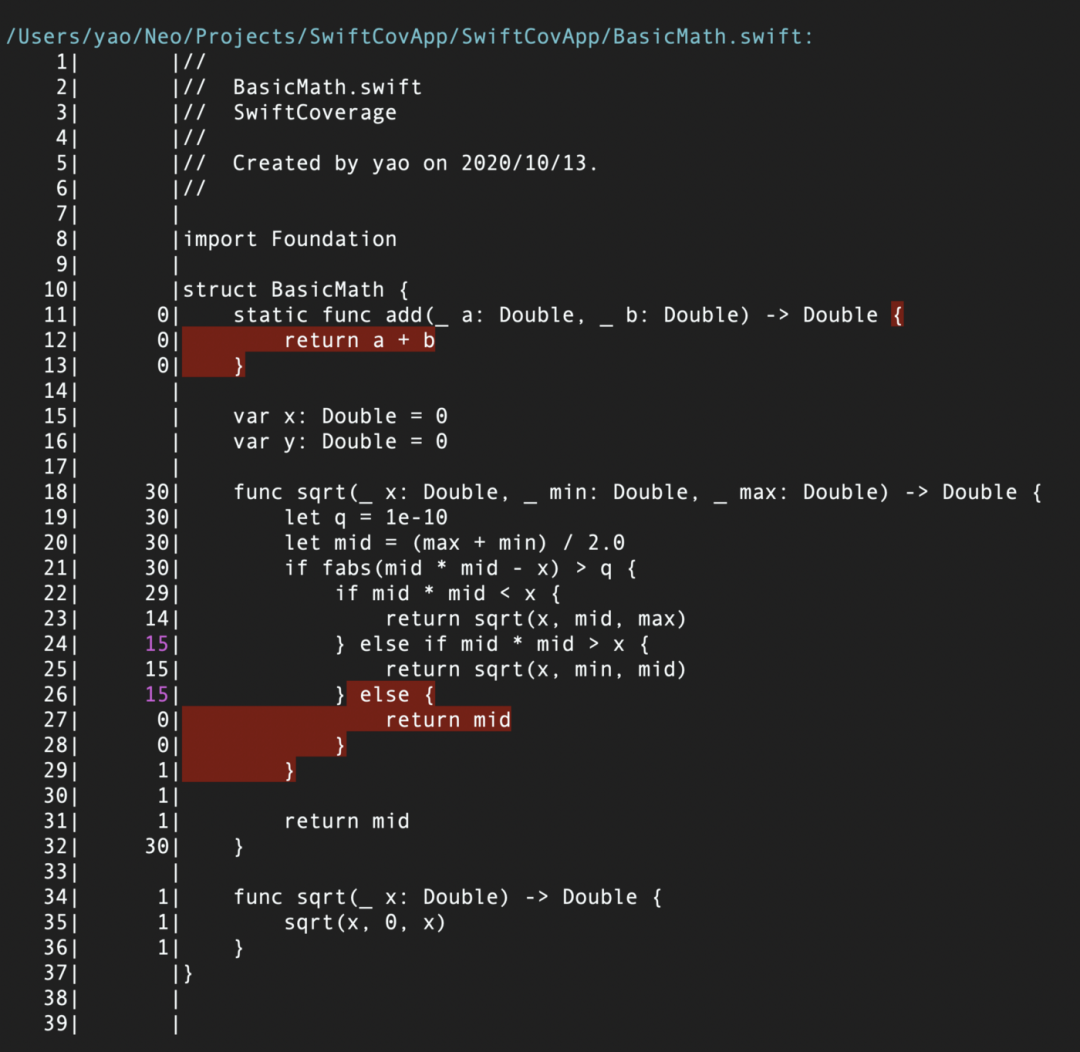
xcrun llvm-cov show ./SwiftCovApp -instr-profile=test.profdata
我们就能看到最后的报告啦~
参考
- Clang 12 Documentation。
- Objective-C 与 Swift 混编工程精准测试探索。


