章节概述
今天,我们就在项目中整合SpringCloud Gateway来为项目增加API网关,同时,会将SpringCloud Gateway与Sentinel进行整合实现网关的限流能力。说干就干,小伙伴们跟上发车速度。
项目整合网关
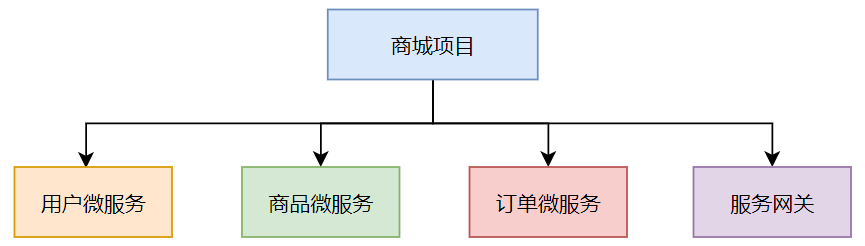
我们需要在项目中增加一个服务网关模块shop-gateway,在服务网关模块中实现网关的能力。此时,我们的项目中就会有用户微服务、商品微服务、订单微服务和服务网关。
新建网关模块
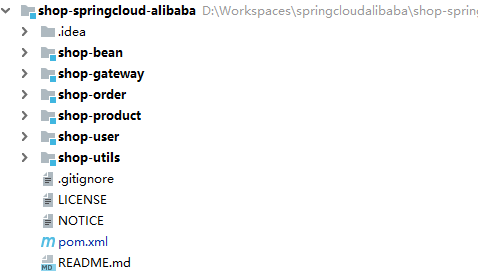
在项目中新建shop-gateway模块,新增网关模块后项目的结构如下图所示。
初步整合SpringCloud Gateway
(1)在服务网关shop-gateway模块的pom.xml文件中添加如下依赖。
<dependencies>
    <dependency>
        <groupId>org.springframework.cloud</groupId>
        <artifactId>spring-cloud-starter-gateway</artifactId>
    </dependency>
</dependencies>- 1.
- 2.
- 3.
- 4.
- 5.
- 6.
(2)在服务网关shop-gateway模块的resources目录下新建application.yml文件,并在文件中添加如下配置信息。
server:
  port: 10001
spring:
  application:
    name: server-gateway
  cloud:
    gateway:
      globalcors:
        cors-configurations:
          '[/**]':
            allowedOrigins: "*"
            allowedMethods: "*"
            allowCredentials: true
            allowedHeaders: "*"

      routes:
        - id: user-gateway
          uri: http://localhost:8060
          order: 1
          predicates:
            - Path=/server-user/**
          filters:
            - StripPrefix=1

        - id: product-gateway
          uri: http://localhost:8070
          order: 1
          predicates:
            - Path=/server-product/**
          filters:
            - StripPrefix=1

        - id: order-gateway
          uri: http://localhost:8080
          order: 1
          predicates:
            - Path=/server-order/**
          filters:
- StripPrefix=1- 1.
- 2.
- 3.
- 4.
- 5.
- 6.
- 7.
- 8.
- 9.
- 10.
- 11.
- 12.
- 13.
- 14.
- 15.
- 16.
- 17.
- 18.
- 19.
- 20.
- 21.
- 22.
- 23.
- 24.
- 25.
- 26.
- 27.
- 28.
- 29.
- 30.
- 31.
- 32.
- 33.
- 34.
- 35.
- 36.
- 37.
- 38.
- 39.
我们重点来看下 spring.cloud.gateway 节点下的配置。
- globalcors:此节点下的配置是为了解决SpringCloud Gateway跨域的问题。
- routes:表示一个路由数组,可以在此节点下配置多个路由信息。
- id:当前路由的唯一标识。
- order:路由的优先级,数字越小表示优先级越高。
- predicates:网关断言,也就是路由转发的条件,也是一个数组,可以配置多个路由转发条件。
- Path:当客户端请求的路径满足Path的规则时,进行路由转发操作。
- filters:网关过滤器,在过滤器中可以修改请求的参数和header信息,以及响应的结果和header信息,网关过滤器也是一个数组,可以配置多个过滤规则。
- StripPrefix:网关在进行路由转发之前,会去掉1层访问路径。
(3)在服务网关shop-gateway模块的io.binghe.shop包下新建GatewayStarter类,表示服务网关的启动类,源码如下所示。
/**
 * @author binghe (公众号:冰河技术)
 * @version 1.0.0
 * @description 服务网关启动类
 */
@SpringBootApplication
public class GatewayStarter {
    public static void main(String[] args){
        SpringApplication.run(GatewayStarter.class, args);
    }
}- 1.
- 2.
- 3.
- 4.
- 5.
- 6.
- 7.
- 8.
- 9.
- 10.
- 11.
(4)由于之前项目中整合了Nacos和Sentinel,所以,在启动项目前,要分别启动Nacos和Sentinel。
- 进入到Nacos的bin目录下,输入如下命令启动Nacos。
startup.cmd -m standalone- 1.
进入Sentinel Jar包所在的目录,输入如下命令启动Sentinel。
java -Dserver.port=8888 -Dcsp.sentinel.dashboard.server=localhost:8888 -Dproject.name=sentinel-dashboard -jar sentinel-dashboard-1.8.4.jar- 1.
(5)分别启动用户微服务、商品微服务、订单微服务和服务网关。
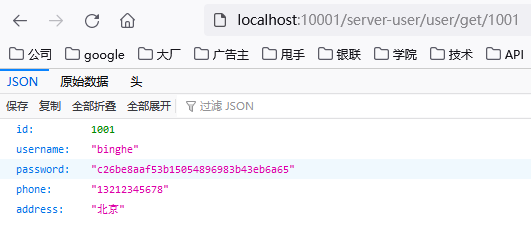
(6)通过服务网关访问用户微服务,在浏览器中输入http://localhost:10001/server-user/user/get/1001,如下所示。

用户微服务返回的原始数据如下所示。
{
  "id": 1001,
  "username": "binghe",
  "password": "c26be8aaf53b15054896983b43eb6a65",
  "phone": "13212345678",
  "address": "北京"
}- 1.
- 2.
- 3.
- 4.
- 5.
- 6.
- 7.
可以看到,通过服务网关能够正确访问到用户微服务。
(7)通过服务网关访问商品微服务,在浏览器中输入http://localhost:10001/server-product/product/get/1001,如下所示。
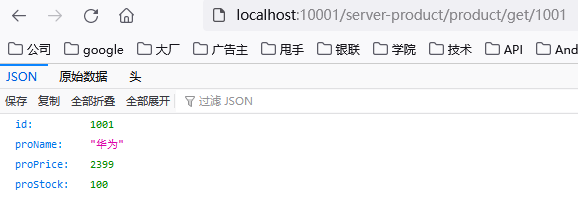
商品微服务返回的原始数据如下所示。
{
  "id": 1001,
  "proName": "华为",
  "proPrice": 2399,
  "proStock": 100
}- 1.
- 2.
- 3.
- 4.
- 5.
- 6.
可以看到,通过服务网关能够正确访问到商品微服务。
(8)通过服务网关访问订单微服务,在浏览器中输入http://localhost:10001/server-order/order/test_sentinel,如下所示。

可以看到,通过服务网关能够正确访问到订单微服务。
网关整合Nacos
在初步整合SpringCloud Gateway中,我们在服务网关模块的application.yml文件中硬编码配置了服务转发的地址,如下所示。
- 硬编码用户微服务地址
uri: http://localhost:8060- 1.
- 硬编码商品微服务地址
uri: http://localhost:8070- 1.
- 硬编码订单微服务地址
uri: http://localhost:8080- 1.
这里,我们将网关整合Nacos实现从Nacos注册中心获取转发的服务地址。
(1)在服务网关shop-gateway模块的pom.xml文件中继续添加如下依赖。
<dependency>
    <groupId>com.alibaba.cloud</groupId>
    <artifactId>spring-cloud-starter-alibaba-nacos-discovery</artifactId>
</dependency>- 1.
- 2.
- 3.
- 4.
(2)在服务网关shop-gateway模块的启动类io.binghe.shop.GatewayStarter上添加@EnableDiscoveryClient注解,如下所示。
/**
 * @author binghe (公众号:冰河技术)
 * @version 1.0.0
 * @description 服务网关启动类
 */
@SpringBootApplication
@EnableDiscoveryClient
public class GatewayStarter {
    public static void main(String[] args){
        SpringApplication.run(GatewayStarter.class, args);
    }
}- 1.
- 2.
- 3.
- 4.
- 5.
- 6.
- 7.
- 8.
- 9.
- 10.
- 11.
- 12.
(3)将application.yml备份一份,命名为application-simple.yml,并修改application.yml配置文件,修改后的文件如下所示。
server:
  port: 10001
spring:
  application:
    name: server-gateway

  cloud:
    nacos:
      discovery:
        server-addr: 127.0.0.1:8848

    gateway:
      globalcors:
        cors-configurations:
          '[/**]':
            allowedOrigins: "*"
            allowedMethods: "*"
            allowCredentials: true
            allowedHeaders: "*"
      discovery:
        locator:
          enabled: true

      routes:
        - id: user-gateway
          uri: lb://server-user
          order: 1
          predicates:
            - Path=/server-user/**
          filters:
            - StripPrefix=1

        - id: product-gateway
          uri: lb://server-product
          order: 1
          predicates:
            - Path=/server-product/**
          filters:
            - StripPrefix=1

        - id: order-gateway
          uri: lb://server-order
          order: 1
          predicates:
            - Path=/server-order/**
          filters:
- StripPrefix=1- 1.
- 2.
- 3.
- 4.
- 5.
- 6.
- 7.
- 8.
- 9.
- 10.
- 11.
- 12.
- 13.
- 14.
- 15.
- 16.
- 17.
- 18.
- 19.
- 20.
- 21.
- 22.
- 23.
- 24.
- 25.
- 26.
- 27.
- 28.
- 29.
- 30.
- 31.
- 32.
- 33.
- 34.
- 35.
- 36.
- 37.
- 38.
- 39.
- 40.
- 41.
- 42.
- 43.
- 44.
- 45.
- 46.
- 47.
上述配置中增加了Nacos相关的配置,如下所示。
spring:
  cloud:
    nacos:
      discovery:
server-addr: 127.0.0.1:8848- 1.
- 2.
- 3.
- 4.
- 5.
新增了让SpringCloud Gateway可以发现Nacos中的服务配置,如下所示。
Spring:
  cloud:
    gateway:
      discovery:
        locator:
enabled: true- 1.
- 2.
- 3.
- 4.
- 5.
- 6.
另外,将硬编码的服务转发地址修改成从Nacos中按照名称获取微服务地址,并按照负载均衡策略分发。
- 从Nacos中获取用户微服务
uri: lb://server-user- 1.
- 从Nacos中获取商品微服务
uri: lb://server-product- 1.
- 从Nacos中获取订单微服务
uri: lb://server-order- 1.
其中,lb指的是从Nacos中按照微服务的名称获取微服务地址,并按照负载均衡的策略分发。使用lb从Nacos中获取微服务时,遵循如下的格式。
lb://微服务名称- 1.
微服务的名称就是各个微服务在application.yml文件中配置的服务名称。
spring:
  application:
name: 服务名称- 1.
- 2.
- 3.
(4)分别启动用户微服务、商品微服务、订单微服务和服务网关。
(5)通过服务网关访问用户微服务,在浏览器中输入http://localhost:10001/server-user/user/get/1001,如下所示。
用户微服务返回的原始数据如下所示。
{
  "id": 1001,
  "username": "binghe",
  "password": "c26be8aaf53b15054896983b43eb6a65",
  "phone": "13212345678",
  "address": "北京"
}- 1.
- 2.
- 3.
- 4.
- 5.
- 6.
- 7.
可以看到,通过服务网关能够正确访问到用户微服务。
(6)通过服务网关访问商品微服务,在浏览器中输入http://localhost:10001/server-product/product/get/1001,如下所示。

商品微服务返回的原始数据如下所示。
{
  "id": 1001,
  "proName": "华为",
  "proPrice": 2399,
  "proStock": 100
}- 1.
- 2.
- 3.
- 4.
- 5.
- 6.
可以看到,通过服务网关能够正确访问到商品微服务。
(7)通过服务网关访问订单微服务,在浏览器中输入http://localhost:10001/server-order/order/test_sentinel,如下所示。

可以看到,通过服务网关能够正确访问到订单微服务。
网关整合Nacos最简配置
SpringCloud Gateway整合Nacos后,可以不用手动指定其他微服务的名称来从Nacos中获取微服务的地址。接下来,我们就来实现SpringCloud Gateway网关整合Nacos的最简配置。
(1)将application.yml备份一份,命名为application-nacos.yml,并修改application.yml配置文件,修改后的文件如下所示。
server:
  port: 10001
spring:
  application:
    name: server-gateway

  cloud:
    nacos:
      discovery:
        server-addr: 127.0.0.1:8848

    gateway:
      globalcors:
        cors-configurations:
          '[/**]':
            allowedOrigins: "*"
            allowedMethods: "*"
            allowCredentials: true
            allowedHeaders: "*"
      discovery:
        locator:
enabled: true- 1.
- 2.
- 3.
- 4.
- 5.
- 6.
- 7.
- 8.
- 9.
- 10.
- 11.
- 12.
- 13.
- 14.
- 15.
- 16.
- 17.
- 18.
- 19.
- 20.
- 21.
- 22.
可以看到,在application.yml文件中,去掉了spring.cloud.gateway.routes 节点及其下面的所有配置。
(2)分别启动用户微服务、商品微服务、订单微服务和服务网关。
(3)通过服务网关访问用户微服务,在浏览器中输入http://localhost:10001/server-user/user/get/1001,如下所示。

用户微服务返回的原始数据如下所示。
{
  "id": 1001,
  "username": "binghe",
  "password": "c26be8aaf53b15054896983b43eb6a65",
  "phone": "13212345678",
  "address": "北京"
}- 1.
- 2.
- 3.
- 4.
- 5.
- 6.
- 7.
可以看到,通过服务网关能够正确访问到用户微服务。
(4)通过服务网关访问商品微服务,在浏览器中输入http://localhost:10001/server-product/product/get/1001,如下所示。

商品微服务返回的原始数据如下所示。
{
  "id": 1001,
  "proName": "华为",
  "proPrice": 2399,
  "proStock": 100
}- 1.
- 2.
- 3.
- 4.
- 5.
- 6.
可以看到,通过服务网关能够正确访问到商品微服务。
(5)通过服务网关访问订单微服务,在浏览器中输入http://localhost:10001/server-order/order/test_sentinel,如下所示。

可以看到,通过服务网关能够正确访问到订单微服务。
注意:SpringCloud Gateway整合Nacos最简配置时,通过网关访问微服务的格式如下所示。
http(s)://网关IP:网关端口/访问的目标微服务名称/接口地址- 1.
网关整合Sentinel限流
Sentinel从1.6.0版本开始,提供了SpringCloud Gateway的适配模块,并且可以提供两种资源维度的限流,一种是route维度;另一种是自定义API分组维度。
- route维度:对application.yml文件中配置的spring.cloud.gateway.routes.id限流,并且资源名为spring.cloud.gateway.routes.id对应的值。
- 自定义API分组维度:利用Sentinel提供的API接口来自定义API分组,并且对这些API分组进行限流。
实现route维度限流
(1)在服务网关shop-gateway模块的pom.xml文件中添加如下依赖。
<dependencies>
    <dependency>
        <groupId>com.alibaba.cloud</groupId>
        <artifactId>spring-cloud-starter-alibaba-sentinel</artifactId>
    </dependency>

    <dependency>
        <groupId>com.alibaba.cloud</groupId>
        <artifactId>spring-cloud-alibaba-sentinel-gateway</artifactId>
    </dependency>

    <dependency>
        <groupId>org.springframework.cloud</groupId>
        <artifactId>spring-cloud-starter-gateway</artifactId>
    </dependency>

    <dependency>
        <groupId>com.alibaba.cloud</groupId>
        <artifactId>spring-cloud-starter-alibaba-nacos-discovery</artifactId>
    </dependency>

    <dependency>
        <groupId>com.alibaba.csp</groupId>
        <artifactId>sentinel-spring-cloud-gateway-adapter</artifactId>
    </dependency>
</dependencies>- 1.
- 2.
- 3.
- 4.
- 5.
- 6.
- 7.
- 8.
- 9.
- 10.
- 11.
- 12.
- 13.
- 14.
- 15.
- 16.
- 17.
- 18.
- 19.
- 20.
- 21.
- 22.
- 23.
- 24.
- 25.
- 26.
(2)在服务网关shop-gateway模块中新建io.binghe.shop.config包,并在包下新建GatewayConfig类。基于Sentinel 的Gateway限流是通过其提供的Filter来完成的,使用时只需注入对应的SentinelGatewayFilter实例以及 SentinelGatewayBlockExceptionHandler 实例即可。
GatewayConfig类的源代码如下所示。
/**
 * @author binghe (公众号:冰河技术)
 * @version 1.0.0
 * @description 网关配置类
 */
@Configuration
public class GatewayConfig {

    private final List<ViewResolver> viewResolvers;

    private final ServerCodecConfigurer serverCodecConfigurer;

    @Value("${spring.cloud.gateway.discovery.locator.route-id-prefix}")
    private String routeIdPrefix;

    public GatewayConfig(ObjectProvider<List<ViewResolver>> viewResolversProvider,
                                ServerCodecConfigurer serverCodecConfigurer) {
        this.viewResolvers = viewResolversProvider.getIfAvailable(Collections::emptyList);
        this.serverCodecConfigurer = serverCodecConfigurer;
    }

    /**
     * 初始化一个限流的过滤器
     */
    @Bean
    @Order(Ordered.HIGHEST_PRECEDENCE)
    public GlobalFilter sentinelGatewayFilter() {
        return new SentinelGatewayFilter();
    }

    @PostConstruct
    public void init() {
       this.initGatewayRules();
       this.initBlockHandlers();
    }

    /**
     * 配置初始化的限流参数
     */
    private void initGatewayRules() {
        Set<GatewayFlowRule> rules = new HashSet<>();

        /**
         * Sentinel整合SpringCloud Gateway使用的API类型为Route ID类型,也就是基于route维度时,
         * 由于Sentinel为SpringCloud Gateway网关生成的API名称规则如下:
         * 生成的规则为:${spring.cloud.gateway.discovery.locator.route-id-prefix}后面直接加上目标微服务的名称,如下所示。
         * ${spring.cloud.gateway.discovery.locator.route-id-prefix}目标微服务的名称
         * 其中,${spring.cloud.gateway.discovery.locator.route-id-prefix}是在yml文件中配置的访问前缀
         *
         * 为了让通过服务网关访问目标微服务链接后,请求链路中生成的API名称与流控规则中生成的API名称一致,以达到启动项目即可实现访问链接的限流效果,
         * 而无需登录Setinel管理界面手动配置限流规则,可以将
         * resource参数设置为${spring.cloud.gateway.discovery.locator.route-id-prefix}目标微服务的名称
         *
         * 当然,如果不按照上述配置,也可以在项目启动后,通过服务网关访问目标微服务链接后,在Sentinel管理界面的请求链路中找到对应的API名称所代表的请求链路,
         * 然后手动配置限流规则。
         **/
//        //用户微服务网关
//        rules.add(this.getGatewayFlowRule("user-gateway"));
//        //商品微服务网关
//        rules.add(this.getGatewayFlowRule("product-gateway"));
//        //订单微服务网关
//        rules.add(this.getGatewayFlowRule("order-gateway"));
        //用户微服务网关
        rules.add(this.getGatewayFlowRule(getResource("server-user")));
        //商品微服务网关
        rules.add(this.getGatewayFlowRule(getResource("server-product")));
        //订单微服务网关
        rules.add(this.getGatewayFlowRule(getResource("server-order")));
        //加载规则
        GatewayRuleManager.loadRules(rules);
    }

    private String getResource(String targetServiceName){
        if (routeIdPrefix == null){
            routeIdPrefix = "";
        }
        return routeIdPrefix.concat(targetServiceName);
    }

    private GatewayFlowRule getGatewayFlowRule(String resource){
        //传入资源名称生成GatewayFlowRule
        GatewayFlowRule gatewayFlowRule = new GatewayFlowRule(resource);
        //限流阈值
        gatewayFlowRule.setCount(1);
        //统计的时间窗口,单位为
        gatewayFlowRule.setIntervalSec(1);
        return gatewayFlowRule;
    }

    /**
     * 配置限流的异常处理器
     */
    @Bean
    @Order(Ordered.HIGHEST_PRECEDENCE)
    public SentinelGatewayBlockExceptionHandler sentinelGatewayBlockExceptionHandler() {
        return new SentinelGatewayBlockExceptionHandler(viewResolvers, serverCodecConfigurer);
    }

    /**
     * 自定义限流异常页面
     */
    private void initBlockHandlers() {
        BlockRequestHandler blockRequestHandler = new BlockRequestHandler() {
            @Override
            public Mono<ServerResponse> handleRequest(ServerWebExchange serverWebExchange, Throwable throwable) {
                Map map = new HashMap<>();
                map.put("code", 1001);
                map.put("codeMsg", "接口被限流了");
                return ServerResponse.status(HttpStatus.OK).
                        contentType(MediaType.APPLICATION_JSON_UTF8).
                        body(BodyInserters.fromObject(map));
            }
        };
        GatewayCallbackManager.setBlockHandler(blockRequestHandler);
    }
}- 1.
- 2.
- 3.
- 4.
- 5.
- 6.
- 7.
- 8.
- 9.
- 10.
- 11.
- 12.
- 13.
- 14.
- 15.
- 16.
- 17.
- 18.
- 19.
- 20.
- 21.
- 22.
- 23.
- 24.
- 25.
- 26.
- 27.
- 28.
- 29.
- 30.
- 31.
- 32.
- 33.
- 34.
- 35.
- 36.
- 37.
- 38.
- 39.
- 40.
- 41.
- 42.
- 43.
- 44.
- 45.
- 46.
- 47.
- 48.
- 49.
- 50.
- 51.
- 52.
- 53.
- 54.
- 55.
- 56.
- 57.
- 58.
- 59.
- 60.
- 61.
- 62.
- 63.
- 64.
- 65.
- 66.
- 67.
- 68.
- 69.
- 70.
- 71.
- 72.
- 73.
- 74.
- 75.
- 76.
- 77.
- 78.
- 79.
- 80.
- 81.
- 82.
- 83.
- 84.
- 85.
- 86.
- 87.
- 88.
- 89.
- 90.
- 91.
- 92.
- 93.
- 94.
- 95.
- 96.
- 97.
- 98.
- 99.
- 100.
- 101.
- 102.
- 103.
- 104.
- 105.
- 106.
- 107.
- 108.
- 109.
- 110.
- 111.
- 112.
- 113.
- 114.
- 115.
- 116.
GatewayConfig类的源代码看上去比较多,但是都是一些非常简单的方法,冰河在这里就不再赘述了。
这里有个需要特别注意的地方:
Sentinel1.8.4整合SpringCloud Gateway使用的API类型为Route ID类型时,也就是基于route维度时,由于Sentinel为SpringCloud Gateway网关生成的API名称规则如下:
生成的规则为:${spring.cloud.gateway.discovery.locator.route-id-prefix}后面直接加上目标微服务的名称,如下所示。
{spring.cloud.gateway.discovery.locator.route-id-prefix}目标微服务的名称。其中,${spring.cloud.gateway.discovery.locator.route-id-prefix}是在yml文件中配置的访问前缀。
为了让通过服务网关访问目标微服务链接后,请求链路中生成的API名称与流控规则中生成的API名称一致,以达到启动项目即可实现访问链接的限流效果,而无需登录Setinel管理界面手动配置限流规则,可以将生成GatewayFlowRule对象的resource参数设置为${spring.cloud.gateway.discovery.locator.route-id-prefix}目标微服务的名称
当然,如果不按照上述配置,也可以在项目启动后,通过服务网关访问目标微服务链接后,在Sentinel管理界面的请求链路中找到对应的API名称所代表的请求链路,然后手动配置限流规则。
(3)将服务网关shop-gateway模块的application.yml文件备份一份名称为application-nacos-simple.yml的文件,并将application.yml文件的内容修改成如下所示。
server:
  port: 10001
spring:
  application:
    name: server-gateway
  main:
    allow-bean-definition-overriding: true
  cloud:
    nacos:
      discovery:
        server-addr: 127.0.0.1:8848
    sentinel:
      transport:
        port: 7777
        dashboard: 127.0.0.1:8888
      web-context-unify: false
      eager: true

    gateway:
      globalcors:
        cors-configurations:
          '[/**]':
            allowedOrigins: "*"
            allowedMethods: "*"
            allowCredentials: true
            allowedHeaders: "*"
      discovery:
        locator:
          enabled: true
route-id-prefix: gateway-- 1.
- 2.
- 3.
- 4.
- 5.
- 6.
- 7.
- 8.
- 9.
- 10.
- 11.
- 12.
- 13.
- 14.
- 15.
- 16.
- 17.
- 18.
- 19.
- 20.
- 21.
- 22.
- 23.
- 24.
- 25.
- 26.
- 27.
- 28.
- 29.
- 30.
其中:
- spring.cloud.sentinel.eager表示程序启动时,流控规则是否立即注册到Sentinel,配置为true表示立即注册到Sentinel。
- spring.cloud.gateway.discovery.locator.route-id-prefix:生成流控规则API名称的前缀。
(4)在IDEA中配置启动服务网关shop-gateway模块的参数-Dcsp.sentinel.app.type=1,如下所示。
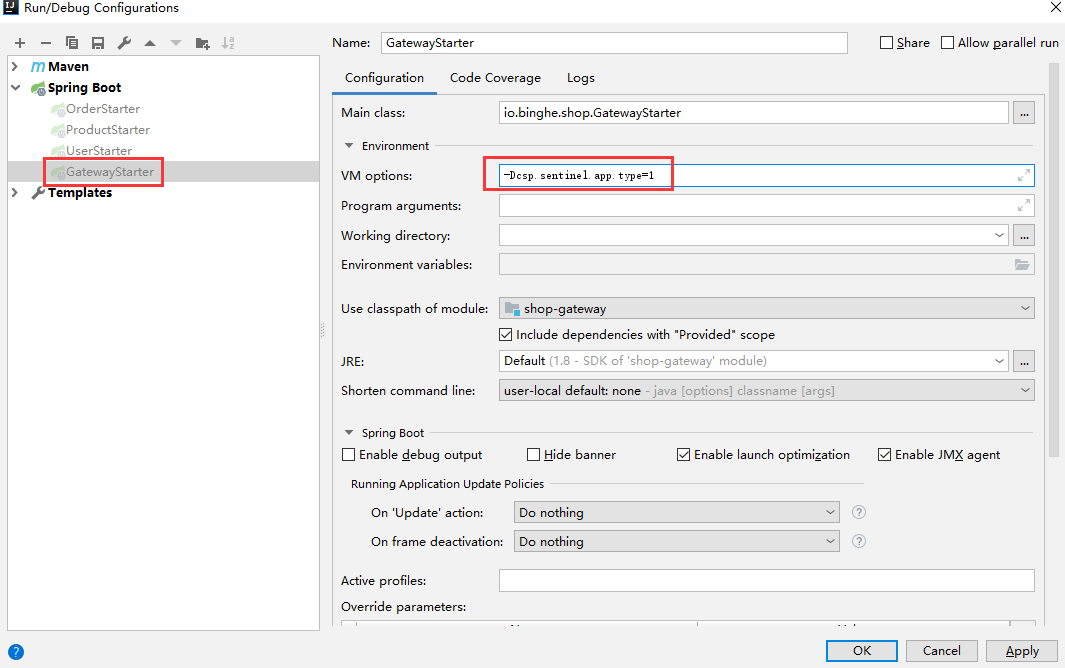
如果是在命令行启动网关服务的Jar包,则可以使用如下命令。
java -Dcsp.sentinel.app.type=1 shop-gateway.jar- 1.
或者在启动类io.binghe.shop.GatewayStarter的main()方法中添加一行System.setProperty("csp.sentinel.app.type", "1");代码,如下所示。
/**
 * @author binghe (公众号:冰河技术)
 * @version 1.0.0
 * @description 服务网关启动类
 */
@SpringBootApplication
@EnableDiscoveryClient
public class GatewayStarter {
    public static void main(String[] args){
        System.setProperty("csp.sentinel.app.type", "1");
        SpringApplication.run(GatewayStarter.class, args);
    }
}- 1.
- 2.
- 3.
- 4.
- 5.
- 6.
- 7.
- 8.
- 9.
- 10.
- 11.
- 12.
- 13.
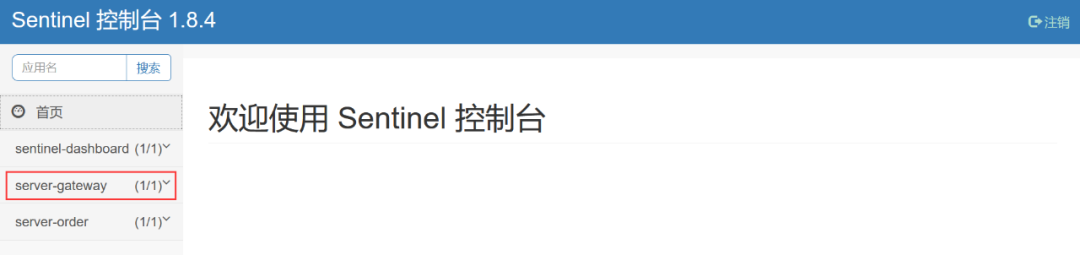
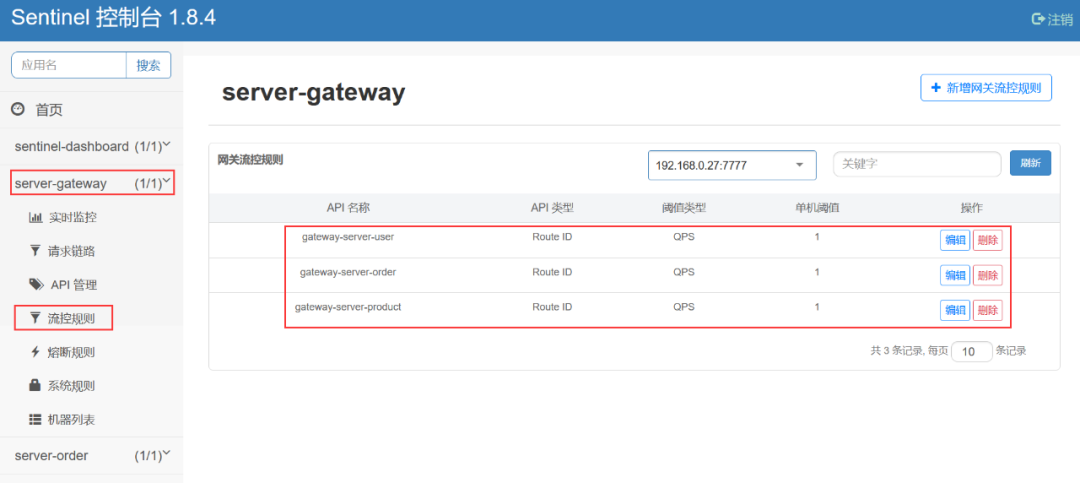
(5)分别启动用户微服务、商品微服务、订单微服务和服务网关,启动后会在Sentinel管理界面左侧菜单栏中看到server-gateway菜单,如下所示。
在server-gateway菜单下的流控规则子菜单中可以看到网关的流控规则已经注册到Sentinel,如下所示。
(6)通过服务网关访问用户微服务,在浏览器中输入http://localhost:10001/server-user/user/get/1001,不断刷新页面,如下所示。
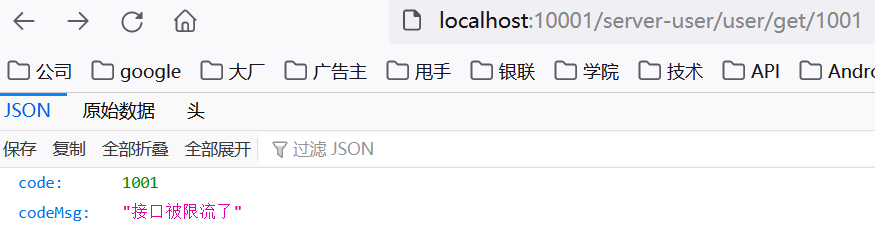
用户微服务返回的原始数据如下所示。
{
  "code": 1001,
  "codeMsg": "接口被限流了"
}- 1.
- 2.
- 3.
- 4.
可以看到,通过服务网关不断刷新用户微服务时,触发了服务限流,并返回了自定义的限流结果数据。
(7)通过服务网关访问商品微服务,在浏览器中输入http://localhost:10001/server-product/product/get/1001,不断刷新页面,如下所示。
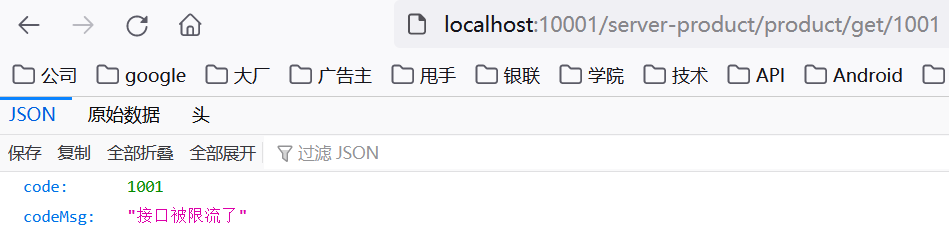
商品微服务返回的原始数据如下所示。
{
  "code": 1001,
  "codeMsg": "接口被限流了"
}- 1.
- 2.
- 3.
- 4.
可以看到,通过服务网关不断刷新商品微服务时,触发了服务限流,并返回了自定义的限流结果数据。
(8)通过服务网关访问订单微服务,在浏览器中输入http://localhost:10001/server-order/order/test_sentinel,不断刷新页面,如下所示。
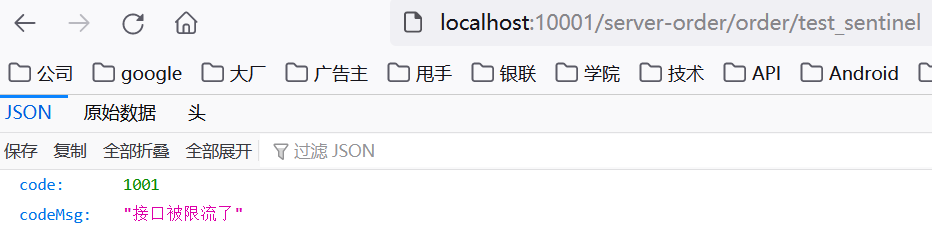
可以看到,通过服务网关不断刷新订单微服务时,触发了服务限流,并返回了自定义的限流结果数据。
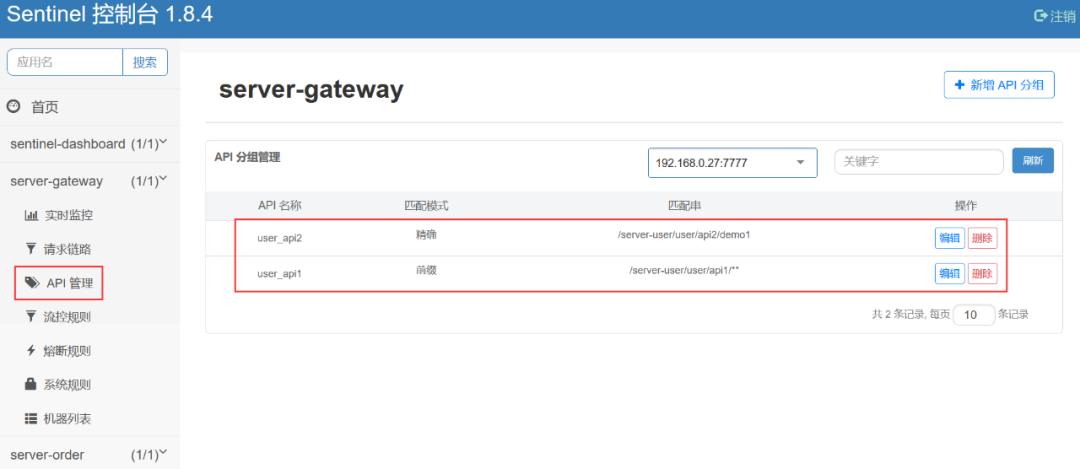
实现自定义API分组维度限流
前面,我们实现了route维度的限流,接下来,我们再基于Sentinel与SpringCloud gateway实现自定义API分组维度的限流。
(1)在服务网关shop-gateway模块的io.binghe.shop.config.GatewayConfig配置类中新增initCustomizedApis()方法,初始化API管理的信息,源码如下所示。
private void initCustomizedApis() {
    Set<ApiDefinition> definitions = new HashSet<>();
    ApiDefinition api1 = new ApiDefinition("user_api1")
        .setPredicateItems(new HashSet<ApiPredicateItem>() {{
            // 以/server-user/user/api1 开头的请求
            add(new ApiPathPredicateItem().setPattern("/server-user/user/api1/**").
                setMatchStrategy(SentinelGatewayConstants.URL_MATCH_STRATEGY_PREFIX));
        }});
    ApiDefinition api2 = new ApiDefinition("user_api2")
        .setPredicateItems(new HashSet<ApiPredicateItem>() {{
            // 以/server-user/user/api2/demo1 完成的url路径匹配
            add(new ApiPathPredicateItem().setPattern("/server-user/user/api2/demo1"));
        }});
    definitions.add(api1);
    definitions.add(api2);
    GatewayApiDefinitionManager.loadApiDefinitions(definitions);
}- 1.
- 2.
- 3.
- 4.
- 5.
- 6.
- 7.
- 8.
- 9.
- 10.
- 11.
- 12.
- 13.
- 14.
- 15.
- 16.
- 17.
上述代码中,配置了两个API分组,每个API分组的规则如下。
- user_api1分组:匹配以/product-serv/product/api1开头的所有请求。
- user_api2分组:精确匹配/server-user/user/api2/demo1。
(2)在服务网关shop-gateway模块的io.binghe.shop.config.GatewayConfig配置类中init()方法中调用initCustomizedApis()方法,为了避免route维度的限流对自定义API分组维度的限流产生影响,这里,同时在init()方法中注释掉调用initGatewayRules()方法,修改后的init()方法的代码如下所示。
@PostConstruct
public void init() {
    //this.initGatewayRules();
    this.initBlockHandlers();
    this.initCustomizedApis();
}- 1.
- 2.
- 3.
- 4.
- 5.
- 6.
(3)在用户微服务shop-user的io.binghe.shop.user.controller.UserController类中新增四个测试接口,源码如下所示。
@GetMapping(value = "/api1/demo1")
public String api1Demo1(){
    log.info("访问了api1Demo1接口");
    return "api1Demo1";
}
@GetMapping(value = "/api1/demo2")
public String api1Demo2(){
    log.info("访问了api1Demo2接口");
    return "api1Demo2";
}

@GetMapping(value = "/api2/demo1")
public String api2Demo1(){
    log.info("访问了api2Demo1接口");
    return "api2Demo1";
}
@GetMapping(value = "/api2/demo2")
public String api2Demo2(){
    log.info("访问了api2Demo2接口");
    return "api2Demo2";
}- 1.
- 2.
- 3.
- 4.
- 5.
- 6.
- 7.
- 8.
- 9.
- 10.
- 11.
- 12.
- 13.
- 14.
- 15.
- 16.
- 17.
- 18.
- 19.
- 20.
- 21.
(4)分别启动用户微服务、商品微服务、订单微服务和服务网关,启动后会在Sentinel管理界面左侧菜单栏中看到server-gateway菜单,如下所示。

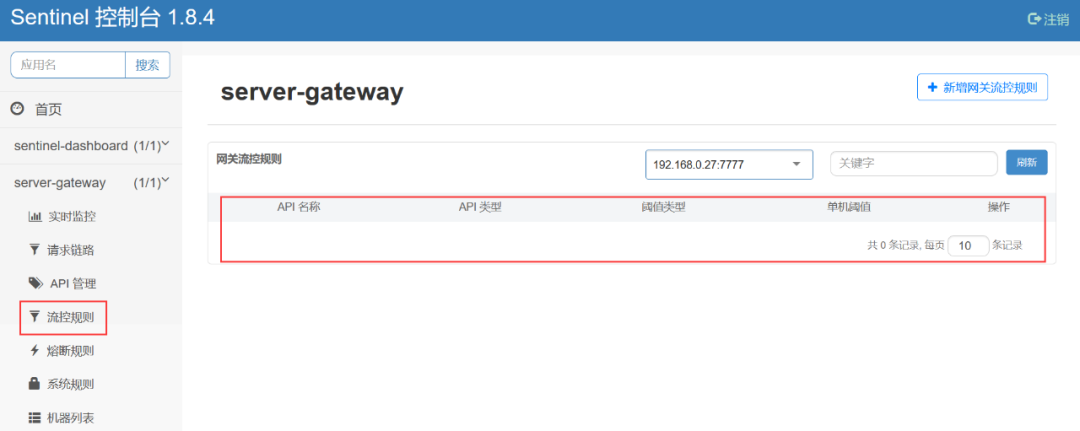
此时,由于我们注释了调用以route维度限流的方法,所以,在流控规则里的限流规则为空,如下所示。
在API管理里面会发现我们定义的API分组已经自动注册到Sentinel中了,如下所示。
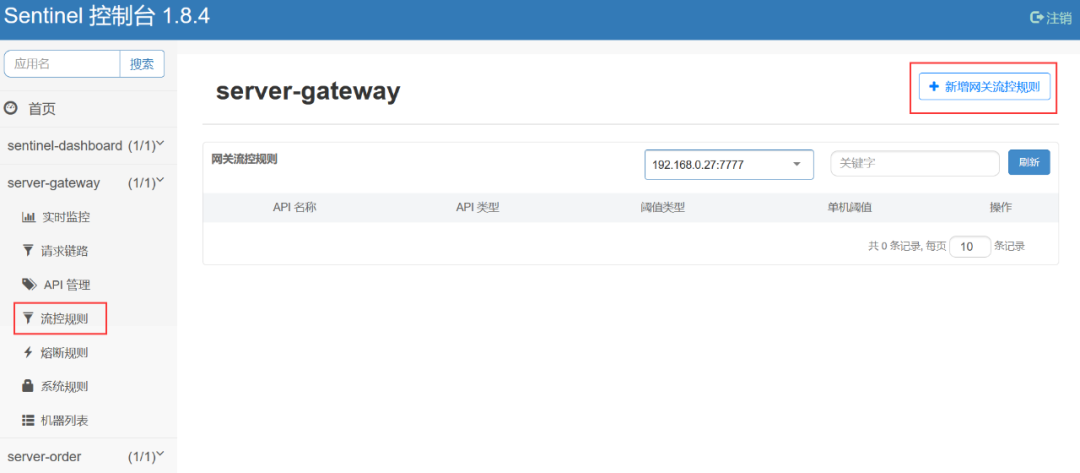
(5)在Sentinel管理界面的流控规则中,新增网关流控规则,如下所示。
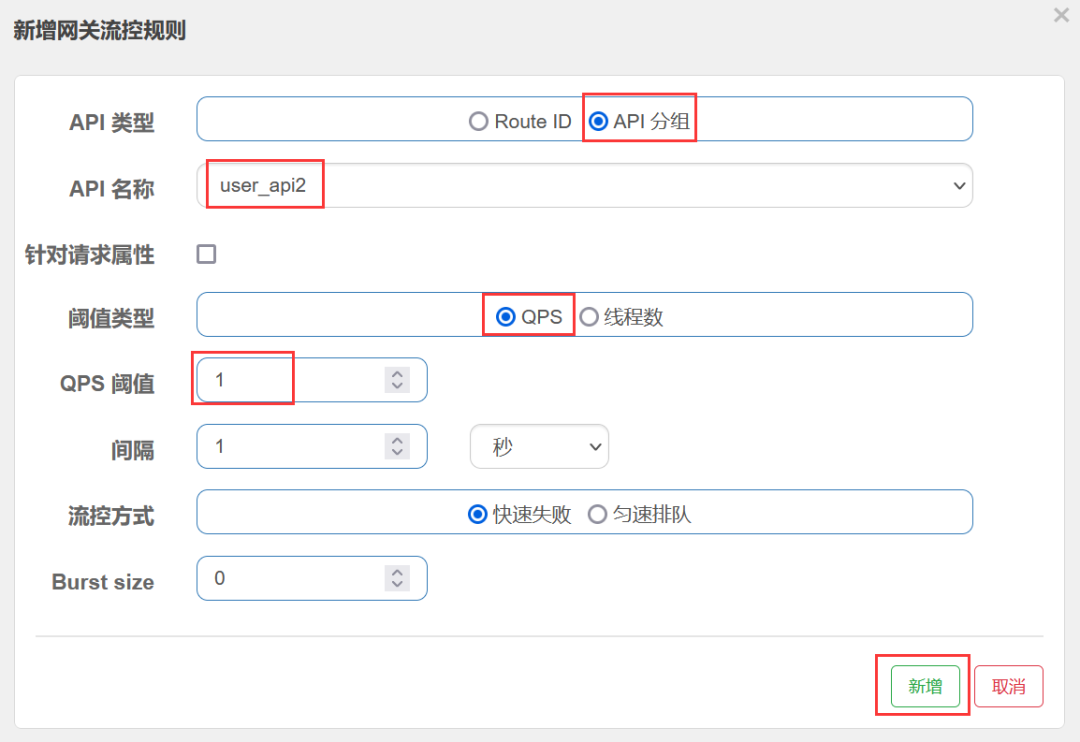
点击新增网关流控规则后,会弹出新增网关流控规则配置框,按照如下方式为user_api1分组配置限流规则。
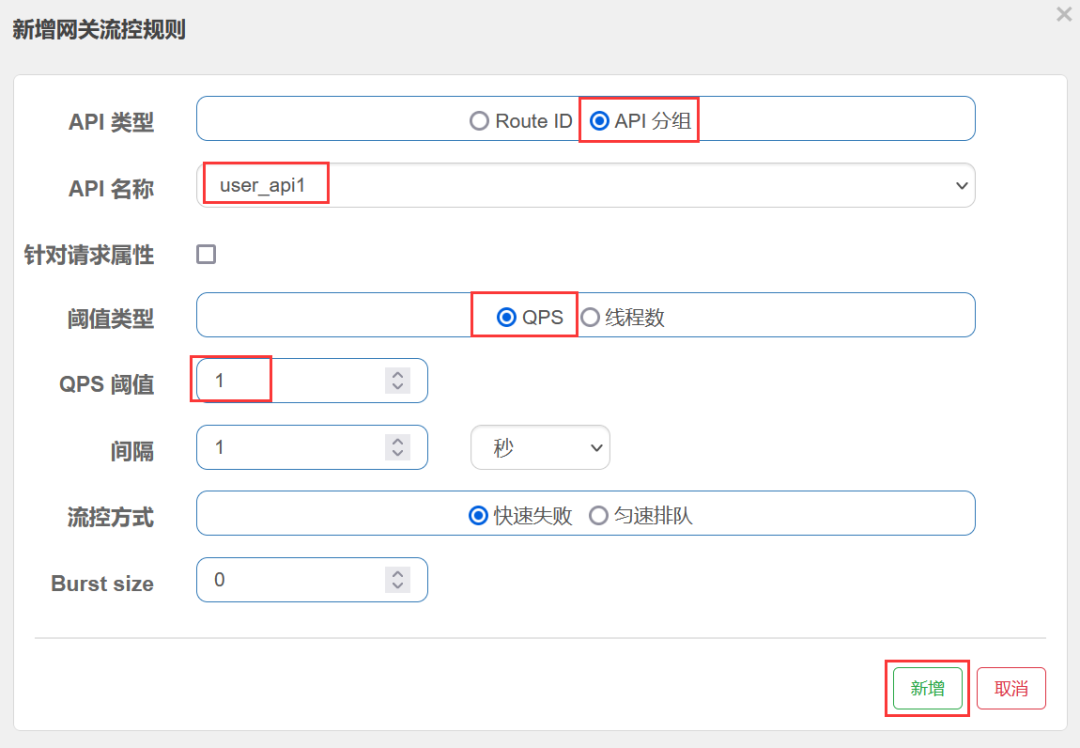
点击新增按钮后,按照同样的方式为user_api2分组配置限流规则。
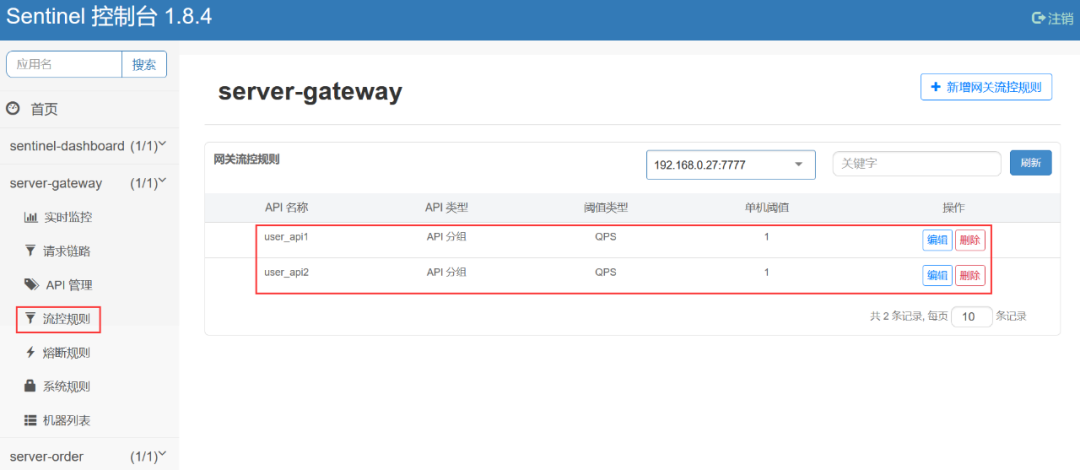
配置完毕后,在流控规则中的限流规则如下所示。
(6)预期的测试结果如下。
- 当频繁访问http://localhost:10001/server-user/user/api1/demo1时会被限流。
- 当频繁访问http://localhost:10001/server-user/user/api1/demo2时会被限流。
- 当频繁访问http://localhost:10001/server-user/user/api2/demo1时会被限流。
- 当频繁访问http://localhost:10001/server-user/user/api2/demo2时不会被限流。
注意:只有最后一个不会被限流。
(7)在浏览器上频繁访问http://localhost:10001/server-user/user/api1/demo1,如下所示。
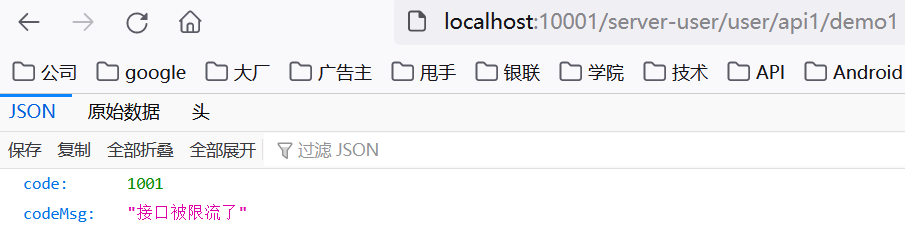
返回的原始数据如下所示。
{
  "code": 1001,
  "codeMsg": "接口被限流了"
}
- 1.
- 2.
- 3.
- 4.
说明触发了服务限流,并返回了自定义的限流结果数据。
(8)在浏览器上频繁访问http://localhost:10001/server-user/user/api1/demo2,如下所示。
返回的原始数据如下所示。
{
  "code": 1001,
  "codeMsg": "接口被限流了"
}- 1.
- 2.
- 3.
- 4.
说明触发了服务限流,并返回了自定义的限流结果数据。
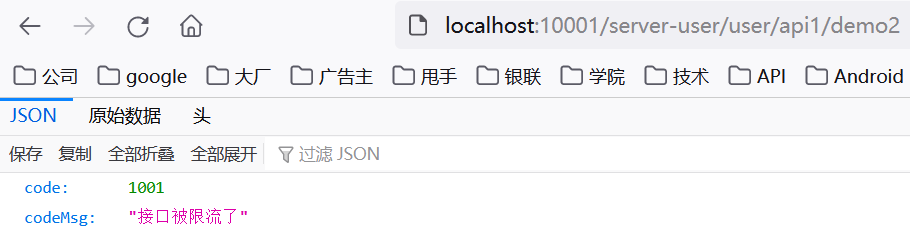
(9)在浏览器上频繁访问http://localhost:10001/server-user/user/api2/demo1,如下所示。
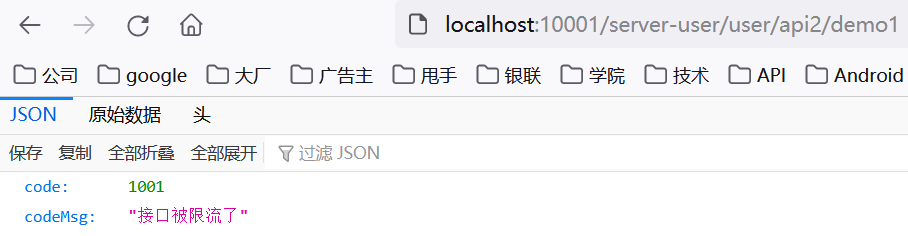
返回的原始数据如下所示。
{
  "code": 1001,
  "codeMsg": "接口被限流了"
}- 1.
- 2.
- 3.
- 4.
说明触发了服务限流,并返回了自定义的限流结果数据。
(10)在浏览器上频繁访问http://localhost:10001/server-user/user/api2/demo2,如下所示。

可以看到,访问http://localhost:10001/server-user/user/api2/demo2时,无论访问的频率多频繁,都不会触发Sentinel限流。
至此,我们就成功在项目中整合了SpringCloud Gateway网关,并通过Sentinel整合SpringCloud Gateway实现了网关的限流操作。