https://harmonyos.51cto.com
简介
在应用开发的过程中,网络请求是很常见的场景,其中常见是加载网络图片、访问后台接口等。在安卓系统中实现这些相信大家已经很熟悉了,
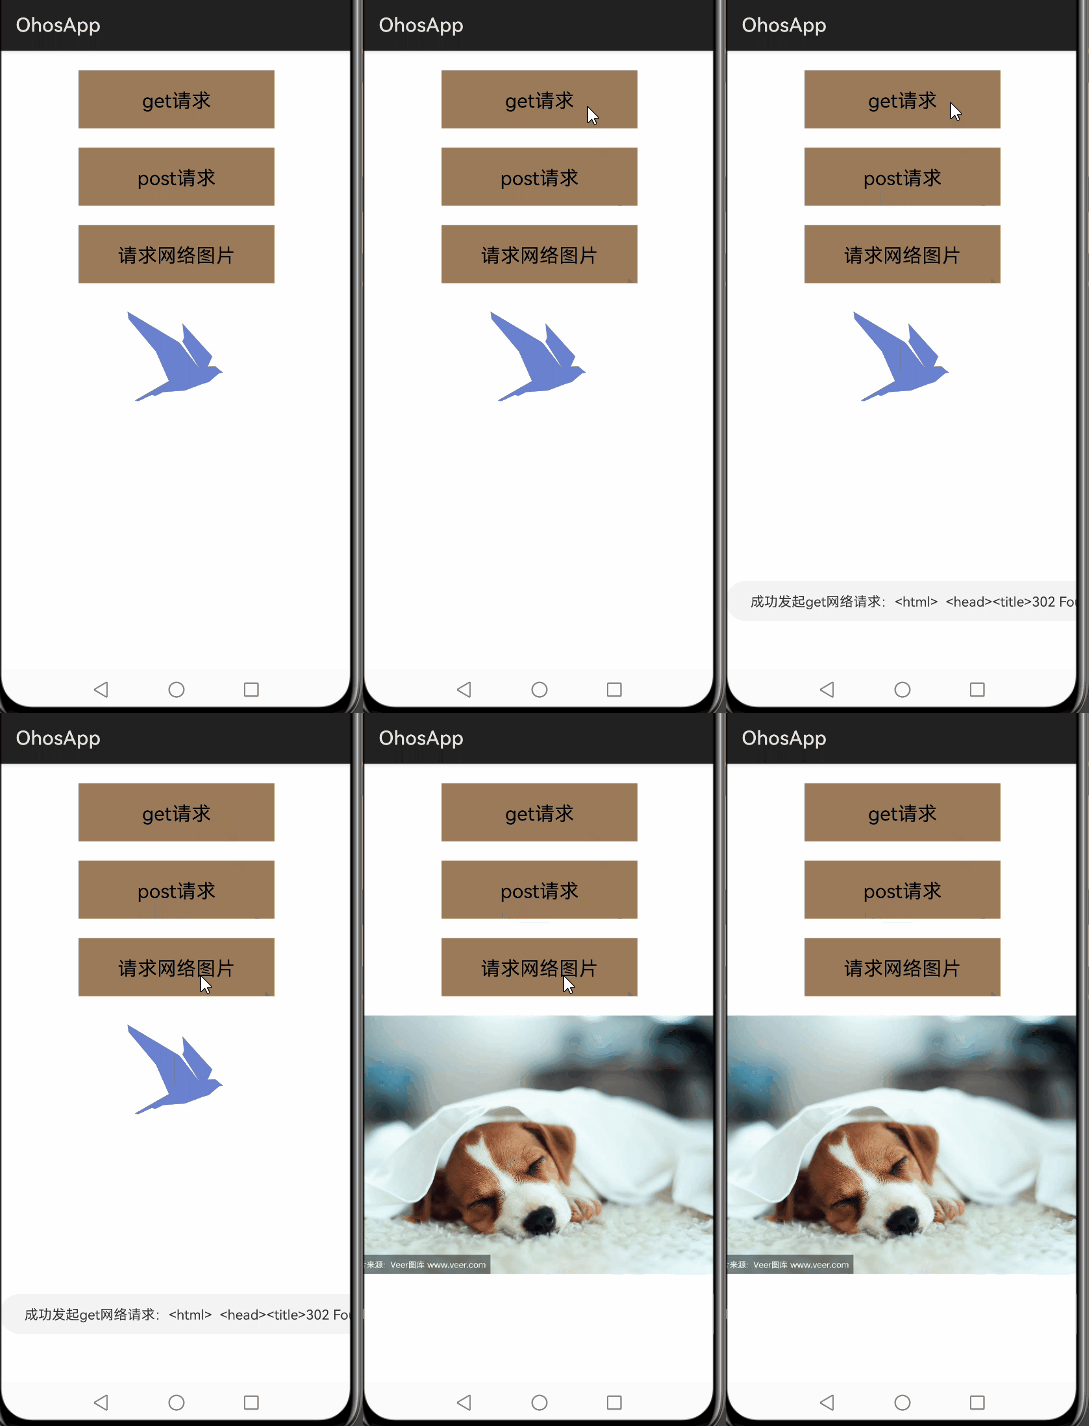
那么在鸿蒙系统中又有哪些相似与不同呢?今天给大家带来的是在鸿蒙系统中发起网络请求的使用示例,示例中包含了使用鸿蒙API完成get、post请求,加载网络图片等。
功能展示

开发概述
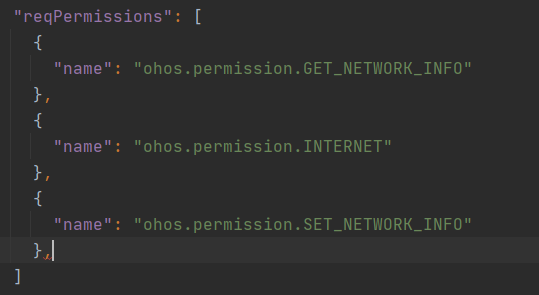
首先,使用网络模块的相关功能时,需要请求相应的权限。

添加在entry模块的config.json中

权限相关配置好后,接下来看一下鸿蒙开发官网上对于网络模块开发的接口说明
鸿蒙官网网络开发文档
文档中给出了网络开发的关键接口说明及网络开发的一般步骤,
1、调用NetManager.getInstance(Context)获取网络管理的实例对象。
2、调用NetManager.getDefaultNet()获取默认的数据网络。
3、调用NetHandle.openConnection()打开一个URL。
4、通过URL链接实例访问网站。
并且提供了网络状态的监听接口addDefaultNetStatusCallback(NetStatusCallback callback)
private final NetStatusCallback callback = new NetStatusCallback() {
        @Override
        public void onAvailable(NetHandle handle) {
           //网络可用时
        }
        @Override
        public void onBlockedStatusChanged(NetHandle handle, boolean blocked) {
           //网络状态变化时
        }
    };
下面我们来编写下完整的网络请求实例
1、get请求
 public void requestByGet() {
        LogUtils.debug("NetRequestUtils  requestByGet");
        NetManager netManager = NetManager.getInstance(null);
        if (!netManager.hasDefaultNet()) {
            LogUtils.debug("NetRequestUtils  network is null");
            return;
        }
        ThreadPoolUtil.submit(() -> {
            NetHandle netHandle = netManager.getDefaultNet();
            netManager.addDefaultNetStatusCallback(callback);
            HttpURLConnection connection = null;
            try (ByteArrayOutputStream outputStream = new ByteArrayOutputStream()) {
                URL url = new URL("http://www.baidu.com");
                URLConnection urlConnection = netHandle.openConnection(url, java.net.Proxy.NO_PROXY);
                if (urlConnection instanceof HttpURLConnection) {
                    connection = (HttpURLConnection) urlConnection;
                }
                connection.setRequestMethod("GET");
                connection.connect();
                //之后可进行url的其他操作
                try (InputStream inputStream = urlConnection.getInputStream()) {
                    byte[] cache = new byte[2 * 1024];
                    int len = inputStream.read(cache);
                    while (len != -1) {
                        outputStream.write(cache, 0, len);
                        len = inputStream.read(cache);
                    }
                } catch (IOException e) {
                    LogUtils.error("NetRequestUtils inner IOException");
                }
                String result = new String(outputStream.toByteArray());
                LogUtils.debug("NetRequestUtils result:" + result);
                getUITaskDispatcher().syncDispatch(() -> Toast.show("成功发起get网络请求:" + result));
                HttpResponseCache.getInstalled().flush();
            } catch (IOException e) {
                LogUtils.error("NetRequestUtils IOException");
            }
        });
    }
2、post请求
测试发现,只需要将connection.setRequestMethod();中的参数修改成“POST"即可
connection.setRequestMethod(“POST”);
3、网络图片加载
 /**
     * 请求网络图片
     */
    public void requestNetImage() {
        ThreadPoolUtil.submit(() -> {
            String requestUrl = "https://t7.baidu.com/it/u=4162611394,4275913936&fm=193&f=GIF";
            HttpURLConnection connection = null;
            try {
                connection = getHttpURLConnection(requestUrl, "GET");
                connection.connect();
                if (connection.getResponseCode() == HttpURLConnection.HTTP_OK) {
                    //将网络请求数据转换成ImageSource
                    ImageSource.SourceOptions srcOpts = new ImageSource.SourceOptions();
                    ImageSource imageSource = ImageSource.create(connection.getInputStream(), srcOpts);
                    //将ImageSource转换成可以设置给image控件的PixelMap对象
                    PixelMap pixelMap = imageSource.createPixelmap(null);
                    getUITaskDispatcher().syncDispatch(() -> image.setPixelMap(pixelMap));
                }
                connection.disconnect();
            } catch (Exception e) {
                LogUtils.error("NetRequestUtilsException  requestNetImage:" + e.getMessage());
            }
        });
    }
    private HttpURLConnection getHttpURLConnection(String requestURL, String requestMethod) throws IOException {
        URL url = new URL(requestURL);
        HttpURLConnection connection = (HttpURLConnection) url.openConnection();
        //设置连接超时时间
        connection.setConnectTimeout(10 * 1000);
        //设置读取服务器数据超时时间
        connection.setReadTimeout(15 * 1000);
        //设置请求方式
        connection.setRequestMethod(requestMethod);
        return connection;
    }
在加载网络图片时,connection连接成功后,获取到的是一张图片的输入流。为了将图片输入流转化成可以显示的PixelMap对象,
需要先创建ImageSource对象,再通过imageSource.createPixelmap(null)创建对应的pixelMap对象,
最终通过image.setPixelMap(pixelMap));将图片加载到屏幕上。
以下是完整代码示例:
public class NetAbilitySlice extends AbilitySlice {
    Image image;
    @Override
    protected void onStart(Intent intent) {
        super.onStart(intent);
        super.setUIContent(ResourceTable.Layout_slice_net);
        findComponentById(ResourceTable.Id_btn_request_get).setClickedListener(component -> {
            requestByGet();
        });
        findComponentById(ResourceTable.Id_btn_request_post).setClickedListener(component -> {
            requestByPost();
        });
        findComponentById(ResourceTable.Id_btn_request_image).setClickedListener(component -> {
            requestNetImage();
        });
        image = (Image) findComponentById(ResourceTable.Id_image_neturl);
    }
    public void requestByGet() {
        LogUtils.debug("NetRequestUtils  requestByGet");
        NetManager netManager = NetManager.getInstance(null);
        if (!netManager.hasDefaultNet()) {
            LogUtils.debug("NetRequestUtils  network is null");
            return;
        }
        ThreadPoolUtil.submit(() -> {
            NetHandle netHandle = netManager.getDefaultNet();
            netManager.addDefaultNetStatusCallback(callback);
            HttpURLConnection connection = null;
            LogUtils.debug("NetRequestUtils  ThreadPoolUtil.submit");
            try (ByteArrayOutputStream outputStream = new ByteArrayOutputStream()) {
                LogUtils.debug("NetRequestUtils  URL.new URL");
                URL url = new URL("http://www.baidu.com");
                URLConnection urlConnection = netHandle.openConnection(url, java.net.Proxy.NO_PROXY);
                if (urlConnection instanceof HttpURLConnection) {
                    connection = (HttpURLConnection) urlConnection;
                }
                connection.setRequestMethod("GET");
                connection.connect();
                LogUtils.debug("NetRequestUtils  connection.connect");
                //之后可进行url的其他操作
                try (InputStream inputStream = urlConnection.getInputStream()) {
                    byte[] cache = new byte[2 * 1024];
                    int len = inputStream.read(cache);
                    while (len != -1) {
                        outputStream.write(cache, 0, len);
                        len = inputStream.read(cache);
                    }
                } catch (IOException e) {
                    LogUtils.error("NetRequestUtils inner IOException");
                }
                String result = new String(outputStream.toByteArray());
                LogUtils.debug("NetRequestUtils result:" + result);
                getUITaskDispatcher().syncDispatch(() -> Toast.show("成功发起get网络请求:" + result));
                HttpResponseCache.getInstalled().flush();
            } catch (IOException e) {
                LogUtils.error("NetRequestUtils IOException");
            }
        });
    }
    private final NetStatusCallback callback = new NetStatusCallback() {
        @Override
        public void onAvailable(NetHandle handle) {
            LogUtils.info("NetStatusCallback onAvailable");
        }
        @Override
        public void onBlockedStatusChanged(NetHandle handle, boolean blocked) {
            LogUtils.info("NetStatusCallback onBlockedStatusChanged");
        }
    };
    public void requestByGet1() {
        String requestUrl = "https://www.baidu.com";
        ThreadPoolUtil.submit(() -> {
        HttpURLConnection connection = null;
        try {
            connection = getHttpURLConnection(requestUrl, "GET");
            connection.connect();
            String response = getReturnString(connection.getInputStream());
            ZSONObject zsonObject = ZSONObject.stringToZSON(response);
            LogUtils.info("NetRequestUtils requestByGet1 :" + zsonObject);
            getUITaskDispatcher().syncDispatch(() -> Toast.show("成功发起get网络请求:" + zsonObject));
        } catch (Exception e) {
            LogUtils.error("NetRequestUtils requestByGet1 :" + e.getMessage());
        }
        });
    }
    public void requestByPost1() {
        ThreadPoolUtil.submit(() -> {
            String requestUrl = "http://10.55.20.48:8082/svnplus/fileSystem/uploadMoel?url=http://120.78.215.13/home/svn/666";
            HttpURLConnection connection = null;
            try {
                connection = getHttpURLConnection(requestUrl, "POST");
                connection.connect();
                String response = getReturnString(connection.getInputStream());
                ZSONObject zsonObject = ZSONObject.stringToZSON(response);
                LogUtils.info("NetRequestUtils requestByPost:" + zsonObject);
                getUITaskDispatcher().syncDispatch(() -> Toast.show("成功发起post网络请求:" + zsonObject));
            } catch (Exception e) {
                LogUtils.error("NetRequestUtilsException requestByPost:" + e.getMessage());
                getUITaskDispatcher().syncDispatch(() -> Toast.show("成功发起post网络请求:" + e.getMessage()));
            }
        });
    }
    public void requestByPost() {
        NetManager netManager = NetManager.getInstance(null);
        if (!netManager.hasDefaultNet()) {
            LogUtils.debug("NetRequestUtils  network is null");
            return;
        }
        ThreadPoolUtil.submit(() -> {
            NetHandle netHandle = netManager.getDefaultNet();
            HttpURLConnection connection = null;
            try (ByteArrayOutputStream outputStream = new ByteArrayOutputStream()) {
                URL url = new URL("http://10.55.20.48:8082/svnplus/fileSystem/uploadMoel?url=http://120.78.215.13/home/svn/666");
                URLConnection urlConnection = netHandle.openConnection(url, java.net.Proxy.NO_PROXY);
                if (urlConnection instanceof HttpURLConnection) {
                    connection = (HttpURLConnection) urlConnection;
                }
                connection.setRequestMethod("POST");
                connection.connect();
                //数据解析
                try (InputStream inputStream = urlConnection.getInputStream()) {
                    byte[] cache = new byte[2 * 1024];
                    int len = inputStream.read(cache);
                    while (len != -1) {
                        outputStream.write(cache, 0, len);
                        len = inputStream.read(cache);
                    }
                } catch (IOException e) {
                    LogUtils.error("NetRequestUtils inner IOException");
                }
                String result = new String(outputStream.toByteArray());
                LogUtils.debug("NetRequestUtils result:" + result);
                getUITaskDispatcher().syncDispatch(() -> Toast.show("成功发起post网络请求:" + result));
            } catch (Exception e) {
                LogUtils.error("NetRequestUtilsException requestByPost:" + e.getMessage());
            }
        });
    }
    /**
     * 请求网络图片
     */
    public void requestNetImage() {
        ThreadPoolUtil.submit(() -> {
            String requestUrl = "https://t7.baidu.com/it/u=4162611394,4275913936&fm=193&f=GIF";
            HttpURLConnection connection = null;
            try {
                connection = getHttpURLConnection(requestUrl, "GET");
                connection.connect();
                if (connection.getResponseCode() == HttpURLConnection.HTTP_OK) {
                    //将网络请求数据转换成ImageSource
                    ImageSource.SourceOptions srcOpts = new ImageSource.SourceOptions();
                    ImageSource imageSource = ImageSource.create(connection.getInputStream(), srcOpts);
                    //将ImageSource转换成可以设置给image控件的PixelMap对象
                    PixelMap pixelMap = imageSource.createPixelmap(null);
                    getUITaskDispatcher().syncDispatch(() -> image.setPixelMap(pixelMap));
                }
                connection.disconnect();
            } catch (Exception e) {
                LogUtils.error("NetRequestUtilsException  requestNetImage:" + e.getMessage());
            }
        });
    }
    private HttpURLConnection getHttpURLConnection(String requestURL, String requestMethod) throws IOException {
        URL url = new URL(requestURL);
        HttpURLConnection connection = (HttpURLConnection) url.openConnection();
        //设置连接超时时间
        connection.setConnectTimeout(10 * 1000);
        //设置读取服务器数据超时时间
        connection.setReadTimeout(15 * 1000);
        //设置请求方式
        connection.setRequestMethod(requestMethod);
        return connection;
    }
    private String getReturnString(InputStream is) {
        try {
            BufferedReader reader = new BufferedReader(new InputStreamReader(is, "utf-8"));
            StringBuilder sb = new StringBuilder();
            String line = "";

            while ((line = reader.readLine()) != null) {
                sb.append(line).append("\n");
            }
            is.close();
            return sb.toString();
        } catch (Exception var5) {
            return null;
        }
    }
}
总结
到此本篇文档就要告一段落了。通过本篇的学习,基本掌握了鸿蒙系统中的网络请求及网络图片加载。
最后跟大家分享一些开发过程中的注意事项.
1、鸿蒙系统中默认的网络请求地址格式是https,如果想要访问http网址,需要修改允许明文信息传输的配置.
同样在entry模块的config.json中(如果存在多个module,最好在每一个config.json文件中均添加上该配置).
  "deviceConfig": {
    "default": {
      "network": {
        "cleartextTraffic": true
      }
    }
  },
2、网络请求是耗时操作,必须执行在子线程中,否则报错android.os.NetworkOnMainThreadException.
3、在加载网络图片示例中,我们将connection.getInputStream()数据流直接转换成了ImageSource。
但是再请求其他网络地址时,如访问www.baidu.com的返回结果就是html文件,因此在网络连接成功的后续数据处理中,需要注意数据格式。
https://harmonyos.51cto.com


