https://harmonyos.51cto.com
一、前言
之前我们开发了小熊派的LED灯驱动,并且编写了相应的代码调用自己的开发驱动,但是自己写的代码只能在终端以命令的形式调用,显然这样十分的不太友好。假设小熊派是我们的一个智能设备,这个LED是我们的手电筒,通过命令行的形式打开手电筒肯定不是我们所期待的,我们更希望能够在图像界面上点一个按钮从而打开我们的手电筒,而目前OpenHarmony大多数采用JS开发应用,如果我们想要在图形界面上打开我们的手电筒,就需要自己定义一个JS的API接口来调用我们的LED。本文便介绍了如何自定义JS API从而调用自己开发的驱动。
二、流程总览
添加JS API接口–>编写接口代码–>配置HDF头文件路径–>添加编译依赖
三、添加JS API接口
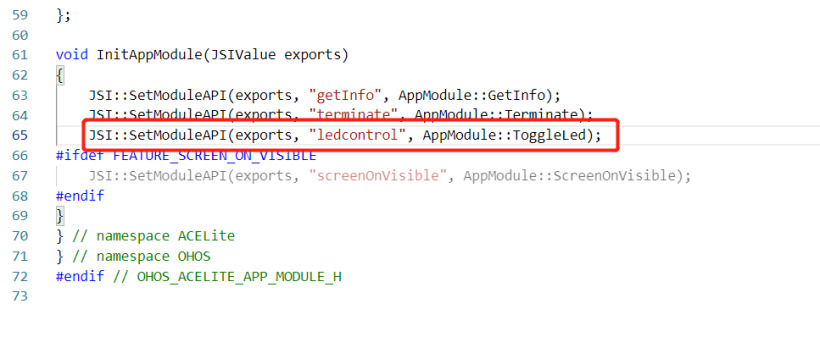
打开文件foundation\ace\ace_engine_lite\frameworks\src\core\modules\app_module.h,在32行处添加如下代码
static JSIValue ToggleLed(const JSIValue thisVal, const JSIValue* args, uint8_t argsNum);
如图所示

在65行处添加如下代码
JSI::SetModuleAPI(exports, "ledcontrol", AppModule::ToggleLed);

四、编写对应的驱动代码
打开foundation\ace\ace_engine_lite\frameworks\src\core\modules\app_module.cpp文件,需要在两个位置添加我们自己API的代码
4.1添加头文件
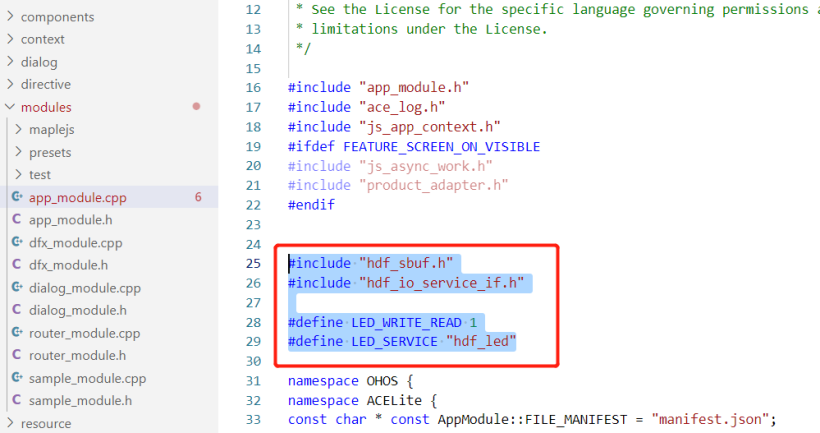
在头文件导入处添加如下头文件
#include "hdf_sbuf.h"
#include "hdf_io_service_if.h"

#define LED_WRITE_READ 1
#define LED_SERVICE "hdf_led"
如图所示

4.2添加API的代码
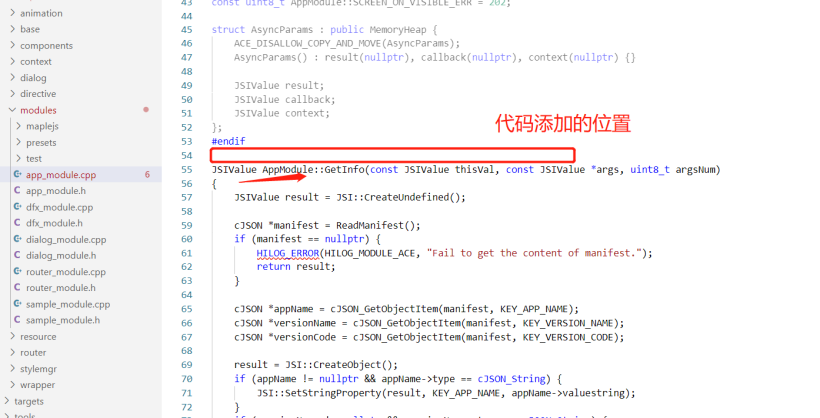
在适当位置加入以下代码,建议在JSIValue AppModule::GetInfo函数之前
static int OnDevEventReceived(void *priv, uint32_t id, struct HdfSBuf *data)
{
    uint32_t value;
    HdfSbufReadUint32(data, &value);
    HILOG_ERROR(HILOG_MODULE_ACE,"%s: dev event received: %u %u\n", (char *)priv, id, value);

    return HDF_SUCCESS;
}

static int GpioWriteRead(struct HdfIoService *serv, int32_t eventData, int32_t *val)
{
    int ret = HDF_FAILURE;
    struct HdfSBuf *data = HdfSBufObtainDefaultSize();
    struct HdfSBuf *reply = HdfSBufObtainDefaultSize();

    if (data == NULL || reply == NULL) {
        HILOG_ERROR(HILOG_MODULE_ACE,"fail to obtain sbuf data\n");
        return ret;
    }

    if (!HdfSbufWriteUint8(data, (uint8_t)eventData))
    {
        HILOG_ERROR(HILOG_MODULE_ACE,"fail to write sbuf\n");
        HdfSBufRecycle(data);
        HdfSBufRecycle(reply);
        return ret;
    }

    ret = serv->dispatcher->Dispatch(&serv->object, LED_WRITE_READ, data, reply);
    if (ret != HDF_SUCCESS)
    {
        HILOG_ERROR(HILOG_MODULE_ACE,"fail to send service call\n");
        HdfSBufRecycle(data);
        HdfSBufRecycle(reply);
        return ret;
    }
    if (!HdfSbufReadInt32(reply, val))
    {
        HILOG_ERROR(HILOG_MODULE_ACE,"fail to get service call reply\n");
        ret = HDF_ERR_INVALID_OBJECT;
        HdfSBufRecycle(data);
        HdfSBufRecycle(reply);
        return ret;
    }
    HILOG_ERROR(HILOG_MODULE_ACE,"Get reply is: %d\n", val);

    HdfSBufRecycle(data);
    HdfSBufRecycle(reply);
    return ret;
}

JSIValue AppModule::ToggleLed(const JSIValue thisVal, const JSIValue *args, uint8_t argsNum)
{
    HILOG_ERROR(HILOG_MODULE_ACE, "led button pressed.");

    struct HdfIoService *serv = HdfIoServiceBind(LED_SERVICE);
    if (serv == NULL)
    {
        HILOG_ERROR(HILOG_MODULE_ACE,"fail to get service2 %s\n", LED_SERVICE);
        return JSI::CreateUndefined();
    }

    if ((args == nullptr) || (argsNum == 0) || (JSI::ValueIsUndefined(args[0]))) {
        return JSI::CreateUndefined();
    }

    JSIValue success = JSI::GetNamedProperty(args[0], CB_SUCCESS);
    JSIValue fail = JSI::GetNamedProperty(args[0], CB_FAIL);
    JSIValue complete = JSI::GetNamedProperty(args[0], CB_COMPLETE);

    int32_t num = (int32_t)JSI::GetNumberProperty(args[0], "code");

    int32_t replyData = 0;

    if (GpioWriteRead(serv, num, &replyData))
    {
        HILOG_ERROR(HILOG_MODULE_ACE,"fail to send event\n");
        JSI::CallFunction(fail, thisVal, nullptr, 0);
        JSI::CallFunction(complete, thisVal, nullptr, 0);
        JSI::ReleaseValueList(success, fail, complete);
        return JSI::CreateUndefined();
    }

    JSIValue result = JSI::CreateObject();
    JSI::SetNumberProperty(result, "led_status", replyData);

    JSIValue argv[ARGC_ONE] = {result};
    JSI::CallFunction(success, thisVal, argv, ARGC_ONE);
    JSI::CallFunction(complete, thisVal, nullptr, 0);
    JSI::ReleaseValueList(success, fail, complete, result);

    HdfIoServiceRecycle(serv);

    return JSI::CreateUndefined();
}
代码推荐添加位置如图所示

五、配置HDF头文件路径
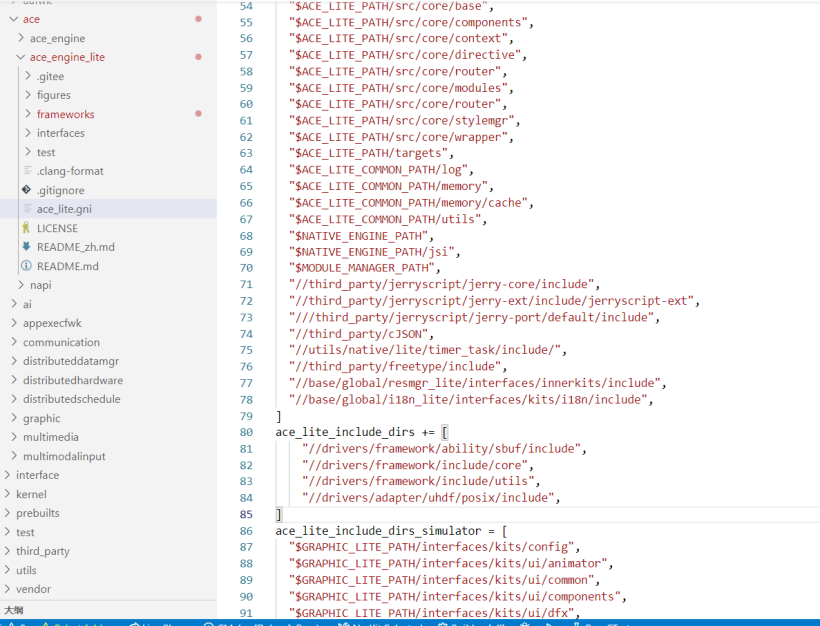
打开foundation\ace\ace_engine_lite\ace_lite.gni文件,在大约80行处添加如下配置
ace_lite_include_dirs += [
    "//drivers/framework/ability/sbuf/include",
    "//drivers/framework/include/core",
    "//drivers/framework/include/utils",
    "//drivers/adapter/uhdf/posix/include",
]


六、添加编译依赖
打开foundation\ace\ace_engine_lite\frameworks\BUILD.gn,在public_deps中添加以下代码
"//drivers/adapter/uhdf/manager:hdf_core",打开foundation\ace\ace_engine_lite\test\ace_test_config.gni,在extra_deps中添加以下代码
"//drivers/adapter/uhdf/manager:hdf_core",https://harmonyos.51cto.com


