https://harmonyos.51cto.com
目标
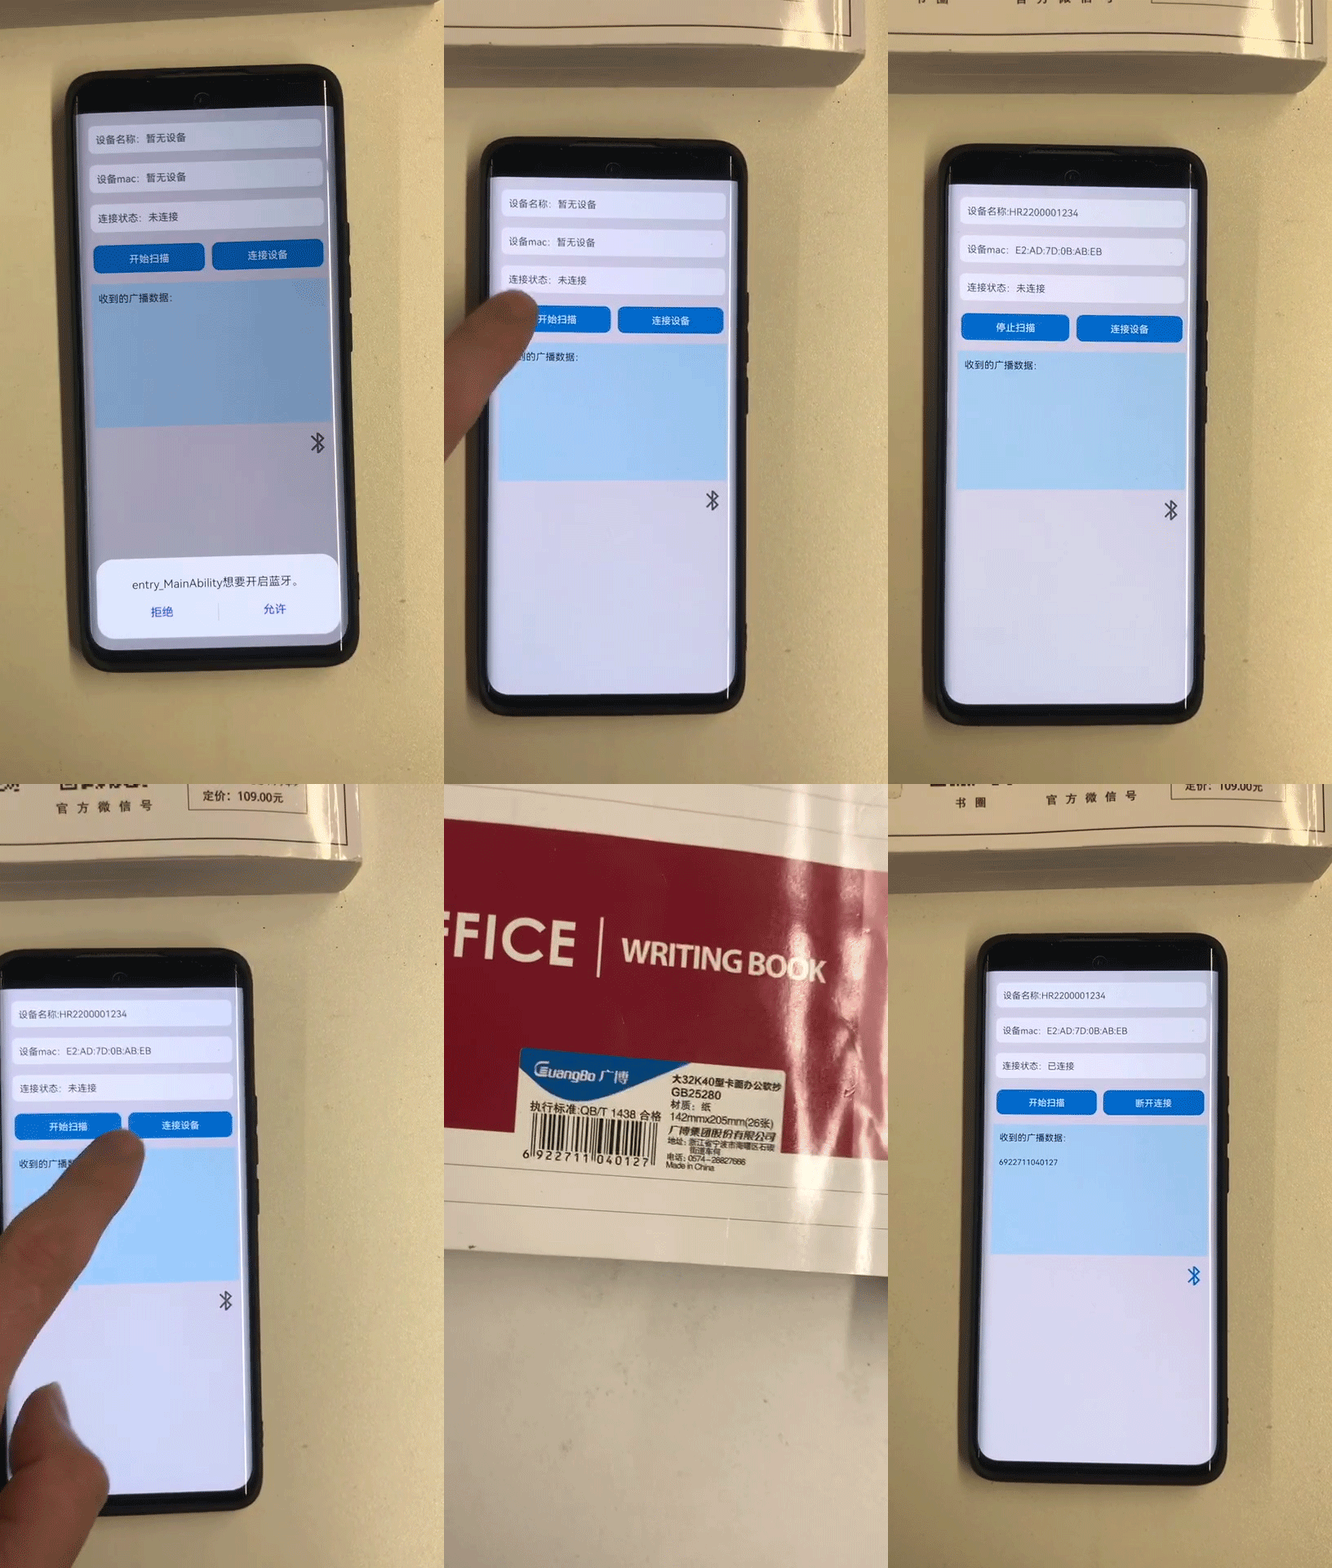
通过BLE扫描和广播提供的开放能力,可以根据指定状态获取外围设备、启动或停止BLE扫描、广播、数据交互。
关于BLE蓝牙的扫描和广播你可以查看官方文档
效果
蓝牙介绍
蓝牙是短距离无线通信的一种方式,支持蓝牙的两个设备必须配对后才能通信。HarmonyOS蓝牙主要分为传统蓝牙和低功耗蓝牙(通常称为BLE,Bluetooth Low Energy)。传统蓝牙指的是蓝牙版本3.0以下的蓝牙,低功耗蓝牙指的是蓝牙版本4.0以上的蓝牙。
如果你对蓝牙感兴趣,可以看看 HarmonyOS 蓝牙介绍或者我前面写的一篇文章:鸿蒙关于蓝牙的那些事
概念
在进入实战之前,先说明一个BLE蓝牙的通信协议,GATT【Generic Attribute Profile】,GATT 是一个在蓝牙连接之上的发送和接收很短的数据段的通用规范,这些很短的数据段被称为属性(Attribute)。在说明GATT之前还需要知道一个GAP【Generic Access Profile】。
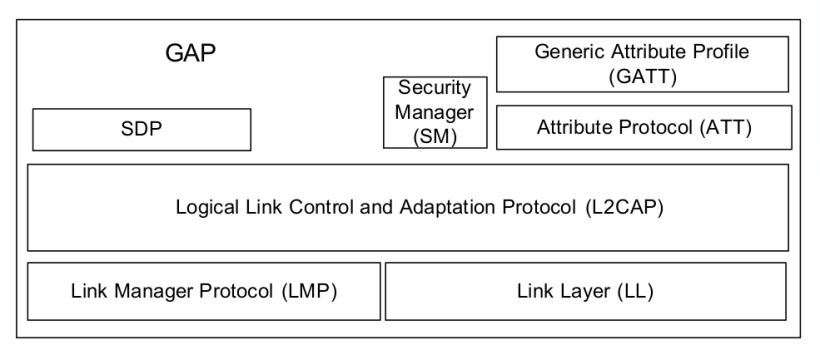
GAP包含:搜索蓝牙设备(Discovery)、管理连接(Link establishment),还有不同的安全等级(Security)。以及从用户层面访问一些参数的方式。GAP给设备定义了若干角色,其中主要的两个是:外围设备(Peripheral)和中心设备(Central)。
- 外围设备:这一般就是非常小或者简单的低功耗设备,用来提供数据,并连接到一个更加相对强大的中心设备,例如:蓝牙手环。
- 中心设备:中心设备相对比较强大,用来连接其他外围设备,例如手机。
GATT定义两个BLE设备通过叫做Service和Characteristic的东西进行通信,他使用了ATT(Attribute Protocol)协议,需要说明的是,GATT连接必需先经过GAP协议。
另外,特别注意的是:GATT连接是独占的。也就是一个BLE外设同时只能被一个中心设备连接。一旦外设被连接,它就会马上停止广播,这样它就对其他设备不可见了。当设备断开,它又开始广播。中心设备和外设需要双向通信的话,唯一的方式就是建立GATT连接。
GATT连接的网络拓扑
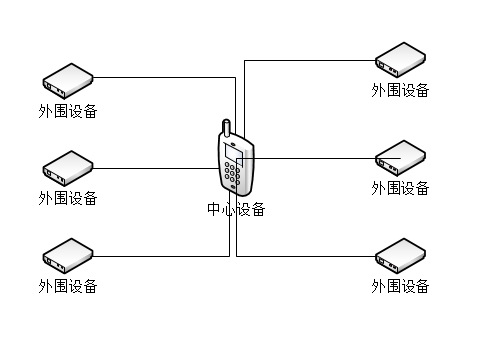
一个外设只能连接一个中心设备,而一个中心设备可以连接多个外设。中心设备负责扫描外围设备、发现广播。外围设备负责发送广播。
前置条件
一、前期准备
说明:如果需要完成蓝牙间的通信则需要借助蓝牙中的服务,如何获取BLE蓝牙相关的MAC地址和服务编号【uuid】可以参看我前面写的一篇文章:鸿蒙关于蓝牙的那些事
1.1、获取外围蓝牙设备的MAC
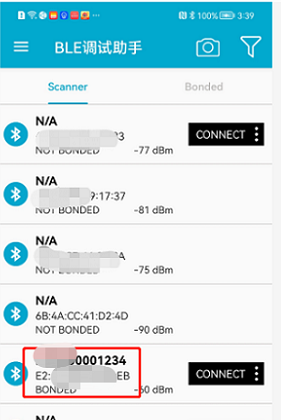
本此讲解的实战中使用到的相关设备MAC
MAC:E2:xx:xx:xx:xx:EB
1.2、获取服务编号【uuid】
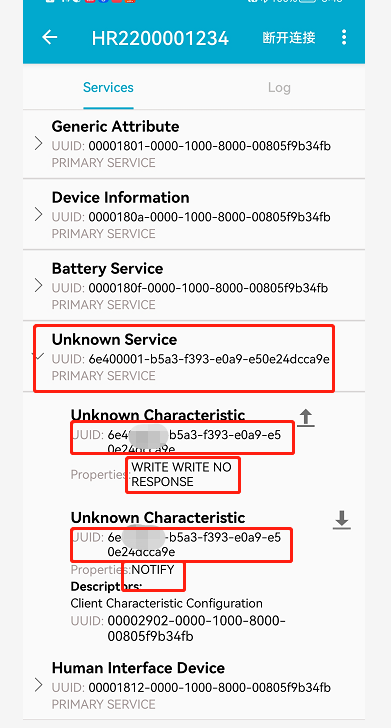
本此讲解的实战中使用到的相关设备UUID
- Service:6e40xxxx-xxxx-xxxx-e0a9-e50e24dcca9e
- Notify:6e40xxxx-xxxx-xxxx-e0a9-e50e24dcca9e
业务逻辑梳理
权限问题,首先需要注册蓝牙相关权限;
搜索蓝牙,应用启动后可以手动的开启和关闭蓝牙扫描;
连接蓝牙,根据蓝牙的mac地址,调用connect进行连接;
遍历蓝牙特征,在蓝牙连接成功后,获取蓝牙的服务特征,设置指定GATT特征通知;
通知数据,将数据通过蓝牙服务中的通知属性发送;
接受通知,中心设备通过characteristicChangedEvent接收通知数据,并显示在屏幕上;
关闭蓝牙,在应用推出后,需要释放资源,断开连接。
实战:BLE蓝牙设备间的数据交互–中心设备接收外围设备的通知数据
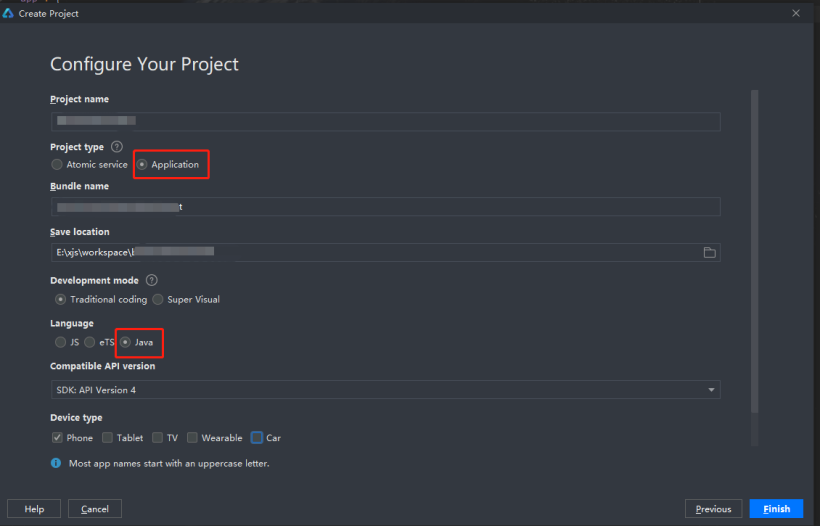
一、创建项目
说明:通过DevEco Studio创建Application项目(java)。
二、权限
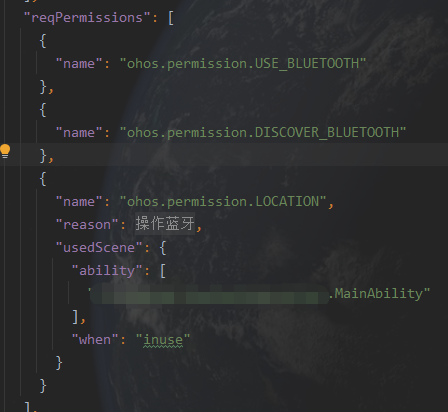
2.1、声明权限
说明:在项目的config.json中声明操作蓝牙必要的权限。
- ohos.permission.USE_BLUETOOTH:允许应用查看蓝牙的配置。
- ohos.permission.DISCOVER_BLUETOOTH:允许应用配置本地蓝牙,并允许其查找远端设备且与之配对连接。
- ohos.permission.LOCATION:允许应用在前台运行时获取位置信息。
代码如下:
 "reqPermissions": [
      {
        "name": "ohos.permission.USE_BLUETOOTH"
      },
      {
        "name": "ohos.permission.DISCOVER_BLUETOOTH"
      },
      {
        "name": "ohos.permission.LOCATION",
        "reason": "$string:permreason_location",
        "usedScene": {
          "ability": [
            ".MainAbility"
          ],
          "when": "inuse"
        }
      }
    ],
2.2、显式声明敏感权限
说明:ohos.permission.LOCATION属于敏感权限,需要在代码中显式声明。在MainAbility中动态申请权限,代码如下:
 private final String PERMISSION_LOCATION = "ohos.permission.LOCATION";
    @Override
    public void onStart(Intent intent) {
        super.onStart(intent);
        super.setMainRoute(MainAbilitySlice.class.getName());
        // 判断权限是否已授予
        if (verifySelfPermission(PERMISSION_LOCATION) != IBundleManager.PERMISSION_GRANTED) {
            // 应用未被授权
            if (canRequestPermission(PERMISSION_LOCATION)) {
                // 是否可以申请弹窗授权
                requestPermissionsFromUser(new String[]{PERMISSION_LOCATION}, 0);
            } else {
                // 显示应用需要权限的理由,提示用户进入设置授权
                new ToastDialog(getContext()).setText("请进入系统设置进行授权").show();
            }
        }
    }
三、启动蓝牙
说明:如果蓝牙处于关闭状态,请求将设备的蓝牙开启,代码如下:
BluetoothHost bluetoothHost = BluetoothHost.getDefaultHost(this);
if (bluetoothHost.getBtState() != BluetoothHost.STATE_ON) {
        bluetoothHost.enableBt();
   }
四、中心设备进行BLE扫描
4.1、API说明
4.1.1、BLE中心设备管理类:BleCentralManager

4.1.2、中心设备管理回调类:BleCentralManagerCallback

4.2、扫描回调的处理
BLE扫描之前要先实现扫描回调:BleCentralManagerCallback的接口,在scanResultEvent回调中可以获取你需要的外围设备实例,代码如下:
BlePeripheralDevice mPeripheralDevice = null;
 /**
     * 实现中心设备管理回调
     */
    public class MyBleCentralManagerCallback implements BleCentralManagerCallback {
        /**
         * 扫码结果回调
         * @param bleScanResult  扫码结果
         */
        @Override
        public void scanResultEvent(BleScanResult bleScanResult) {
            // 根据扫码结果获取外围设备实例
             mPeripheralDevice = bleScanResult.getPeripheralDevice();
        }

        /**
         * 扫描失败回调
         * @param i
         */
        @Override
        public void scanFailedEvent(int i) {

        }

        /**
         * 组扫描成功回调
         * @param list 组信息
         */
        @Override
        public void groupScanResultsEvent(List<BleScanResult> list) {
        }
    }
4.3、获取中心设备管理对象
调用BleCentralManager(BleCentralManagerCallback callback)接口获取中心设备管理对象。代码如下:
MyBleCentralManagerCallback myCentralManagerCallback = new MyBleCentralManagerCallback();
BleCentralManager mCentralManager = new BleCentralManager(this, myCentralManagerCallback);
4.4、启动扫描
调用startScan()开始扫描BLE设备,在回调【BleCentralManagerCallback】中获取扫描到的BLE设备。
值得一提的是,启动扫描接口中,可以传入蓝牙扫描过滤器【BleScanFilter】,如果过滤器为空,则不过滤。
下面使用指定的MAC地址进行过滤启动蓝牙扫描,代码如下:
// 开始扫描(过滤器指定的)设备
BleScanFilter bleScanFilter = new BleScanFilter();
bleScanFilter.setPeripheralAddress("E2:XX:XX:XX:XX:EB");// 替换你需要过滤的MAC
mFilters.add(bleScanFilter);
mCentralManager.startScan(mFilters);
五、蓝牙连接
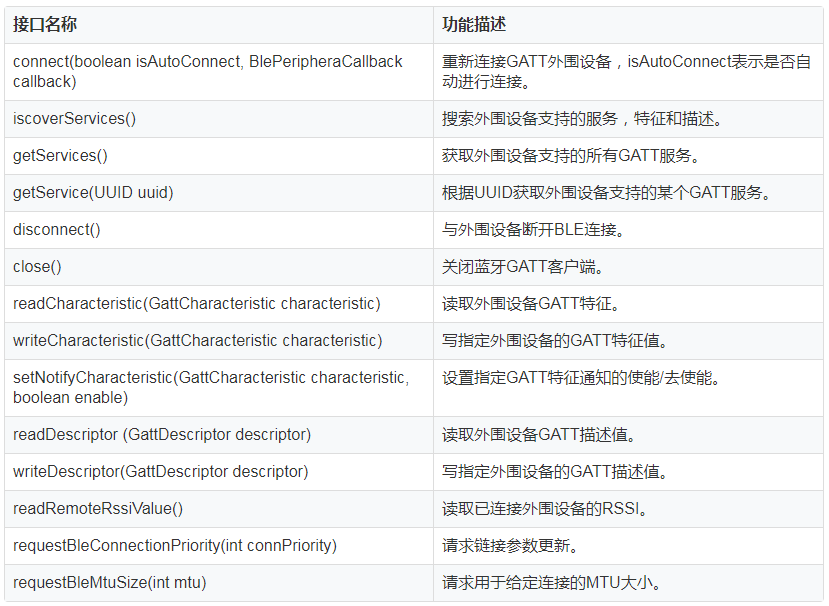
5.1、API
5.1.1、BLE蓝牙外围设备操作类:BlePeripheralDevice相关接口说明
5.1.2、BLE蓝牙外围设备操作回调类:BlePeripheralCallback相关接口说明
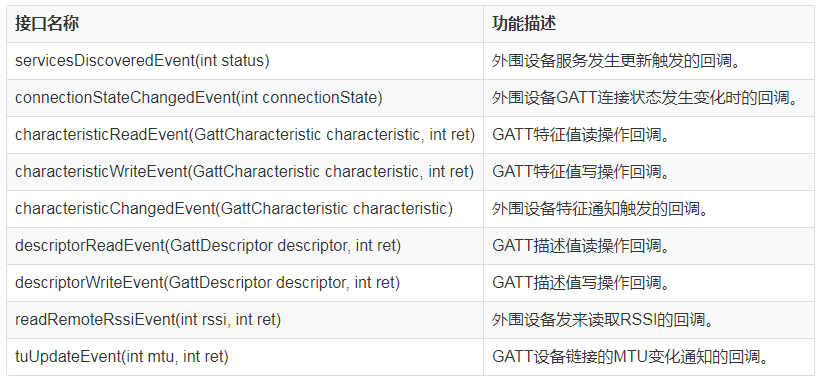
5.2、实现外围设备操作回调:BlePeripheralCallback,部分代码如下:
/**
 * 实现外围设备操作回调
 * 中心设备作为GattService的客户端
 */
  private class MyBlePeripheralCallback extends BlePeripheralCallback {
    // TODO 回调接口实现包括:connectionStateChangeEvent、servicesDiscoveredEvent、characteristicChangedEvent等
   }
在回调的接口中可以做三件事。
1、在connectionStateChangeEvent回调接口中,如果GATT连接成功,则可以调用mPeripheralDevice.discoverServices()获取外围设备支持的 Services、Characteristics 等特征值,在回调 servicesDiscoveredEvent(int status) 中获取外围设备支持的服务和特征值,并根据 UUID 判断是什么服务。代码如下:
 /**
     * 连接状态变更
     * 连接成功后可以在中心设备上(客户端)发现GattService
     * @param connectionState
     */
        @Override
        public void connectionStateChangeEvent(int connectionState) {
            super.connectionStateChangeEvent(connectionState);
            HiLog.info(label, "connectionState:" + connectionState);
            if (connectionState == ProfileBase.STATE_CONNECTED && !isConnected) {
                isConnected = true;
                mPeripheralDevice.discoverServices();// 与外围设备连接成功,发现GattService
                setText(mTvStatus, "连接状态:已连接");
            } else if (connectionState == ProfileBase.STATE_DISCONNECTED) {
                // 断开连接
                setText(mTvStatus, "连接状态:未连接");
            }
        }
2、在servicesDiscoveredEvent回调接口中,如果Service获取成功,则根据获取到的服务和特征值,调用 setNotifyCharacteristic设置指定GATT特征通知。代码如下:
 /**
   * 在中心设备上发现服务(GattService外围设备)的回调
   * @param status 状态
  */
   @Override
   public void servicesDiscoveredEvent(int status) { // 外围设备服务发生更新触发的回调。
       if (status == BlePeripheralDevice.OPERATION_SUCC) {
           HiLog.info(label, "servicesDiscoveredEvent OPERATION_SUCC");
           List<GattService> services = mPeripheralDevice.getServices(); // 获取Service成功后获服务列表
           for (GattService service : services) {
               // 对每个服务进行相应操作
               if (service.getUuid().equals(UUID.fromString(Constant.SERVICE_UUID))) {
                  HiLog.info(label, "servicesDiscoveredEvent 找到服务");
                  mPeripheralDevice.setNotifyCharacteristic
                     (service.getCharacteristic(UUID.fromString(Constant.NOTIFY_CHARACTER_UUID)).get(), true);
                    }
                }
            }
        }
3、在characteristicChangedEvent回调接口中处理外围设备特征的通知,可以从中获取到通知的数据。代码如下:
/**
   * 特性变更的回调
   * 接受外围设备发送的数据
   * @param characteristic
  */
  @Override
   public void characteristicChangedEvent(GattCharacteristic characteristic) {
     super.characteristicChangedEvent(characteristic);
     // 更新外围设备发送的数据
     String msg = new String(characteristic.getValue());
      HiLog.info(label, "characteristicChangedEvent msg=" + msg);
       setText(mTvData, msg);
 }
5.3、设备蓝牙连接
说明:中心设备与外围设备建立连接,调用connect(boolean isAutoConnect, BlePeripheraCallback callback)建立与外围BLE设备的GATT连接,boolean参数isAutoConnect用于设置是否允许设备在可发现距离内自动建立GATT连接。代码如下:
MyBlePeripheralCallback mPeripheralCallback = new MyBlePeripheralCallback();
mPeripheralDevice.connect(false, mPeripheralCallback);
六、常量
说明:Constant是用于定义常量类,其中定义了业务中需要使用的常量。其中"X"需要替换成你的蓝牙设备信息。
public static final String PERIPHERAL_ADDRESS = "E2:XX:XX:XX:XX:EB";// 蓝牙MAC
public static final String SERVICE_UUID = "6eXXXXXX-XXXX-XXXX-XXXX-e50e24dcca9e";// 蓝牙的服务编号
public static final String NOTIFY_CHARACTER_UUID = "6eXXXXXX-XXXX-XXXX-XXXX-e50e24dcca9e";// 蓝牙特性通知属性的编号
到目前为止,就完成了中心设备与外围设备的连接和相关的监听回调,当外围设备通过NOTIFY_CHARACTER_UUID发送的通知在外围设备操作回调接口characteristicChangedEvent中就能监听到变更,在参数GattCharacteristic中就可以获取到通知中的数据内容。
七、代码
7.1、BLE蓝牙中心设备的完整代码
package xxx;

import com.nlscan.bluetoothassistant.ResourceTable;
import com.nlscan.bluetoothassistant.common.Constant;
import ohos.aafwk.ability.AbilitySlice;
import ohos.aafwk.content.Intent;
import ohos.agp.components.*;
import ohos.agp.utils.LayoutAlignment;
import ohos.agp.window.dialog.ToastDialog;
import ohos.agp.window.service.WindowManager;
import ohos.bluetooth.ProfileBase;
import ohos.bluetooth.ble.*;
import ohos.hiviewdfx.HiLog;
import ohos.hiviewdfx.HiLogLabel;
import java.util.ArrayList;
import java.util.List;
import java.util.UUID;
public class MainAbilitySlice extends AbilitySlice implements Component.ClickedListener{
    private static final HiLogLabel label = new HiLogLabel(HiLog.LOG_APP, 0x00201, "BleCentralAbilitySlice");
    public BlePeripheralDevice mPeripheralDevice;// 外围设备实例
    public GattCharacteristic mWriteCharacteristic;
    private MyBlePeripheralCallback mPeripheralCallback;// 外围设备操作回调
    private MyBleCentralManagerCallback myCentralManagerCallback;// 中心设备管理器回调
    private BleCentralManager mCentralManager;// 中心设备管理器
    private List<BleScanFilter> mFilters;// 扫描过滤器
    public boolean isConnected = false;// 是否已连接
    private boolean isScanning = false;// 是否正在扫描
    // 容器
    private Text mTvStatus;// 状态
    private Text mTvData;// 数据
    private Text mTvDevice;// 设备
    private Button mBtnScan;// 扫描
    private Button mBtnConnect;// 连接
    private Button mBtnSend;// 发送
    private TextField mTfInput;// 内容输入框
    private Text mTvName;// 设备名称
    private Image mIvBle;// 蓝牙图标
    @Override
    protected void onStart(Intent intent) {
        super.onStart(intent);
        super.setUIContent(ResourceTable.Layout_ability_main);
        // 隐藏状态栏、设置状态栏和导航栏透明
        getWindow().addFlags(WindowManager.LayoutConfig.MARK_FULL_SCREEN|
                WindowManager.LayoutConfig.MARK_TRANSLUCENT_STATUS|
                WindowManager.LayoutConfig.MARK_TRANSLUCENT_NAVIGATION);
        initData();
        initComponent();
        initListener();
    }
    private void initData() {
        mPeripheralCallback = new MyBlePeripheralCallback();
        myCentralManagerCallback = new MyBleCentralManagerCallback();
        mCentralManager = new BleCentralManager(this, myCentralManagerCallback);
        mFilters = new ArrayList<>();
    }

    private void initComponent() {
        mTvDevice = (Text) findComponentById(ResourceTable.Id_device_info);
        mBtnScan = (Button) findComponentById(ResourceTable.Id_scan);
        mTvStatus = (Text) findComponentById(ResourceTable.Id_status);
        mBtnConnect = (Button) findComponentById(ResourceTable.Id_connect);
        mTvData = (Text) findComponentById(ResourceTable.Id_data);
        mBtnSend = (Button) findComponentById(ResourceTable.Id_send);
        mTfInput = (TextField) findComponentById(ResourceTable.Id_input);
        mTvName = (Text) findComponentById(ResourceTable.Id_device_name);
        mIvBle =  (Image) findComponentById(ResourceTable.Id_ble_image);
    }
    private void initListener() {
        mBtnScan.setClickedListener(this);
        mBtnConnect.setClickedListener(this);
        mBtnSend.setClickedListener(this);
    }
    @Override
    public void onClick(Component component) {
        int viewId = component.getId();
        if (viewId == ResourceTable.Id_scan) {
            // 处理扫描
            disposeScan();
        } else if (viewId == ResourceTable.Id_connect) {
            // 处理连接
            disposeConnect();
        } else if (viewId == ResourceTable.Id_send) {
            // 向外围设备发送消息
            disposeSend();
        }
    }
    /**
     * 处理扫描
     */
    private void disposeScan() {
        if (!isScanning) {
            isScanning = true;
            mBtnScan.setText("停止扫描");
            mTvDevice.setText("设备mac:正在扫描...");
            mTvName.setText("设备名称:暂无设备");
            // 开始扫描(过滤器指定的)设备
            BleScanFilter bleScanFilter = new BleScanFilter();
            bleScanFilter.setPeripheralAddress(Constant.PERIPHERAL_ADDRESS);
            mFilters.add(bleScanFilter);
            mCentralManager.startScan(mFilters);
        } else {
            isScanning = false;
            mBtnScan.setText("开始扫描");
            // 停止扫描
            mCentralManager.stopScan();
        }
    }
    /**
     * 处理连接
     */
    private void disposeConnect() {
        if (mPeripheralDevice == null) {
            // 外围设备对象未连接
            mTvStatus.setText("连接状态:请先扫描获取设备信息");
            return;
        }
        if (!isConnected) {
            mBtnConnect.setText("断开连接");
            mTvStatus.setText("连接状态:连接中...");
            // 发起连接
            mPeripheralDevice.connect(false, mPeripheralCallback);
        } else {
            isConnected = false;
            mBtnConnect.setText("连接设备");
            mTvStatus.setText("连接状态:未连接");
            mTvDevice.setText("设备mac:暂无设备");
            mTvName.setText("设备名称:暂无设备");
            setBleImage();
            // 发起断开连接
            mPeripheralDevice.disconnect();
            mPeripheralDevice = null;
        }
    }
    /**
     * 处理向外围设备发送消息
     */
    private void disposeSend() {
        String msg = mTfInput.getText().toString();
        if (msg.isEmpty() || mPeripheralDevice == null || !isConnected) {
            return;
        }
        // 向外围设备发送用户输入的数据
        mWriteCharacteristic.setValue(msg.getBytes());
        boolean result = mPeripheralDevice.writeCharacteristic(mWriteCharacteristic);
        HiLog.info(label, "发送内容:" + msg + "发送结果:" + result);
        String sendResult = result ? "发送成功": "发送失败";
        showToast(sendResult);
    }
    /**
     * 实现外围设备操作回调
     * 中心设备作为GattService的客户端
     */
    private class MyBlePeripheralCallback extends BlePeripheralCallback {
        /**
         * 在中心设备上发现服务(GattService外围设备)的回调
         * @param status 状态
         */
        @Override
        public void servicesDiscoveredEvent(int status) { // 外围设备服务发生更新触发的回调。
            if (status == BlePeripheralDevice.OPERATION_SUCC) {
                HiLog.info(label, "servicesDiscoveredEvent OPERATION_SUCC");
                List<GattService> services = mPeripheralDevice.getServices(); // 获取Service成功后获服务列表
                for (GattService service : services) {
                    // 对每个服务进行相应操作
                    if (service.getUuid().equals(UUID.fromString(Constant.SERVICE_UUID))) {
                        HiLog.info(label, "servicesDiscoveredEvent 找到服务");
                        mPeripheralDevice.setNotifyCharacteristic(service.getCharacteristic(UUID.fromString(Constant.NOTIFY_CHARACTER_UUID)).get(), true);
                    }
                }
            }
        }
        /**
         * 连接状态变更
         * 连接成功后可以在中心设备上(客户端)发现GattService
         * @param connectionState
         */
        @Override
        public void connectionStateChangeEvent(int connectionState) {
            super.connectionStateChangeEvent(connectionState);
            HiLog.info(label, "connectionState:" + connectionState);
            if (connectionState == ProfileBase.STATE_CONNECTED && !isConnected) {
                isConnected = true;
                mPeripheralDevice.discoverServices();// 与外围设备连接成功,发现GattService
                setText(mTvStatus, "连接状态:已连接");
            } else if (connectionState == ProfileBase.STATE_DISCONNECTED) {
                // 断开连接
                setText(mTvStatus, "连接状态:未连接");
            }
        }
        /**
         * 特性变更的回调
         * 接受外围设备发送的数据
         * @param characteristic
         */
        @Override
        public void characteristicChangedEvent(GattCharacteristic characteristic) {
            super.characteristicChangedEvent(characteristic);
            // 更新外围设备发送的数据
            String msg = new String(characteristic.getValue());
            HiLog.info(label, "characteristicChangedEvent msg=" + msg);
            setText(mTvData, msg);
        }
    }
    /**
     * 实现中心设备管理回调
     */
    public class MyBleCentralManagerCallback implements BleCentralManagerCallback{
        /**
         * 扫码结果回调
         * @param bleScanResult  扫码结果
         */
        @Override
        public void scanResultEvent(BleScanResult bleScanResult) {
            // 根据扫码结果获取外围设备实例
            if (mPeripheralDevice == null) {
                String deviceAddr = bleScanResult.getPeripheralDevice().getDeviceAddr();
                String deviceName = bleScanResult.getPeripheralDevice().getDeviceName().get();
                HiLog.info(label, "设备mac:" + deviceAddr);
                if (Constant.PERIPHERAL_ADDRESS.equals(deviceAddr)) {
                    mPeripheralDevice = bleScanResult.getPeripheralDevice();
                    setText(mTvDevice, "设备mac:" + deviceAddr);
                    setText(mTvName, "设备名称:" + deviceName);
                }
            }
        }
        /**
         * 扫描失败回调
         * @param i
         */
        @Override
        public void scanFailedEvent(int i) {
            setText(mTvDevice, "设备mac:扫描失败,请重新扫描");
            setText(mTvName, "设备名称:暂无设备");
        }
        /**
         * 组扫描成功回调
         * @param list 组信息
         */
        @Override
        public void groupScanResultsEvent(List<BleScanResult> list) {
        }
    }
    /**
     * 设置Text的内容
     * @param text 容器
     * @param content 内容
     */
    private void setText(Text text, final String content) {
        getUITaskDispatcher().syncDispatch(new Runnable() {
            @Override
            public void run() {
                text.setText(content);
            }
        });
    }
    private void showToast(String msg) {
        ToastDialog toastDialog = new ToastDialog(this);
        toastDialog.setAlignment(LayoutAlignment.CENTER).setText(msg).show();
    }
    @Override
    protected void onStop() {
        super.onStop();
        if (mPeripheralDevice != null) {
            mPeripheralDevice.disconnect();
            mPeripheralDevice = null;
        }
    }
    private void setBleImage() {
        if (isConnected) {
            mIvBle.setPixelMap(ResourceTable.Media_icon_ble_ling);
        } else {
            mIvBle.setPixelMap(ResourceTable.Media_icon_ble_black);
        }
    }
}
https://harmonyos.51cto.com


