
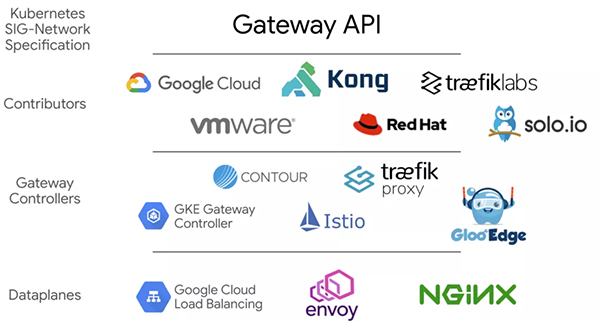
Gateway API(之前叫 Service API)是由 SIG-NETWORK 社区管理的开源项目,项目地址:https://gateway-api.sigs.k8s.io/。
主要原因是 Ingress 资源对象不能很好的满足网络需求,很多场景下 Ingress 控制器都需要通过定义 annotations 或者 crd 来进行功能扩展,这对于使用标准和支持是非常不利的,新推出的 Gateway API 旨在通过可扩展的面向角色的接口来增强服务网络。
Gateway API 是 Kubernetes 中的一个 API 资源集合,包括 GatewayClass、Gateway、HTTPRoute、TCPRoute、Service 等,这些资源共同为各种网络用例构建模型。
Gateway API的价值与定位
- 提供跨Namespace的一种Ingress机制:让多个跨Namespace的服务,可以分享一个L7 LoadBalancer
- 可实现多租户的一种Ingress机制:提供HttpRoute与Gateway分离的抽象组件,让设计路由(HttpRoute)的人,可以共享一个L7 LoadBalancer,
- 蓝绿部署金丝雀部署时为使用同一个命名空间下的部署,可以简单的定义在HttpRoute中
- 基于Hostname、Header、或Subpath的服务,使用AB测试等等。
Gateway API 介绍
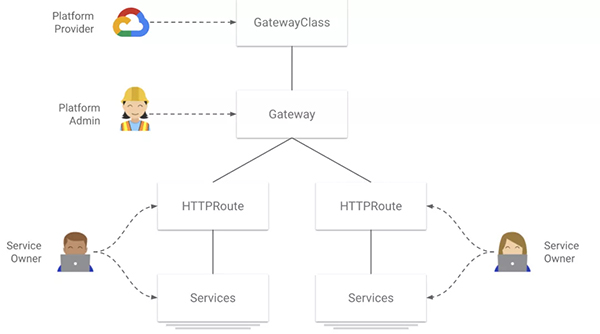
网关API主要分为以下几个角色:
- GatewayClass(由Cloud或K8s提供者提供),
- Gateway(由网管平台公司自建GatewayClass),
- HTTPRoute(由开发者团队服务部署者选择对应的网关对接)
目前 GKE 提供了四种网关类,分别是:
- gke-l7-rilb建立在内部 HTTP(S) 负载均衡上的区域内部 HTTP(S) 负载均衡器(单丛集Internal LoadBalancer)
- gke-l7-gxlb建立在外部 HTTP(S) 负载均衡之上的全球外部 HTTP(S) 负载均衡器(单丛集External LoadBalancer)
- gke-l7-rilb-mc基于Internal HTTP(S) Load Balancing的多集群区域负载均衡器(多丛集Internal LoadBalancer)
- gke-l7-gxlb-mc基于External HTTP(S) Load Balancing的多集群全局负载均衡器(多丛集External LoadBalancer)
网关部署
目前GKE的Gateway APIK8S 1.20以上的版本,如果使用GKE发布频道需要捧油,现在需要使用RAPID区域,同时仅在以下提供公开Beta测试:
- us-west1
- us-east1
- us-central1
- europe-west4
- europe-west3
- europe-west2
- europe-west1
- asia-southeast1
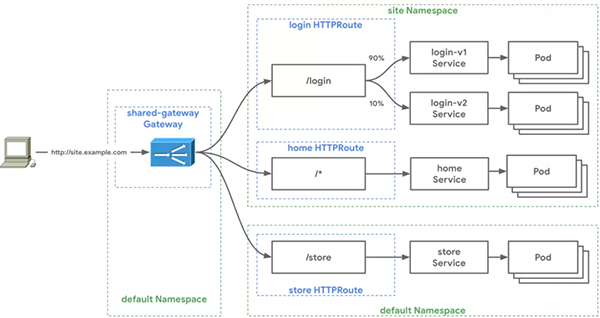
下面的测试,我们选择先测试Interal-LoadBalancer并尝试下面的拓扑图:
部署私有 GKE
我们先开发一个私人GKE集群,可以参照我提供的Terraform脚本,请直接将shawn.tfvars改为符合你集群的参数,另外,由于我使用远端GCS也请设置保存 tfstate,修改config.tf里面的bucket名称。其他经常设置和私有GKE类似,只需要使用内部LB而增加了一个proxy-only的子网给Envoy使用。
部署网关
根据上述的第三个阶段,我们先部署Gateway API的CRD档案:
- kubectl kustomize "github.com/kubernetes-sigs/gateway-api/config/crd?ref=v0.3.0" \
- | kubectl apply -f -
- # 部署成功後,可使用下方命令檢視單叢集internal/external GatewayClass
- private-gke-tf % kubectl get gatewayclass
- NAME CONTROLLER AGE
- gke-l7-gxlb networking.gke.io/gateway 23h
- gke-l7-rilb networking.gke.io/gateway 23h
下一步我们准备部署网关,使用 kubectl apply -f 部署底下YAML:
- kind: Gateway
- apiVersion: networking.x-k8s.io/v1alpha1
- metadata:
- name: internal-http
- spec:
- gatewayClassName: gke-l7-rilb
- listeners:
- - protocol: HTTP
- port: 80
- routes:
- kind: HTTPRoute
- selector:
- matchLabels:
- gateway: internal-http
- namespaces:
- from: "All"
因为Gateway可以接受三个关联模式,基于 kind,selector,以及namespace。
- kind:以下可选任一种Route: HTTPRoute, TCPRoute, or customRoute
- 标签:通过选择或选择对应的标签
- namespaces:贯穿 namespaces.from 选择Route所在的namespace,预设是跟Gateway在同一个namespace的Route
因为我们想创建一个跨命名空间的共享网关,所以我们将 namespaces.from 改成 All。
部署成功后,可以通过以下命令来查看:
- private-gke-tf % kubectl describe gateway internal-http
- Events:
- Type Reason Age From Message
- ---- ------ ---- ---- -------
- Normal SYNC 4m59s (x396 over 23h) sc-gateway-controller SYNC on default/internal-http was a success
部署服务+HTTPRoute
接下来我们快速部署测试的两个服务,其中 store 服务部署在默认命名空间,site 服务部署在 site 命名空间。部署对应的 HTTPRoute,其中 http-route.yaml 适用于 store 服务的:
- kind: HTTPRoute
- apiVersion: networking.x-k8s.io/v1alpha1
- metadata:
- name: store
- labels:
- gateway: internal-http
- spec:
- hostnames:
- - "store.example.com"
- rules:
- - forwardTo:
- - serviceName: store-v1
- port: 8080
- weight: 50
- - serviceName: store-v2
- port: 8080
- weight: 50
- - matches:
- - headers:
- type: Exact
- values:
- env: canary
- forwardTo:
- - serviceName: store-v2
- port: 8080
- - matches:
- - path:
- type: Prefix
- value: /de
- forwardTo:
- - serviceName: store-german
- port: 8080
我们针对 store 服务,故意开发了三个不同的后端服务,一次来测试HTTPRoute的不同能力
- (1)主机名匹配:通过不同的主机名(如store.example.com or site.example.com)将用户连接路由到指定的后台服务
- (2.1) header match: 如果请求 header 中包含 env: canary 这样的信息,就会被路由到 store-v2 服务
- (2.2)前缀匹配:若请求路径前缀是 /de,则会被路由到 store-german 服务
- (3)默认路由:根据权重,自动均衡到指定的 store-v1 与 store-v2 的两个后台服务
而 http-service.yaml 是用于配置服务的,由于 HTTPRoute 与 Gateway 所在的命名空间不同,因此必须引入一个 gatewayRefs 参数:
- kind: HTTPRoute
- apiVersion: networking.x-k8s.io/v1alpha1
- metadata:
- name: site
- namespace: site
- labels:
- gateway: internal-http
- spec:
- gateways:
- allow: FromList
- gatewayRefs:
- - name: internal-http
- namespace: default
- hostnames:
- - "site.example.com"
- rules:
- - forwardTo:
- - serviceName: site-v1
- port: 8080
由于我们使用的是 Internal LoadBalancer,所以我们需要开一台 GCE VM 来进行测试,由于我们使用的是 private cluster,所以要记得 GCE VM 和 private GKE cluster 在同一个 VPC 中。
在 K8S client上,获取 Internal LoadBalancer 的IP地址:
- kubectl get gateway internal-http -o jsonpath='{.status.addresses[0].value}'
- 10.81.68.140
在 GCE VM 上,我们来测试上面我们定义的 HttpRoute:
(1) 按照 Hostname 来路由服务:通过定义 hostname 为 site.example.com 来路由到另一个 namespace 的K8S服务中:
- shawnho@jumper2:~$ curl -H "host: site.example.com" 10.81.68.140
- {
- "cluster_name": "pgke-1",
- "host_header": "site.example.com",
- "metadata": "site-v1",
- "node_name": "gke-pgke-1-cluster-runtime-425beb23-vx9j.c.shawn-demo-2021.internal",
- "pod_name": "site-v1-86dc4b4fbc-4g6jr",
- "pod_name_emoji": "🌾",
- "project_id": "shawn-demo-2021",
- "timestamp": "2021-07-18T15:26:15",
- "zone": "asia-southeast1-a"
- }
(2) 基于Hostname: “store.example.com”,再分別测试 (2.1) Header 与 (2.2) Prefix 前缀机制:
- # 测试header match
- shawnho@jumper2:~$ curl -H "host: store.example.com" -H "env: canary" 10.81.68.140
- {
- "cluster_name": "pgke-1",
- "host_header": "store.example.com",
- "metadata": "store-v2",
- "node_name": "gke-pgke-1-cluster-runtime-425beb23-vx9j.c.shawn-demo-2021.internal",
- "pod_name": "store-v2-6856f59f7f-49fv8",
- "pod_name_emoji": "🎹",
- "project_id": "shawn-demo-2021",
- "timestamp": "2021-07-18T15:33:04",
- "zone": "asia-southeast1-a"
- }
- # 测试prefix match
- shawnho@jumper2:~$ curl -H "host: store.example.com" 10.81.68.140/de
- {
- "cluster_name": "pgke-1",
- "host_header": "store.example.com",
- "metadata": "Gutentag!",
- "node_name": "gke-pgke-1-cluster-runtime-425beb23-vx9j.c.shawn-demo-2021.internal",
- "pod_name": "store-german-66dcb75977-ttngz",
- "pod_name_emoji": "💇🏼♀",
- "project_id": "shawn-demo-2021",
- "timestamp": "2021-07-18T15:32:15",
- "zone": "asia-southeast1-a"
- }
(3) 通过基于 Host: store.example.com 下的 Default Route 按权重(1:1)路由服务:
- # 测试default route
- shawnho@jumper2:~$ curl -H "host: store.example.com" 10.81.68.140
- {
- "cluster_name": "pgke-1",
- "host_header": "store.example.com",
- "metadata ": "store-v1",
- "node_name": "gke-pgke-1-cluster-runtime-425beb23-vx9j.c.shawn-demo-2021.internal",
- "pod_name": "store-v1-65b47557df-rv65j ",
- "pod_name_emoji": "🧘🏿♂️",
- "project_id": "shawn-demo-2021",
- "timestamp": "2021-07-18T15:32:09",
- "zone": "asia-southeast1-a”
- }
- shawnho@jumper2:~$ curl -H "host: store.example.com" 10.81.68.140
- {
- "cluster_name": "pgke-2",
- "host_header": "store.example.com",
- "metadata": "store -v2",
- "node_name": "gke-pgke-2-cluster-runtime-e7f1b4b7-wg5a.c.shawn-demo-2021.internal",
- "pod_name": "store-v2-6856f59f7f-gkkct",
- "pod_name_emoji ": "👈🏼",
- "project_id": "shawn-demo-2021",
- "timestamp": "2021-07-18T15:32:29",
- "zone": "asia-southeast1-a"
- }
到这里可以看到测试成功了!