前端发展百花放,一技未熟百技出。未知何处去下手,关注小编胜百书。 我是前端人,专注分享前端内容!
本篇文章主要是,使用 vite 创建一个vue3 项目,实践 vie-router4 vuex4 结合 componsition API 的使用。目的是让未接触过 vue3 的同学快速上手。
一、vue3.0 创建项目
vue3 创建项目的时候有两种方式,第一种就是官方推荐的 vite 。另外一种就是使用 webpack 创建。
1.1、vite 创建项目
vite 需要 Node.js >= 12.x版本。所以使用 vite 搭建项目之前,请先检查 node 版本!
运行 :$ npm init vite@latest 命令,然后按照提示信息选择创建项目的类型。具体的步骤可以参考《什么,你还使用 webpack?别人都在用 vite 搭建项目了》文章。
也可以通过附加命令行选项,指定使用的模板。如:
- npm init vite@latest my-vue-app --template vue
使用最新 vite 创建 vue 模板项目。
项目目录如图所示:

1.2、webpack 创建项目
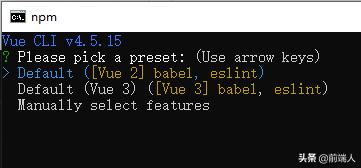
使用 vue/cli 脚手架创建 vue3 项目时,需要升级 vue cli v4.5版本!使用 vue -V 检查版本,如果版本过低时,请全局重新安装。
- npm install -g @vue/cli
使用命令,开始创建项目:
- vue create project-name

选择需要创建 vue3 项目,根据提示创建项目就可以了。
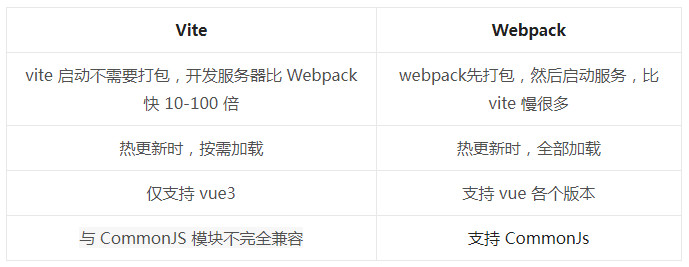
1.3、vite 与 webpack 相比优缺点
在本篇文章内,我们选择 第一种方式 vite 创建一个 learn-vue3 的项目。
二、vue-router4
项目创建完成之后,我们要做的第一件事就是配置路由了,添加路由的时候,需要在 main.js 内引入 router。
main.js 代码:
- import { createApp } from 'vue'
- import App from './App.vue'
- createApp(App).mount('#app')
此时发现与 vue2 的创建实例完全不一样,vue3 使用的是 createApp ,使用前需要先引入。
2.1、引入路由
在 vue3 中使用 vue-router 时,需要安装 vue-router 4 。
- npm install vue-router@4
安装之后可以在 package.json 文件中查看 vue-router 的版本。
- {
- "dependencies": {
- "vue": "^3.2.25",
- "vue-router": "^4.0.12"
- }
- }
vue-router 4 的大多数的 API 是保持不变的,但是在 vue3 中以插件形式存在,所以在创建的时候有一定的改变。
新建 router 文件夹,新建 index.js 文件
- // 1、按需引入方法
- import { createRouter, createWebHashHistory } from "vue-router"
- // 2、定义一些路由
- const routes = [
- // 每个路由都需要映射到一个组件
- ]
- //3、创建路由实例
- const router = createRouter({
- routes,
- history:createWebHashHistory("./")
- })
- export default router
然后到 main.js 中,将路由挂载到实例上。
- import { createApp } from 'vue'
- import App from './App.vue'
- import router from "./router/index"
- createApp(App)
- //整个应用支持路由
- .use(router)
- .mount('#app')
2.2、新建组件配置路由
在 src 目录下,新建 pages 文件夹,新建 index.vue 文件:
- <template>
- 首页入口
- </template>
在 router.js 文件内,定义路由
- const routes = [
- {
- path:"/",
- component:()=>import("../pages/index.vue")
- }
- ]
然后在 App.vue 文件内添加 router-view 容器。
- <template>
- <img alt="Vue logo" src="./assets/logo.png" />
- <router-view></router-view>
- </template>
此时运行项目的时候就能看到新建的 index.vue 的内容了。
三、vue-router4 结合 composition API 使用
3.1、composition API
composition API 中文叫做组合式API,它是 Vue3 特有的,同时 vue3 也能够向下兼容 Options API。
setup 函数就是 composition API 的入口,是处于生命周期钩子函数 beforeCreate 和 created 两个函数之间,所以 setup 中的属性和方法在外部使用时,需要先 return 暴漏出去。
修改 index.vue 组件,采用 composition API 。
- <template>
- <div>
- <input type="text" v-model="msg" />
- </div>
- </template>
- <script>
- export default {
- setup() {
- const msg = '前端人,前端魂'
- return {
- msg,
- }
- }
- }
- </script>
3.2、响应式数据
上述的实例中中,如果我们在 template 内,打印 msg 的时候,就会发现响应式失效。
- <template>
- <div>
- <input type="text" v-model="msg" />
- {{ msg }}
- </div>
- </template>
是因为在 setup 内地自定义属性不具备响应式能力。vue3 的响应式原理是 通过底层代理 proxy 将数据包装一下,使得具有响应式。vue3 的响应式原理详情可查看《vue3 学习笔记 (五)——vue3 的 setup 如何实现响应式功能?》
此处 msg 是一个基础数据类型,可以通过 ref 包装下数据,ref 使用之前需要从 vue 中先引入。修改 script 中的代码
- <script>
- import { ref } from 'vue'
- export default {
- setup() {
- const msg = ref('前端人,前端魂')
- return {
- msg,
- }
- }
- }
- </script>
此时在 input 或在 setup 内改变 msg 的值,如:
- <script>
- import { ref } from 'vue'
- export default {
- setup() {
- const msg = ref('前端人,前端魂')
- setTimeout(()=>{
- msg.value = "我是前端人"
- },3000)
- return {
- msg,
- }
- }
- }
- </script>
此时无论如何修改 msg 都会保证实时响应。
与 ref 类似的还有 reactive 。ref 是让基础数据类型具有响应式,reactive 是让引用数据类型具有响应式。
3.3、组合式内如何使用路由?
一个项目中,导航选项卡是很常见的,在 App.vue 文件内,加入两个导航:
- <template>
- <router-view></router-view>
- <router-link to="/">首页</router-link>
- <router-link to="/my">我的</router-link>
- </template>
如果把上述路由跳转方式修改成 push 时,如何修改呢?
composition API 内使用路由时,需要先导入 userRouter 方法,调用该方法,生成 router。
如:
- import { useRouter } from 'vue-router'
- const router = useRouter()
router 是路由【导航对象】。
想要获取当前路由时,使用 useRoute 方法,如:
- import { useRoute } from 'vue-router'
- const route = useRoute()
route 是当前激活的路由状态信息对象,包含所有路由中的参数,params, query 都属于它。
修改上边路由跳转方式使用 push ,代码如下:
- <script >
- import { useRouter } from 'vue-router'
- export default{
- setup(){
- const router = useRouter()
- function go() {
- router.push({ path: '/my' })
- }
- return{
- go
- }
- }
- }
- </script>
- <template>
- <router-view></router-view>
- <router-link to="/">首页</router-link>
- <button @click="go">我的</button>
- </template>
路由传参以及参数获取,只需要把之前的 this.$router 换成 router 就可以啦。
四、vuex 4
vuex 是专为 vue.js 应用程序开发的状态管理模式+库。它采用集中式存储管理应用的所有组件的状态,并以相应的规则保证状态以一种可预测的方式发生变化。
在 vue3 中使用的是 vuex4 。vuex4 提供了和 vuex3 相同的 API 。
安装:
- npm install vuex@next
package.json 检查版本
- "dependencies": {
- "vue": "^3.2.25",
- "vue-router": "^4.0.12",
- "vuex": "^4.0.2"
- }
4.1、引入 vuex 状态管理
vuex4 创建 store 实例时,使用 createStore 函数创建,createStore 在使用之前需要先引入。
在 src 目录下,新建 store 文件夹下建 index.js :
- import { createStore } from "vuex"
- // 创建新的 store 实例
- const store = createStore({
- state: {
- name:'前端人'
- },
- getters: { },
- mutations: { },
- actions: { },
- modules: { }
- })
- export default store
在 main.js 中将 store 实例作为插件安装。
- import { createApp } from 'vue'
- import App from './App.vue'
- import router from "./router/index"
- import store from "./store/index"
- createApp(App).use(router).use(store).mount('#app')
4.2、获取状态信息
在 App.js 文件内,使用状态信息,这与 vuex3 使用方式相同。
- <template>
- 获取 state 内的状态信息
- {{ this.$store.state }}
- 获取 getters 内的属性
- {{ this.$store.getters.getName }}
- </template>
五、vuex 结合 composition API
在 组合式 API 中使用 store 时,需要使用 useStore 把 store 引入组件,然后才能操作。
- <script>
- import { useStore } from 'vuex'
- export default {
- setup() {
- const store = useStore()
- console.log('store', store.state.name)
- },
- }
- </script>
useStore 使用之前,需要先引入,然后调用。
5.1、操作 vuex 状态信息
vuex 中同步操作数据是由 commit 调用 mutations 内的方法,异步操作是 dispatch 调用 actions 内的方法。
示例1:mutations 内方法修改 name 的值。
- // 在 index.js 内
- mutations: {
- changeName(state,data) {
- //data 是传入要修改的值
- state.name = data
- }
- }
- //App.vue 内
- <script>
- import { useStore } from 'vuex'
- export default {
- setup() {
- const store = useStore()
- console.log('store', store.state.name)
- store.commit('changeName', '我是前端人')
- console.log('store', store.state.name)
- }
- }
- </script>
示例1:actions 内方法修改 name 的值。
actions 内的方法是没有办法直接操作 state 的状态信息,只有 mutations 内的方法才可以,所以需要调用 mutations 的方法,实现修改 。
index.js 代码
- import { createStore } from "vuex"
- const store = createStore({
- state: {
- name:'前端人'
- },
- getters: {
- getName(state) {
- return state.name
- }
- },
- mutations: {
- changeName(state,data) {
- state.name = data
- }
- },
- actions: {
- changeVal(state) {
- // 借用setTimeout 模拟异步操作
- setTimeout(() => {
- state.commit('changeName','我是前端人')
- },2000)
- }
- },
- modules:{}
- })
- export default store
App.vue 代码
- <script>
- import { useStore } from 'vuex'
- export default {
- setup() {
- const store = useStore()
- store.dispatch('changeVal')
- }
- }
- </script>
- <template>
- {{ this.$store.state.name }}
- {{ this.$store.getters.getName }}
- </template>


