目录
- 工作队列是什么
- 驱动程序
- 编译、测试
别人的经验,我们的阶梯!
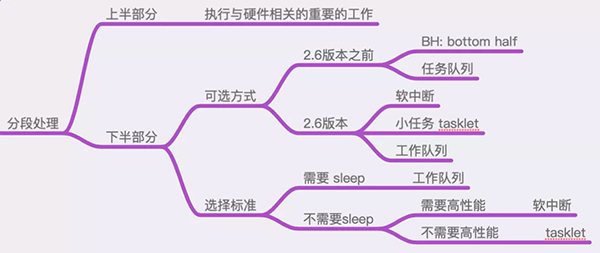
Linux中断处理可用下图总结:
图中描述了中断处理中的下半部分都有哪些机制,以及如何根据实际的业务场景、限制条件来进行选择。
可以看出:这些不同的实现之间,有些是重复的,或者是相互取代的关系。
也正因为此,它们之间的使用方式几乎是大同小异,至少是在API接口函数的使用方式上,从使用这的角度来看,都是非常类似的。
这篇文章,我们就通过实际的代码操作,来演示一下工作队列(workqueue)的使用方式。
工作队列是什么
工作队列是Linux操作系统中,进行中断下半部分处理的重要方式!
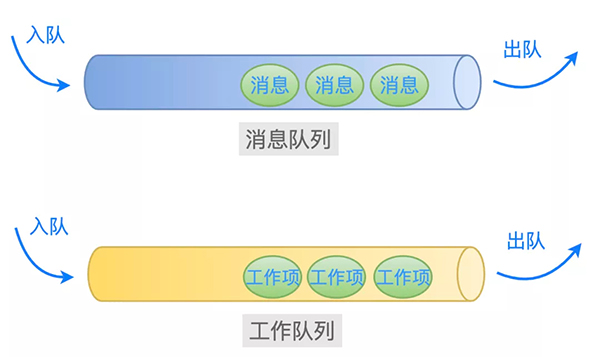
从名称上可以猜到:一个工作队列就好像业务层常用的消息队列一样,里面存放着很多的工作项等待着被处理。
工作队列中有两个重要的结构体:工作队列(workqueue_struct) 和 工作项(work_struct):
- struct workqueue_struct {
- struct list_head pwqs; /* WR: all pwqs of this wq */
- struct list_head list; /* PR: list of all workqueues */
- ...
- char name[WQ_NAME_LEN]; /* I: workqueue name */
- ...
- /* hot fields used during command issue, aligned to cacheline */
- unsigned int flags ____cacheline_aligned; /* WQ: WQ_* flags */
- struct pool_workqueue __percpu *cpu_pwqs; /* I: per-cpu pwqs */
- struct pool_workqueue __rcu *numa_pwq_tbl[]; /* PWR: unbound pwqs indexed by node */
- };
- struct work_struct {
- atomic_long_t data;
- struct list_head entry;
- work_func_t func; // 指向处理函数
- #ifdef CONFIG_LOCKDEP
- struct lockdep_map lockdep_map;
- #endif
- };
在内核中,工作队列中的所有工作项,是通过链表串在一起的,并且等待着操作系统中的某个线程挨个取出来处理。
这些线程,可以是由驱动程序通过 kthread_create 创建的线程,也可以是由操作系统预先就创建好的线程。
这里就涉及到一个取舍的问题了。
如果我们的处理函数很简单,那么就没有必要创建一个单独的线程来处理了。
原因有二:
- 创建一个内核线程是很耗费资源的,如果函数很简单,很快执行结束之后再关闭线程,太划不来了,得不偿失;
- 如果每一个驱动程序编写者都毫无节制地创建内核线程,那么内核中将会存在大量不必要的线程,当然了本质上还是系统资源消耗和执行效率的问题;
为了避免这种情况,于是操作系统就为我们预先创建好一些工作队列和内核线程。
我们只需要把需要处理的工作项,直接添加到这些预先创建好的工作队列中就可以了,它们就会被相应的内核线程取出来处理。
例如下面这些工作队列,就是内核默认创建的(include/linux/workqueue.h):
- /*
- * System-wide workqueues which are always present.
- *
- * system_wq is the one used by schedule[_delayed]_work[_on]().
- * Multi-CPU multi-threaded. There are users which expect relatively
- * short queue flush time. Don't queue works which can run for too
- * long.
- *
- * system_highpri_wq is similar to system_wq but for work items which
- * require WQ_HIGHPRI.
- *
- * system_long_wq is similar to system_wq but may host long running
- * works. Queue flushing might take relatively long.
- *
- * system_unbound_wq is unbound workqueue. Workers are not bound to
- * any specific CPU, not concurrency managed, and all queued works are
- * executed immediately as long as max_active limit is not reached and
- * resources are available.
- *
- * system_freezable_wq is equivalent to system_wq except that it's
- * freezable.
- *
- * *_power_efficient_wq are inclined towards saving power and converted
- * into WQ_UNBOUND variants if 'wq_power_efficient' is enabled; otherwise,
- * they are same as their non-power-efficient counterparts - e.g.
- * system_power_efficient_wq is identical to system_wq if
- * 'wq_power_efficient' is disabled. See WQ_POWER_EFFICIENT for more info.
- */
- extern struct workqueue_struct *system_wq;
- extern struct workqueue_struct *system_highpri_wq;
- extern struct workqueue_struct *system_long_wq;
- extern struct workqueue_struct *system_unbound_wq;
- extern struct workqueue_struct *system_freezable_wq;
- extern struct workqueue_struct *system_power_efficient_wq;
- extern struct workqueue_struct *system_freezable_power_efficient_wq;
以上这些默认工作队列的创建代码是(kernel/workqueue.c):
- int __init workqueue_init_early(void)
- {
- ...
- system_wq = alloc_workqueue("events", 0, 0);
- system_highpri_wq = alloc_workqueue("events_highpri", WQ_HIGHPRI, 0);
- system_long_wq = alloc_workqueue("events_long", 0, 0);
- system_unbound_wq = alloc_workqueue("events_unbound", WQ_UNBOUND,
- WQ_UNBOUND_MAX_ACTIVE);
- system_freezable_wq = alloc_workqueue("events_freezable",
- WQ_FREEZABLE, 0);
- system_power_efficient_wq = alloc_workqueue("events_power_efficient",
- WQ_POWER_EFFICIENT, 0);
- system_freezable_power_efficient_wq = alloc_workqueue("events_freezable_power_efficient",
- WQ_FREEZABLE | WQ_POWER_EFFICIENT,
- 0);
- ...
- }
此外,由于工作队列 system_wq 被使用的频率很高,于是内核就封装了一个简单的函数(schedule_work)给我们使用:
- /**
- * schedule_work - put work task in global workqueue
- * @work: job to be done
- *
- * Returns %false if @work was already on the kernel-global workqueue and
- * %true otherwise.
- *
- * This puts a job in the kernel-global workqueue if it was not already
- * queued and leaves it in the same position on the kernel-global
- * workqueue otherwise.
- */
- static inline bool schedule_work(struct work_struct *work){
- return queue_work(system_wq, work);
- }
当然了,任何事情有利就有弊!
由于内核默认创建的工作队列,是被所有的驱动程序共享的。
如果所有的驱动程序都把等待处理的工作项委托给它们来处理,那么就会导致某个工作队列中过于拥挤。
根据先来后到的原则,工作队列中后加入的工作项,就可能因为前面工作项的处理函数执行的时间太长,从而导致时效性无法保证。
因此,这里存在一个系统平衡的问题。
关于工作队列的基本知识点就介绍到这里,下面来实际操作验证一下。
驱动程序
之前的几篇文章,在驱动程序中测试中断处理的操作流程都是一样的,因此这里就不在操作流程上进行赘述了。
这里直接给出驱动程序的全貌代码,然后查看 dmesg 的输出信息。
创建驱动程序源文件和 Makefile:
- $ cd tmp/linux-4.15/drivers
- $ mkdir my_driver_interrupt_wq
- $ touch my_driver_interrupt_wq.c
- $ touch Makefile
示例代码全貌
测试场景是:加载驱动模块之后,如果监测到键盘上的ESC键被按下,那么就往内核默认的工作队列system_wq中增加一个工作项,然后观察该工作项对应的处理函数是否被调用。
- #include <linux/kernel.h>
- #include <linux/module.h>
- #include <linux/interrupt.h>
- static int irq;
- static char * devname;
- static struct work_struct mywork;
- // 接收驱动模块加载时传入的参数
- module_param(irq, int, 0644);
- module_param(devname, charp, 0644);
- // 定义驱动程序的 ID,在中断处理函数中用来判断是否需要处理
- #define MY_DEV_ID 1226
- // 驱动程序数据结构
- struct myirq
- {
- int devid;
- };
- struct myirq mydev ={ MY_DEV_ID };
- #define KBD_DATA_REG 0x60
- #define KBD_STATUS_REG 0x64
- #define KBD_SCANCODE_MASK 0x7f
- #define KBD_STATUS_MASK 0x80
- // 工作项绑定的处理函数
- static void mywork_handler(struct work_struct *work)
- {
- printk("mywork_handler is called. \n");
- // do some other things
- }
- //中断处理函数
- static irqreturn_t myirq_handler(int irq, void * dev)
- {
- struct myirq mydev;
- unsigned char key_code;
- mydev = *(struct myirq*)dev;
- // 检查设备 id,只有当相等的时候才需要处理
- if (MY_DEV_ID == mydev.devid)
- {
- // 读取键盘扫描码
- key_code = inb(KBD_DATA_REG);
- if (key_code == 0x01)
- {
- printk("ESC key is pressed! \n");
- // 初始化工作项
- INIT_WORK(&mywork, mywork_handler);
- // 加入到工作队列 system_wq
- schedule_work(&mywork);
- }
- }
- return IRQ_HANDLED;
- }
- // 驱动模块初始化函数
- static int __init myirq_init(void)
- {
- printk("myirq_init is called. \n");
- // 注册中断处理函数
- if(request_irq(irq, myirq_handler, IRQF_SHARED, devname, &mydev)!=0)
- {
- printk("register irq[%d] handler failed. \n", irq);
- return -1;
- }
- printk("register irq[%d] handler success. \n", irq);
- return 0;
- }
- // 驱动模块退出函数
- static void __exit myirq_exit(void)
- {
- printk("myirq_exit is called. \n");
- // 释放中断处理函数
- free_irq(irq, &mydev);
- }
- MODULE_LICENSE("GPL");
- module_init(myirq_init);
- module_exit(myirq_exit);
Makefile 文件
- ifneq ($(KERNELRELEASE),)
- obj-m := my_driver_interrupt_wq.o
- else
- KERNELDIR ?= /lib/modules/$(shell uname -r)/build
- PWD := $(shell pwd)
- default:
- $(MAKE) -C $(KERNELDIR) M=$(PWD) modules
- clean:
- $(MAKE) -C $(KERNEL_PATH) M=$(PWD) clean
- endif
编译、测试
- $ make
- $ sudo insmod my_driver_interrupt_wq.ko irq=1 devname=mydev
检查驱动模块是否加载成功:
- $ lsmod | grep my_driver_interrupt_wq
- my_driver_interrupt_wq 16384 0
再看一下 dmesg 的输出信息:
- $ dmesg
- ...
- [ 188.247636] myirq_init is called.
- [ 188.247642] register irq[1] handler success.
说明:驱动程序的初始化函数 myirq_init 被调用了,并且成功注册了 1 号中断的处理程序。
此时,按一下键盘上的 ESC 键。
操作系统在捕获到键盘中断之后,会依次调用此中断的所有中断处理程序,其中就包括我们注册的 myirq_handler 函数。
在这个函数中,当判断出是ESC按键时,就初始化一个工作项(把结构体 work_struct 类型的变量与一个处理函数绑定起来),然后丢给操作系统预先创建好的工作队列(system_wq)去处理,如下所示:
- if (key_code == 0x01)
- {
- printk("ESC key is pressed! \n");
- INIT_WORK(&mywork, mywork_handler);
- schedule_work(&mywork);
- }
因此,当相应的内核线程从这个工作队列(system_wq)中取出工作项(mywork)来处理的时候,函数 mywork_handler 就会被调用。
现在来看一下 dmesg 的输出信息:
- [ 305.053155] ESC key is pressed!
- [ 305.053177] mywork_handler is called.
可以看到:mywork_handler函数被正确调用了。
完美!


