本文转载自微信公众号「Java极客技术」,作者鸭血粉丝Tang。转载本文请联系Java极客技术公众号。
前几天阿粉给大家扩展了关于 Neo4J 图谱数据库的内容,今天阿粉教给大家如何使用 Java 来操作 Neo4j 数据库。
使用 Java 操作 Neo4J
首先我们先使用原生的这种方式,导入 jar 包,然后:
- public class TestController {
- public static void main(String[] args) {
- Driver driver = GraphDatabase.driver("bolt://localhost:7687", AuthTokens.basic("neo4j", "Yinlidong1995."));
- Session session = driver.session();
- session.run("CREATE (n:Part {name: {name},title: {title}})",
- parameters( "name", "Arthur001", "title", "King001" ));
- StatementResult result = session.run( "MATCH (a:Part) WHERE a.name = {name} " +
- "RETURN a.name AS name, a.title AS title",
- parameters( "name", "Arthur001"));
- while (result.hasNext()) {
- Record record = result.next();
- System.out.println( record.get( "title" ).asString() + "" + record.get( "name" ).asString() );
- }
- session.close();
- driver.close();
- }
- }
这是一种比较古老的方式,来实现的,而且还是需要些 CQL 语句来进行实现。但是胜在非常好理解,这个时候,我们需要再来看看图,看看在 Neo4J 中他是怎么展现的。
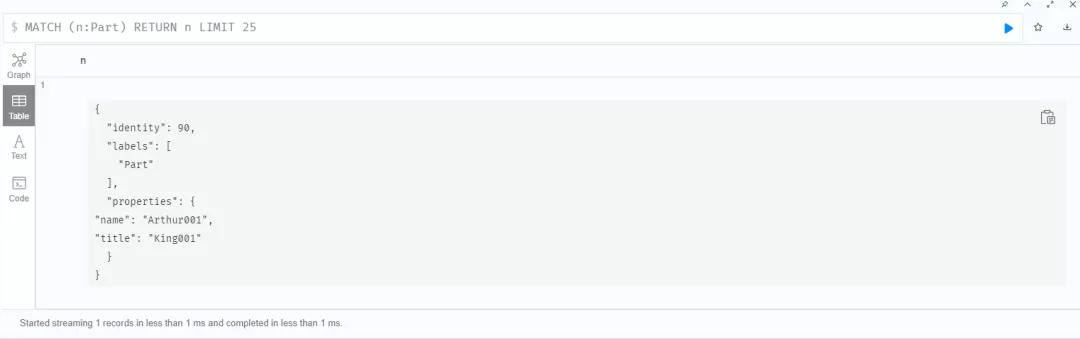
通过这个,我们至少证明我们成功连上了,并且创建也成功了。
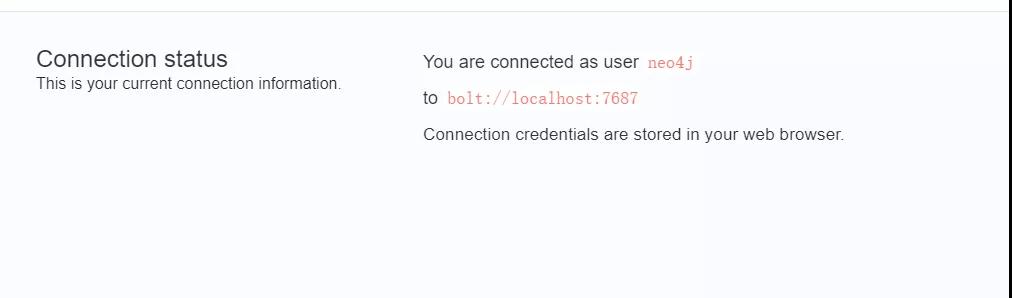
这时候有细心的读者就会问,为啥我之前在 GraphDatabase.driver 的地方,连接的是
bolt://localhost:7687.
这是因为,你启动的Neo4J 是7474,也就是说,Neo4J 服务里面可不是这个来连接,
SpringBoot 整合 Neo4j
1.创建SpringBoot项目
常规的创建SpringBoot项目,
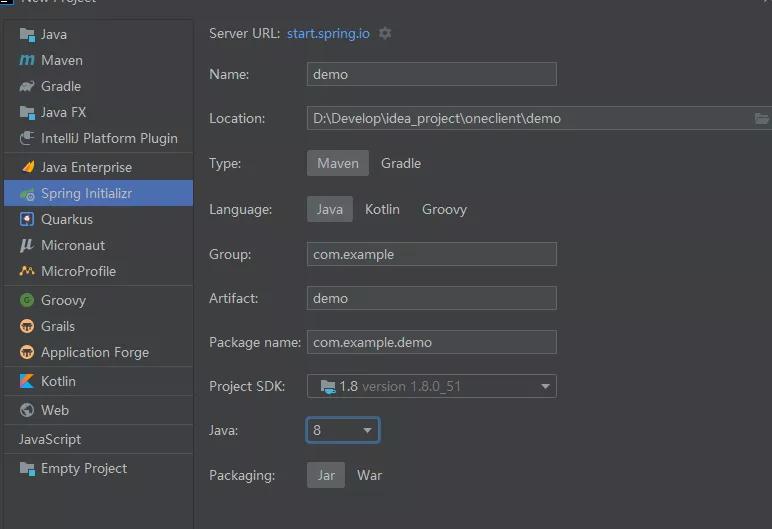
创建完成之后,习惯性的要改一下 SpringBoot 的版本号,最好别用最新的,因为阿粉亲身经历,使用最新版的,出现了错误你都不知道怎么出现的,就是这么神奇,你永远都发现不了的bug。
我们把版本号改成2.1.0,这样的话,我们在 pom 文件中加入依赖 jar
- <dependency>
- <groupId>org.springframework.boot</groupId>
- <artifactId>spring-boot-starter-data-neo4j</artifactId>
- </dependency>
- <dependency>
- <groupId>org.projectlombok</groupId>
- <artifactId>lombok</artifactId>
- <version>1.16.10</version>
- </dependency>
2.增加配置
- spring:
- data:
- neo4j:
- url: bolt://localhost:7687
- username: neo4j
- password: Yinlidong1995.
- main:
- allow-bean-definition-overriding: true
3.Neo4JConfig
- package com.example.neo4j.config;
- import org.neo4j.driver.v1.AuthTokens;
- import org.neo4j.driver.v1.Driver;
- import org.neo4j.driver.v1.GraphDatabase;
- import org.neo4j.driver.v1.Session;
- import org.springframework.beans.factory.annotation.Value;
- import org.springframework.context.annotation.Bean;
- import org.springframework.context.annotation.Configuration;
- import org.springframework.data.neo4j.repository.config.EnableNeo4jRepositories;
- import org.springframework.transaction.annotation.EnableTransactionManagement;
- @Configuration
- @EnableNeo4jRepositories("com.example.neo4j.repository")
- @EnableTransactionManagement
- public class Neo4jConfig {
- @Value("${spring.data.neo4j.url}")
- private String url;
- @Value("${spring.data.neo4j.username}")
- private String userName;
- @Value("${spring.data.neo4j.password}")
- private String password;
- @Bean(name = "session")
- public Session neo4jSession() {
- Driver driver = GraphDatabase.driver(url, AuthTokens.basic(userName, password));
- return driver.session();
- }
- }
4.编写实体类
- package com.example.neo4j.entry;
- import org.neo4j.ogm.annotation.*;
- import java.util.HashSet;
- import java.util.Set;
- @NodeEntity("group")
- @Data
- public class GroupNode {
- @Id
- @GeneratedValue
- private Long id;
- /**
- * 班级名称
- */
- @Property(name = "name")
- private String name;
- /**
- * 编号
- */
- private String num;
- @Relationship(type = "RelationEdge")
- private Set<RelationEdge> sets = new HashSet<>();
- public void addRelation(StudentNode sonNode, String name) {
- RelationEdge relationNode = new RelationEdge(this, sonNode, name);
- sets.add(relationNode);
- sonNode.getSets().add(relationNode);
- }
- }
学生实体类:
- package com.example.neo4j.entry;
- import org.neo4j.ogm.annotation.GeneratedValue;
- import org.neo4j.ogm.annotation.Id;
- import org.neo4j.ogm.annotation.NodeEntity;
- import org.neo4j.ogm.annotation.Relationship;
- import java.util.HashSet;
- import java.util.Set;
- /**
- * 有点类似于Mysql中的table 映射的对象类,mysql中叫做ORM,neo4j中叫做OGM [object graph mapping]
- */
- @NodeEntity("student")
- @Data
- public class StudentNode {
- @Id
- @GeneratedValue
- private Long id;
- /**
- * 学生名称
- */
- private String name;
- /**
- * 性别
- */
- private String sex;
- @Relationship(type = "RelationEdge", direction = "INCOMING")
- private Set<RelationEdge> sets = new HashSet<>();
- }
- package com.example.neo4j.entry;
- import lombok.Data;
- import org.neo4j.ogm.annotation.*;
- @RelationshipEntity(type = "RelationEdge")
- @Data
- public class RelationEdge {
- @Id
- @GeneratedValue
- private Long id;
- // 关系名
- private String name;
- @StartNode
- private GroupNode groupNode;
- @EndNode
- private StudentNode studentNode;
- public RelationEdge(GroupNode parentNode, StudentNode sonNode, String name) {
- this.groupNode = parentNode;
- this.studentNode = sonNode;
- this.name = name;
- }
- }
5.Repository接口
对应的学生接口:
- package com.example.neo4j.repository;
- import com.example.neo4j.entry.StudentNode;
- import org.springframework.data.neo4j.repository.Neo4jRepository;
- public interface StudentRepository extends Neo4jRepository<StudentNode,Long> {
- }
对应的班级接口
- package com.example.neo4j.repository;
- import com.example.neo4j.entry.GroupNode;
- import org.springframework.data.neo4j.repository.Neo4jRepository;
- public interface GroupRepository extends Neo4jRepository<GroupNode,Long> {
- }
最后完成编写我们的 Controller
- package com.example.neo4j.controller;
- import com.example.neo4j.entry.*;
- import com.example.neo4j.repository.GroupRepository;
- import com.example.neo4j.repository.StudentRepository;
- import lombok.extern.slf4j.Slf4j;
- import org.springframework.beans.factory.annotation.Autowired;
- import org.springframework.web.bind.annotation.GetMapping;
- import org.springframework.web.bind.annotation.RequestMapping;
- import org.springframework.web.bind.annotation.RestController;
- @RestController
- @RequestMapping("/node")
- @Slf4j
- public class GroupController {
- @Autowired
- private StudentRepository studentRepository;
- @Autowired
- private GroupRepository groupRepository;
- @GetMapping(value = "/create")
- public void createNodeRelation() {
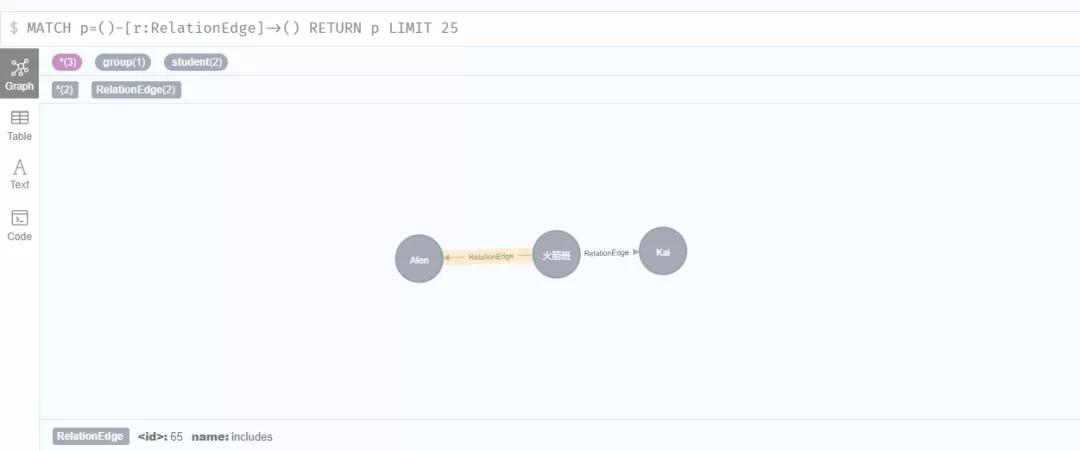
- StudentNode studentNode1 = new StudentNode();
- studentNode1.setName("Alen");
- studentNode1.setSex("男");
- StudentNode studentNode2 = new StudentNode();
- studentNode2.setName("Kai");
- studentNode2.setSex("女");
- studentRepository.save(studentNode1);
- studentRepository.save(studentNode2);
- GroupNode groupNode = new GroupNode();
- groupNode.setName("火箭班");
- groupNode.setNum("298");
- // 增加关系
- groupNode.addRelation(studentNode1, "includes");
- groupNode.addRelation(studentNode2, "includes");
- groupRepository.save(groupNode);
- }
- }
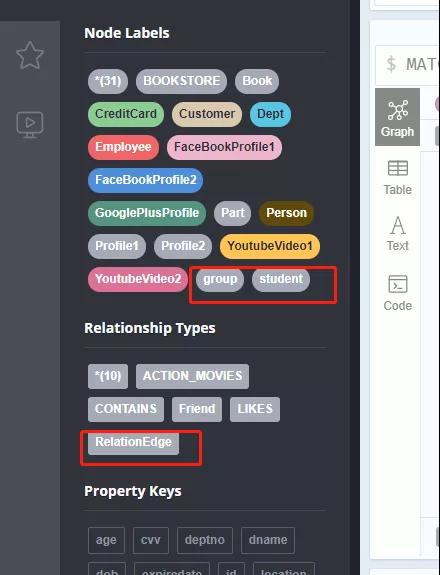
启动之后,访问http://localhost:8080/node/create
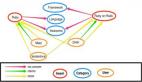
我们再去图谱数据库看看。
怎么样,使用Java 操作是不是也是非常简单的呢?这样的图谱数据库你会选择么?