1 简介
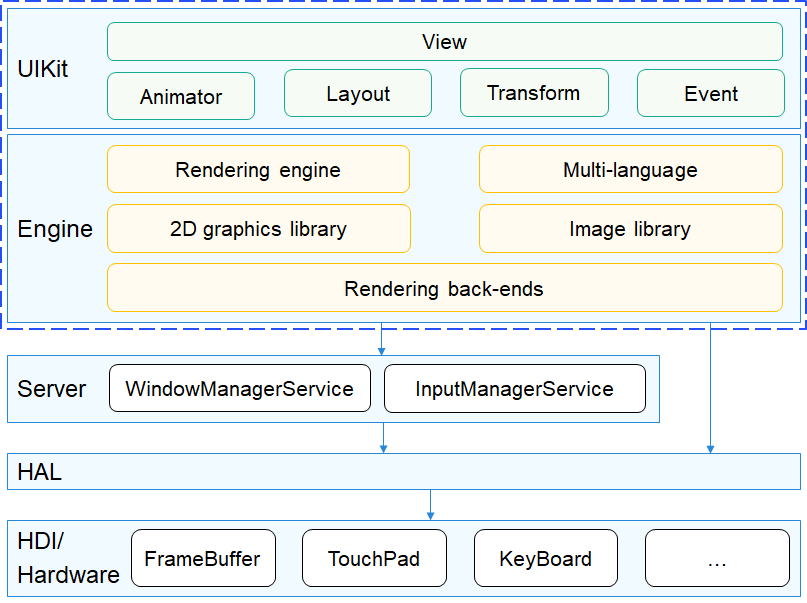
本文基于OpenHarmony 3.0为基础,讲解Graphic子系统的UI。 图形UI组件实现了一套系统级的图形引擎,该组件为应用开发提供UIKit接口,包括了动画、布局、图形转换、事件处理,以及丰富的UI组件。组件内部直接调用HAL接口,或者使用WMS(Window Manager Service)提供的客户端与硬件交互,以完成事件响应、图像绘制等操作。目前只看到在L1有使用。
1.1 图形子系统相关
- 《OpenHarmony 源码解析之图形子系统 (一)》
- 《OpenHarmony 源码解析之图形子系统(UI)》
1.2 OpenHarmony 架构图
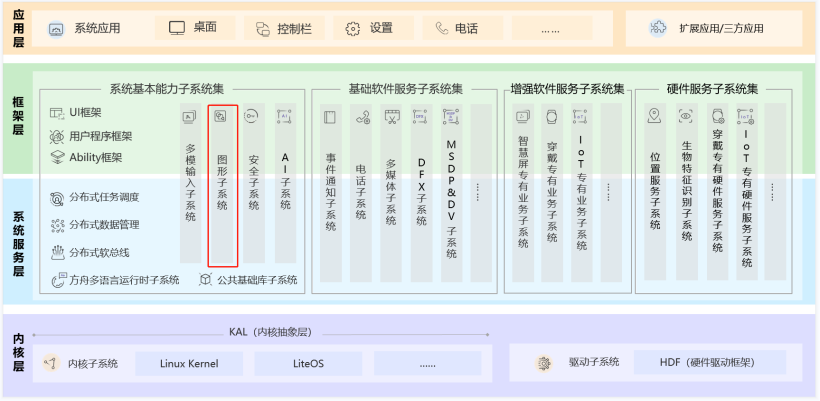
1.3 图形子系统架构图
2 基础知识
2.1 代码目录
- /foundation/graphic/ui
- ├── frameworks # 框架代码
- │ ├── animator # 动画模块
- │ ├── common # 公共模块
- │ ├── components # 组件
- │ ├── core # ui主流程(渲染、任务管理等)
- │ ├── default_resource
- │ ├── dfx # 维测功能
- │ ├── dock # 驱动适配层
- │ │ └── ohos # ohos平台适配
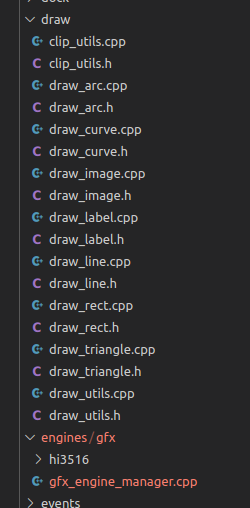
- │ ├── draw # 绘制逻辑
- │ ├── engines # 绘制引擎
- │ │ ├── dfb
- │ │ ├── general
- │ │ ├── gpu_vglite
- │ │ └── software_zlite
- │ ├── events # 事件
- │ ├── font # 字体
- │ ├── imgdecode # 图片管理
- │ ├── layout # 页面布局
- │ ├── themes # 主题管理
- │ ├── window # 窗口管理适配层
- │ └── window_manager
- │ └── dfb
- ├── interfaces # 接口
- │ ├── innerkits # 模块间接口
- │ │ └── xxx # 子模块的接口
- │ └── kits # 对外接口
- │ └── xxx # 子模块的接口
- ├── test # 测试代码
- │ ├── framework
- │ │ ├── include # 测试框架头文件
- │ │ └── src # 测试框架源码
- │ ├── uitest # 显示效果测试(可执行程序在foundation/graphic/wms/test:sample_ui)
- │ │ └── test_xxx # 具体UI组件效果测试
- │ └── unittest # 单元测试
- │ └── xxx # 具体UI组件单元测试
- └── tools # 测试和模拟器工具(模拟器工程、资源文件)
- └── qt # QT工程
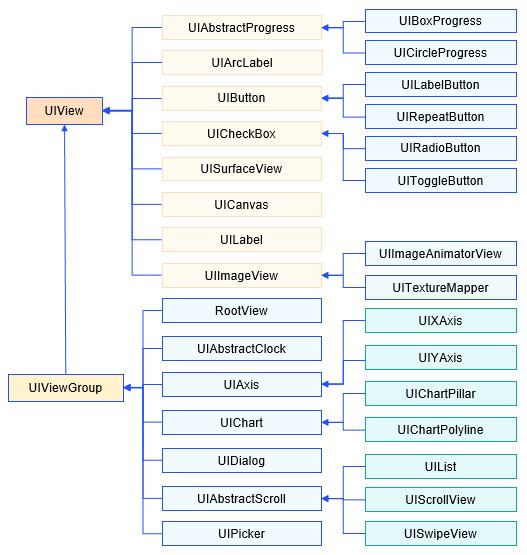
2.2 图形组件一览
3 实践
3.1 UI控件效果
具体UI控件效果可以通过QT Creator运行QT工程,效果如下:
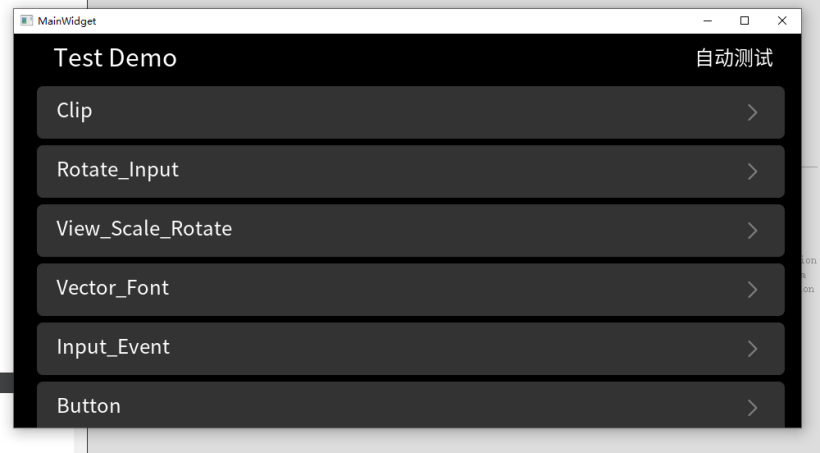
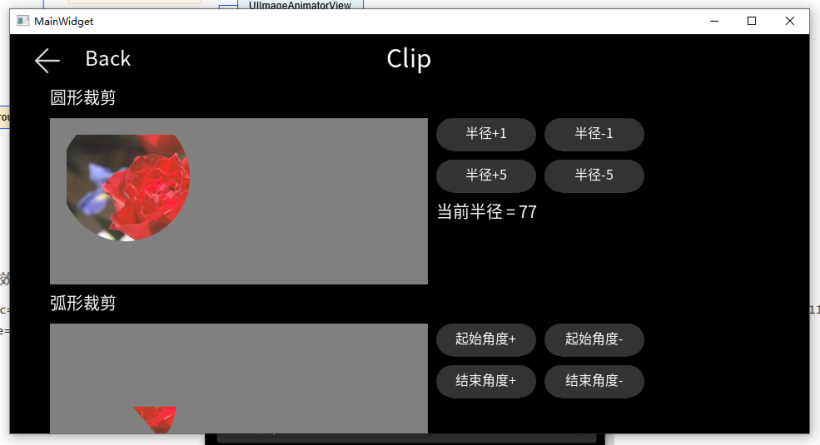
所有UI控件在工程都可以找到效果,通过查看工程代码可以了解到各控件的使用方式以及参数详情。
3.2 示例
下面我们举例UIButton解析控件的实现:
构造函数-参数
- UIButton::UIButton()
- : defaultImgSrc_(nullptr),
- triggeredImgSrc_(nullptr),
- currentImgSrc_(ButtonImageSrc::BTN_IMAGE_DEFAULT),
- imgX_(0),
- imgY_(0),
- contentWidth_(0),
- contentHeight_(0),
- state_(RELEASED),
- styleState_(RELEASED),
- #if DEFAULT_ANIMATION
- enableAnimation_(true),
- animator_(*this),
- #endif
- buttonStyleAllocFlag_(false)
设置Theme
- void UIButton::SetupThemeStyles()
- {
- Theme* theme = ThemeManager::GetInstance().GetCurrent();
- if (theme == nullptr) {
- buttonStyles_[RELEASED] = &(StyleDefault::GetButtonReleasedStyle());
- buttonStyles_[PRESSED] = &(StyleDefault::GetButtonPressedStyle());
- buttonStyles_[INACTIVE] = &(StyleDefault::GetButtonInactiveStyle());
- } else {
- buttonStyles_[RELEASED] = &(theme->GetButtonStyle().released);
- buttonStyles_[PRESSED] = &(theme->GetButtonStyle().pressed);
- buttonStyles_[INACTIVE] = &(theme->GetButtonStyle().inactive);
- }
- style_ = buttonStyles_[RELEASED];
- }
绘制OnDraw
- void UIButton::OnDraw(BufferInfo& gfxDstBuffer, const Rect& invalidatedArea)
- {
- OpacityType opa = GetMixOpaScale();
- BaseGfxEngine::GetInstance()->DrawRect(gfxDstBuffer, GetOrigRect(), invalidatedArea, *buttonStyles_[state_], opa);
- DrawImg(gfxDstBuffer, invalidatedArea, opa);
- }
可以看到需要绘制2个,第一个通过绘制引擎绘制点->DrawRect,
- void BaseGfxEngine::DrawRect(BufferInfo& dst,
- const Rect& rect,
- const Rect& dirtyRect,
- const Style& style,
- OpacityType opacity)
- {
- DrawRect::Draw(dst, rect, dirtyRect, style, opacity);
- }
第2个绘制图片->DrawImg
- void UIButton::DrawImg(BufferInfo& gfxDstBuffer, const Rect& invalidatedArea, OpacityType opaScale)
- {
- const Image* image = GetCurImageSrc();
- if (image == nullptr) {
- return;
- }
- ImageHeader header = {0};
- image->GetHeader(header);
- Rect coords;
- Rect viewRect = GetContentRect();
- coords.SetLeft(viewRect.GetLeft() + GetImageX());
- coords.SetTop(viewRect.GetTop() + GetImageY());
- coords.SetWidth(header.width);
- coords.SetHeight(header.height);
- Rect trunc(invalidatedArea);
- if (trunc.Intersect(trunc, viewRect)) {
- image->DrawImage(gfxDstBuffer, coords, trunc, *buttonStyles_[state_], opaScale);
- }
- }
可以发现最终还是调用draw目录下通过绘制点、线、图片等等来进行绘制:
事件处理
UIButton只重写了OnPressEvent,OnReleaseEvent和OnCancelEvent,增加了动画,具体实现还是在基类UIView,主要使用的函数:
- void UIView::InvalidateRect(const Rect& invalidatedArea)
- {
- if (!visible_) {
- if (needRedraw_) {
- needRedraw_ = false;
- } else {
- return;
- }
- }
- Rect trunc(invalidatedArea);
- bool isIntersect = true;
- UIView* par = parent_;
- UIView* cur = this;
- while (par != nullptr) {
- if (!par->visible_) {
- return;
- }
- isIntersect = trunc.Intersect(par->GetContentRect(), trunc);
- if (!isIntersect) {
- break;
- }
- cur = par;
- par = par->parent_;
- }
- if (isIntersect && (cur->GetViewType() == UI_ROOT_VIEW)) {
- RootView* rootView = reinterpret_cast<RootView*>(cur);
- rootView->AddInvalidateRectWithLock(trunc, this);
- }
- }
在UIView里面可以发现还有很多事件比如:OnLongPressEvent,我们可以重写来自定义效果。
UIView重要函数说明
(1) OnPreDraw——准备绘制
(2) OnDraw——绘制动作
(3) OnPostDraw——能在UI线程绘制
(4) Invalidate——请求重新绘制,有需要更新界面就可以调用此函数重新绘制
(5) Scale——缩放事件
(6) Translate——移动事件
(7) OnPressEvent等——触摸事件
还有很多常用的函数,有兴趣的同学可以自行查阅。
4 总结
到这我们对UI控件的一个使用和效果都有了解,底层实现流程也熟悉。不管是直接绘制还是通过绘制引擎绘制,最终还是调用draw目录下的绘制函数。自定义控件我们可以继承现有控件,扩展实现效果,还可以直接继承基类UIView。