前言
在上一篇关于 TCA 的文章中,我们通过总览的方式看到了 TCA 中一个 Feature 的运作方式,并尝试实现了一个最小的 Feature 和它的测试。在这篇文章中,我们会继续深入,看看 TCA 中对 Binding 的处理,以及使用 Environment 来把依赖从 reducer 中解耦的方法。
如果你想要跟做,可以直接使用上一篇文章完成练习后最后的状态,或者从这里[1]获取到起始代码。
关于绑定
绑定和普通状态的区别
在上一篇文章中,我们实现了“点击按钮” -> “发送 Action” -> “更新 State” -> “触发 UI 更新” 的流程,这解决了“状态驱动 UI”这一课题。不过,除了单纯的“通过状态来更新 UI” 以外,SwiftUI 同时也支持在反方向使用 @Binding 的方式把某个 State 绑定给控件,让 UI 能够不经由我们的代码,来更改某个状态。在 SwiftUI 中,我们几乎可以在所有既表示状态,又能接受输入的控件上找到这种模式,比如 TextField 接受 String 的绑定 Binding
当我们把某个状态通过 Binding 交给其他 view 时,这个 view 就有能力改变去直接改变状态了,实际上这是违反了 TCA 中关于只能在 reducer 中更改状态的规定的。对于绑定,TCA 中为 View Store 添加了将状态转换为一种“特殊绑定关系”的方法。我们来试试看把 Counter 例子中的显示数字的 Text 改成可以接受直接输入的 TextField。
在 TCA 中实现单个绑定
首先,为 CounterAction 和 counterReducer 添加对应的接受一个字符串值来设定 count 的能力:
- enum CounterAction {
- case increment
- case decrement
- + case setCount(String)
- case reset
- }
- let counterReducer = Reducer<Counter, CounterAction, CounterEnvironment> {
- state, action, _ in
- switch action {
- // ...
- + case .setCount(let text):
- + if let value = Int(text) {
- + state.count = value
- + }
- + return .none
- // ...
- }.debug()
接下来,把 body 中原来的 Text 替换为下面的 TextField:
- var body: some View {
- WithViewStore(store) { viewStore in
- // ...
- - Text("\(viewStore.count)")
- + TextField(
- + String(viewStore.count),
- + text: viewStore.binding(
- + get: { String($0.count) },
- + send: { CounterAction.setCount($0) }
- + )
- + )
- + .frame(width: 40)
- + .multilineTextAlignment(.center)
- .foregroundColor(colorOfCount(viewStore.count))
- }
- }
viewStore.binding 方法接受 get 和 send 两个参数,它们都是和当前 View Store 及绑定 view 类型相关的泛型函数。在特化 (将泛型在这个上下文中转换为具体类型) 后:
- get: (Counter) -> String 负责为对象 View (这里的 TextField) 提供数据。
- send: (String) -> CounterAction 负责将 View 新发送的值转换为 View Store 可以理解的 action,并发送它来触发 counterReducer。 在 counterReducer 接到 binding 给出的 setCount 事件后,我们就回到使用 reducer 进行状态更新,并驱动 UI 的标准 TCA 循环中了。
传统的 SwiftUI 中,我们在通过 $ 符号获取一个状态的 Binding 时,实际上是调用了它的 projectedValue。而 viewStore.binding 在内部通过将 View Store 自己包装到一个 ObservedObject 里,然后通过自定义的 projectedValue 来把输入的 get 和 send 设置给 Binding 使用中。对内,它通过内部存储维持了状态,并把这个细节隐藏起来;对外,它通过 action 来把状态的改变发送出去。捕获这个改变,并对应地更新它,最后再把新的状态再次通过 get 设置给 binding,是开发者需要保证的事情。
简化代码
做一点重构:现在 binding 的 get 是从 $0.count 生成的 String,reducer 中对 state.count 的设定也需要先从 String 转换为 Int。我们把这部分 Mode 和 View 表现形式相关的部分抽取出来,放到 Counter 的一个 extension 中,作为 View Model 使用:
- extension Counter {
- var countString: String {
- get { String(count) }
- set { count = Int(newValue) ?? count }
- }
- }
把 reducer 中转换 String 的部分替换成 countString:
- let counterReducer = Reducer<Counter, CounterAction, CounterEnvironment> {
- state, action, _ in
- switch action {
- // ...
- case .setCount(let text):
- - if let value = Int(text) {
- - state.count = value
- - }
- + state.countString = text
- return .none
- // ...
- }.debug()
在 Swift 5.2 中,KeyPath 已经可以被当作函数使用了,因此我们可以把 \Counter.countString 的类型看作 (Counter) -> String。同时,Swift 5.3 中 enum case 也可以当作函数[2],可以认为 CounterAction.setCount 具有类型 (String) -> CounterAction。两者恰好满足 binding 的两个参数的要求,所以可以进一步将创建绑定的部分简化:
- // ...
- TextField(
- String(viewStore.count),
- text: viewStore.binding(
- - get: { String($0.count) },
- + get: \.countString,
- - send: { CounterAction.setCount($0) }
- + send: CounterAction.setCount
- )
- )
- // ...
最后,别忘了为 .setCount 添加测试!
多个绑定值 如果在一个 Feature 中,有多个绑定值的话,使用例子中这样的方式,每次我们都会需要添加一个 action,然后在 binding 中 send 它。这是千篇一律的模板代码,TCA 中设计了 @BindableState 和 BindableAction,让多个绑定的写法简单一些。具体来说,分三步:
为 State 中的需要和 UI 绑定的变量添加 @BindableState。
将 Action 声明为 BindableAction,然后添加一个“特殊”的 case binding(BindingAction
在 Reducer 中处理这个 .binding,并添加 .binding() 调用。
直接用代码说明会更快:
- // 1
- struct MyState: Equatable {
- + @BindableState var foo: Bool = false
- + @BindableState var bar: String = ""
- }
- // 2
- - enum MyAction {
- + enum MyAction: BindableAction {
- + case binding(BindingAction<MyState>)
- }
- // 3
- let myReducer = //...
- // ...
- + case .binding:
- + return .none
- }
- + .binding()
这样一番操作后,我们就可以在 View 里用类似标准 SwiftUI 的做法,使用 $ 取 projected value 来进行 Binding 了:
- struct MyView: View {
- let store: Store<MyState, MyAction>
- var body: some View {
- WithViewStore(store) { viewStore in
- + Toggle("Toggle!", isOn: viewStore.binding(\.$foo))
- + TextField("Text Field!", text: viewStore.binding(\.$bar))
- }
- }
- }
这样一来,即使有多个 binding 值,我们也只需要用一个 .binding action 就能对应了。这段代码能够工作,是因为 BindableAction 要求一个签名为 BindingAction
- public protocol BindableAction {
- static func binding(_ action: BindingAction<State>) -> Self
- }
再一次,利用了将 enum case 作为函数使用的 Swift 新特性,代码可以变得非常简单优雅。
环境值
猜数字游戏
回到 Counter 的例子来。既然已经有输入数字的方式了,那不如来做一个猜数字的小游戏吧!
猜数字:程序随机选择 -100 到 100 之间的数字,用户输入一个数字,程序判断这个数字是否就是随机选择的数字。如果不是,返回“太大”或者“太小”作为反馈,并要求用户继续尝试输入下一个数字进行猜测。
最简单的方法,是在 Counter 中添加一个属性,用来持有这个随机数:
- struct Counter: Equatable {
- var count: Int = 0
- + let secret = Int.random(in: -100 ... 100)
- }
检查 count 和 secret 的关系,返回答案:
- extension Counter {
- enum CheckResult {
- case lower, equal, higher
- }
- var checkResult: CheckResult {
- if count < secret { return .lower }
- if count > secret { return .higher }
- return .equal
- }
- }
有了这个模型,我们就可以通过使用 checkResult 来在 view 中显示一个代表结果的 Label 了:
- struct CounterView: View {
- let store: Store<Counter, CounterAction>
- var body: some View {
- WithViewStore(store) { viewStore in
- VStack {
- + checkLabel(with: viewStore.checkResult)
- HStack {
- Button("-") { viewStore.send(.decrement) }
- // ...
- }
- func checkLabel(with checkResult: Counter.CheckResult) -> some View {
- switch checkResult {
- case .lower:
- return Label("Lower", systemImage: "lessthan.circle")
- .foregroundColor(.red)
- case .higher:
- return Label("Higher", systemImage: "greaterthan.circle")
- .foregroundColor(.red)
- case .equal:
- return Label("Correct", systemImage: "checkmark.circle")
- .foregroundColor(.green)
- }
- }
- }
最终,我们可以得到这样的 UI:
外部依赖
当我们用这个 UI “蒙对”答案后,Reset 按钮虽然可以把猜测归零,但它并不能为我们重开一局,这当然有点无聊。我们来试试看把 Reset 按钮改成 New Game 按钮。
在 UI 和 CounterAction 里我们已经定义了 .reset 行为了,进行一些重命名的工作:
- enum CounterAction {
- // ...
- - case reset
- + case playNext
- }
- struct CounterView: View {
- // ...
- var body: some View {
- // ...
- - Button("Reset") { viewStore.send(.reset) }
- + Button("Next") { viewStore.send(.playNext) }
- }
- }
然后在 counterReducer 里处理这个情况,
- struct Counter: Equatable {
- var count: Int = 0
- - let secret = Int.random(in: -100 ... 100)
- + var secret = Int.random(in: -100 ... 100)
- }
- let counterReducer = Reducer<Counter, CounterAction, CounterEnvironment> {
- // ...
- - case .reset:
- + case .playNext:
- state.count = 0
- + state.secret = Int.random(in: -100 ... 100)
- return .none
- // ...
- }.debug()
运行 app,观察 reducer debug() 的输出,可以看到一切正常!太好了。
随时 Cmd + U 运行测试是大家都应该养成的习惯,这时候我们可以发现测试编译失败了。最后的任务就是修正原来的 .reset 测试,这也很简单:
- func testReset() throws {
- - store.send(.reset) { state in
- + store.send(.playNext) { state in
- state.count = 0
- }
- }
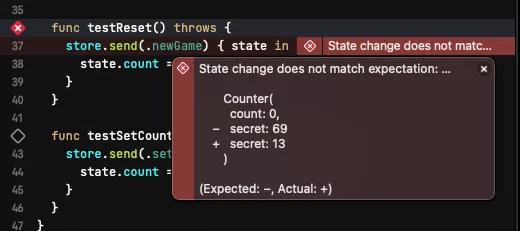
但是,测试的运行结果大概率会失败!
这是因为 .playNext 现在不仅重置 count,也会随机生成新的 secret。而 TestStore 会把 send 闭包结束时的 state 和真正的由 reducer 操作的 state 进行比较并断言:前者没有设置合适的 secret,导致它们并不相等,所以测试失败了。
我们需要一种稳定的方式,来保证测试成功。
使用环境值解决依赖
在 TCA 中,为了保证可测试性,reducer 必须是纯函数:也就是说,相同的输入 (state, action 和 environment) 的组合,必须能给出相同的输入 (在这里输出是 state 和 effect,我们会在后面的文章再接触 effect 角色)。
- let counterReducer = // ... {
- state, action, _ in
- // ...
- case .playNext:
- state.count = 0
- state.secret = Int.random(in: -100 ... 100)
- return .none
- //...
- }.debug()
在处理 .playNext 时,Int.random 显然无法保证每次调用都给出同样结果,它也是导致 reducer 变得无法测试的原因。TCA 中环境 (Environment) 的概念,就是为了对应这类外部依赖的情况。如果在 reducer 内部出现了依赖外部状态的情况 (比如说这里的 Int.random,使用的是自动选择随机种子的 SystemRandomNumberGenerator),我们可以把这个状态通过 Environment 进行注入,让实际 app 和单元测试能使用不同的环境。
首先,更新 CounterEnvironment,加入一个属性,用它来持有随机生成 Int 的方法。
- struct CounterEnvironment {
- + var generateRandom: (ClosedRange<Int>) -> Int
- }
现在编译器需要我们为原来 CounterEnvironment() 的地方加上 generateRandom 的设定。我们可以直接在生成时用 Int.random 来创建一个 CounterEnvironment:
- CounterView(
- store: Store(
- initialState: Counter(),
- reducer: counterReducer,
- - environment: CounterEnvironment()
- + environment: CounterEnvironment(
- + generateRandom: { Int.random(in: $0) }
- + )
- )
- )
一种更加常见和简洁的做法,是为 CounterEnvironment 定义一组环境,然后把它们传到相应的地方:
- struct CounterEnvironment {
- var generateRandom: (ClosedRange<Int>) -> Int
- + static let live = CounterEnvironment(
- + generateRandom: Int.random
- + )
- }
- CounterView(
- store: Store(
- initialState: Counter(),
- reducer: counterReducer,
- - environment: CounterEnvironment()
- + environment: .live
- )
- )
现在,在 reducer 中,就可以使用注入的环境值来达到和原来等效的结果了:
- let counterReducer = // ... {
- - state, action, _ in
- + state, action, environment in
- // ...
- case .playNext:
- state.count = 0
- - state.secret = Int.random(in: -100 ... 100)
- + state.secret = environment.generateRandom(-100 ... 100)
- return .none
- // ...
- }.debug()
万事俱备,回到最开始的目的 - 保证测试能顺利通过。在 test target 中,用类似的方法创建一个 .test 环境:
- extension CounterEnvironment {
- static let test = CounterEnvironment(generateRandom: { _ in 5 })
- }
现在,在生成 TestStore 的时候,使用 .test,然后在断言时生成合适的 Counter 作为新的 state,测试就能顺利通过了:
- store = TestStore(
- initialState: Counter(count: Int.random(in: -100...100)),
- reducer: counterReducer,
- - environment: CounterEnvironment()
- + environment: .test
- )
- store.send(.playNext) { state in
- - state.count = 0
- + state = Counter(count: 0, secret: 5)
- }
在 store.send 的闭包里,我们现在直接为 state 设置了一个新的 Counter,并明确了所有期望的属性。这里也可以分开两行,写成 state.count = 0 以及 state.secret = 5,测试也可以通过。选择哪种方式都可以,但在涉及到复杂的情况下,会倾向于选择完整的赋值:在测试中,我们希望的是通过断言来比较期望 state 和实际 state 的差别,而不是重新去实现一次 reducer 中的逻辑。这可能引入混乱,因为在测试失败时你需要去排查到底是 reducer 本身的问题,还是测试代码中操作状态造成的问题。
其他常见依赖
除了像是 random 系列以外,凡是会随着调用环境的变化 (包括时间,地点,各种外部状态等等) 而打破 reducer 纯函数特性的外部依赖,都应该被纳入 Environment 的范畴。常见的像是 UUID 的生成,当前 Date 的获取,获取某个运行队列 (比如 main queue),使用 Core Location 获取现在的位置信息,负责发送网络请求的网络框架等等。
它们之中有一些是可以同步完成的,比如例子中的 Int.random;有一些则是需要一定时间才能得到结果,比如获取位置信息和发送网络请求。对于后者,我们往往会把它转换为一个 Effect。我们会在下一篇文章中再讨论 Effect。
练习
如果你没有跟随本文更新代码,你可以在这里[3]找到下面练习的起始代码。参考实现可以在这里[4]找到。
添加一个 Slider
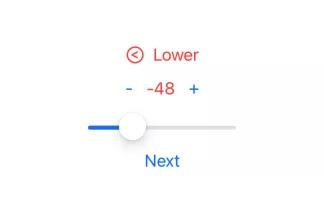
用键盘和加减号来控制 Counter 已经不错了,但是添加一个 Slider 会更有趣。请为 CounterView 添加一个 Slider,用来来和 TextField 以及 “+” “-“ Button 一起,控制我们的猜数字游戏。
期望的 UI 大概是这样:
别忘了写测试!
完善 Counter,记录更多信息
为了后面功能的开发,我们需要更新一下 Counter 模型。首先,每个谜题添加一些元信息,比如谜题 ID:
在 Counter 中加上下面的属性,然后让它满足 Identifiable:
- - struct Counter: Equatable {
- + struct Counter: Equatable, Identifiable {
- var count: Int = 0
- var secret = Int.random(in: -100 ... 100)
- + var id: UUID = UUID()
- }
在开始新一轮游戏的时候,记得更新 id。还有,别忘了写测试!


