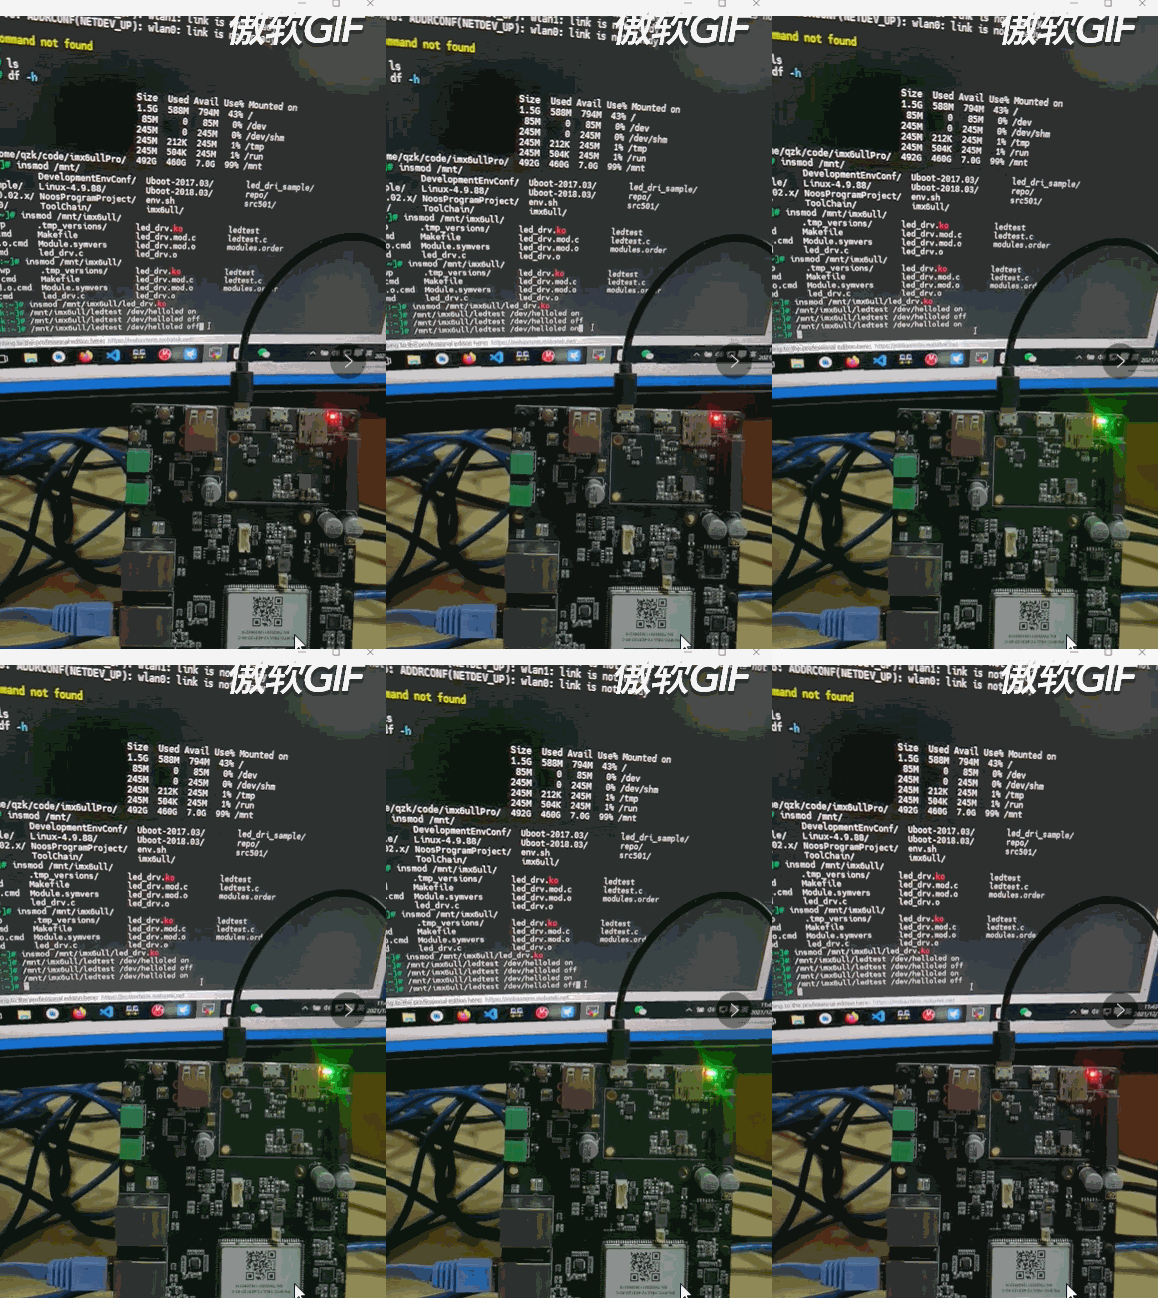
老规矩还是将最终希望跑出来的效果放出来。如下:

HDF驱动框架探路5:
前言
想要深入了解HDF框架的话,应该绕不开linux驱动程序的掌握。由于是在看了韦东山老师对openharmony做的移植后,觉得linux驱动的内功还是必须要有的,所以本文章对比linux应用在imx6ull中点亮LED灯。所以先修炼修炼内功。
本文框架图
本文的框架图是最近这段时间结合了对3516测试HDF框架,以及imx6ull上linux驱动程序的学习,所得出的,是基于目前社区中所用的比较多的几款板子和openharmony、linux对比所做的图,大佬们觉得这个图有任何问题,欢迎批评指出。
1.驱动程序
1.1 最简单的驱动程序逻辑

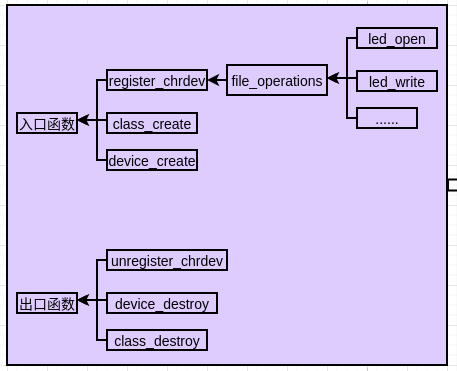
- 如上图所示,首先有个驱动程序入口函数和出口函数分别是module_init(led_init),module_exit(led_exit);
- 然后分别实现led_open和led_write这两个业务函数去填充file_operations结构体。
- 最后把file_operations结构体放入register_chrdev函数进行注册,然后放入入口函数中。
- 因为驱动程序的字符设备需要绑定IO设备去使用,所以在入口函数中调用class_create和device_create。
1.2 完成的实现代码如下:
- #include <linux/kernel.h>
- #include <linux/module.h>
- #include <linux/slab.h>
- #include <linux/init.h>
- #include <linux/fs.h>
- #include <linux/delay.h>
- #include <linux/poll.h>
- #include <linux/mutex.h>
- #include <linux/wait.h>
- #include <linux/uaccess.h>
- #include <linux/device.h>
- #include <asm/io.h>
- static int major;
- static struct class *led_class;
- /* registers */
- // IOMUXC_SNVS_SW_MUX_CTL_PAD_SNVS_TAMPER3 地址:0x02290000 + 0x14
- static volatile unsigned int *IOMUXC_SNVS_SW_MUX_CTL_PAD_SNVS_TAMPER3;
- // GPIO5_GDIR 地址:0x020AC004
- static volatile unsigned int *GPIO5_GDIR;
- //GPIO5_DR 地址:0x020AC000
- static volatile unsigned int *GPIO5_DR;
- static ssize_t led_write(struct file *filp, const char __user *buf,
- size_t count, loff_t *ppos)
- {
- char val;
- int ret;
- /* copy_from_user : get data from app */
- ret = copy_from_user(&val, buf, 1);
- /* to set gpio register: out 1/0 */
- if (val)
- {
- /* set gpio to let led on */
- *GPIO5_DR &= ~(1<<3);
- }
- else
- {
- /* set gpio to let led off */
- *GPIO5_DR |= (1<<3);
- }
- return 1;
- }
- static int led_open(struct inode *inode, struct file *filp)
- {
- /* enable gpio5
- * configure gpio5_io3 as gpio
- * configure gpio5_io3 as output
- */
- *IOMUXC_SNVS_SW_MUX_CTL_PAD_SNVS_TAMPER3 &= ~0xf;
- *IOMUXC_SNVS_SW_MUX_CTL_PAD_SNVS_TAMPER3 |= 0x5;
- *GPIO5_GDIR |= (1<<3);
- return 0;
- }
- static struct file_operations led_fops = {
- .owner = THIS_MODULE,
- .write = led_write,
- .open = led_open,
- };
- /* 入口函数 */
- static int __init led_init(void)
- {
- printk("%s %s %d\n", __FILE__, __FUNCTION__, __LINE__);
- major = register_chrdev(0, "hello_led", &led_fops);
- /* ioremap */
- // IOMUXC_SNVS_SW_MUX_CTL_PAD_SNVS_TAMPER3 地址:0x02290000 + 0x14
- IOMUXC_SNVS_SW_MUX_CTL_PAD_SNVS_TAMPER3 = ioremap(0x02290000 + 0x14, 4);
- // GPIO5_GDIR 地址:0x020AC004
- GPIO5_GDIR = ioremap(0x020AC004, 4);
- //GPIO5_DR 地址:0x020AC000
- GPIO5_DR = ioremap(0x020AC000, 4);
- led_class = class_create(THIS_MODULE, "helloled");
- device_create(led_class, NULL, MKDEV(major, 0), NULL, "helloled"); /* /dev/myled */
- return 0;
- }
- static void __exit led_exit(void)
- {
- iounmap(IOMUXC_SNVS_SW_MUX_CTL_PAD_SNVS_TAMPER3);
- iounmap(GPIO5_GDIR);
- iounmap(GPIO5_DR);
- device_destroy(led_class, MKDEV(major, 0));
- class_destroy(led_class);
- unregister_chrdev(major, "hello_led");
- }
- module_init(led_init);
- module_exit(led_exit);
- MODULE_LICENSE("GPL");
2.驱动程序测试部分
2.1 测试模块实现思路
在linux内核中注册相应的驱动模块后,通过glibc库函数提供的open,read,write接口访问驱动程序绑定驱动字符设备的IO文件就可以直接调用到对应的驱动程序了。
2.2 测试部分完成实现代码
- #include <sys/types.h>
- #include <sys/stat.h>
- #include <fcntl.h>
- #include <string.h>
- #include <unistd.h>
- #include <stdio.h>
- // ledtest /dev/helloled on
- // ledtest /dev/helloled off
- int main(int argc, char **argv)
- {
- int fd;
- char status = 0;
- if (argc != 3)
- {
- printf("Usage: %s <dev> <on|off>\n", argv[0]);
- printf(" eg: %s /dev/helloled on\n", argv[0]);
- printf(" eg: %s /dev/helloled off\n", argv[0]);
- return -1;
- }
- // open
- fd = open(argv[1], O_RDWR);
- if (fd < 0)
- {
- printf("can not open %s\n", argv[0]);
- return -1;
- }
- // write
- if (strcmp(argv[2], "on") == 0)
- {
- status = 1;
- }
- write(fd, &status, 1);
- return 0;
- }
3.编译
3.1 编译思路:
- 首先需要将驱动程序编译成ko文件。
- 将测试程序编译成可执行文件。
3.2 完成实现代码如下:
- KERN_DIR = /home/qzk/code/imx6ullPro/Linux-4.9.88
- all:
- make -C $(KERN_DIR) M=`pwd` modules
- $(CROSS_COMPILE)gcc -o ledtest ledtest.c
- clean:
- make -C $(KERN_DIR) M=`pwd` modules clean
- rm -rf modules.order
- rm -f ledtest
- obj-m += led_drv.o
上述代码需要的注意的,大家在使用时候需要换掉KERN_DIR中的值,换成大家自己的内核目录,因为编译时候会去这个目录下找头文件。
4.安装驱动进行测试
4.1 安装驱动思路
通过上述的步骤,大家会发现驱动程序编译好了放在了ubuntu系统中,我们的目标是需要将驱动程序安装进入imx6ull中,所以我们的目标是将驱动程序放入imx6ull中。这里的方案是:将网线插入电脑,然后串口连接imx6ull,先各自写死ip地址,目标是二者能够ping通,然后搭建nfs,这样就达到了imx6ull访问ubuntu下的驱动程序的目的
4.2 搭建好环境后进行安装驱动
通过insmod命令进行安装。
4.3 执行测试文件去点亮,熄灭灯
如下图:执行命令
没什么意外的话,这盏灯就在你的掌控之中了
文章相关附件可以点击下面的原文链接前往下载
https://harmonyos.51cto.com/resource/1583


