本Demo界面由ArkUI实现,网络逻辑部分由java实现,服务器用容易部署演练的Go实现。JAVA和GO初次实战,本Demo还存在并发数据安全未处理,所以本Demo仅能用于学习。可学习之处有以下几点:
一、FA与PA采用ACE方式的调用及相互交互、数据流转等。
二、Harmonyos的事件机制及使用–自定义事件.
三、异步多线程TCP通信。
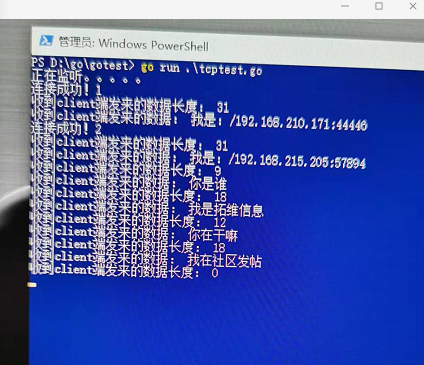
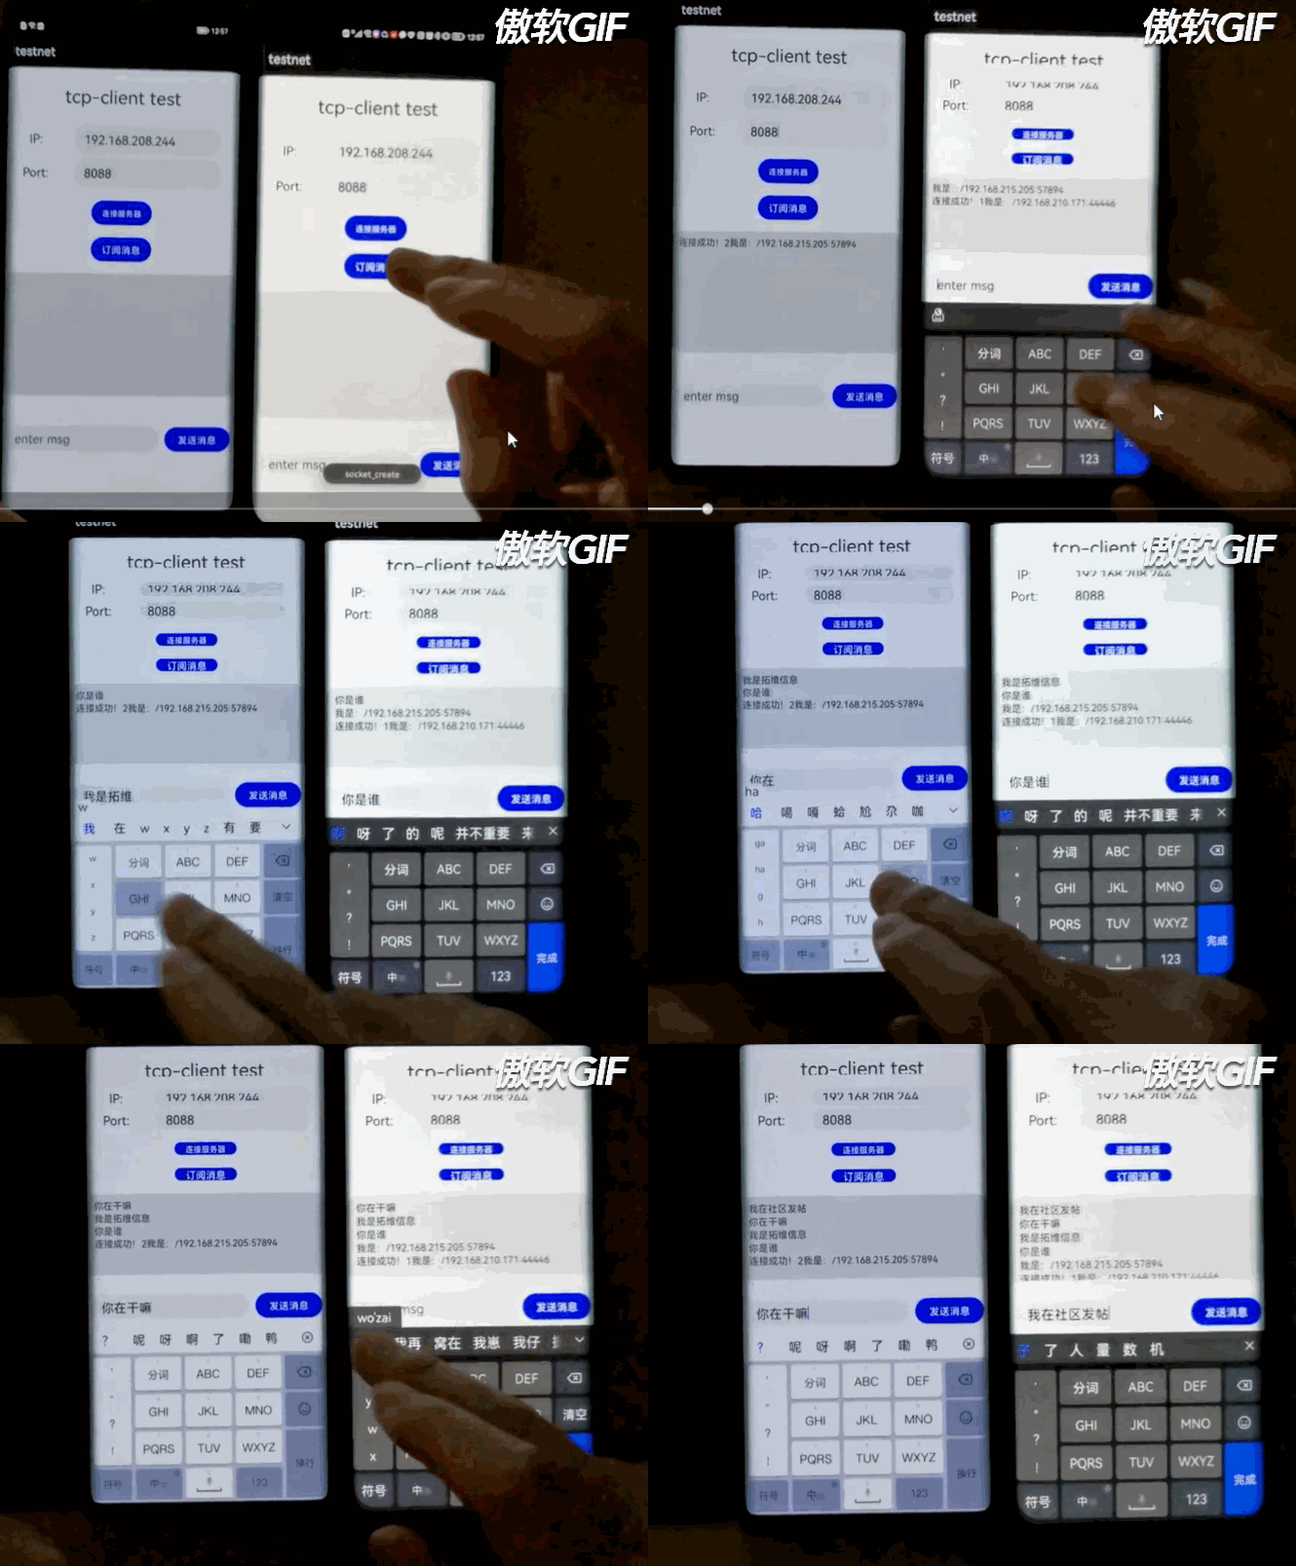
一、效果展示
1,服务器端

2,客户端

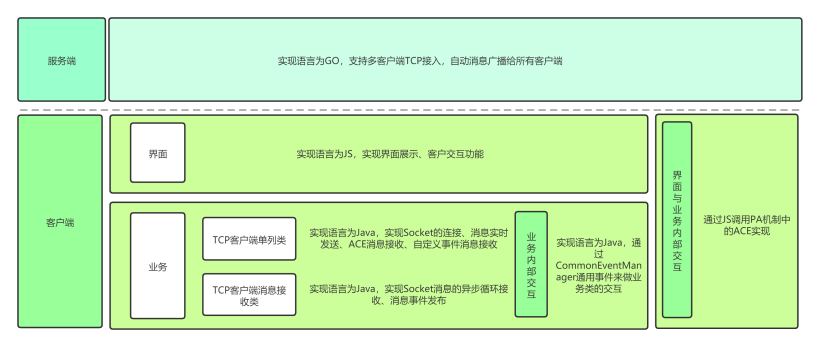
二、设计流程图

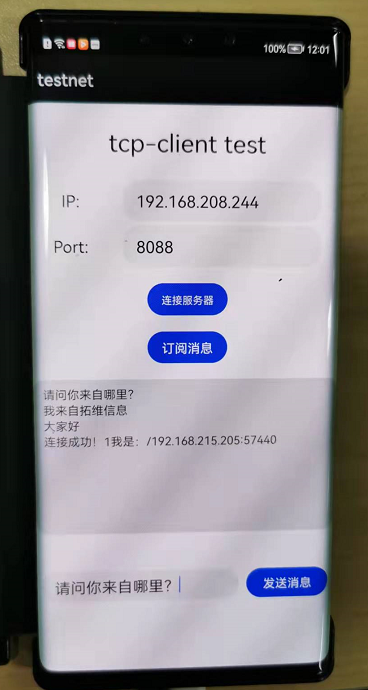
三、界面编写
1,界面效果

2,界面代码
HML代码:
<div class="container">
    <div class="container1">
        <text class="title">
            tcp-client test
        </text>
    </div>
    <div class="container2">
        <text class="text2">IP:</text>
        <input class="input2" placeholder="enter ip" onchange="onChange2">
        </input>
    </div>
    <div class="container3">
        <text class="text3">Port:</text>
        <input class="input3" placeholder="enter port" onchange="onChange3">
        </input>
    </div>
    <button class="button1" type="capsule" onclick="onConnect">连接服务器</button>
    <button class="button3" type="capsule" onclick="onSubResvMsg">订阅消息</button>
    <textarea class="text4">
        {{outcont}}
    </textarea>
    <div class="container4">
        <input class="input5" placeholder="enter msg" onchange="onChange4">
        </input>
        <button class="button2" type="capsule" onclick="onSend">发送消息</button>
    </div>
</div>
- 1.
- 2.
- 3.
- 4.
- 5.
- 6.
- 7.
- 8.
- 9.
- 10.
- 11.
- 12.
- 13.
- 14.
- 15.
- 16.
- 17.
- 18.
- 19.
- 20.
- 21.
- 22.
- 23.
- 24.
- 25.
- 26.
- 27.
JS代码:
import prompt from '@system.prompt';

export default {
    data: {
        title: 'World',
        outcont: '',
        ip:'',
        port:'',
        msg:''
    },

    initConnectAction: function (code,ip,port) {
        var actionData = {};
        actionData.ip = ip;
        actionData.port = port;
        var action = {};
        action.bundleName = "com.gane.tcpclient";
        action.abilityName = "TcpClientAbility";
        action.messageCode = code;
        action.data = actionData;
        action.abilityType = 1;
        action.syncOption = 0;
        return action;
    },

    initAction: function (code) {
        var actionData = {};
        var action = {};
        action.bundleName = "com.gane.tcpclient";
        action.abilityName = "TcpClientAbility";
        action.messageCode = code;
        action.data = actionData;
        action.abilityType = 1;
        action.syncOption = 0;
        return action;
    },

    initAction2: function (code,msg) {
        var actionData = {};
        actionData.msg = msg;
        var action = {};
        action.bundleName = "com.gane.tcpclient";
        action.abilityName = "TcpClientAbility";
        action.messageCode = code;
        action.data = actionData;
        action.abilityType = 1;
        action.syncOption = 0;
        return action;
    },


    onChange2(e){
        this.ip = e.value;
    },

    onChange3(e){
        this.port = e.value;
    },

    onConnect: async function() {
        try {
            var action = this.initConnectAction(1001,this.ip,this.port);
            var result = await FeatureAbility.callAbility(action);
            console.info(" result = " + result);
            this.showToast(result);
        } catch (pluginError) {
            console.error("getBatteryLevel : Plugin Error = " + pluginError);
        }
    },

    onSubResvMsg:async function(){
        try {
            var action = this.initAction(1003);
            var that = this;
            var result = await FeatureAbility.subscribeAbilityEvent(action,function (msgdata) {
                console.info(" batteryLevel info is: " + msgdata);
                var msgRet = JSON.parse(msgdata).data;
                that.printData(msgRet.msg);
                that.showToast(" batteryState change: " + msgRet.msg);
            });
            this.showToast(" subscribe result " + result);
            console.info(" subscribeCommonEvent result = " + result);
        } catch (pluginError) {
            console.error("subscribeCommonEvent error : result= " + result + JSON.stringify(pluginError));
        }
    },

    onSend: async function() {
        try {
            var action = this.initAction2(1002,this.msg);
            var result = await FeatureAbility.callAbility(action);
            console.info("onSend result = " + result);
            this.showToast(result);
        } catch (pluginError) {
            console.error("getBatteryLevel : Plugin Error = " + pluginError);
        }
    },

    onChange4(e){
        this.msg = e.value;
    },

    printData(msg){
        if(this.outcont != null || this.outcont != ""){
            this.outcont = msg + "\n" + this.outcont;
        } else {
            this.outcont = msg;
        }
    },

    showToast: function (msg) {
        prompt.showToast({
            message: msg
        });
    }
}
- 1.
- 2.
- 3.
- 4.
- 5.
- 6.
- 7.
- 8.
- 9.
- 10.
- 11.
- 12.
- 13.
- 14.
- 15.
- 16.
- 17.
- 18.
- 19.
- 20.
- 21.
- 22.
- 23.
- 24.
- 25.
- 26.
- 27.
- 28.
- 29.
- 30.
- 31.
- 32.
- 33.
- 34.
- 35.
- 36.
- 37.
- 38.
- 39.
- 40.
- 41.
- 42.
- 43.
- 44.
- 45.
- 46.
- 47.
- 48.
- 49.
- 50.
- 51.
- 52.
- 53.
- 54.
- 55.
- 56.
- 57.
- 58.
- 59.
- 60.
- 61.
- 62.
- 63.
- 64.
- 65.
- 66.
- 67.
- 68.
- 69.
- 70.
- 71.
- 72.
- 73.
- 74.
- 75.
- 76.
- 77.
- 78.
- 79.
- 80.
- 81.
- 82.
- 83.
- 84.
- 85.
- 86.
- 87.
- 88.
- 89.
- 90.
- 91.
- 92.
- 93.
- 94.
- 95.
- 96.
- 97.
- 98.
- 99.
- 100.
- 101.
- 102.
- 103.
- 104.
- 105.
- 106.
- 107.
- 108.
- 109.
- 110.
- 111.
- 112.
- 113.
- 114.
- 115.
- 116.
注意:
1,这里的交互方法都是用的异步方法,因为这样不会因业务侧而阻塞UI线程,从而阻塞主线程。
2,仔细看清楚每个initAction(),弄明白action的构造和带参传递的写法。
四、PA编写与交互
java类实现方式如下:
public class TcpClientAbility extends AceInternalAbility {
    private static final String TAG = TcpClientAbility.class.getSimpleName();
    private static final String BUNDLE_NAME = "com.gane.tcpclient";
    private static final String ABILITY_NAME = "TcpClientAbility";
    public static final String SELF_SOCKET_MSG = "TCP.CLIENT.MSG";
    private static TcpClientAbility instance;
    private TcpClientAbility() {
        super(BUNDLE_NAME, ABILITY_NAME);
    }

    /**
     * ACE注册
     */
    public void register() {
        this.setInternalAbilityHandler(this::onRemoteRequest);
        HiLog.error(LABEL_LOG,"socket_register");
    }

    /**
     * ACE取消注册
     */
    public void deregister() {
        this.setInternalAbilityHandler(null);
        HiLog.error(LABEL_LOG,"socket_unregister");
    }
    /**
     * ACE事件回调接口
     */
    public boolean onRemoteRequest(int code, MessageParcel data, MessageParcel reply, MessageOption option) {
        switch (code) {
        }
        return true;
    }
}
- 1.
- 2.
- 3.
- 4.
- 5.
- 6.
- 7.
- 8.
- 9.
- 10.
- 11.
- 12.
- 13.
- 14.
- 15.
- 16.
- 17.
- 18.
- 19.
- 20.
- 21.
- 22.
- 23.
- 24.
- 25.
- 26.
- 27.
- 28.
- 29.
- 30.
- 31.
- 32.
- 33.
- 34.
注意:
1,类必须继承AceInternalAbility,必须实现注册、取消注册、事件回调接口。
2,register()、deregister()需在合适的位置调用,我是在mainAblity的onstart和onstop中调用的
五、TCP客户端网络
网络实现,考虑到要能随时随地的自由发送和接收消息,就将消息的收、发分离,全采用异步进行。根据业务需求选型了AsynchronousSocketChannel作为本次实现的网络基础类型,主要用到了AsynchronousSocketChannel.open()、AsynchronousSocketChannel.setOption()、AsynchronousSocketChannel.connect()、AsynchronousSocketChannel.write()、AsynchronousSocketChannel.read()等接口。
示例代码如下:
socketChannel = AsynchronousSocketChannel.open();
socketChannel.setOption(StandardSocketOptions.TCP_NODELAY,true);
socketChannel.setOption(StandardSocketOptions.SO_REUSEADDR, true);
socketChannel.connect(new InetSocketAddress(param.getIp(), param.getPort()), null,
    new CompletionHandler<Void, Object>() {
        @Override
        public void completed(Void result, Object attachment) {
        ByteBuffer byteBuffer = ByteBuffer.allocate(1024);
        String intput = "我是:";
        try {
            intput = intput + socketChannel.getLocalAddress().toString();
        } catch (IOException e) {
            e.printStackTrace();
        }
        try {
            byteBuffer.put(intput.getBytes("UTF-8"));
        } catch (UnsupportedEncodingException e) {
            e.printStackTrace();
        }
        socketChannel.write(byteBuffer, 1, TimeUnit.SECONDS, null,
            new CompletionHandler<Integer, Object>() {
            @Override
            public void completed(Integer result, Object attachment) {
            }
            public void failed(Throwable exc, Object attachment) {
            }
        });
        }

        @Override
        public void failed(Throwable exc, Object attachment) {
        }
    });
- 1.
- 2.
- 3.
- 4.
- 5.
- 6.
- 7.
- 8.
- 9.
- 10.
- 11.
- 12.
- 13.
- 14.
- 15.
- 16.
- 17.
- 18.
- 19.
- 20.
- 21.
- 22.
- 23.
- 24.
- 25.
- 26.
- 27.
- 28.
- 29.
- 30.
- 31.
- 32.
- 33.
if (TcpClientAbility.socketChannel != null && TcpClientAbility.socketChannel.isOpen()) {
    ByteBuffer byteBuffer = ByteBuffer.allocate(1024);
    CompletionHandler<Integer, Object> comphandler = new CompletionHandler<Integer, Object>() {
        @Override
        public void completed(Integer result, Object attachment) {
            byteBuffer.flip();
            byte[] byten = new byte[byteBuffer.limit()]; // 可用的字节数量
            byteBuffer.get(byten, byteBuffer.position(), byteBuffer.limit());
            String ret = new String(byten);
            TcpClientAbility.socketChannel.read(byteBuffer, -1, TimeUnit.SECONDS, null, this);
        }
        @Override
        public void failed(Throwable exc, Object attachment) {
            TcpClientAbility.socketChannel.read(byteBuffer, -1, TimeUnit.SECONDS, null, this);
            }
        };
    TcpClientAbility.socketChannel.read(byteBuffer, -1, TimeUnit.SECONDS, null, comphandler);
}
- 1.
- 2.
- 3.
- 4.
- 5.
- 6.
- 7.
- 8.
- 9.
- 10.
- 11.
- 12.
- 13.
- 14.
- 15.
- 16.
- 17.
- 18.
六、自定义事件
由官方提供的CommonEventManager通用事件启发而来,官方提供了harmonyos系统提供了蓝牙、电池、时间、日期等等相关的通用事件,还提供了电池相关的Demo,具体介绍看官方文档。我这里拿CommonEventManager的CommonEventManager.subscribeCommonEvent()订阅事件、CommonEventManager.publishCommonEvent()发布事件给大家看下:
MatchingSkills matchingSkills = new MatchingSkills();
matchingSkills.addEvent(SELF_SOCKET_MSG);
IRemoteObject notifier = data.readRemoteObject();
CommonEventSubscribeInfo subscribeInfo = new CommonEventSubscribeInfo(matchingSkills);
subscriber = new CommonEventSubscriber(subscribeInfo) {
    @Override
    public void onReceiveEvent(CommonEventData commonEventData) {
        //HiLog.info(LABEL_LOG,"socket===shijian" + commonEventData.getData() + ret);
            }
        };
        try {
            CommonEventManager.subscribeCommonEvent(subscriber);
        } catch (RemoteException e) {
        }
}
- 1.
- 2.
- 3.
- 4.
- 5.
- 6.
- 7.
- 8.
- 9.
- 10.
- 11.
- 12.
- 13.
- 14.
- 15.
Intent intent = new Intent();
Operation operation = new Intent.OperationBuilder().withAction(TcpClientAbility.SELF_SOCKET_MSG).build();
intent.setOperation(operation);
intent.setParam("msg",ret);
CommonEventData eventData = new CommonEventData(intent);
eventData.setData(ret);
try {
    CommonEventManager.publishCommonEvent(eventData);
} catch (RemoteException e) {
    e.printStackTrace();
}
- 1.
- 2.
- 3.
- 4.
- 5.
- 6.
- 7.
- 8.
- 9.
- 10.
- 11.
七、总结
大概思路和所用到的重点知识点在上面以分别列出来了,做完了觉得很简单,但实际上用一门或多门不怎么熟悉而且相关开发思路借鉴比较少的开发框架写东西时,确实会在动手前很迷茫。觉得迷茫不要退缩,还是那句话,没有程序解决不了的问题,只有没思路的程序员,只要想做,就要将整体拆解,化整为零,个个击破。
本文虽然实现了简单的多客户端自由聊天,但还有很多不足,如聊天记录保存,跳转页面后回来怎么恢复页面,websocket、UDP、HTTP、蓝牙等通信模式的探索实践等,不足之处后续有空继续探索不上。有啥不足之处欢迎大家留言,助我改进提升。
文章相关附件可以点击下面的原文链接前往下载
https://harmonyos.51cto.com/resource/1567


