一、前言
上一篇 轻松玩转HDC2021趣味闯关赛平行视界服务流转 帖子里是基于Codelabs里Java电影卡片,平行视界Sample集成的,此帖从空白项目开始,一步步教你如何在项目里,学到列表显示,平行视界,服务卡片,服务流转各知识点。下面大慨说一下项目的开发流程:
实现List显示, 点击某项跳转到RightAbility界面
添加JS服务卡片, 点击跳转到List列表
平行视界, 点击List列表, 左边显示列表,右边显示详情图片
服务流转, 在详情,点击连接图标, 选择流转设备; 再点击流转图标==
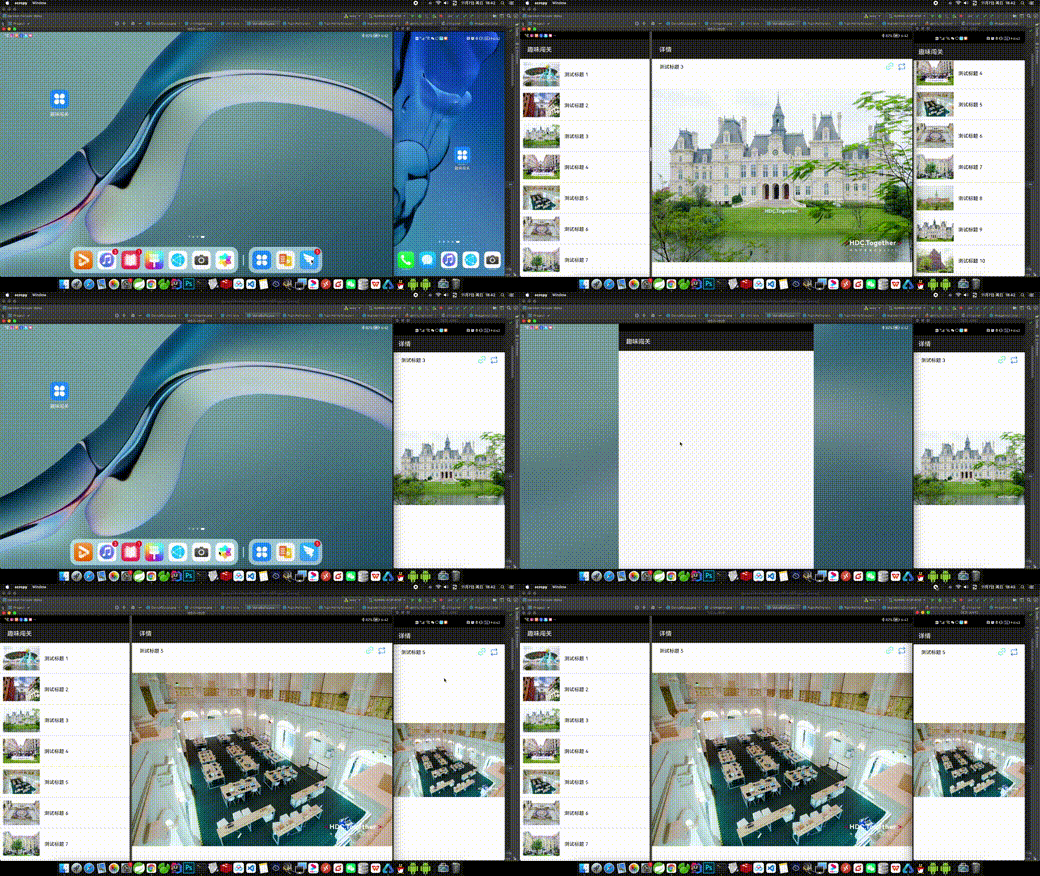
二、实现效果
B站视频:https://www.bilibili.com/video/BV1tL4y1q7A6/
三、工程搭建
打开DevEco Studio 3.0.0.600开发工具, 点击菜单File -> New -> New Project, 弹出以下框,按截图选择创建:
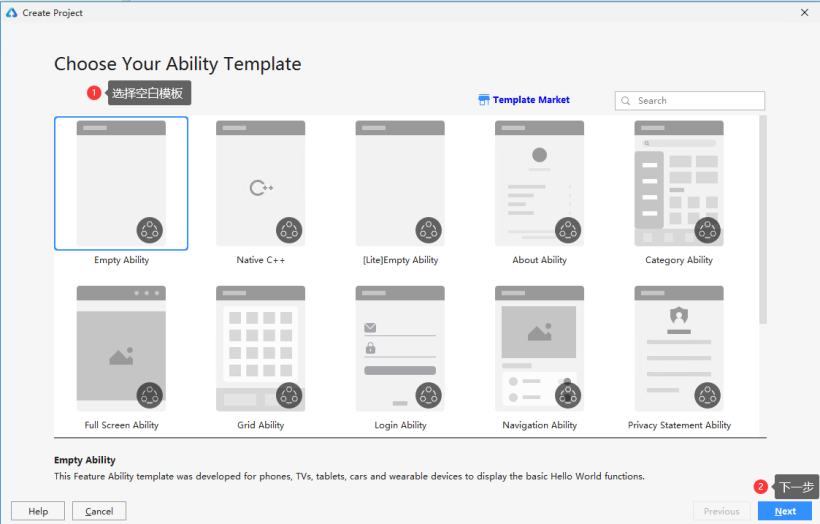
下一步后的界面以下,请按照标注操作。
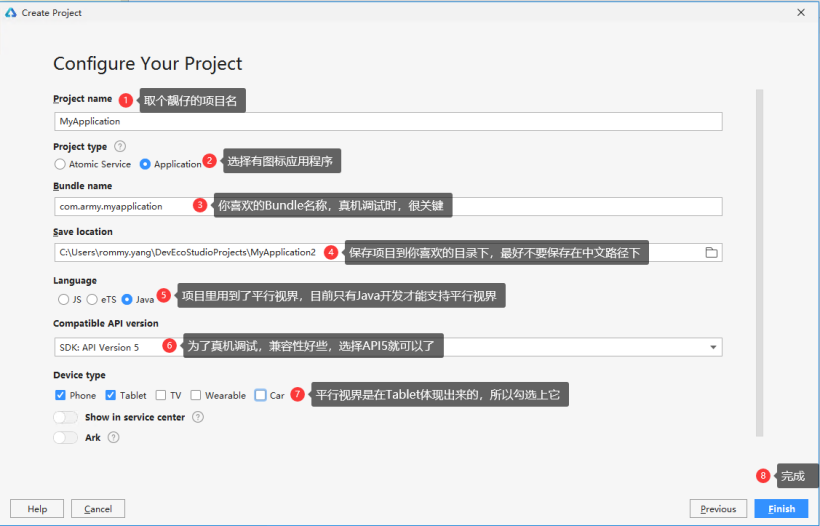
空模板项目到此,就创建完成了,下面我们来按照上面说的步骤一步一步来完成。
四、工程讲解
1. 实现List显示, 点击某项跳转到RightAbility界面
首先把List列表显示出来,下面是List列表的XML布局文件,由于List列表项是数据驱动的,这里只提供List容器,并给予id就可以。
- <?xml version="1.0" encoding="utf-8"?>
- <DirectionalLayout
- xmlns:ohos="http://schemas.huawei.com/res/ohos"
- ohos:height="match_parent"
- ohos:width="match_parent"
- ohos:alignment="center"
- ohos:orientation="vertical">
- <ListContainer
- ohos:id="$+id:list"
- ohos:height="match_parent"
- ohos:width="match_parent"
- ohos:orientation="vertical"/>
- </DirectionalLayout>
从上面效果图可以看出,列表项左边显示图片,右边显示文字,下面有一条分割线,XML布局文件以下:
- <?xml version="1.0" encoding="utf-8"?>
- <DirectionalLayout
- xmlns:ohos="http://schemas.huawei.com/res/ohos"
- ohos:height="match_content"
- ohos:width="match_parent"
- ohos:orientation="vertical">
- <DirectionalLayout
- ohos:height="100vp"
- ohos:width="match_parent"
- ohos:padding="10vp"
- ohos:orientation="horizontal">
- <Image
- ohos:id="$+id:img"
- ohos:height="match_parent"
- ohos:scale_mode="zoom_center"
- ohos:width="120vp"></Image>
- <Text
- ohos:id="$+id:title"
- ohos:height="match_parent"
- ohos:width="match_content"
- ohos:padding="5vp"
- ohos:text_size="16fp"
- ohos:left_margin="10vp"/>
- </DirectionalLayout>
- <Component
- ohos:height="1vp"
- ohos:width="match_parent"
- ohos:background_element="#CCCCCC"/>
- </DirectionalLayout>
List列表的页面布局就说完了,下面来说一下Java代码:先介绍一下列表项的实体类,也就两个属性,一个是图片,一个是标题
- import ohos.media.image.PixelMap;
- public class Item {
- // 显示图片
- private PixelMap img;
- // 显示每项标题
- private String title;
- public PixelMap getImg() {
- return img;
- }
- public void setImg(PixelMap img) {
- this.img = img;
- }
- public String getTitle() {
- return title;
- }
- public void setTitle(String title) {
- this.title = title;
- }
- }
下面介绍一下List列表的核心部分就是适配器类的实现:大部分代码都有注释,适配器类首先要继承BaseItemProvider 基础类,然后实现里面相应的方法。
- /**
- * 列表适配器类
- */
- public class ListAdapter extends BaseItemProvider {
- // 上下文
- private static Context context;
- // 数据项列表
- private List<Item> items;
- // 自定义事件处理
- private MyEventHandle myEventHandle;
- /**
- * 构造方法
- * @param items
- * @param context
- */
- public ListAdapter(List<Item> items, Context context) {
- this.items = items == null ? new ArrayList() : items;
- this.context = context;
- }
- /**
- * 获取列表有多少项
- * @return
- */
- @Override
- public int getCount() {
- return items == null ? 0 : items.size();
- }
- /**
- * 获取当前项数据
- * @param i
- * @return
- */
- @Override
- public Item getItem(int i) {
- return this.items.get(i);
- }
- /**
- * 获取当前Id
- * @param i
- * @return
- */
- @Override
- public long getItemId(int i) {
- return i;
- }
- /**
- * 获取组件内容
- * @param i
- * @param component
- * @param componentContainer
- * @return
- */
- @Override
- public Component getComponent(int i, Component component, ComponentContainer componentContainer) {
- ViewHolder viewHolder = null;
- Component cmp = component;
- if (cmp == null) {
- cmp = LayoutScatter.getInstance(context).parse(ResourceTable.Layout_item, null, false);
- // 初始化项布局
- viewHolder = new ViewHolder();
- // 获取图片组件
- viewHolder.img = (Image)cmp.findComponentById(ResourceTable.Id_img);
- // 获取标题组件
- viewHolder.title = (Text)cmp.findComponentById(ResourceTable.Id_title);
- // 缓存起来
- cmp.setTag(viewHolder);
- } else {
- viewHolder = (ViewHolder) cmp.getTag();
- }
- viewHolder.img.setPixelMap(items.get(i).getImg());
- viewHolder.title.setText(items.get(i).getTitle());
- viewHolder.img.setClickedListener(listener -> itemClick(i));
- viewHolder.title.setClickedListener(listener -> itemClick(i));
- return cmp;
- }
- public void replace(Collection<Item> listConstructor) {
- if (listConstructor == null) {
- return;
- }
- this.items = null;
- // 重新初始化listContainer中的数据
- this.items = new ArrayList<>(0);
- // 将重新得到的项数据放到listContainer中
- this.items.addAll(listConstructor);
- // 刷新listContainer,调用getComponent方法重新设置页面元素布局
- notifyDataChanged();
- }
- /**
- * 内部类,封装列表项组件
- */
- private static class ViewHolder {
- // 显示图片
- Image img;
- // 显示标题
- Text title;
- }
- /**
- * 点击图片或标题事件
- * @param index
- */
- private void itemClick(int index) {
- // 初始化处理程序
- initHandler();
- // 获取内部事件
- InnerEvent event = InnerEvent.get(1, 0, index);
- myEventHandle.sendEvent(event);
- }
- /**
- * 初始化处理程序
- */
- private void initHandler() {
- EventRunner runner = EventRunner.getMainEventRunner();
- if (runner == null) {
- return;
- }
- myEventHandle = new MyEventHandle(runner);
- }
- /**
- * 自定义处理事件
- */
- public static class MyEventHandle extends EventHandler {
- MyEventHandle(EventRunner runner) throws IllegalArgumentException {
- super(runner);
- }
- @Override
- protected void processEvent(InnerEvent event) {
- super.processEvent(event);
- int eventId = event.eventId;
- int index = (Integer) event.object;
- if (eventId == 1) {
- IntentParams intentParams = new IntentParams();
- intentParams.setParam("index", index); // 选择列表项下标
- // 跳转到 RightAbility 分屏
- Intent intent = new Intent();
- intent.setParams(intentParams);
- ElementName element = new ElementName("", context.getBundleName(), RightAbility.class.getName());
- intent.setElement(element);
- context.startAbility(intent, 0);
- }
- }
- }
- }
项目用的数据是静态数据,在一个Utils封装好的,以下:
- public class Utils {
- private static final HiLogLabel TAG = new HiLogLabel(HiLog.LOG_APP, 0xD001400, "Utils");
- private static final List<Integer> PICTURE_IDS = Arrays.asList(ResourceTable.Media_1,
- ResourceTable.Media_2, ResourceTable.Media_3,
- ResourceTable.Media_4, ResourceTable.Media_5,
- ResourceTable.Media_6, ResourceTable.Media_7,
- ResourceTable.Media_8, ResourceTable.Media_9,
- ResourceTable.Media_10);
- private static List<PixelMap> resourcePixelMaps;
- public static void transResourceIdsToListOnce(Context context) {
- resourcePixelMaps = new ArrayList<>(0);
- // Set the pixel map
- for (int index: PICTURE_IDS) {
- InputStream source = null;
- ImageSource imageSource;
- try {
- source = context.getResourceManager().getResource(index);
- imageSource = ImageSource.create(source, null);
- resourcePixelMaps.add(imageSource.createPixelmap(null));
- } catch (IOException | NotExistException e) {
- HiLog.error(TAG, "Get Resource PixelMap error");
- } finally {
- try {
- assert source != null;
- source.close();
- } catch (IOException e) {
- HiLog.error(TAG, "getPixelMap source close error");
- }
- }
- }
- }
- /**
- * 封装列表项数据
- * @return
- */
- public static List<Item> getItems() {
- List<Item> items = new ArrayList<>();
- int index = 1;
- for (PixelMap pixelMap : resourcePixelMaps) {
- Item item = new Item();
- item.setImg(pixelMap);
- item.setTitle("测试标题 " + index);
- items.add(item);
- index++;
- }
- return items;
- }
- /**
- * 根据下标获取列表项数据
- * @param index
- * @return
- */
- public static Item getItem(int index) {
- List<Item> items = getItems();
- return items.get(index);
- }
- }
在MainAbilitySlice加载显示出列表容器里的内容:
- public class MainAbilitySlice extends AbilitySlice {
- // 列表容器
- private static ListContainer listContainer;
- // 列表适配器类
- private static ListAdapter listAdapter;
- // 上下文
- private static Context context;
- @Override
- public void onStart(Intent intent) {
- super.onStart(intent);
- super.setUIContent(ResourceTable.Layout_ability_main);
- context = getContext();
- // 初始化界面
- initView();
- // 将 Media 中的图像转换为 List<PixelMap>。 使用默认大小
- Utils.transResourceIdsToListOnce(context);
- // UI线程更新列表数据
- getUITaskDispatcher().delayDispatch(() -> initData(Utils.getItems()), 10);
- }
- /**
- * 初始化界面
- */
- private void initView() {
- // 获取List容器
- listContainer = (ListContainer) findComponentById(ResourceTable.Id_list);
- // 初始化列表适配器
- listAdapter = new ListAdapter(null, context);
- // 设置列表容器项数据提供者
- listContainer.setItemProvider(listAdapter);
- }
- /**
- * 更新界面数据
- * @param items
- */
- public static void initData(List<Item> items) {
- context.getUITaskDispatcher().asyncDispatch(() -> {
- listContainer.setItemProvider(listAdapter);
- listAdapter.replace(items);
- });
- }
- }
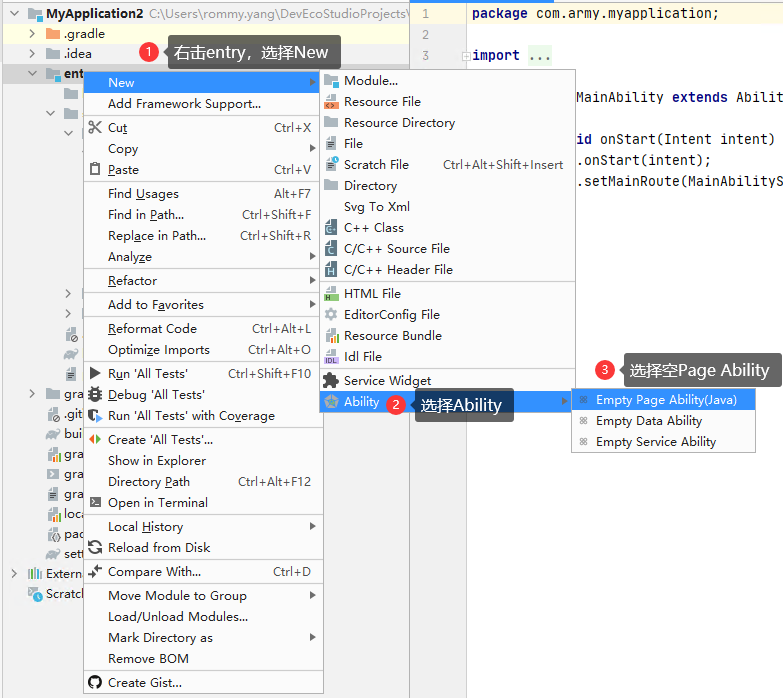
这样主界面的List列表就完成了,项目用的素材图片是放在resources -> media下的,下来介绍一下点击列表项跳转到详情页面,这里我们要创建一个Page Ability, 取名为RightAbility,同时在使用平行视界时,这个Ability显示在平板的右边。
界面布局分为上下显示,上面显示标题和后面用到的服务流转图标,下面显示点击的图片。
- <?xml version="1.0" encoding="utf-8"?>
- <DirectionalLayout
- xmlns:ohos="http://schemas.huawei.com/res/ohos"
- ohos:height="match_parent"
- ohos:width="match_parent"
- ohos:alignment="center"
- ohos:orientation="vertical">
- <DependentLayout
- ohos:id="$+id:container_title"
- ohos:height="50vp"
- ohos:padding="10vp"
- ohos:width="match_parent">
- <Text
- ohos:id="$+id:right_title"
- ohos:height="match_parent"
- ohos:width="match_content"
- ohos:padding="5vp"
- ohos:text_size="16fp"
- ohos:left_margin="10vp"/>
- <Image
- ohos:id="$+id:imgConnect"
- ohos:left_margin="10vp"
- ohos:right_margin="10vp"
- ohos:height="30vp"
- ohos:width="30vp"
- ohos:background_element="$media:connect"
- ohos:left_of="$id:imgCirculation"/>
- <Image
- ohos:id="$+id:imgCirculation"
- ohos:height="30vp"
- ohos:width="30vp"
- ohos:right_margin="10vp"
- ohos:background_element="$media:circulation"
- ohos:align_parent_right="true"/>
- </DependentLayout>
- <Image
- ohos:id="$+id:right_img"
- ohos:height="match_parent"
- ohos:scale_mode="zoom_center"
- ohos:width="match_parent"></Image>
- </DirectionalLayout>
在新Page Ability接收到跳转过来的参数,显示相应的标题和图片。
- public class RightAbilitySlice extends AbilitySlice {
- private static Context context; // 上下文
- private static int paramIndex; // 页面跳转参数
- @Override
- public void onStart(Intent intent) {
- super.onStart(intent);
- super.setUIContent(ResourceTable.Layout_ability_right);
- context = getContext();
- // 如果页面跳转参数index为空, 默认为0
- paramIndex = intent.getIntParam("index", 0);
- Item item = Utils.getItem(paramIndex);
- // 初始化界面
- initView(item);
- }
- private void initView(Item item) {
- Image img = (Image)findComponentById(ResourceTable.Id_right_img);
- img.setPixelMap(item.getImg());
- Text title = (Text)findComponentById(ResourceTable.Id_right_title);
- title.setText(item.getTitle());
- Image btnSelect = (Image)findComponentById(ResourceTable.Id_imgConnect);
- Image btnShare = (Image)findComponentById(ResourceTable.Id_imgCirculation);
- btnSelect.setClickedListener(va -> {
- // 打开设备选择框(连接)
- //deviceDialog.showDeviceList();
- });
- btnShare.setClickedListener(va -> {
- // 流转
- //circulation();
- });
- }
- }
添加JS服务卡片, 点击跳转到List列表。
先创建一个JS服务卡片,步骤以下:
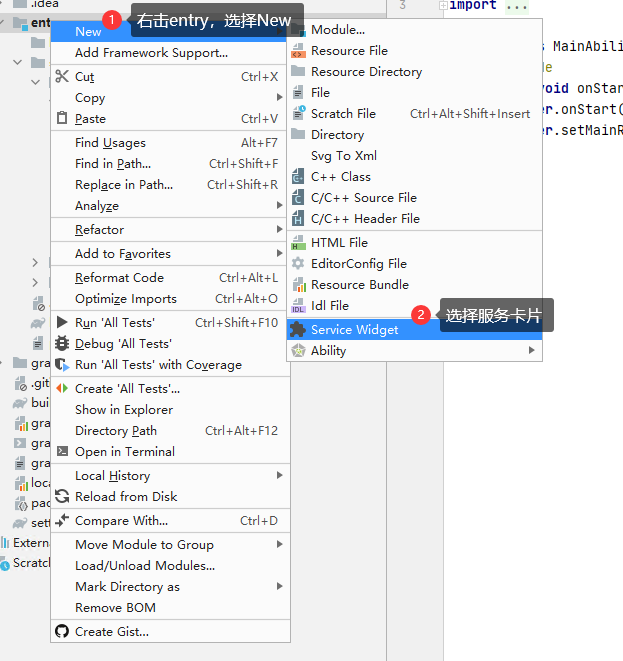
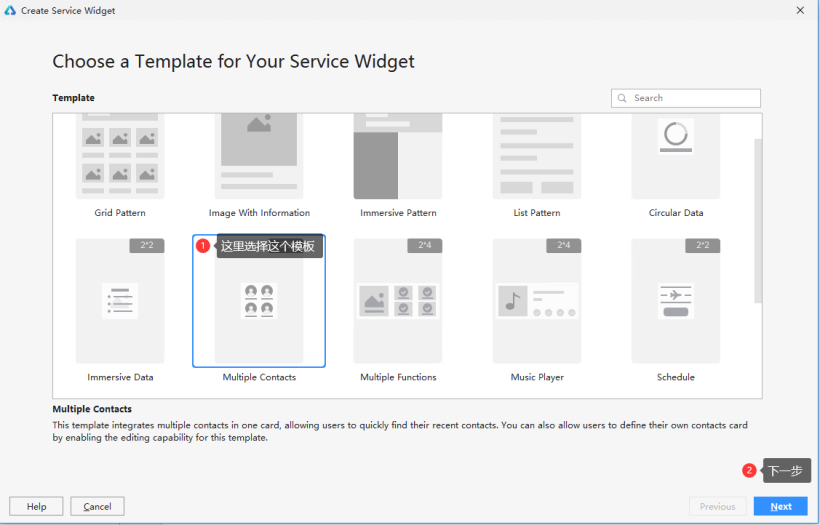
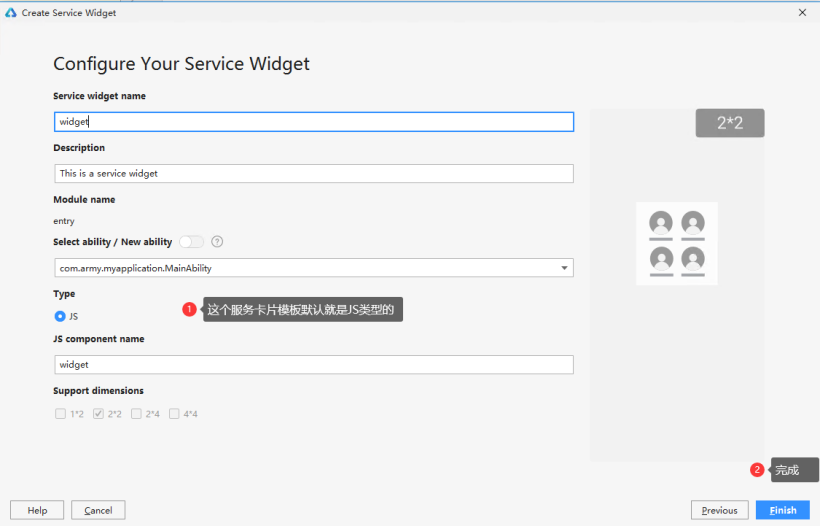
默认服务卡片里面内容,不是我要的效果,我简单修改一下后:
- <div class="card_root_layout">
- <div class="button_containers">
- <div class="item_first_container">
- <div class="button_left">
- <image src="/common/images/1.jpg" onclick="routerEvent"></image>
- </div>
- <div class="button_right">
- <image src="/common/images/2.jpg" onclick="routerEvent"></image>
- </div>
- </div>
- <div class="item_second_container">
- <div class="button_left">
- <image src="/common/images/3.jpg" onclick="routerEvent"></image>
- </div>
- <div class="button_right">
- <image src="/common/images/4.jpg" onclick="routerEvent"></image>
- </div>
- </div>
- </div>
- </div>
- .card_root_layout {
- flex-direction: column;
- align-items: center;
- justify-content: center;
- width: 100%;
- height: 100%;
- padding: 10px;
- background-color: #FFFFFF;
- }
- .button_containers {
- flex-direction: column;
- align-items: center;
- justify-content: center;
- }
- .item_first_container {
- flex-weight: 0.4;
- flex-direction: row;
- align-items: center;
- justify-content: center;
- }
- .item_second_container {
- flex-weight: 0.4;
- flex-direction: row;
- align-items: center;
- justify-content: center;
- }
- .button_left {
- flex-weight: 0.5;
- flex-direction: column;
- align-items: center;
- justify-content: center;
- padding: 4px;
- }
- .button_right {
- flex-weight: 0.5;
- flex-direction: column;
- align-items: center;
- justify-content: center;
- padding: 4px;
- }
- {
- "actions": {
- "routerEvent": {
- "action": "router",
- "abilityName": "com.army.study.MainAbility"
- }
- }
- }
简单的服务卡片就修改好了,点击服务卡片,跳转到List列表界面。
平行视界, 点击List列表, 左边显示列表,右边显示详情图片。
实现平行视界,注意三点就可以了,第一点,平行视界目前只能在两个Java Page Ability实现,第二点在resources -> rawfile目录下添加一个文件easygo.json, 第三点修改config.json配置,就可以了,下面我们就一点一点来完成平行视界效果。
第一点:上面已经创建好两个Java Page Ability了,一个是MainAbility, 一个是RightAbility。
第二点:添加easygo.json内容为:
- {
- "easyGoVersion": "1.0",
- "client": "com.army.study", // 保持和config.json bundleName一致
- "logicEntities": [
- {
- "head": {
- "function": "magicwindow",
- "required": "true"
- },
- "body": {
- "mode": "1",
- "abilityPairs": [
- {
- "from": "com.army.study.MainAbility", // 显示在平行视界左边的列表页面
- "to": "com.army.study.RightAbility" // 显示在平行视界右边的详情页面
- }
- ],
- "UX": {
- "isDraggable": "true",
- "supportRotationUxCompat": "true",
- "supportDraggingToFullScreen": "ALL"
- }
- }
- }
- ]
- }
第三点:修改config.json在moudle节点下添加以下:
- "metaData": {
- "customizeData": [
- {
- "name": "EasyGoClient",
- "value": "true"
- }
- ]
- }
平行视界效果就完成了。
服务流转, 在详情,点击连接图标, 选择流转设备; 再点击流转图标。
- 服务流转也是有几点注意的,第一点当然就是授权了,除了在config.json配置了权限申请,还要在应用入口加上动态授权,第二点就是实现流转的Abitily和AbilitySlic都要实现IAbilityContinuation接口,第三点就是显示当然环境下,在线设备可以流转到的设备,这里使用到了Codelabs平行视界Sample里封装好的DeviceDialog类,里面使用的流转任务管理服务管理类IContinuationRegisterManager, 简化了很多代码。下面就开始一 一介绍吧。
第一点授权,在config.json里module节点下添加以下配置:
- "reqPermissions": [
- {
- "name": "ohos.permission.DISTRIBUTED_DATASYNC",
- "usedScene":
- {
- "ability": [
- "com.army.study.MainAbility",
- "com.army.study.RightAbility"
- ],
- "when": "always"
- }
- },
- {
- "name": "ohos.permission.GET_DISTRIBUTED_DEVICE_INFO",
- "usedScene":
- {
- "ability": [
- "com.army.study.MainAbility",
- "com.army.study.RightAbility"
- ],
- "when": "always"
- }
- }
- ]
在应用入口MainAbility里onStart()方法添加动态授权:
- // 声明跨端迁移访问的权限
- requestPermissionsFromUser(new String[]{SystemPermission.DISTRIBUTED_DATASYNC}, 0);
第二点在RightAbility和RightAbilitySlice多实现IAbilityContinuation接口,其实RightAbility实现接口后,在实现方法里面返回true就可以,具体逻辑是在RightAbilitySlice中实现。
- public class RightAbility extends Ability implements IAbilityContinuation {
- @Override
- public void onStart(Intent intent) {
- super.onStart(intent);
- super.setMainRoute(RightAbilitySlice.class.getName());
- }
- @Override
- public boolean onStartContinuation() {
- return true;
- }
- @Override
- public boolean onSaveData(IntentParams intentParams) {
- return true;
- }
- @Override
- public boolean onRestoreData(IntentParams intentParams) {
- return true;
- }
- @Override
- public void onCompleteContinuation(int i) {
- }
- }
- public class RightAbilitySlice extends AbilitySlice implements IAbilityContinuation {
- private boolean isCirculation = false; // 是否流转中
- private static String selectDeviceId; // 选择的设备id
- private DeviceDialog deviceDialog; // 设备选择
- private static Context context; // 上下文
- private static int paramIndex; // 页面跳转参数
- private static int removeIndex; // 流转参数
- @Override
- public void onStart(Intent intent) {
- super.onStart(intent);
- super.setUIContent(ResourceTable.Layout_ability_right);
- context = getContext();
- // 如果页面跳转参数index为空,说明是流转过来参数, 使用流转removeIndex
- paramIndex = intent.getIntParam("index", removeIndex);
- Item item = Utils.getItem(paramIndex);
- // 初始化界面
- initView(item);
- // 初始化设备选择
- deviceDialog = new DeviceDialog(getContinuationRegisterManager(),RightAbilitySlice.this);
- }
- private void initView(Item item) {
- Image img = (Image)findComponentById(ResourceTable.Id_right_img);
- img.setPixelMap(item.getImg());
- Text title = (Text)findComponentById(ResourceTable.Id_right_title);
- title.setText(item.getTitle());
- Image btnSelect = (Image)findComponentById(ResourceTable.Id_imgConnect);
- Image btnShare = (Image)findComponentById(ResourceTable.Id_imgCirculation);
- btnSelect.setClickedListener(va -> {
- // 打开设备选择框(连接)
- deviceDialog.showDeviceList();
- });
- btnShare.setClickedListener(va -> {
- // 流转
- circulation();
- });
- }
- /**
- * 流转
- */
- private void circulation() {
- if (isCirculation) {
- Utils.createToastDialog(context, "正在流转,请稍后再试!");
- return;
- }
- if (selectDeviceId == null || "".equals(selectDeviceId)) {
- // 选择设备以后才能流转(迁移)
- Utils.createToastDialog(context, "请选择连接设备后进行流转操作!");
- return;
- }
- isCirculation = true;
- continueAbility(selectDeviceId);
- }
- /**
- * 设置选择设备Id
- * @param deviceId
- */
- public static void setDeviceId(String deviceId) {
- selectDeviceId = deviceId;
- }
- @Override
- public void onActive() {
- super.onActive();
- }
- @Override
- public void onForeground(Intent intent) {
- super.onForeground(intent);
- }
- @Override
- public boolean onStartContinuation() {
- return true;
- }
- @Override
- public boolean onSaveData(IntentParams intentParams) {
- // 流转前保存index
- intentParams.setParam("removeIndex", paramIndex);
- return true;
- }
- @Override
- public boolean onRestoreData(IntentParams intentParams) {
- // 获取流转过来的index
- removeIndex = Integer.parseInt(intentParams.getParam("removeIndex").toString());
- return true;
- }
- @Override
- public void onCompleteContinuation(int i) {
- }
- }
这里说一下详情页参数index,有两个地方传递了,一个是在单设备时,从列表点击跳转到详情页,传递了参数index,另一个是服务流转到另一个设备时,流转前通过onSaveData保存index,到另一个设备通过onRestoreData获取到流转过来的index。
第三点就是使用封装好的DeviceDialog类,代码不多,我都添加注释了,把这个类理解了,分布式工作就省了不少代码了。
- public class DeviceDialog {
- private static final HiLogLabel LABEL_LOG = new HiLogLabel(3, 0xD001100, "设备对话框");
- // 上下文
- private final Context context;
- // 获取流转任务管理服务管理类
- private final IContinuationRegisterManager continuationRegisterManager;
- // 注册传输任务管理服务后返回的能力令牌
- private int abilityToken;
- // 用户在设备列表中选择设备后返回的设备ID
- private String selectDeviceId;
- /**
- * 初始化设备对话框,设置传输任务管理服务管理类,并注册传输任务管理服务管理类。
- * @param continuationRegisterManager
- * @param slice
- */
- public DeviceDialog(IContinuationRegisterManager continuationRegisterManager, Context slice) {
- this.continuationRegisterManager = continuationRegisterManager;
- this.context = slice;
- // 注册流转任务管理服务管理类
- registerManager();
- }
- /**
- * 注册流转任务管理服务管理类
- */
- private void registerManager() {
- // 增加过滤条件
- ExtraParams params = new ExtraParams();
- String[] devTypes = new String[]{ExtraParams.DEVICETYPE_SMART_PAD, ExtraParams.DEVICETYPE_SMART_PHONE};
- params.setDevType(devTypes);
- continuationRegisterManager.register(context.getBundleName(), params, callback, requestCallback);
- }
- // 设置流转任务管理服务设备状态变更的回调
- private final IContinuationDeviceCallback callback = new IContinuationDeviceCallback() {
- @Override
- public void onDeviceConnectDone(String str, String str1) {
- // 在用户选择设备后设置设备ID
- selectDeviceId = str;
- continuationRegisterManager.updateConnectStatus(abilityToken, selectDeviceId,
- DeviceConnectState.CONNECTED.getState(), null);
- // 返回设备ID
- returnDeviceId();
- }
- @Override
- public void onDeviceDisconnectDone(String str) {
- }
- };
- // 设置注册流转任务管理服务回调
- private final RequestCallback requestCallback = new RequestCallback() {
- @Override
- public void onResult(int result) {
- abilityToken = result;
- }
- };
- /**
- * 返回设备ID
- */
- private void returnDeviceId() {
- HiLog.info(LABEL_LOG, "deviceid::" + selectDeviceId);
- // 将选择设备Id, 告诉RightAbilitySlice
- RightAbilitySlice.setDeviceId(selectDeviceId);
- }
- /**
- * 打开设备选择框
- *
- * @since 2021-09-10
- */
- public void showDeviceList() {
- // 设置过滤设备类型
- ExtraParams params = new ExtraParams();
- String[] devTypes = new String[]{ExtraParams.DEVICETYPE_SMART_PAD, ExtraParams.DEVICETYPE_SMART_PHONE};
- params.setDevType(devTypes);
- // 注册
- continuationRegisterManager.register(context.getBundleName(), params, callback, requestCallback);
- // 显示选择设备列表
- continuationRegisterManager.showDeviceList(abilityToken, params, null);
- }
- /**
- * 断开流转任务管理服务
- *
- * @since 2021-09-10
- */
- public void clearRegisterManager() {
- // 解注册流转任务管理服务
- continuationRegisterManager.unregister(abilityToken, null);
- // 断开流转任务管理服务连接
- continuationRegisterManager.disconnect();
- }
- }
到这里就介绍完我说的四个步骤了,帖子有些长,要有点耐心看才行,如果不能集中看完,也可以直接同步源码,先运行起来,看看效果,然后再一步一步的去理解就,最后合在一起就成了。


