前言
10.23去参加了HDC2021 Codelabs趣味闯关赛,闯关赛的题目需要实现的功能大致分为以下三步:
- 点击电影卡片跳转到电影列表页面(服务卡片开发)
- 点击电影列表中的具体电影,跳转到具体电影的信息,该窗口实现平行视界(平行视界服务开发)
- 点击具体电影的信息,流转到另一设备中(分布式流转开发)
这一次就给大家分享关于平行视界服务开发的心得体会(~ ̄▽ ̄)~
概述
平行视界是多窗口交互服务的其中一种,平行视界是以界面为基本单位实现应用内双窗口显示的系统侧解决方案。
应用可以根据自身业务设计双窗口显示界面组合,以实现符合应用逻辑的最佳单应用多窗口用户体验。适用于办公、邮箱、IM、电商等效率类或需要频繁来回切换的应用。HarmonyOS对于折叠屏展开态、平板横屏设备支持平行视界。用户应用程序可以根据自身业务特点,设计最佳的双窗口组合体验,如社交类应用的“列表+聊天”,购物类应用的“双窗口比价”等。
平行视界的开发分为两步:
- 在config.json中声明支持平行视界。
- 在src -> main -> resources -> rawfile目录下增加easygo.json配置文件,实现平行视界显示策略配置。
正文
1. 安装和配置DevEco Studio 3.0 Beta
2. 创建一个Empty Ability应用
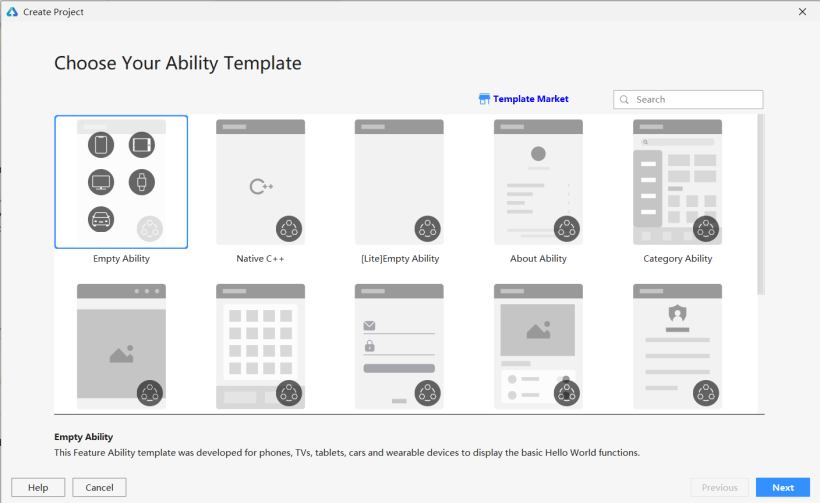
DevEco Studio下载安装成功后,打开DevEco Studio,点击左上角的File,点击New,再选择New Project,选择Empty Ability选项,点击Next按钮。
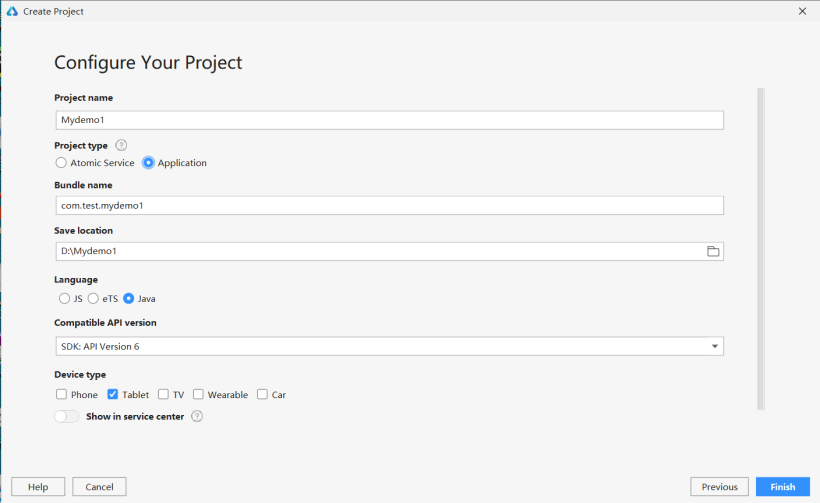
将文件命名为Mydemo1(文件名不能出现中文或者特殊字符,否则将无法成功创建项目文件),Project Type勾选Application,选择保存路径,Language勾选Java,选择API 6,设备勾选Tablet,最后点击Finish按钮。
选择Empty Ability配置文件信息
3. 编写简单逻辑代码
代码文件结构如下:
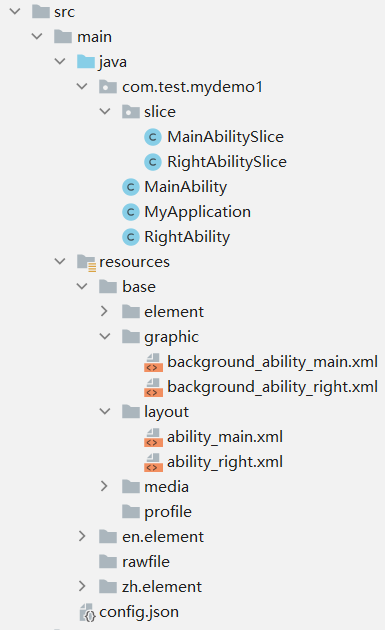
在com.test.mydemo1目录下创建RightAbility文件后,代码有作修改的如下:
ability_main.xml:
- <?xml version="1.0" encoding="utf-8"?>
- <DirectionalLayout
- xmlns:ohos="http://schemas.huawei.com/res/ohos"
- ohos:height="match_parent"
- ohos:width="match_parent"
- ohos:alignment="center"
- ohos:orientation="vertical">
- <Text
- ohos:id="$+id:text_helloworld"
- ohos:height="match_content"
- ohos:width="match_content"
- ohos:background_element="$graphic:background_ability_main"
- ohos:layout_alignment="horizontal_center"
- ohos:text="这是MainAbilitySlice页面"
- ohos:text_size="40vp"
- />
- <Button
- ohos:id="$+id:btn"
- ohos:height="match_content"
- ohos:width="match_content"
- ohos:background_element="#888888"
- ohos:layout_alignment="horizontal_center"
- ohos:text="跳转到RightAbilitySlice页面"
- ohos:text_size="40vp"
- />
- </DirectionalLayout>
ability_right:
- <?xml version="1.0" encoding="utf-8"?>
- <DirectionalLayout
- xmlns:ohos="http://schemas.huawei.com/res/ohos"
- ohos:height="match_parent"
- ohos:width="match_parent"
- ohos:alignment="center"
- ohos:orientation="vertical"
- ohos:background_element="#DDDDDD">
- <Text
- ohos:id="$+id:text_helloworld"
- ohos:height="match_content"
- ohos:width="match_content"
- ohos:layout_alignment="horizontal_center"
- ohos:text="这是RightAbilitySlice页面"
- ohos:text_size="40vp"
- />
- <Button
- ohos:id="$+id:btn"
- ohos:height="match_content"
- ohos:width="match_content"
- ohos:background_element="#888888"
- ohos:layout_alignment="horizontal_center"
- ohos:text="返回到MainAbilitySlice页面"
- ohos:text_size="40vp"
- />
- </DirectionalLayout>
MainAbilitySlice.java:
- public class MainAbilitySlice extends AbilitySlice {
- @Override
- public void onStart(Intent intent) {
- super.onStart(intent);
- super.setUIContent(ResourceTable.Layout_ability_main);
- findComponentById(ResourceTable.Id_btn).setClickedListener(new Component.ClickedListener() {
- @Override
- public void onClick(Component component) {
- Operation operation = new Intent.OperationBuilder()
- .withDeviceId("")
- .withBundleName(getBundleName())
- .withAbilityName(RightAbility.class.getName())
- .build();
- intent.setOperation(operation);
- startAbility(intent);
- }
- });
- }
- @Override
- public void onActive() {
- super.onActive();
- }
- @Override
- public void onForeground(Intent intent) {
- super.onForeground(intent);
- }
- }
RightAbilitySlice.java:
- public class RightAbilitySlice extends AbilitySlice {
- @Override
- public void onStart(Intent intent) {
- super.onStart(intent);
- super.setUIContent(ResourceTable.Layout_ability_right);
- findComponentById(ResourceTable.Id_btn).setClickedListener(new Component.ClickedListener() {
- @Override
- public void onClick(Component component) {
- terminateAbility();
- }
- });
- }
- @Override
- public void onActive() {
- super.onActive();
- }
- @Override
- public void onForeground(Intent intent) {
- super.onForeground(intent);
- }
- }
4. 在config.json中声明支持平行视界
config.json配置文件的module对象中新增metaData:
- "metaData": {
- "customizeData": [
- {
- "name": "EasyGoClient",
- "value": "true"
- }
- ]
- }
5. 创建平行视界配置文件easygo.json
在src -> main -> resources -> rawfile目录下增加easygo.json配置文件:
- {
- "easyGoVersion": "1.0",
- "client": "com.test.mydemo1",
- "logicEntities": [
- {
- "head": {
- "function": "magicwindow",
- "required": "true"
- },
- "body": {
- "mode": "1",
- "abilityPairs": [
- {
- "from": "com.test.mydemo1.MainAbility",
- "to": "com.test.mydemo1.RightAbility"
- }
- ],
- "Abilities": [
- {
- "name": "com.test.mydemo1.MainAbility",
- "defaultFullScreen": "false"
- },
- {
- "name": "com.test.mydemo1.RightAbility",
- "defaultFullScreen": "false"
- }
- ],
- "UX": {
- "isDraggable": "true"
- }
- }
- }
- ]
- }
上述代码easygo.json配置文件的相关元素的描述如下:
- {
- "easyGoVersion": 必选,固定值为"1.0",
- "client": 必选,该程序的应用包名,
- "logicEntities": [
- {
- "head": {
- "function": 必选,调用组件名,固定值为"magicwindow",
- "required": 必选,预留字段,固定值为"true"
- },
- "body": {
- "mode": 必选,基础分屏模式."0":购物模式,abilityPairs节点不生效;"1":自定义模式(包含导航模式),
- "abilityPairs": [自定义模式下必选,配置从from页面到to页面的分屏显示
- {
- "from": 自定义模式下必选,AbilityA的包名,
- "to": 自定义模式下必选,AbilityB的包名,
- }表示A上启动B,触发分屏(A左B右)
- ],
- "Abilities": [可选,应用Page Ability属性列表,
- {
- "name": 可选,Page Ability包名,
- "defaultFullScreen": 可选,Page Ability是否支持默认以全屏启动."true": 支持;,"false": 不支持
- },
- {
- "name": 可选,Page Ability包名,
- "defaultFullScreen": 可选,Page Ability是否支持默认以全屏启动."true": 支持;,"false": 不支持
- }
- ],
- "UX": {可选,页面UX控制配置
- "isDraggable": 可选,是否支持分屏窗口拖动(仅针对平板产品生效)."true": 支持;,"false": 不支持(缺省值为false)
- }
- }
- }
- ]
- }
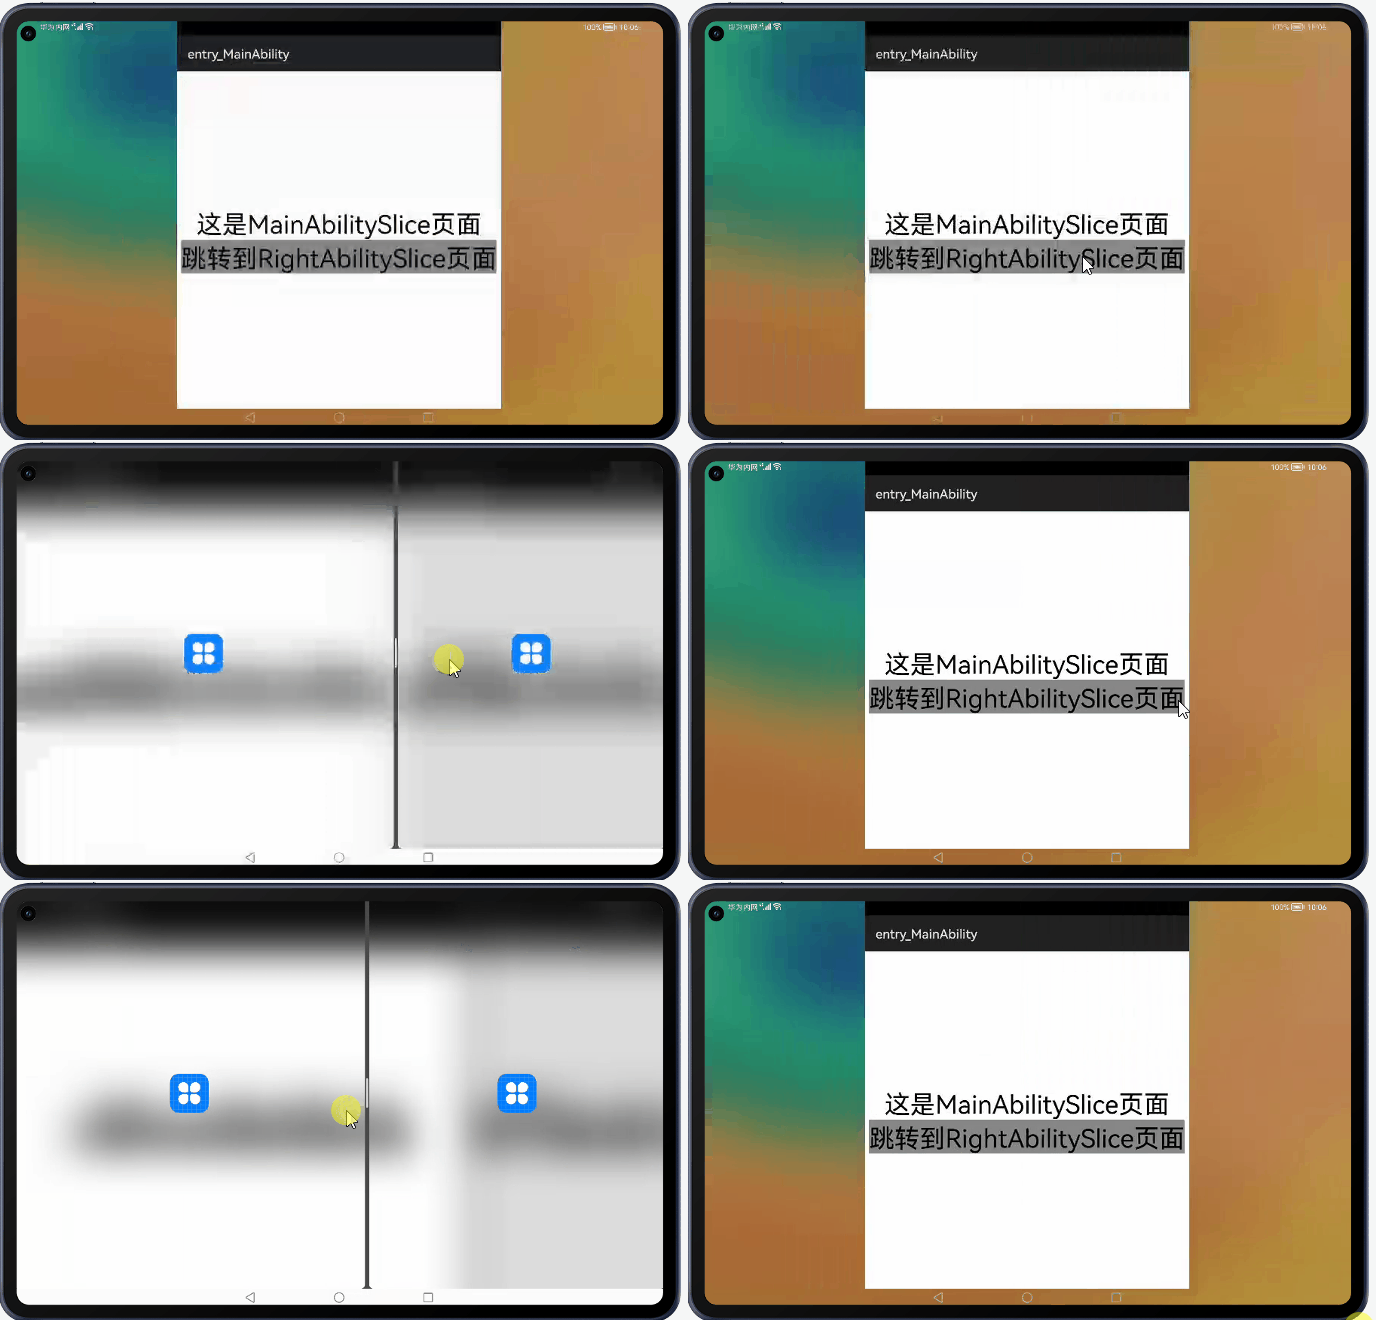
平板横屏的运行效果如下:
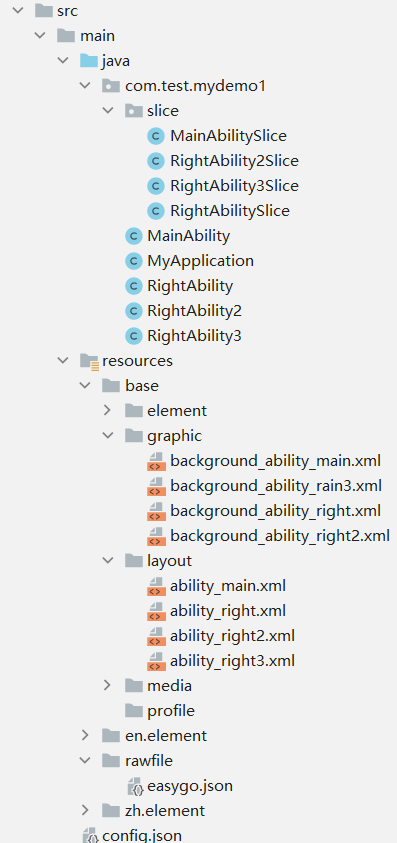
6. 添加复杂逻辑代码
具体代码见附录文件,代码文件结构如下:
7. 完善easygo.json配置文件
- {
- "easyGoVersion": "1.0",
- "client": "com.test.mydemo1",
- "logicEntities": [
- {
- "head": {
- "function": "magicwindow",
- "required": "true"
- },
- "body": {
- "mode": "1",
- "abilityPairs": [
- {
- "from": "com.test.mydemo1.MainAbility",
- "to": "com.test.mydemo1.RightAbility"
- },
- {
- "from": "com.test.mydemo1.RightAbility",
- "to": "com.test.mydemo1.RightAbility2"
- }
- ],
- "Abilities": [
- {
- "name": "com.test.mydemo1.MainAbility",
- "defaultFullScreen": "false"
- },
- {
- "name": "com.test.mydemo1.RightAbility",
- "defaultFullScreen": "false"
- },
- {
- "name": "com.test.mydemo1.RightAbility2",
- "defaultFullScreen": "false"
- },
- {
- "name": "com.test.mydemo1.RightAbility3",
- "defaultFullScreen": "false"
- }
- ],
- "UX": {
- "isDraggable": "true"
- }
- }
- }
- ]
- }
平板横屏的运行效果如下:
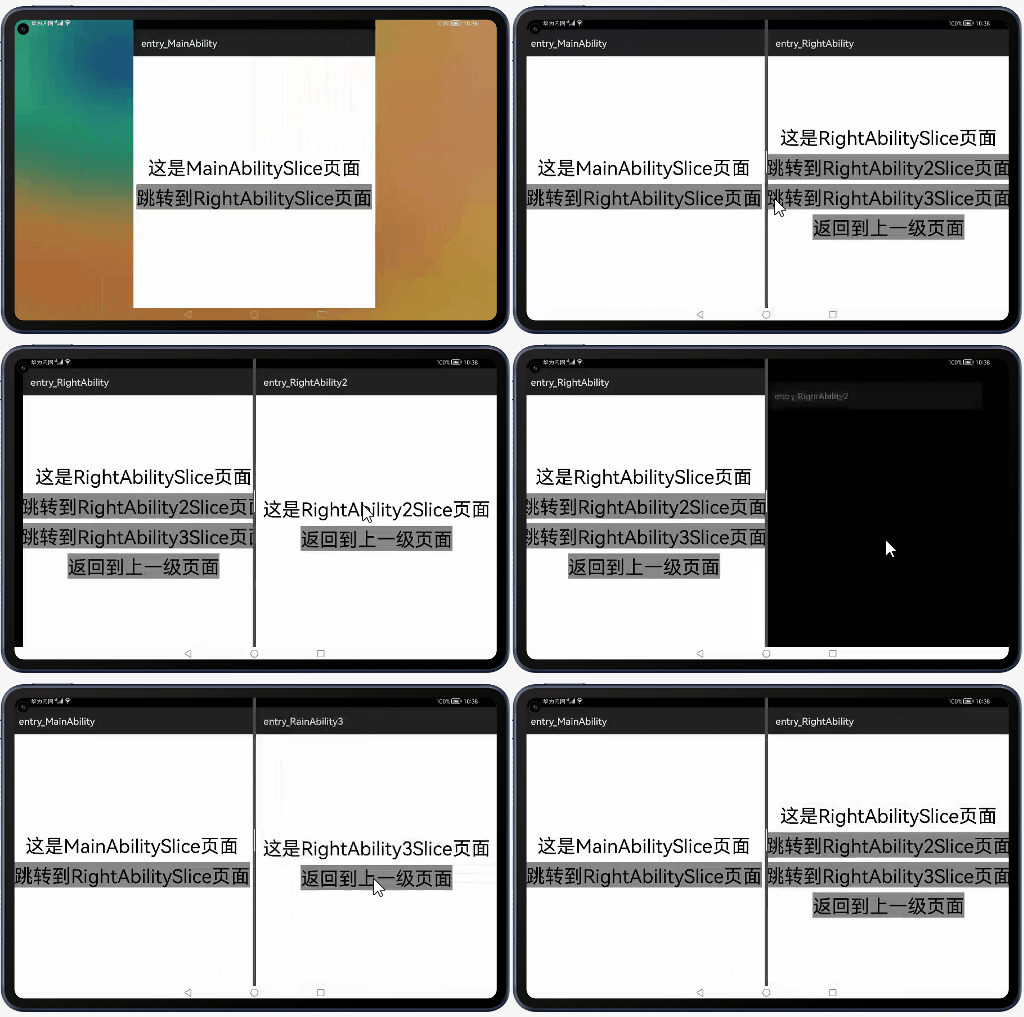
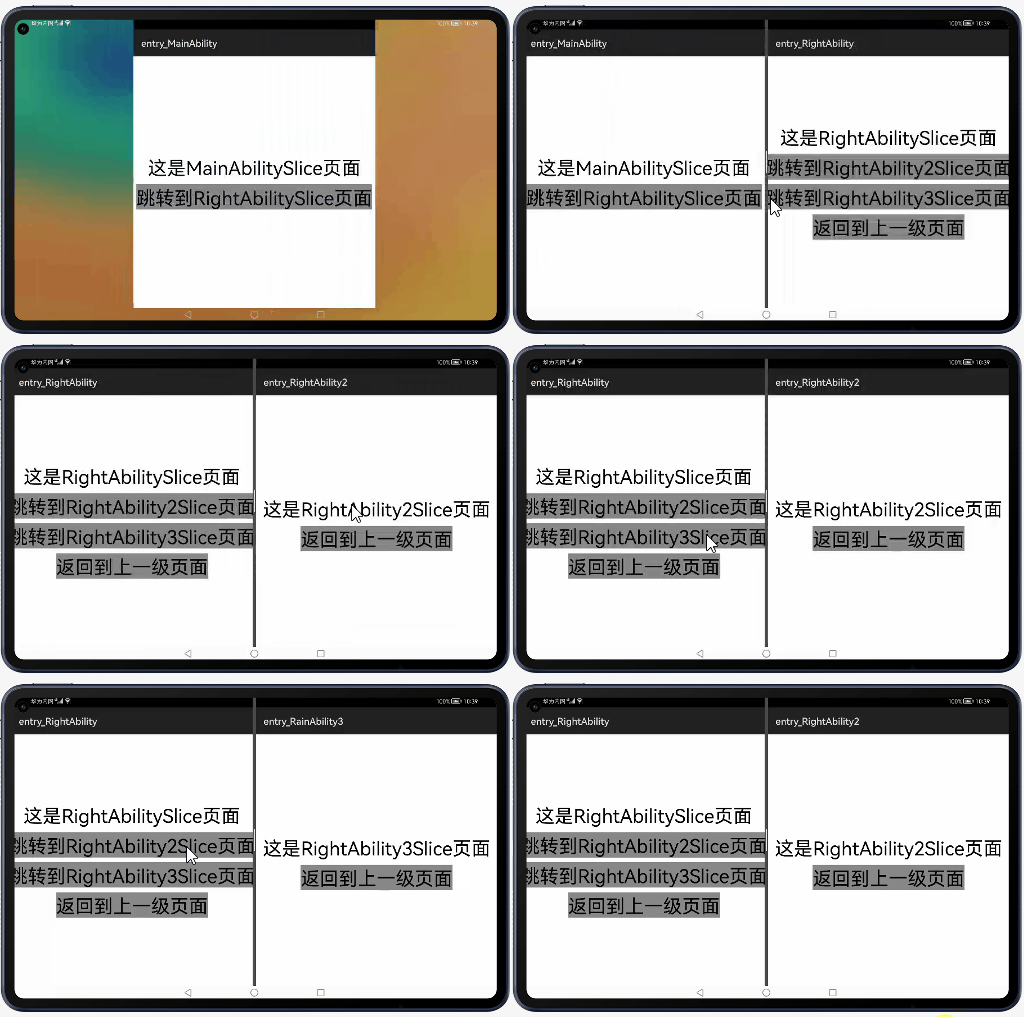
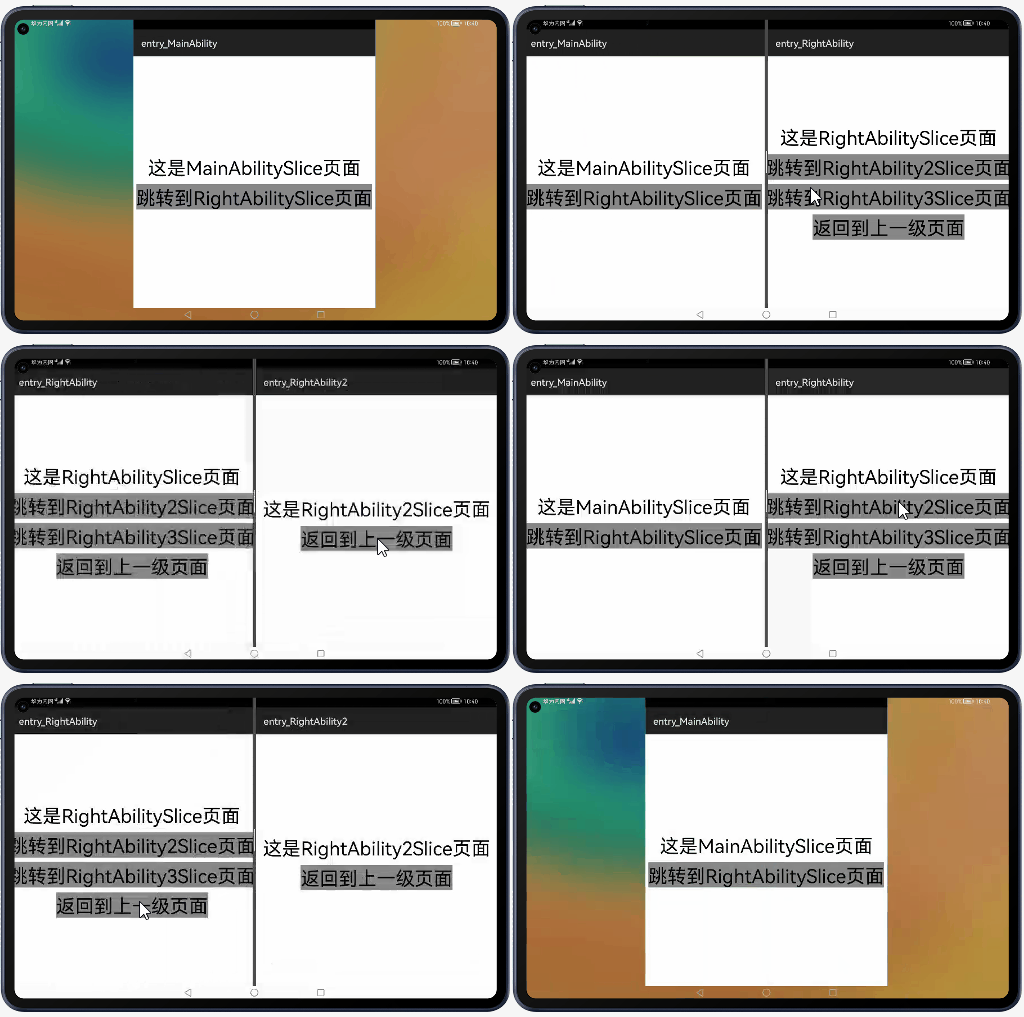
图1图2图3
总结
从上述easygo.json文件可以看出,配置文件只设置了MainAbility|RightAbility和RightAbility|RightAbility2(A|B表示A左B右分屏),但是从运行效果可以发现以下四点内容:
- 若配置了A|B,则在A上启动B,触发双窗口显示(A左B右),但在B上启动A不会触发平行视界双窗口,如正文的第五点的运行效果。
- 若配置了A|B、B|C,没有配置A|D,则A左B右分屏时,B触发C,B左移,C右侧显示,即B左C右分屏;但无论从左或右触发D,都右侧显示D,即A左D右分屏,如图1所示。
- 没有配置B|D,则D窗口跟随B此时的显示方式。如果B此时是全屏,则全屏显示D;如果B此时是双窗口,则D在双窗口右边显示,即B左D右分屏,如图2所示。
- 返回页面切换和跳转显示页面基本为相反的过程,如图3所示。
这一次的分享就到这里结束啦O(∩_∩)O~,平行视界服务开发还有购物模式、导航模式、后台锁定等内容,就留到下一次啦,我会在以后的文章中陆陆续续分享我的实战操作,希望能与各位一起学习相互交流♪(∇*)


