前言
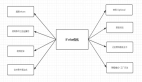
代码中如果if-else比较多,阅读起来比较困难,维护起来也比较困难,很容易出bug,接下来,本文将介绍优化if-else代码的八种方案。
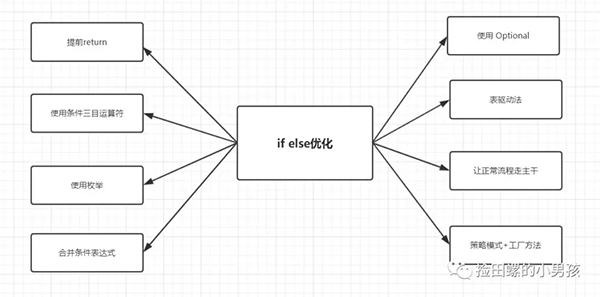
优化方案一:提前return,去除不必要的else
如果if-else代码块包含return语句,可以考虑通过提前return,把多余else干掉,使代码更加优雅。
优化前:
if (condition) {
    //doSomething
} else {
    return;
}
- 1.
- 2.
- 3.
- 4.
- 5.
优化后:
if(!condition){
    return;
}
//doSomething
- 1.
- 2.
- 3.
- 4.
优化方案二:使用条件三目运算符
使用条件三目运算符可以简化某些if-else,使代码更加简洁,更具有可读性。
优化前:
int price;
if (condition) {
    price = 80;
} else {
    price = 100;
}
- 1.
- 2.
- 3.
- 4.
- 5.
- 6.
优化后:
int price = condition ? 80 : 100;
- 1.
优化方案三:使用枚举
在某些时候,使用枚举也可以优化if-else逻辑分支,按个人理解,它也可以看作一种表驱动方法。
优化前:
String OrderStatusDes;
if (orderStatus == 0) {
    OrderStatusDes = "订单未支付";
} elseif ( OrderStatus == 1 ) {
    OrderStatusDes = "订单已支付";
} elseif ( OrderStatus == 2 ) {
    OrderStatusDes = "已发货";
}
...
- 1.
- 2.
- 3.
- 4.
- 5.
- 6.
- 7.
- 8.
- 9.
优化后:
先定义一个枚举
public enum OrderStatusEnum {
      UN_PAID(0, "订单未支付"),
      PAIDED(1, "订单已支付"),
      SENDED(2, "已发货"),
      ;
      private int index;
      private String desc;
      public int getIndex() {
          return index;
      }
      public String getDesc() {
          return desc;
      }
      OrderStatusEnum(int index, String desc) {
          this.index = index;
          this.desc = desc;
      }
      OrderStatusEnum of(int orderStatus) {
          for (OrderStatusEnum temp : OrderStatusEnum.values()) {
              if (temp.getIndex() == orderStatus) {
                  return temp;
              }
          }
          return null;
      }
  }
- 1.
- 2.
- 3.
- 4.
- 5.
- 6.
- 7.
- 8.
- 9.
- 10.
- 11.
- 12.
- 13.
- 14.
- 15.
- 16.
- 17.
- 18.
- 19.
- 20.
- 21.
- 22.
- 23.
- 24.
- 25.
- 26.
有了枚举之后,以上if-else逻辑分支,可以优化为一行代码
String OrderStatusDes = OrderStatusEnum.0f(orderStatus).getDesc();
- 1.
优化方案四:合并条件表达式
如果有一系列条件返回一样的结果,可以将它们合并为一个条件表达式,让逻辑更加清晰。
优化前
double getVipDiscount () {
  if (age < 18) {
      return 0.8;
  }
  if ("深圳".equals(city)) {
      return 0.8;
  }
  if (isStudent) {
      return 0.8;
  }
  //do somethig
}
- 1.
- 2.
- 3.
- 4.
- 5.
- 6.
- 7.
- 8.
- 9.
- 10.
- 11.
- 12.
优化后
double getVipDiscount(){
    if (age< 18 || "深圳".equals(city)||isStudent){
        return 0.8;
    }
    //doSomthing
}
- 1.
- 2.
- 3.
- 4.
- 5.
- 6.
优化方案五:使用 Optional
有时候if-else比较多,是因为非空判断导致的,这时候你可以使用java8的Optional进行优化。
优化前:
String str = "jay@huaxiao";
if (str != null) {
    System.out.println(str);
} else {
    System.out.println("Null");
}
- 1.
- 2.
- 3.
- 4.
- 5.
- 6.
优化后:
Optional<String> strOptional = Optional.of("jay@huaxiao");
strOptional.ifPresentOrElse(System.out::println, () -> System.out.println("Null"));
- 1.
- 2.
优化方案六:表驱动法
表驱动法,又称之为表驱动、表驱动方法。表驱动方法是一种使你可以在表中查找信息,而不必用很多的逻辑语句(if或case)来把它们找出来的方法。以下的demo,把map抽象成表,在map中查找信息,而省去不必要的逻辑语句。
优化前:
if (param.equals(value1)) {
    doAction1(someParams);
} else if (param.equals(value2)) {
    doAction2(someParams);
} else if (param.equals(value3)) {
    doAction3(someParams);
}
// ...
- 1.
- 2.
- 3.
- 4.
- 5.
- 6.
- 7.
- 8.
优化后:
Map<?, Function<?> action> actionMappings = new HashMap<>();
// 这里泛型 ? 是为方便演示,实际可替换为你需要的类型
// 初始化
actionMappings.put(value1, (someParams) -> {
    doAction1(someParams)
});
actionMappings.put(value2, (someParams) -> {
    doAction2(someParams)
});
actionMappings.put(value3, (someParams) -> {
    doAction3(someParams)
});
// 省略多余逻辑语句
actionMappings.get(param).apply(someParams);
- 1.
- 2.
- 3.
- 4.
- 5.
- 6.
- 7.
- 8.
- 9.
- 10.
- 11.
- 12.
- 13.
- 14.
优化方案七:优化逻辑结构,让正常流程走主干
优化前:
public double getAdjustedCapital () {
    if (_capital <= 0.0) {
        return 0.0;
    }
    if (_intRate > 0 && _duration > 0) {
        return (_income / _duration) * ADJ_FACTOR;
    }
    return 0.0;
}
- 1.
- 2.
- 3.
- 4.
- 5.
- 6.
- 7.
- 8.
- 9.
优化后:
public double getAdjustedCapital () {
    if (_capital <= 0.0) {
        return 0.0;
    }
    if (_intRate <= 0 || _duration <= 0) {
        return 0.0;
    }
    return (_income / _duration) * ADJ_FACTOR;
}
- 1.
- 2.
- 3.
- 4.
- 5.
- 6.
- 7.
- 8.
- 9.
将条件反转使异常情况先退出,让正常流程维持在主干流程,可以让代码结构更加清晰。
优化方案八:策略模式+工厂方法消除if else
假设需求为,根据不同勋章类型,处理相对应的勋章服务,优化前有以下代码:
String medalType = "guest";
if ("guest".equals(medalType)) {
    System.out.println("嘉宾勋章");
} else if ("vip".equals(medalType)) {
    System.out.println("会员勋章");
} else if ("guard".equals(medalType)) {
    System.out.println("展示守护勋章");
}
...
- 1.
- 2.
- 3.
- 4.
- 5.
- 6.
- 7.
- 8.
- 9.
首先,我们把每个条件逻辑代码块,抽象成一个公共的接口,可以得到以下代码:
//勋章接口
public interface IMedalService {
    void showMedal ();
    String getMedalType ();
}
- 1.
- 2.
- 3.
- 4.
- 5.
我们根据每个逻辑条件,定义相对应的策略实现类,可得以下代码:
//守护勋章策略实现类
public class  GuardMedalServiceImpl implements IMedalService {
    @Override
    public void showMedal() {
        System.out.println("展示守护勋章");
    }
    @Override
    public String getMedalType() {
        return "guard";
    }
}
//嘉宾勋章策略实现类
public class GuestMedalServiceImpl implements IMedalService {
    @Override
    public void showMedal() {
        System.out.println("嘉宾勋章");
    }
    @Override
    public String getMedalType() {
        return "guest";
    }
}
//VIP勋章策略实现类
public class VipMedalServiceImpl implements IMedalService {
    @Override
    public void showMedal() {
        System.out.println("会员勋章");
    }
    @Override
    public String getMedalType() {
        return "vip";
    }
}
- 1.
- 2.
- 3.
- 4.
- 5.
- 6.
- 7.
- 8.
- 9.
- 10.
- 11.
- 12.
- 13.
- 14.
- 15.
- 16.
- 17.
- 18.
- 19.
- 20.
- 21.
- 22.
- 23.
- 24.
- 25.
- 26.
- 27.
- 28.
- 29.
- 30.
- 31.
- 32.
- 33.
接下来,我们再定义策略工厂类,用来管理这些勋章实现策略类,如下:
//勋章服务工产类
public class MedalServicesFactory {
    private static final Map<String, IMedalService> map = new HashMap<>();
    static {
        map.put("guard", new GuardMedalServiceImpl());
        map.put("vip", new VipMedalServiceImpl());
        map.put("guest", new GuestMedalServiceImpl());
    }
    public static IMedalService getMedalService(String medalType) {
        return map.get(medalType);
    }
}
...
- 1.
- 2.
- 3.
- 4.
- 5.
- 6.
- 7.
- 8.
- 9.
- 10.
- 11.
- 12.
- 13.
使用了策略+工厂模式之后,代码变得简洁多了,如下:
public class Test {
    public static void main(String[] args) {
        String medalType = "guest";
        IMedalService medalService = MedalServicesFactory.getMedalService(medalType);
        medalService.showMedal();
    }
}
- 1.
- 2.
- 3.
- 4.
- 5.
- 6.
- 7.