1.介绍
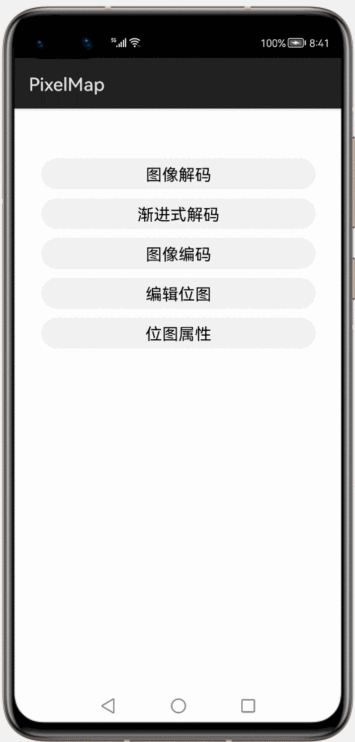
HarmonyOS图像模块支持图像业务的开发,常见功能如图像解码、图像编码、基本的位图操作、图像编辑等。当然,也支持通过接口组合来实现更复杂的图像处理逻辑。
那么什么叫图像解码,什么叫图像编码,什么叫位图?
PixelMap是图像解码后无压缩的位图格式
图像解码就是不同的存档格式图片(如JPEG、PNG等)解码为无压缩的位图格式
图像编码就是将无压缩的位图格式,编码成不同格式的存档格式图片(JPEG、PNG等)
不管是编码还是解码的目的是方便在应用或者系统中进行相应的处理。
本文正在参与优质创作者激励
2.搭建环境
安装DevEco Studio,详情请参考DevEco Studio下载。
设置DevEco Studio开发环境,DevEco Studio开发环境需要依赖于网络环境,需要连接上网络才能确保工具的正常使用,可以根据如下两种情况来配置开发环境:
- 如果可以直接访问Internet,只需进行下载HarmonyOS SDK操作。
- 如果网络不能直接访问Internet,需要通过代理服务器才可以访问,请参考配置开发环境。
下载源码后,使用DevEco Studio 打开项目,模拟器运行即可。
真机运行需要将config.json中的buddleName修改为自己的,如果没有请到AGC上进行配置,参见 使用模拟器进行调试 。
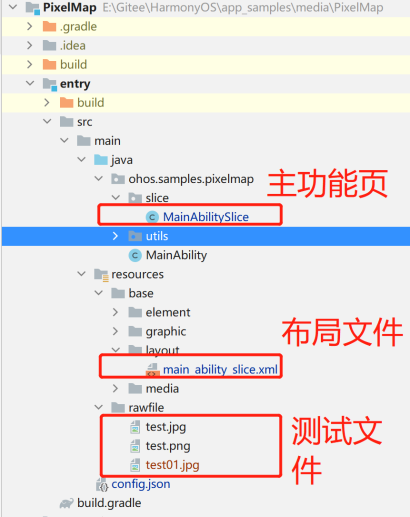
3.代码结构
4.实例讲解
4.1.界面布局
布局只有几个操作按钮,见后面的效果图,不是本文的重点。
4.2.后台代码
4.2.1 图像解码功能
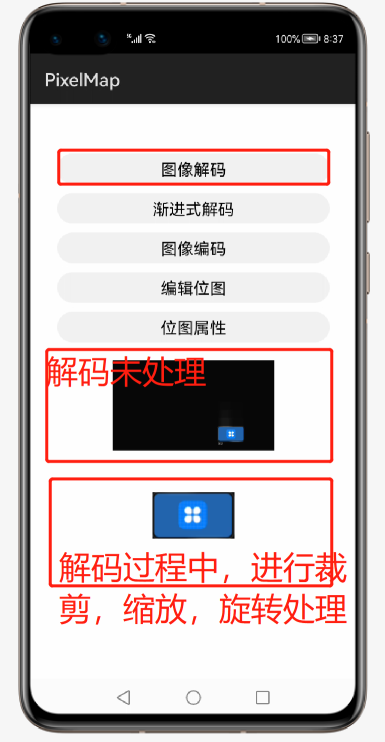
图像解码就是将所支持格式的存档图片解码成统一的PixelMap图像,用于后续图像显示或其他处理,比如旋转、缩放、裁剪等。当前支持格式包括JPEG、PNG、GIF、HEIF、WebP、BMP。
主要用到 ImageSource等
ImageSource.SourceOptions 指定数据源的格式信息,非必填
ImageSource.DecodingOptions 用来支持在解码过程中的图像处理操作,例如缩放、裁剪、旋转,非必填。
接下来看个最简单的图像解码的例子:
- /**
- * 图形解码
- * png -->ImageSource -->PixelMap
- *
- * @param component
- */
- private void commonDecode(Component component) {
- cleanComponents();
- //1.获取应用程序在设备内部存储器上存放文件的目录。
- String pathName = new File(getFilesDir(), "test.png").getPath();
- /*
- InputStream inputStream=null;
- try {
- //2.读取 media目录的图片
- inputStream = getContext().getResourceManager().getResource(ResourceTable.Media_icon);
- ImageSource imageSource = ImageSource.create(inputStream, null);
- inputStream.close();
- } catch (IOException e) {
- e.printStackTrace();
- } catch (NotExistException e) {
- e.printStackTrace();
- }*/
- //--------------------最简单的方式-----------------------
- ImageSource imageSource = ImageSource.create(pathName, null);
- //解码为位图格式
- PixelMap pixelMap = imageSource.createPixelmap(null);
- //设置图片显示
- showFirstImage.setPixelMap(pixelMap);
- //--------------------使用SourceOptions、DecodingOptions 选项-------------
- //指定数据源的格式信息,提高解码效率
- ImageSource.SourceOptions sourceOptions = new ImageSource.SourceOptions();
- sourceOptions.formatHint = "image/png";
- //image 源
- imageSource = ImageSource.create(pathName, sourceOptions);
- //提供图像解码选项
- ImageSource.DecodingOptions decodingOptions = new ImageSource.DecodingOptions();
- //裁剪,如果设置为全0,则不进行裁剪。358/227-448/279
- decodingOptions.desiredRegion = new Rect(358, 227, 90, 52);
- //缩放,如果选择的尺寸与原始图像尺寸不同,则将图像放大或缩小后输出。如果设置为全0,则不进行缩放
- decodingOptions.desiredSize = new Size(90 * 3, 52 * 3);
- //旋转角度,取值范围为0~360。以原图为旋转中心,顺时针旋转图像。
- decodingOptions.rotateDegrees = 180;
- //解码为位图格式
- pixelMap = imageSource.createPixelmap(decodingOptions);
- //设置图片先死
- showSecondImage.setPixelMap(pixelMap);
- //记得释放资源
- imageSource.release();
- pixelMap.release();
- }
效果:
- 10-26 19:02:01.594 13148-13148/? D 00000/=>MainAbilitySlice: pngCachePath:/data/user/0/com.buty.samples/files/test.png
- 10-26 19:02:01.594 13148-13148/? D 00000/=>MainAbilitySlice: jpgCachePath:/data/user/0/com.buty.samples/files/test.jpg
还有一个渐进式解码,
官方文档的描述:在未获取到全部图像时,支持先更新部分数据来尝试解码,调用updateData更新数据,将参数isFinal设置为false;当获取到全部数据后,最后一次更新数据时设置isFinal为true,表示数据更新完毕。
又去网上搜索了一下关于渐进式解码的内容,是这么说的。
“渐进式解码提供在整个图像完成下载之前以增量方式解码和呈现图像部分的能力。 此功能极大地改进了从 Internet 查看图像时用户的体验,因为用户无需等待整个图像下载,就可以开始解码。 在下载整个映像之前,用户可以查看包含可用数据的映像预览。 此功能对于用于从 Internet 或带宽有限的数据源查看图像的任何应用程序都至关重要。”
“渐进式解码是一种从不完整的图像文件中以增量方式解码图像部分的能力。 传统解码需要完整的图像文件才能开始解码。 渐进式解码在图像的渐进式级别完成下载后开始。 解码器对图像的当前渐进式级别执行解码传递。 然后,它会在下载每个渐进式级别时对图像执行多个解码传递。 每次解码传递都显示更多图像,直到完全下载并解码图像。 解码完整图像所需的传递数取决于图像文件格式和用于创建图像的编码过程。
使用渐进式解码的要求:
1.图像文件必须支持渐进式解码。 大多数图像格式不支持渐进式解码,尽管常用图像格式为 JPEG、PNG 和 GIF。
2.图像文件必须编码为渐进式图像。 未使用渐进式图像编码创建的图像文件无法实现渐进式解码,即使文件格式会支持渐进式解码。
3.支持渐进式解码的编解码器必须可用。 如果编解码器不支持渐进式解码,则编码为渐进式图像的图像将被解码为传统图像。”
一起看个渐进式解码的例子,
点击 “渐进式解码” 按钮,执行一次imageSource.updateData
- /**
- * 渐进式解码
- *
- * @param component
- */
- private void regionDecode(Component component) {
- if (buttonClickNum < 10) {
- // 获取到一定的数据时尝试解码,
- imageSource.updateData(fileByte, fileByte.length * buttonClickNum / 10, fileByte.length / 10,
- buttonClickNum==9?true:false);
- pixelMap = imageSource.createPixelmap(null);
- showResultText.setText( (buttonClickNum + 1) + "/10");
- showSecondImage.setPixelMap(pixelMap);
- buttonClickNum++;
- }else{
- pixelMap.release();
- imageSource.release();
- readFileForInitFileByte();
- buttonClickNum=0;
- cleanComponents();
- }
- }
- /**
- * 读取文件初始化 fileByte变量
- * 初始化 imageSource
- */
- private void readFileForInitFileByte() {
- File file = new File(jpgCachePath);
- try {
- FileInputStream fileInputStream = new FileInputStream(file);
- ByteArrayOutputStream byteArrayOutputStream = new ByteArrayOutputStream();
- byte[] data = new byte[1024];
- int len = -1;
- while ((len = fileInputStream.read(data)) != -1) {
- byteArrayOutputStream.write(data, 0, len);
- }
- fileByte = byteArrayOutputStream.toByteArray();
- ImageSource.SourceOptions srcOpts = new ImageSource.SourceOptions();
- srcOpts.formatHint = "image/jpeg";
- //增量源选项 IncrementalSourceOptions
- ImageSource.IncrementalSourceOptions incrementalSourceOptions = new ImageSource.IncrementalSourceOptions();
- incrementalSourceOptions.opts = srcOpts;
- //表示只输入增量数据来更新源。
- incrementalSourceOptions.mode = ImageSource.UpdateMode.INCREMENTAL_DATA;
- //创建增量数据源
- imageSource = ImageSource.createIncrementalSource(incrementalSourceOptions);
- } catch (IOException e) {
- e.printStackTrace();
- }
- }
效果:
4.2.2 图像编码功能
图像编码主要用到ImagePacker
ImagePacker.PackingOptions 设置编码选项,目前没有太多可选。
- /**
- * 使用 ImagePacker 来打包图片
- * 表示将压缩图像打包成文件或其他对象的图像打包器。
- * 可以调用create创建图片打包器,调用initializePacking设置打包选项,调用addImage添加要打包的图片数据,调用finalizePacking完成打包输出目标对象。
- *
- * @param component
- */
- private void encode(Component component) {
- cleanComponents();
- //创建ImagePacker对象
- ImagePacker imagePacker = ImagePacker.create();
- //设置编码选项
- ImagePacker.PackingOptions packingOptions = new ImagePacker.PackingOptions();
- //图像质量,范围从0-100,100为最佳质量。
- packingOptions.quality = 90;
- //文件输出流, test_encode.jpg
- try (FileOutputStream outputStream = new FileOutputStream(encodeOutPath)) {
- //初始化将结果输出到 OutputStream 对象的打包任务。
- imagePacker.initializePacking(outputStream, packingOptions);
- //图像数据源,test.png
- ImageSource imageSource = ImageSource.create(pngCachePath, null);
- //转为位图格式
- PixelMap pixelMap = imageSource.createPixelmap(null);
- //将pixelMap添加到编码器,进行编码
- boolean result = imagePacker.addImage(pixelMap);
- showResultText.setText(
- "Encode result : " + result + System.lineSeparator() + "OutputFilePath:" + encodeOutPath);
- //释放图像数据源
- imageSource.release();
- pixelMap.release();
- } catch (IOException e) {
- HiLog.info(LABEL_LOG, "%{public}s", "encode IOException ");
- }
- //释放imagePacker
- imagePacker.release();
- }
4.2.3 编辑位图功能
a.通过imageSource创建缩略图,createThumbnailPixelmap
- //解码 ImageSource 实例中包含的缩略图数据以生成缩略图并创建缩略图像素图。
- //allowFromImage - 如果 ImageSource 不包含缩略图数据,则指定是否允许基于原始图像创建。
- PixelMap thumbnailPixelMap = imageSource.createThumbnailPixelmap(decodingOpts, true);
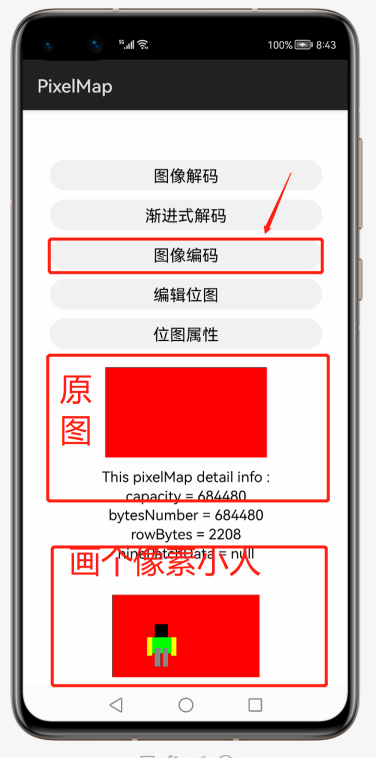
b.读写位图像素数据,画个像素小人
- /**
- * 编辑位图
- * @param component
- */
- private void edit(Component component) {
- cleanComponents();
- int colorsWidth = 552;
- int colorsHeight = 310;
- //PixelMap 选项
- PixelMap.InitializationOptions initializationOptions = new PixelMap.InitializationOptions();
- //指示要创建的像素图的预期大小。
- initializationOptions.size = new Size(colorsWidth, colorsHeight);
- initializationOptions.pixelFormat = PixelFormat.ARGB_8888;
- //PixelMap是否允许修改
- initializationOptions.editable = true;
- //表示像素颜色的 int 数组。 数组中的每个元素都是 PixelFormat#ARGB_8888 格式。
- int[] colors = new int[colorsWidth * colorsHeight];
- Arrays.fill(colors, Color.RED.getValue());
- //创建PixelMap
- PixelMap pixelMap = PixelMap.create(colors, initializationOptions);
- //显示图片
- showFirstImage.setPixelMap(pixelMap);
- // 以另外一个PixelMap作为数据源创建
- PixelMap pixelMap2 = PixelMap.create(pixelMap, initializationOptions);
- //读取指定位置的颜色值。
- int color = pixelMap2.readPixel(new Position(1, 1));
- HiLog.info(LABEL_LOG, "%{public}s", "pixelMapEdit readPixel color :" + color);
- //背上一把宝剑
- for(int i=130;i<180 ;i++){
- //在指定位置写入像素
- pixelMap2.writePixel(new Position(i, i), 0xFF112233);
- }
- //在指定区域写入像素
- int[] pixelArray = new int[1024*1024];
- Arrays.fill(pixelArray, Color.BLACK.getValue());
- //头
- Rect region = new Rect(160, 110, 50, 50);
- //stride - 表示数组每行中的像素数。 该值必须大于或等于此 PixelMap 中目标区域的宽度。
- pixelMap2.writePixels(pixelArray, 0, 100, region);
- Arrays.fill(pixelArray, Color.GREEN.getValue());
- //身体
- Rect region2= new Rect(150, 160, 70, 60);
- //stride - 表示数组每行中的像素数。 该值必须大于或等于此 PixelMap 中目标区域的宽度。
- pixelMap2.writePixels(pixelArray, 0, 100, region2);
- Arrays.fill(pixelArray, Color.YELLOW.getValue());
- //胳膊
- Rect region3= new Rect(130, 160, 20, 70);
- //stride - 表示数组每行中的像素数。 该值必须大于或等于此 PixelMap 中目标区域的宽度。
- pixelMap2.writePixels(pixelArray, 0, 100, region3);
- //胳膊
- Rect region4= new Rect(220, 160, 20, 70);
- //stride - 表示数组每行中的像素数。 该值必须大于或等于此 PixelMap 中目标区域的宽度。
- pixelMap2.writePixels(pixelArray, 0, 100, region4);
- Arrays.fill(pixelArray, Color.GRAY.getValue());
- //腿
- Rect region5= new Rect(160, 200, 20, 70);
- //stride - 表示数组每行中的像素数。 该值必须大于或等于此 PixelMap 中目标区域的宽度。
- pixelMap2.writePixels(pixelArray, 0, 100, region5);
- //腿
- Rect region6= new Rect(190, 200, 20, 70);
- //stride - 表示数组每行中的像素数。 该值必须大于或等于此 PixelMap 中目标区域的宽度。
- pixelMap2.writePixels(pixelArray, 0, 100, region6);
- showSecondImage.setPixelMap(pixelMap2);
- //从位图对象中获取信息
- long capacity = pixelMap.getPixelBytesCapacity();
- long bytesNumber = pixelMap.getPixelBytesNumber();
- int rowBytes = pixelMap.getBytesNumberPerRow();
- byte[] ninePatchData = pixelMap.getNinePatchChunk();
- showResultText.setText(
- "This pixelMap detail info :" + System.lineSeparator() + "capacity = " + capacity + System.lineSeparator()
- + "bytesNumber = " + bytesNumber + System.lineSeparator() + "rowBytes = " + rowBytes
- + System.lineSeparator() + "ninePatchData = " + Arrays.toString(ninePatchData) + System.lineSeparator());
- pixelMap.release();
- pixelMap2.release();
- }
效果是这样的:
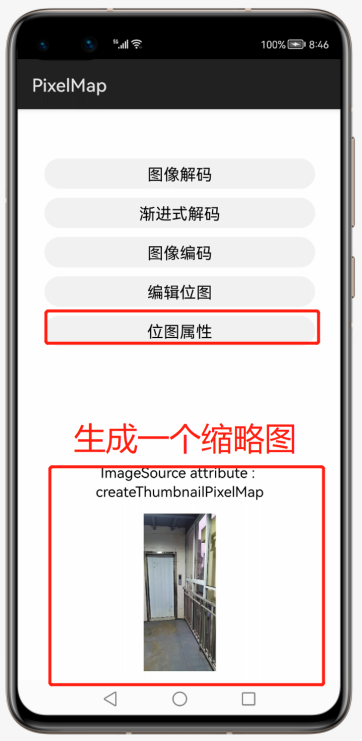
4.2.4 获取图像属性
图像属性解码就是获取图像中包含的属性信息,PropertyKey 存储了常用的属性KEY信息。
看代码:
- /**
- * 获取图片的缩略图和位置信息
- *
- * @param component
- */
- private void attribute(Component component) {
- cleanComponents();
- ImageSource.SourceOptions srcOpts = new ImageSource.SourceOptions();
- srcOpts.formatHint = "image/jpeg";
- HiLog.debug(LABEL_LOG,"jpgCachePath="+jpgCachePath);
- ImageSource imageSource = ImageSource.create(jpgCachePath, srcOpts);
- ImageSource.DecodingOptions decodingOpts = new ImageSource.DecodingOptions();
- //解码 ImageSource 实例中包含的缩略图数据以生成缩略图并创建缩略图像素图。
- //allowFromImage - 如果 ImageSource 不包含缩略图数据,则指定是否允许基于原始图像创建。
- PixelMap thumbnailPixelMap = imageSource.createThumbnailPixelmap(decodingOpts, true);
- //位置信息
- String location = imageSource.getImagePropertyString(PropertyKey.Exif.SUBJECT_LOCATION);
- HiLog.info(LABEL_LOG, "%{public}s", "imageExif location : " + location);
- showResultText.setText("ImageSource attribute : createThumbnailPixelMap");
- showSecondImage.setPixelMap(thumbnailPixelMap);
- //
- imageSource.release();
- thumbnailPixelMap.release();
- }
效果:
5.思考总结
通过这次实践,可以学到的内容:
- 位图的概念,如何进行图像的编码、解码、编辑。
- 渐进式解码的概念,如何生成缩略图,获取其他图像属性等。
文章相关附件可以点击下面的原文链接前往下载
https://harmonyos.51cto.com/resource/1419


