前言
最近爱了上 Nest.js 这个框架,边学边做了一个 nest-todo 这个项目。
https://github.com/haixiangyan/nest-todo
没错,就是一个 UI 很丑陋的 Todo List App。不知道为啥,慢慢开始喜欢上这种原始风味的 UI 样式了,不写 CSS 也挺好看的。
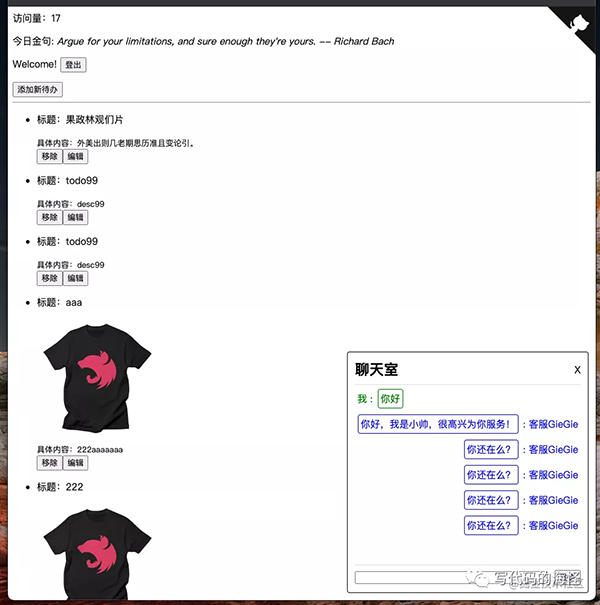
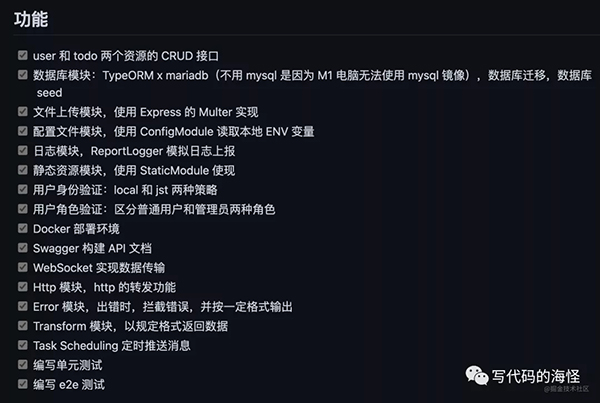
虽然皮肤很丑,但是项目里面包含了大量 Nest.js 文档里的知识点(除了 GraphQL 和微服务,这部分平常用得不多就不瞎整了),能实现的点我基本都想个需求实现了:
为什么
为什么要做这个项目呢?市面上的文章和博客看了不少,很多都浅尝辄止,写个 CRUD 就完事了,也太 easy 了,一行 nest g resource 就搞定。所以,就想实现一个 大而全 的 Nest.js 的 Demo 出来。
除此之外,这个 Demo 还能给很多要马上上手的前端一个示范。虽然 Nest.js 文档也齐全,但是如果你稍微做重一点的业务,它就有点顶不住了,很多东西都要 试。那这个时候 nest-todo 就可以站出来说:“不会就抄我吧,我肯定能 Work”。
前端
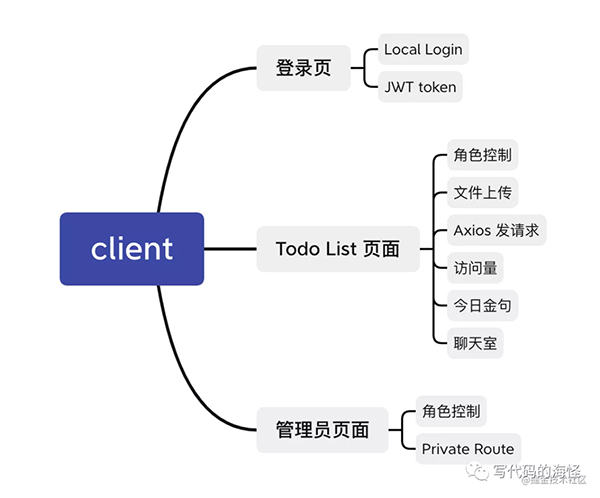
前端部分主要使用 React 来实现,仅有 0.0000001% 的样式,几乎都是 JS 逻辑,且有 100% TypeScript 类型提示,可大胆学习观看。
由于本项目以后端为主,所以前端也只有这些东西:
后端
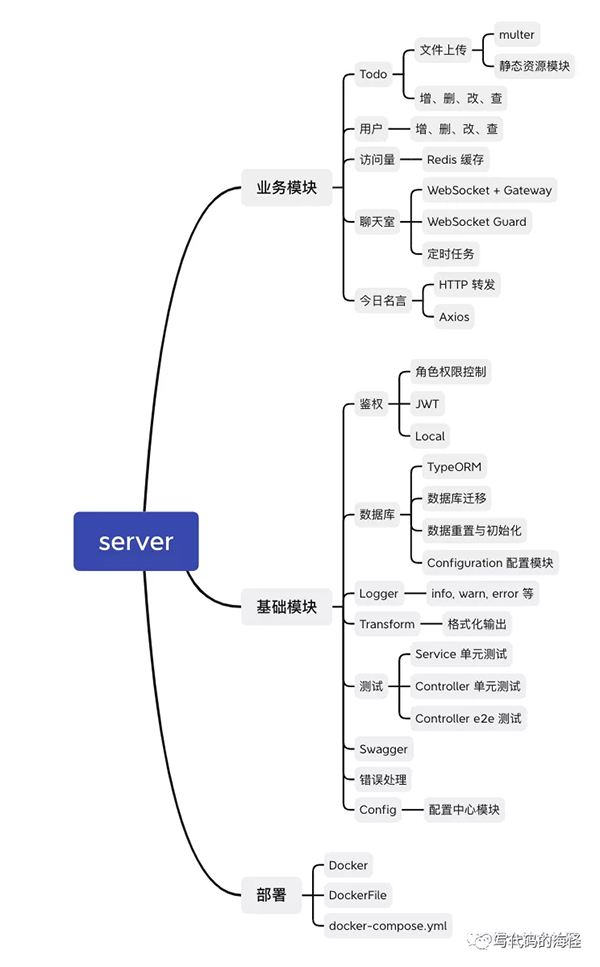
后端内容则比较多了,主要就是主角 Nest.js,以及非常多的模块:
下面例举几个我觉得比较重要的模块来说说吧,当然下面都是一些代码片段,想了解更具体的实现,可以到 Github 的 nest-todo 查看。
Todo 模块
最基础的增、删、改、查。相信很多人在一些博客或文章都见过这样的写法。
TodoController 负责路由实现:
- @ApiTags('待办事项')
- @ApiBearerAuth()
- @Controller('todo')
- export class TodoController {
- constructor(private readonly todoService: TodoService) {}
- @Post()
- async create(
- @Request() request,
- @Body() createTodoDto: CreateTodoDto,
- ): Promise<Todo> {
- return this.todoService.create(request.user.id, createTodoDto);
- }
- @Get()
- async findAll(@Request() request): Promise<Todo[]> {
- const { id, is_admin } = request.user;
- if (is_admin === 1) {
- return this.todoService.findAll();
- } else {
- return this.todoService.findAllByUserId(id);
- }
- }
- @Get(':id')
- async findOne(@Param('id', ParseIntPipe) id: number): Promise<Todo> {
- return this.todoService.findOne(id);
- }
- @Patch(':id')
- async update(
- @Param('id', ParseIntPipe) id: number,
- @Body() updateTodoDto: UpdateTodoDto,
- ) {
- await this.todoService.update(id, updateTodoDto);
- return updateTodoDto;
- }
- @Delete(':id')
- async remove(@Param('id', ParseIntPipe) id: number) {
- await this.todoService.remove(id);
- return { id };
- }
- }
而 TodoService 则实现更底层的业务逻辑,这里则是要从数据库增、删、改、查:
- @Injectable()
- export class TodoService {
- constructor(
- private todoRepository: TodoRepository,
- private userRepository: UserRepository,
- ) {}
- async create(userId: number, createTodoDto: CreateTodoDto): Promise<Todo> {
- const user = await this.userRepository.findOne(userId);
- const { title, description, media } = createTodoDto;
- const todo = new Todo();
- todo.title = title;
- todo.description = description;
- todo.status = createTodoDto.status || TodoStatus.TODO;
- todo.media = media;
- todo.author = user;
- return this.todoRepository.save(todo);
- }
- async findAll(): Promise<Todo[]> {
- return this.todoRepository.find();
- }
- async findAllByUserId(userId: number): Promise<Todo[]> {
- const user = await this.userRepository.findOne({
- relations: ['todos'],
- where: { id: userId },
- });
- return user ? user.todos : [];
- }
- async findOne(id: number): Promise<Todo> {
- return this.todoRepository.findOne(id);
- }
- async update(id: number, updateTodoDto: UpdateTodoDto) {
- const { title, description, status, media } = updateTodoDto;
- return this.todoRepository.update(id, {
- title,
- description,
- status: status || TodoStatus.TODO,
- media: media || '',
- });
- }
- async remove(id: number) {
- return this.todoRepository.delete({
- id,
- });
- }
- }
可惜的是,这些文章和博客到此就结束了,可能作者看到这里也不想再继续搞下去了。不过,我并不打算到此结束,这才刚开始呢。
数据库模块
上面的 TodoService 里用到了数据库,那就来聊聊数据库模块。我这里的选型是 TypeORM + mariadb,为啥不用 mysql 呢?因为我用 M1 的 Mac,装不了 mysql 这个镜像,非常蛋疼。
要使用 TypeORM,就需要在 AppModule 上添加这个配置,然而,明文写配置是个沙雕做法,更好的实现应该用 Nest.js 提供的 ConfigModule 来读取配置。
这里的读取配置目前我先采用读取 .env 的配置实现,其实一般在公司里都应该有个配置中心,里面存放了 username, password 这些敏感字段,ConfigModule 则负责开启应用时读取这些配置。
读取配置这里使用 读取 .env 文件” 实现:
- const loadConfig = () => {
- const { env } = process;
- return {
- db: {
- database: env.TYPEORM_DATABASE,
- host: env.TYPEORM_HOST,
- port: parseInt(env.TYPEORM_PORT, 10) || 3306,
- username: env.TYPEORM_USERNAME,
- password: env.TYPEORM_PASSWORD,
- },
- redis: {
- host: env.REDIS_HOST,
- port: parseInt(env.REDIS_PORT) || 6379,
- },
- };
- };
然后再在 AppModule 使用 ConfigModule 和 TypeORMModule:
- const libModules = [
- ConfigModule.forRoot({
- load: [loadConfig],
- envFilePath: [DOCKER_ENV ? '.docker.env' : '.env'],
- }),
- ScheduleModule.forRoot(),
- TypeOrmModule.forRootAsync({
- imports: [ConfigModule],
- inject: [ConfigService],
- useFactory: (configService: ConfigService) => {
- const { host, port, username, password, database } =
- configService.get('db');
- return {
- type: 'mariadb',
- // .env 获取
- host,
- port,
- username,
- password,
- database,
- // entities
- entities: ['dist/**/*.entity{.ts,.js}'],
- };
- },
- }),
- ];
- @Module({
- imports: [...libModules, ...businessModules],
- controllers: [AppController],
- providers: [AppService],
- })
- export class AppModule {}
最后一步,在 Todo 业务模块里注入数据表对应的 Repository,这里一来 TodoService 就可以用 Repository 来操作数据库表了:
- @Module({
- imports: [
- TypeOrmModule.forFeature([TodoRepository, UserRepository]),
- UserModule,
- ],
- controllers: [TodoController],
- providers: [TodoService],
- })
- export class TodoModule {}
数据库模块还没完...
除了连接数据库,数据库的迁移与初始化是很多人经常忽略的点。
先说初始化,非常简单,就是一个脚本的事:
- const checkExist = async (userRepository: Repository<User>) => {
- console.log('检查是否已初始化...');
- const userNum = await userRepository.count();
- const exist = userNum > 0;
- if (exist) {
- console.log(`已存在 ${userNum} 条用户数据,不再初始化。`);
- return true;
- }
- return false;
- };
- const seed = async () => {
- console.log('开始插入数据...');
- const connection = await createConnection(ormConfig);
- const userRepository = connection.getRepository<User>(User);
- const dataExist = await checkExist(userRepository);
- if (dataExist) {
- return;
- }
- const initUsers = getInitUsers();
- console.log('生成初始化数据...');
- initUsers.forEach((user) => {
- user.todos = lodash.range(3).map(getRandomTodo);
- });
- const users = lodash.range(10).map(() => {
- const todos = lodash.range(3).map(getRandomTodo);
- return getRandomUser(todos);
- });
- const allUsers = [...initUsers, ...users];
- console.log('插入初始化数据...');
- await userRepository.save(allUsers);
- console.log('数据初始化成功!');
- };
- seed()
- .then(() => process.exit(0))
- .catch((e) => {
- console.error(e);
- process.exit(1);
- });
当然,最好也提供重置数据库的能力:
- const reset = async () => {
- const connection = await createConnection(ormConfig);
- await connection.createQueryBuilder().delete().from(Todo).execute();
- await connection.createQueryBuilder().delete().from(User).execute();
- };
- reset()
- .then(() => process.exit(0))
- .catch((e) => {
- console.error(e);
- process.exit(1);
- });
这样一来,小白上手完全不慌。只要改坏数据库,一个 reset + seed 的操作,数据库又回来的了。当然,这一步仅仅是针对 数据 来说的。
针对数据库表结构则需要 数据库迁移。令人激动的是 TypeORM 已经提供了一条非常 NB 的迁移命令:
- // package.json
- "db:seed": "ts-node scripts/db/seed.ts",
- "db:reset": "ts-node scripts/db/reset.ts",
- "migration:generate": "npm run build && npm run typeorm migration:generate -- -n",
- "migration:run": "npm run build && npm run typeorm migration:run"
但是,TypeORM 是从哪知道数据表的结构的呢?这就是 Entity 的作用了,下面就是一个 Todo entity:
- @Entity()
- export class Todo {
- @ApiProperty()
- @PrimaryGeneratedColumn()
- id: number; // 自增 id
- @ApiProperty()
- @Column({ length: 500 })
- title: string; // 标题
- @ApiProperty()
- @Column('text')
- description?: string; // 具体内容
- @ApiProperty()
- @Column('int', { default: TodoStatus.TODO })
- status: TodoStatus; // 状态
- @ApiProperty({ required: false })
- @Column('text')
- media?: string;
- @ManyToOne(() => User, (user) => user.todos)
- author: User;
- }
然后在 .env 里添加配置:
- # Type ORM 专有变量
- # 详情:https://typeorm.io/#/using-ormconfig
- # 生产环境在服务器上的容器里配置
- TYPEORM_CONNECTION=mariadb
- TYPEORM_DATABASE=nest_todo
- TYPEORM_HOST=127.0.0.1
- TYPEORM_PORT=3306
- TYPEORM_USERNAME=root
- TYPEORM_PASSWORD=123456
- TYPEORM_ENTITIES=dist/**/*.entity{.ts,.js}
- TYPEORM_MIGRATIONS=dist/src/db/migrations/*.js
- TYPEORM_MIGRATIONS_DIR=src/db/migrations
有了上面的命令,还有什么数据库我不敢删的?遇事不决 npm run migration:run + npm run db:seed 一下。
上传模块
从上面 Demo 可看到,Todo 是支持图片上传的,所以这里还需要提供上传功能。Nest.js 非常给力,直接内置了 multer 这个库:
- @ApiTags('文件上传')
- @ApiBearerAuth()
- @Controller('upload')
- export class UploadController {
- @Post('file')
- @UseInterceptors(FileInterceptor('file'))
- uploadFile(@UploadedFile() file: Express.Multer.File) {
- return {
- file: staticBaseUrl + file.originalname,
- };
- }
- @Post('files')
- @UseInterceptors(FileInterceptor('files'))
- uploadFiles(@UploadedFiles() files: Array<Express.Multer.File>) {
- return {
- files: files.map((f) => staticBaseUrl + f.originalname),
- };
- }
- }
当然,必不可少,需要在 UploadModule 里注入模块:
- @Module({
- imports: [
- MulterModule.register({
- storage: diskStorage({
- destination: path.join(__dirname, '../../upload_dist'),
- filename(req, file, cb) {
- cb(null, file.originalname);
- },
- }),
- }),
- ],
- controllers: [UploadController],
- providers: [UploadService],
- })
- export class UploadModule {}
静态资源模块
首先,必须说明一下上面的上传应该是要上传到 COS 桶或者 CDN 上,而不应该上传到自己服务器,使用自己服务器来管理文件。这里仅为了用一用这个静态资源模块。
回到主题,上面上传是上传到 /upload_dist 这个文件夹里,那我们静态资源就是要 host 这个文件夹下面的文件:
- const uploadDistDir = join(__dirname, '../../', 'upload_dist');
- @Controller('static')
- export class StaticController {
- @SkipJwtAuth()
- @Get(':subPath')
- render(@Param('subPath') subPath, @Res() res) {
- const filePath = join(uploadDistDir, subPath);
- return res.sendFile(filePath);
- }
- }
- @Module({
- controllers: [StaticController],
- })
- export class StaticModule {}
Very easy ~ 过
登录模块
相信细心的你一定看到上面的 @SkipJwtAuth,这是因为我全局开了 JWT 鉴权,只有请求头带有 Bearer Token 才能访问这个接口,而 @SkipJwtAuth 则表示这个接口不需要 JWT 鉴权。不妨来看看普通的鉴权是怎么实现的。
首先,你必要熟悉 Passport.js 里的 Strategy 和 verifyCallback 概念,否则咱还是别聊了。这里 Nest.js 将这个 verifyCallback 封装成了 Strategy 里的 validate 方法,当编写 valiate 则是在写 verifyCallback:
- @Injectable()
- export class LocalStrategy extends PassportStrategy(Strategy) {
- constructor(
- private moduleRef: ModuleRef,
- private reportLogger: ReportLogger,
- ) {
- super({ passReqToCallback: true });
- this.reportLogger.setContext('LocalStrategy');
- }
- async validate(
- request: Request,
- username: string,
- password: string,
- ): Promise<Omit<User, 'password'>> {
- const contextId = ContextIdFactory.getByRequest(request);
- // 现在 authService 是一个 request-scoped provider
- const authService = await this.moduleRef.resolve(AuthService, contextId);
- const user = await authService.validateUser(username, password);
- if (!user) {
- this.reportLogger.error('无法登录,sb');
- throw new UnauthorizedException();
- }
- return user;
- }
- }
上面是用 username + password 实现鉴权的一种策略,当然我们正常服务是可以存在多种鉴权策略的,要使用这个策略,需要用到 Guard:
- @Injectable()
- export class LocalAuthGuard extends AuthGuard('local') {}
然后将这个 Guard 放在对应的接口头顶就 O 了:
- @ApiTags('登录验证')
- @Controller('auth')
- export class AuthController {
- constructor(private authService: AuthService) {}
- @ApiBody({ type: LoginDto })
- @SkipJwtAuth()
- @UseGuards(LocalAuthGuard)
- @Post('login')
- async login(@Request() req) {
- return this.authService.login(req.user);
- }
- }
和 local 这个 Strategy 相似的,JWT 也有对应的 Strategy:
- @Injectable()
- export class JwtStrategy extends PassportStrategy(Strategy) {
- constructor(private userService: UserService) {
- super({
- jwtFromRequest: ExtractJwt.fromAuthHeaderAsbearerToken(),
- ignoreExpiration: false,
- secretOrKey: jwtConstants.secret,
- });
- }
- async validate(payload: any) {
- const existUser = this.userService.findOne(payload.sub);
- if (!existUser) {
- throw new UnauthorizedException();
- }
- return { ...payload, id: payload.sub };
- }
- }
而在 JwtGuard 里,用 canActive 实现了 权限控制:
- @Injectable()
- export class JwtAuthGuard extends AuthGuard('jwt') {
- constructor(private reflector: Reflector) {
- super();
- }
- canActivate(
- context: ExecutionContext,
- ): boolean | Promise<boolean> | Observable<boolean> {
- // 自定义用户身份验证逻辑
- const isPublic = this.reflector.getAllAndOverride<boolean>(IS_PUBLIC_KEY, [
- context.getHandler(),
- context.getClass(),
- ]);
- // skip
- if (isPublic) return true;
- return super.canActivate(context);
- }
- handleRequest(err, user) {
- // 处理 info
- if (err || !user) {
- throw err || new UnauthorizedException();
- }
- return user;
- }
- }
格式化输出
写完接口了,就得格式化输出,我比较喜欢的格式是:
- {
- retcode: 0,
- message: "",
- data: ...
- }
我们更希望不要在 Controller 里重复添加上面的 “格式化” 数据结构。Nest.js 提供了 Interceptor,可以让我们在 拉 数据给前端之前 “加点料”:
- export class TransformInterceptor<T>
- implements NestInterceptor<T, Response<T>>
- {
- intercept(context: ExecutionContext, next: CallHandler<T>) {
- return next.handle().pipe(
- map((data) => ({
- retcode: 0,
- message: 'OK',
- data,
- })),
- );
- }
- }
然后在 main.ts 入口里全局使用:
- app.useGlobalInterceptors(
- new LogInterceptor(reportLogger),
- new TransformInterceptor(),
- );
测试
写完了一个接口,肯定免不了要写测试。我相信绝大部分人是不会写测试,当然他们自己也是不会写的。
它不是 “Jest”,也不是 “Cypress”,而是一个可以研究得很深的领域。它难的点并不在于 “写”,而在于 “造”,以及 测试策略。
先来说测试策略吧,请问什么东西应该测?什么东西可以不测?什么东西不应该测?这三问是个人觉得是个玄学问题,没有正确答案,只能根据自己的项目来判断。并不是 100% 的覆盖率就是好的,也要看更新迭代时测试代码的改造成本。
我先给出这个项目的测试原则:
- 数据库操作不测,因为这个测试内容 TypeORM 能保证 API 的调用是 OK 的
- 简单实现不测,比如一个函数只有一行,那还测个 P
- 我只测一个模块,因为我懒,剩下大家自己看我那个模块的测试就能学会了
- 我的 测试策略 不一定正确,只能说是我目前想到比较好的 测试策略
对 TodoService 进行测试,比较难的点是对 TypeOrm 的 Repository 进行 Mock,这玩意我自己搞了一整天才搞通,相信没人有耐心整这些了:
- const { mockTodos, mockUsers } = createMockDB();
- describe('TodoService', () => {
- let mockTodoRepository;
- let mockUserRepository;
- let service: TodoService;
- beforeEach(async () => {
- mockUserRepository = new MockUserRepository(mockUsers);
- mockTodoRepository = new MockTodoRepository(mockTodos);
- const module: TestingModule = await Test.createTestingModule({
- providers: [
- TodoService,
- {
- provide: TodoRepository,
- useValue: mockTodoRepository,
- },
- {
- provide: UserRepository,
- useValue: mockUserRepository,
- },
- ],
- }).compile();
- service = module.get<TodoService>(TodoService);
- });
- it('create', async () => {
- expect(service).toBeDefined();
- // 创建一个 todo
- const returnTodos = await service.create(99, {
- title: 'title99',
- description: 'desc99',
- status: TodoStatus.TODO,
- });
- // expect
- expect(returnTodos.title).toEqual('title99');
- expect(returnTodos.description).toEqual('desc99');
- expect(returnTodos.status).toEqual(TodoStatus.TODO);
- });
- it('findAll', async () => {
- expect(service).toBeDefined();
- const returnTodos = await service.findAll();
- // expect
- expect(returnTodos).toEqual(mockTodos);
- });
- it('findAllByUserId', async () => {
- expect(service).toBeDefined();
- // 直接返回第一个 user
- jest.spyOn(mockUserRepository, 'findOne').mockImplementation(async () => {
- return mockUsers[0];
- });
- // 找到 userId 为 0 的所有 todo
- const returnTodos = await service.findAllByUserId(0);
- const [firstTodo] = returnTodos;
- // expect
- expect(mockUserRepository.findOne).toBeCalled();
- expect(firstTodo.id).toEqual(0);
- expect(firstTodo.title).toEqual('todo1');
- expect(firstTodo.description).toEqual('desc1');
- });
- it('findOne', async () => {
- expect(service).toBeDefined();
- // 找到一个 todo
- const returnTodo = await service.findOne(0);
- // expect
- expect(returnTodo.id).toEqual(0);
- expect(returnTodo.title).toEqual('todo1');
- expect(returnTodo.description).toEqual('desc1');
- });
- it('update', async () => {
- expect(service).toBeDefined();
- // 所有 todo
- const allTodos = await service.findAll();
- // 更新一个 todo
- await service.update(0, {
- title: 'todo99',
- description: 'desc99',
- });
- // expect
- const targetTodo = allTodos.find((todo) => todo.id === 0);
- expect(targetTodo.id).toEqual(0);
- expect(targetTodo.title).toEqual('todo99');
- expect(targetTodo.description).toEqual('desc99');
- });
- it('remote', async () => {
- expect(service).toBeDefined();
- // 删除 todo
- await service.remove(0);
- // 获取所有 todo
- const allTodos = await service.findAll();
- // expect
- expect(allTodos.length).toEqual(1);
- expect(allTodos.find((todo) => todo.id === 0)).toBeUndefined();
- });
- });
对 TodoController 的单元测试,我觉得这个 class 没什么可测的,因为里面的函数太简单了:
- const { mockTodos, mockUsers } = createMockDB();
- describe('TodoController', () => {
- let todoController: TodoController;
- let todoService: TodoService;
- let mockTodoRepository;
- let mockUserRepository;
- beforeEach(async () => {
- mockTodoRepository = new MockTodoRepository(mockTodos);
- mockUserRepository = new MockUserRepository(mockUsers);
- const app: TestingModule = await Test.createTestingModule({
- controllers: [TodoController],
- providers: [
- TodoService,
- {
- provide: TodoRepository,
- useValue: mockTodoRepository,
- },
- {
- provide: UserRepository,
- useValue: mockUserRepository,
- },
- ],
- }).compile();
- todoService = app.get<TodoService>(TodoService);
- todoController = app.get<TodoController>(TodoController);
- });
- describe('findAll', () => {
- const [firstTodo] = mockTodos;
- it('普通用户只能访问自己的 todo', async () => {
- jest
- .spyOn(todoService, 'findAllByUserId')
- .mockImplementation(async () => {
- return [firstTodo];
- });
- const todos = await todoController.findAll({
- user: { id: 0, is_admin: 0 },
- });
- expect(todos).toEqual([firstTodo]);
- });
- it('管理员能访问所有的 todo', async () => {
- jest.spyOn(todoService, 'findAll').mockImplementation(async () => {
- return mockTodos;
- });
- const todos = await todoController.findAll({
- user: { id: 0, is_admin: 1 },
- });
- expect(todos).toEqual(mockTodos);
- });
- });
- });
最后就是 e2e 的测试,难点在于 Bearer Token 鉴权的获取,这玩意也同样搞了我一天时间:
- describe('TodoController (e2e)', () => {
- const typeOrmModule = TypeOrmModule.forRoot({
- type: 'mariadb',
- database: 'nest_todo',
- username: 'root',
- password: '123456',
- entities: [User, Todo],
- });
- let app: INestApplication;
- let bearerToken: string;
- let createdTodo: Todo;
- beforeAll(async (done) => {
- const moduleFixture: TestingModule = await Test.createTestingModule({
- imports: [TodoModule, AuthModule, typeOrmModule],
- providers: [TodoRepository, UserRepository],
- }).compile();
- app = moduleFixture.createNestApplication();
- await app.init();
- // 生成测试用户的 token
- request(app.getHttpServer())
- .post('/auth/login')
- .send({ username: 'user', password: 'user' })
- .expect(201)
- .expect((res) => {
- bearerToken = `Bearer ${res.body.token}`;
- })
- .end(done);
- });
- it('GET /todo', (done) => {
- return request(app.getHttpServer())
- .get('/todo')
- .set('Authorization', bearerToken)
- .expect(200)
- .expect((res) => {
- expect(typeof res.body).toEqual('object');
- expect(res.body instanceof Array).toBeTruthy();
- expect(res.body.length >= 3).toBeTruthy();
- })
- .end(done);
- });
- it('POST /todo', (done) => {
- const newTodo: CreateTodoDto = {
- title: 'todo99',
- description: 'desc99',
- status: TodoStatus.TODO,
- media: '',
- };
- return request(app.getHttpServer())
- .post('/todo')
- .set('Authorization', bearerToken)
- .send(newTodo)
- .expect(201)
- .expect((res) => {
- createdTodo = res.body;
- expect(createdTodo.title).toEqual('todo99');
- expect(createdTodo.description).toEqual('desc99');
- expect(createdTodo.status).toEqual(TodoStatus.TODO);
- })
- .end(done);
- });
- it('PATCH /todo/:id', (done) => {
- const updatingTodo: UpdateTodoDto = {
- title: 'todo9999',
- description: 'desc9999',
- };
- return request(app.getHttpServer())
- .patch(`/todo/${createdTodo.id}`)
- .set('Authorization', bearerToken)
- .send(updatingTodo)
- .expect(200)
- .expect((res) => {
- expect(res.body.title).toEqual(updatingTodo.title);
- expect(res.body.description).toEqual(updatingTodo.description);
- })
- .end(done);
- });
- it('DELETE /todo/:id', (done) => {
- return request(app.getHttpServer())
- .delete(`/todo/${createdTodo.id}`)
- .set('Authorization', bearerToken)
- .expect(200)
- .expect((res) => {
- expect(res.body.id).toEqual(createdTodo.id);
- })
- .end(done);
- });
- afterAll(async () => {
- await app.close();
- });
- });
Swagger
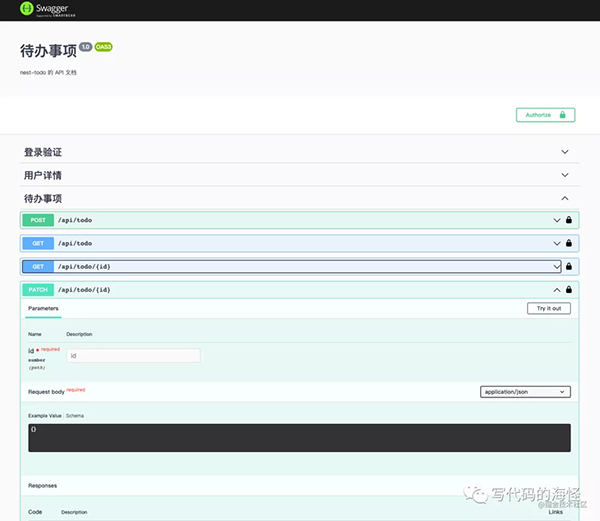
Swagger 是一个非常强大的文档工具,可以识别接口的 URL,入参,出参,简直是前端使用者的福音:
首先在 main.ts 里接入 Swagger:
- const setupSwagger = (app) => {
- const config = new DocumentBuilder()
- .addBearerAuth()
- .setTitle('待办事项')
- .setDescription('nest-todo 的 API 文档')
- .setVersion('1.0')
- .build();
- const document = SwaggerModule.createDocument(app, config);
- SwaggerModule.setup('docs', app, document, {
- swaggerOptions: {
- persistAuthorization: true,
- },
- });
- };
然后在 nest-cli.json 里也接入 Swagger 的插件,这样才能自动识别,不然就要一个 ApiProperty 一个 ApiProperty 去声明了:
- {
- "collection": "@nestjs/schematics",
- "sourceRoot": "src",
- "compilerOptions": {
- "plugins": ["@nestjs/swagger"]
- }
- }
最后
还有非常多的模块没讲,我觉得那些并不是那么重要,只要看过文档就会了。上面的模块是踩了很多坑才实现出来的,中间走走停停花了大概 1 个月左右的时间。
大家先本地 Clone 玩吧。如果你对 Nest.js 也感兴趣,也想学一下它,不妨 Clone 一下 nest-todo 这个项目,抄抄改改学一下吧。


