【51CTO.com快译】应用编程接口(API)好比数字化转型的燃料,使公司能够快速开发应用程序和微服务。 DataTrucker.IO是一个新的免费的开源(Apache 2.0)无代码/低代码API后端,缩减了构建API所需的时间。
DataTrucker读取简单的JSON和YAML配置,生成将其转换为API的代码。除了创建代码外,它还在Node.js服务器上托管代码库,使其立即可供公众使用。
DataTrucker处理开发人员需要处理新项目的大部分日常活动,包括:
- 创建有指定业务逻辑的API端点(使用简单的插件)
- 运用标准的基于角色的访问控制(RBAC)
- 运用授权逻辑
- 在端点上运用加固措施
- 处理日志管理
- 连接到各种系统
- 模块化业务逻辑
- 几乎无需代码,处理所有工作
安装DataTrucker
该教程展示了如何在OpenShift上安装DataTrucker,并为Postgres数据库构建API。整个过程在Kubernetes环境中大同小异。
第1步:创建名为Trucker的命名空间
- oc new-project trucker
第2步:下载并安装应用程序
DataTrucker.IO在OpenShift的OperatorHub中可以找到,可以作为Operator添加到您的集群中。
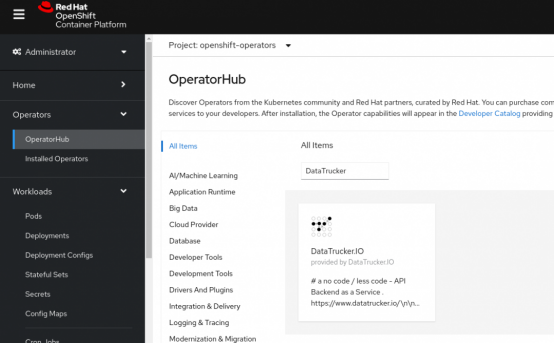
第3步:导航到Operators
点击左侧导航窗格中的Operators,打开DataTrucker.IO Operator。
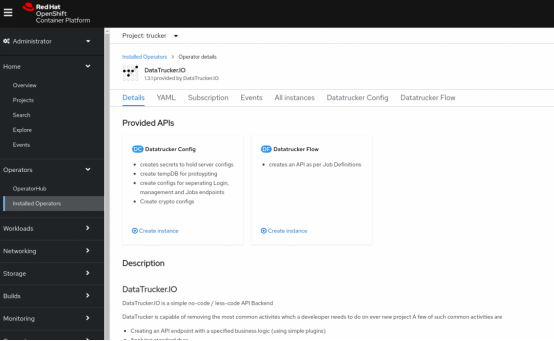
第4步:运行YAML对象,从而创建DataTrucker配置
为数据库后端创建持久卷声明(PVC)。注意:下面提供的Postgres数据库使用Crunchy Data容器以便开始上手。建议对生产工作负载使用经过加固的地理冗余数据库。
1. 创建名为samplepvc的PVC。
2. 创建DatatruckerConfig对象的实例。
3. 点击“创建”之前,确保DatatruckerConfig对象中的TempDB.enabled是True。为下面的演示设计原型需要这么做。
您可以在DataTrucker的GitLab存储库中找到示例。
- oc apply -f DatatruckerConfig.yaml
配置对象Kind: DatatruckerConfig创建以下内容:
- Postgres数据库:您可以创建临时的非加固Crunchy Data数据库以遵循该教程,只需在DataTrucker配置中启用下列参数(对生产工作负载而言,您应该使用加固的地理冗余数据库):
- TempDB:
- enabled: true
- pvc: samplepvc
- 数据库配置:在生产系统中,使用地理冗余的Postgres数据库:
- user: testuser
- password: password
- databasename: userdb
- hostname: db
- type: pg
- port: 5432
- 加密配置:创建加密配置:
- API:
- cryptokeys: |-
- ....
可在DataTrucker.IO文档的“生产加固”部分查看详细信息。
- API服务器后端配置:创建API服务器后端配置:
- API:
- name: API
- loginServer: |-
- ....
- managementServer: |-
- ....
- jobsServer: |-
- ....
第5步:创建登录和管理端点
创建一个用于获取登录令牌的端点:
- apiVersion: datatrucker.datatrucker.io/v1
- kind: DatatruckerFlow
- metadata:
- name: login-endpoint
- spec:
- Type: Login
- DatatruckerConfig: < the name of the config object created in step 4 >
为RBAC管理和登录信息创建一个端点:
- apiVersion: datatrucker.datatrucker.io/v1
- kind: DatatruckerFlow
- metadata:
- name: management-endpoint
- spec:
- Type: Management
- DatatruckerConfig: < the name of the config object created in step 4 >
以上几项为用户界面(UI)和管理API创建部署和服务端点。
第6步:公开管理端点
公开路由:
- $ oc get svc | grep endpoint
- login-endpoint ClusterIP 10.217.5.89 <none> 80/TCP 3m43s
- management-endpoint ClusterIP 10.217.5.220 <none> 80/TCP 3m29s
- management-endpoint-ui ClusterIP 10.217.4.42 <none> 80/TCP 3m28s
- $ oc expose svc management-endpoint-ui
- route.route.openshift.io/management-endpoint-ui exposed
- $ oc expose svc login-endpoint
- route.route.openshift.io/login-endpoint exposed
- $ oc get routes
- NAME HOST/PORT PATH SERVICES PORT TERMINATION WILDCARD
- login-endpoint login-endpoint-trucker.apps-crc.testing login-endpoint 8080 None
- management-endpoint-ui management-endpoint-ui-trucker.apps-crc.testing management-endpoint-ui 9080 None
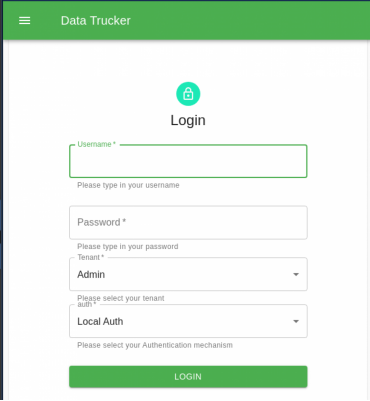
第7步:使用Web浏览器登录到UI
1. 创建管理员用户:
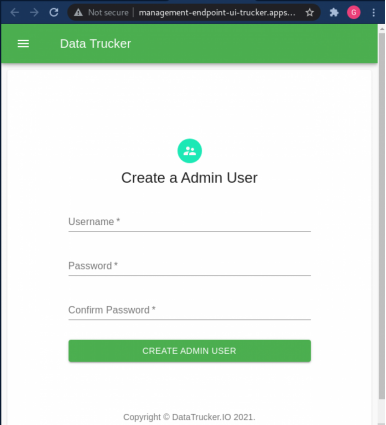
2. 以该管理员用户的身份登录
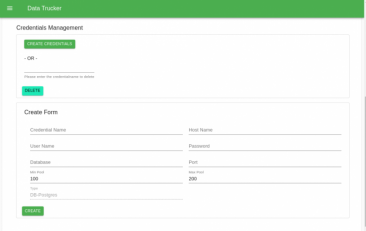
第8步:为API创建Postgres登录信息
鉴于DataTrucker已安装和配置,现在可以构建API了。
为您选择的数据库创建Postgres登录信息:
1. 展开左边导航栏。
2. 选择“登录信息”。
3. 打开“Postgres登录信息”面板。
4. 点击“创建登录信息”。
5. 输入您的数据库资料。
第9步:创建Postgres API
创建一个Flow对象,附有下列工作规格。
- ---
- apiVersion: datatrucker.datatrucker.io/v1
- kind: DatatruckerFlow
- metadata:
- name: my-first-api
- spec:
- DatatruckerConfig: datatruckerconfig-sample
- JobDefinitions:
- - credentialname: db < cred name from step 8 >
- job_timeout: 600
- name: postgres1
- restmethod: POST
- script: 'select ''[[userinput]]'' as userinput; ' < query you want to execute>
- tenant: Admin
- type: DB-Postgres
- validations:
- properties:
- userinput:
- maxLength: 18
- pattern: '^[a-z0-9]*$'
- type: string
- type: object
- - credentialname: db < cred name from step 8 >
- job_timeout: 600
- name: postgres2
- restmethod: GET
- script: select * from information_schema.tables < query you want to execute>
- tenant: Admin
- type: DB-Postgres
- Type: Job
该规格创建新的微服务以托管API,该微服务在其路由上有两个API:
- postgres1:
- 将当前日期和用户发送的参数录入到SQL中
- 这是POST请求
- 为用户输入变量userinput净化输入
- postgres2:
- 获得可用表格列表
- 这是GET请求
现在,搜索服务:
- $. oc get svc | grep my-first-api
- my-first-api ClusterIP 10.217.5.116 <none> 80/TCP 45s
- $. oc expose svc my-first-api
- route.route.openshift.io/my-first-api exposed
- $. oc get routes | grep my-first-api
- my-first-api my-first-api-trucker.apps-crc.testing my-first-api 8080 None
您有了URL,可以试一下。
URL在下列表单中:
- http://<your api route>/api/v1/jobs/<name of the JobDefinitions defined in the yaml>
在上述例子中,您创建了两个JobDefinitions:
- 类型POST的postgres1
- 类型GET的postgres2
第10步:测试您的API
从登录端点获得登录令牌:
- curl --location --request POST 'http://login-endpoint-trucker.<wilcard.domain>/api/v1/login' \
- --header 'Content-Type: application/json' \
- --data-raw '{
- "username": "xxx",
- "password": "xxxxxxxx",
- "tenant": "Admin"
- }'
- Response:
- {
- "status": true,
- "username": "xxx",
- "token": "xxxxxxxxxxxx"
- }
现在针对您的API使用登录令牌:
- 第一个API:
- curl --location --request POST 'http://my-first-api-trucker.<wilcard.domain>/api/v1/jobs/postgres1' \
- --header 'Authorization: Bearer xxxxxxxxxxxxxxxxxxxxxxxxxxxxxxxxxxxxxxxxxx \
- --header 'Content-Type: application/json' \
- --data-raw '{
- "userinput": "myfirstresponse"
- }'
响应:
- {
- "reqCompleted": true,
- "date": "2021-09-05T22:05:58.064Z",
- "reqID": "req-3w",
- "data": {
- "command": "SELECT",
- "rowCount": 1,
- "oid": null,
- "rows": [
- .............
- 第二个API:
- curl --location --request GET 'http://my-first-api-trucker.<wilcard.domain>/api/v1/jobs/postgres2' \
- --header 'Authorization: Bearer xxxxxxxxxxxxxxxxxxxxxxxxxxxxxxxxxxxxx'
响应:
- {
- "reqCompleted": true,
- "date": "2021-09-05T22:03:58.389Z",
- "reqID": "req-35",
- "data": {
- "command": "SELECT",
- "rowCount": 185,
- "oid": null,
- "rows": [
- {
- " .......
原文标题:Use this tool to build an API without code,作者:Gaurav Shankar
【51CTO译稿,合作站点转载请注明原文译者和出处为51CTO.com】