本文转载自微信公众号「Android开发编程」,作者Android开发编程。转载本文请联系Android开发编程公众号。
前言
为什么 View.post() 的操作是可以对 UI 进行操作的呢,即使是在子线程中调用 View.post()?
今天我们就来分析分析
一、View.post源码深入分析
1、View.post()
View 的 post 方法如下:
- public boolean post(Runnable action) {
- // 1、首先判断AttachInfo是否为null
- final AttachInfo attachInfo = mAttachInfo;
- if (attachInfo != null) {
- // 1.1如果不为null,直接调用其内部Handler的post
- return attachInfo.mHandler.post(action);
- }
- // 2、否则加入当前View的等待队列
- getRunQueue().post(action);
- return true;
- }
- AttachInfo 是 View 的静态内部类,每个 View 都会持有一个 AttachInfo,它默认为 null;
- 如果mAttachInfo为空,就执行:把action加入当前view的等待队列;
2、getRunQueue().post()
看下 getRunQueue().post():
- private HandlerActionQueue getRunQueue() {
- if (mRunQueue == null) {
- mRunQueue = new HandlerActionQueue();
- }
- return mRunQueue;
- }
- getRunQueue() 返回的是 HandlerActionQueue;
- 调用了 HandlerActionQueue 的 post 方法:
- public void post(Runnable action) {
- // 调用到postDelayed方法,这有点类似于Handler发送消息
- postDelayed(action, 0);
- }
- // 实际调用postDelayed
- public void postDelayed(Runnable action, long delayMillis) {
- // HandlerAction表示要执行的任务
- final HandlerAction handlerAction = new HandlerAction(action, delayMillis);
- synchronized (this) {
- if (mActions == null) {
- // 创建一个保存HandlerAction的数组
- mActions = new HandlerAction[4];
- }
- // 表示要执行的任务HandlerAction 保存在 mActions 数组中
- mActions = GrowingArrayUtils.append(mActions, mCount, handlerAction);
- // mActions数组下标位置累加1
- mCount++;
- }
- }
3、HandlerAction
HandlerAction 表示一个待执行的任务,内部持有要执行的 Runnable 和延迟时间;=
- private static class HandlerAction {
- // post的任务
- final Runnable action;
- // 延迟时间
- final long delay;
- public HandlerAction(Runnable action, long delay) {
- this.action = action;
- this.delay = delay;
- }
- // 比较是否是同一个任务
- // 用于匹配某个 Runnable 和对应的HandlerAction
- public boolean matches(Runnable otherAction) {
- return otherAction == null && action == null
- || action != null && action.equals(otherAction);
- }
- }
postDelayed() 创建一个默认长度为 4 的 HandlerAction 数组,用于保存 post() 添加的任务;
梳理总结:
- 我们调用 View.post(Runnable) 传进去的 Runnable 操作,在传到 HandlerActionQueue 里会先经过 HandlerAction 包装一下,然后再缓存起来;
- 在 执行 View.post(Runnable) 时,因为这时候 View 还没有 attachedToWindow,所以这些 Runnable 操作其实并没有被执行,而是先通过 HandlerActionQueue 缓存起来;
4、AttachInfo
看下 AttachInfo 的创建过程,先看下它的构造方法:
- AttachInfo(IWindowSession session, IWindow window, Display display,
- ViewRootImpl viewRootImpl, Handler handler, Callbacks effectPlayer,
- Context context) {
- mSession = session;
- mWindow = window;
- mWindowToken = window.asBinder();
- mDisplay = display;
- // 持有当前ViewRootImpl
- mViewRootImpl = viewRootImpl;
- // 当前渲染线程Handler
- mHandler = handler;
- mRootCallbacks = effectPlayer;
- mTreeObserver = new ViewTreeObserver(context);
- }
AttachInfo 中持有当前线程的 Handler;
4.1、mAttachInfo 赋值:
- void dispatchAttachedToWindow(AttachInfo info, int visibility) {
- // 给当前View赋值AttachInfo,此时所有的View共用同一个AttachInfo(同一个ViewRootImpl内)
- mAttachInfo = info;
- if (mOverlay != null) {
- // 任何一个View都有一个ViewOverlay
- // ViewGroup的是ViewGroupOverlay
- // 它区别于直接在类似RelativeLaout/FrameLayout添加View,通过ViewOverlay添加的元素没有任何事件
- // 此时主要分发给这些View浮层
- mOverlay.getOverlayView().dispatchAttachedToWindow(info, visibility);
- }
- mWindowAttachCount++;
- if ((mPrivateFlags & PFLAG_SCROLL_CONTAINER) != 0) {
- mAttachInfo.mScrollContainers.add(this);
- mPrivateFlags |= PFLAG_SCROLL_CONTAINER_ADDED;
- }
- // mRunQueue,就是在前面的 getRunQueue().post()
- // 实际类型是 HandlerActionQueue,内部保存了当前View.post的任务
- if (mRunQueue != null) {
- // 执行使用View.post的任务
- // 注意这里是post到渲染线程的Handler中
- mRunQueue.executeActions(info.mHandler);
- // 保存延迟任务的队列被置为null,因为此时所有的View共用AttachInfo
- mRunQueue = null;
- }
- performCollectViewAttributes(mAttachInfo, visibility);
- // 回调View的onAttachedToWindow方法
- // 在Activity的onResume方法中调用,但是在View绘制流程之前
- onAttachedToWindow();
- ListenerInfo li = mListenerInfo;
- final CopyOnWriteArrayList<OnAttachStateChangeListener> listeners =
- li != null ? li.mOnAttachStateChangeListeners : null;
- if (listeners != null && listeners.size() > 0) {
- for (OnAttachStateChangeListener listener : listeners) {
- // 通知所有监听View已经onAttachToWindow的客户端,即view.addOnAttachStateChangeListener();
- // 但此时View还没有开始绘制,不能正确获取测量大小或View实际大小
- listener.onViewAttachedToWindow(this);
- }
- }
- }
5、executeActions
mRunQueue 就是保存了 View.post() 任务的 HandlerActionQueue;此时调用它的 executeActions 方法如下:
- public void executeActions(Handler handler) {
- synchronized (this) {
- // 任务队列
- final HandlerAction[] actions = mActions;
- // 遍历所有任务
- for (int i = 0, count = mCount; i < count; i++) {
- final HandlerAction handlerAction = actions[i];
- //发送到Handler中,等待执行
- handler.postDelayed(handlerAction.action, handlerAction.delay);
- }
- //此时不在需要,后续的post,将被添加到AttachInfo中
- mActions = null;
- mCount = 0;
- }
- }
- 遍历所有已保存的任务,发送到 Handler 中排队执行;
- 将保存任务的 mActions 置为 null,因为后续 View.post() 直接添加到 AttachInfo 内部的 Handler;
6、performTraversals
- dispatchAttachedToWindow() 的调用时机是在 View 绘制流程的开始阶段;
- 在 ViewRootImpl 的 performTraversals 方法,在该方法将会依次完成 View 绘制流程的三大阶段:测量、布局和绘制;
- // View 绘制流程开始在 ViewRootImpl
- private void performTraversals() {
- // mView是DecorView
- final View host = mView;
- if (mFirst) {
- .....
- // host为DecorView
- // 调用DecorVIew 的 dispatchAttachedToWindow,并且把 mAttachInfo 给子view
- host.dispatchAttachedToWindow(mAttachInfo, 0);
- mAttachInfo.mTreeObserver.dispatchOnWindowAttachedChange(true);
- dispatchApplyInsets(host);
- .....
- }
- mFirst=false
- getRunQueue().executeActions(mAttachInfo.mHandler);
- // View 绘制流程的测量阶段
- performMeasure();
- // View 绘制流程的布局阶段
- performLayout();
- // View 绘制流程的绘制阶段
- performDraw();
- }
7、dispatchAttachedToWindow
- 每个 Activity 都有一个关联的 Window 对象,用来描述应用程序窗口,每个窗口内部又包含一个 DecorView 对象,DecorView 对象用来描述窗口的视图 — xml 布局;
- 通过 setContentView() 设置的 View 布局最终添加到 DecorView 的 content 容器中;
- DecorView 的 dispatchAttachedToWindow 方法的执行过程,DecorView 并没有重写该方法,而是在其父类 ViewGroup 中:
- void dispatchAttachedToWindow(AttachInfo info, int visibility) {
- mGroupFlags |= FLAG_PREVENT_DISPATCH_ATTACHED_TO_WINDOW;
- super.dispatchAttachedToWindow(info, visibility);
- mGroupFlags &= ~FLAG_PREVENT_DISPATCH_ATTACHED_TO_WINDOW;
- // 子View的数量
- final int count = mChildrenCount;
- final View[] children = mChildren;
- // 遍历所有子View
- for (int i = 0; i < count; i++) {
- final View child = children[i];
- // 遍历调用所有子View的dispatchAttachedToWindow
- // 为每个子View关联AttachInfo
- child.dispatchAttachedToWindow(info,
- combineVisibility(visibility, child.getVisibility()));
- }
- }
- for 循环遍历当前 ViewGroup 的所有 childView,为其关联 AttachInfo;
- 子 View 的 dispatchAttachedToWindow,首先为当前 View 关联 AttachInfo,然后将之前 View.post() 保存的任务添加到 AttachInfo 内部的 Handler;
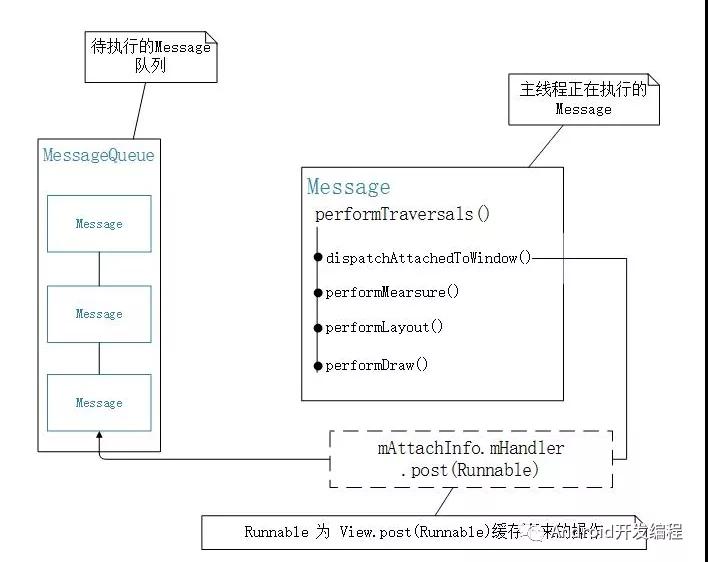
- performTraversals() 会先执行 dispatchAttachedToWindow(),这时候所有子 View 通过 View.post(Runnable) 缓存起来的 Runnable 操作就都会通过 mAttachInfo.mHandler 的 post() 方法将这些 Runnable 封装到 Message 里发送到 MessageQueue 里;
- mHandler 我们上面也分析过了,绑定的是主线程的 Looper,所以这些 Runnable 其实都是发送到主线程的 MessageQueue 里排队,等待执行。然后 performTraversals() 继续往下工作,相继执行 performMeasure(),performLayout() 等操作;
- 等全部执行完后,表示这个 Message 已经处理完毕,所以 Looper 才会去取下一个 Message,这时候,才有可能轮到这些 Runnable 执行;
- 所以,这些 Runnable 操作也就肯定会在 performMeasure() 操作之后才执行,宽高也就可以获取到了;
总结
View.post(Runnable) 内部会自动分两种情况处理,当 View 还没 attachedToWindow 时,会先将这些 Runnable 操作缓存下来;否则就直接通过 mAttachInfo.mHandler 将这些 Runnable 操作 post 到主线程的 MessageQueue 中等待执行;
View.post() 任务能够保证在所有 View 绘制流程结束之后被调用,故如果需要依赖 View 绘制任务,此时可以优先考虑使用该机制;