前言
前一篇我们讲解了View的Measure过程,那今天我们来讲解下Layout;
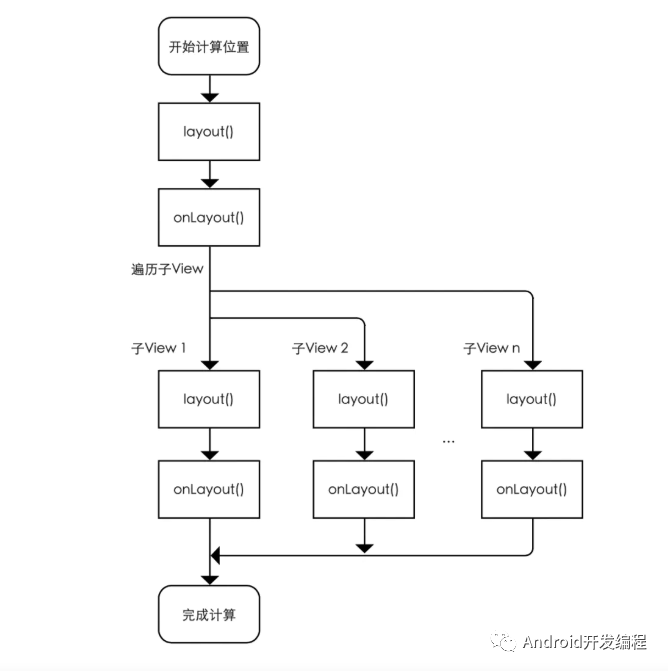
View的layout方法作用是确定View的位置,ViewGroup的layout方法不仅要确定自身的位置,还有确定子View的位置;
Android进阶之深入理解View的测量(Measure)流程机制
一、Layout流程源码详解
1、performLayout
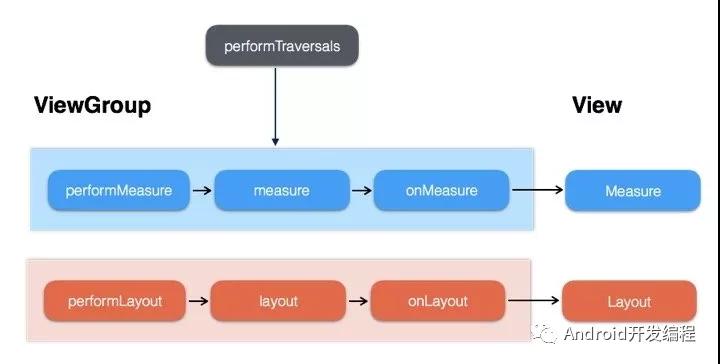
View三大工作流程是从ViewRootImpl#performTraversals开始的,其中performMeasure、performLayout、performDraw方法分别对应了View的测量、布局、绘制;
从performLayout开始分析View布局流程;
- private void performLayout(WindowManager.LayoutParams lp, int desiredWindowWidth,
- int desiredWindowHeight) {
- mLayoutRequested = false;
- mScrollMayChange = true;
- mInLayout = true;
- final View host = mView;
- Trace.traceBegin(Trace.TRACE_TAG_VIEW, "layout");
- try {
- host.layout(0, 0, host.getMeasuredWidth(), host.getMeasuredHeight());
- //省略...
- } finally {
- Trace.traceEnd(Trace.TRACE_TAG_VIEW);
- }
- mInLayout = false;
- }
方法中的mView其实就是DecorView,那么host也就代表了DecorView,DecorView其实是个FrameLayout,ViewGroup并没有重写layout方法,所以我们来看下View#layout方法
2、layout
- /**
- * 源码分析起始点:layout()
- * 作用:确定View本身的位置,即设置View本身的四个顶点位置
- */
- public void layout(int l, int t, int r, int b) {
- // 当前视图的四个顶点
- int oldL = mLeft;
- int oldT = mTop;
- int oldB = mBottom;
- int oldR = mRight;
- // 1. 确定View的位置:setFrame() / setOpticalFrame()
- // 即初始化四个顶点的值、判断当前View大小和位置是否发生了变化 & 返回
- // setFrame() ->分析1
- // setOpticalFrame() ->分析2
- boolean changed = isLayoutModeOptical(mParent) ? setOpticalFrame(l, t, r, b) : setFrame(l, t, r, b);
- // 2. 若视图的大小 & 位置发生变化
- // 会重新确定该View所有的子View在父容器的位置:onLayout()
- if (changed || (mPrivateFlags & PFLAG_LAYOUT_REQUIRED) == PFLAG_LAYOUT_REQUIRED) {
- onLayout(changed, l, t, r, b);
- // 对于单一View的laytou过程:由于单一View是没有子View的,故onLayout()是一个空实现 ->分析3
- // 对于ViewGroup的laytou过程:由于确定位置与具体布局有关,所以onLayout()在ViewGroup为1个抽象方法,需自定义重写实现(下面的章节会详细说明)
- }
- /**
- * 分析1:setFrame()
- * 作用:根据传入的4个位置值,设置View本身的四个顶点位置
- * 即:最终确定View本身的位置
- */
- protected boolean setFrame(int left, int top, int right, int bottom) {
- // 通过以下赋值语句记录下了视图的位置信息,即确定View的四个顶点
- // 从而确定了视图的位置
- mLeft = left;
- mTop = top;
- mRight = right;
- mBottom = bottom;
- mRenderNode.setLeftTopRightBottom(mLeft, mTop, mRight, mBottom);
- }
- /**
- * 分析2:setOpticalFrame()
- * 作用:根据传入的4个位置值,设置View本身的四个顶点位置
- * 即:最终确定View本身的位置
- */
- private boolean setOpticalFrame(int left, int top, int right, int bottom) {
- Insets parentInsets = mParent instanceof View ?
- ((View) mParent).getOpticalInsets() : Insets.NONE;
- Insets childInsets = getOpticalInsets();
- // 内部实际上是调用setFrame()
- return setFrame(
- left + parentInsets.left - childInsets.left,
- top + parentInsets.top - childInsets.top,
- right + parentInsets.left + childInsets.right,
- bottom + parentInsets.top + childInsets.bottom);
- }
- // 回到调用原处
- /**
- * 分析3:onLayout()
- * 注:对于单一View的laytou过程
- * 1. 由于单一View是没有子View的,故onLayout()是一个空实现
- * 2. 由于在layout()中已经对自身View进行了位置计算:setFrame() / setOpticalFrame()
- * 3. 所以单一View的layout过程在layout()后就已完成了
- */
- protected void onLayout(boolean changed, int left, int top, int right, int bottom) {
- // 参数说明
- // changed 当前View的大小和位置改变了
- // left 左部位置
- // top 顶部位置
- // right 右部位置
- // bottom 底部位置
- }
3、setFrame
layout方法是用来确定自身位置的,其内部调用了setOpticalFrame、setFrame和onLayout方法,setOpticalFrame内部又会调用setFrame。所以我们先来看setFrame方法,如下
- protected boolean setFrame(int left, int top, int right, int bottom) {
- boolean changed = false;
- if (mLeft != left || mRight != right || mTop != top || mBottom != bottom) {
- //判断View的位置是否发生改变
- changed = true;
- // Remember our drawn bit
- int drawn = mPrivateFlags & PFLAG_DRAWN;
- int oldWidth = mRight - mLeft;//获取原来的宽度
- int oldHeight = mBottom - mTop;//获取原来的高度
- int newWidth = right - left;//获取新的宽度
- int newHeight = bottom - top;//获取新的高度
- //判断View的尺寸是否发生改变
- boolean sizeChanged = (newWidth != oldWidth) || (newHeight != oldHeight);
- // Invalidate our old position
- invalidate(sizeChanged);
- //对mLeft、mTop、mRight 、mBottom初始化,View自身的位置也就确定了。
- mLeft = left;
- mTop = top;
- mRight = right;
- mBottom = bottom;
- mRenderNode.setLeftTopRightBottom(mLeft, mTop, mRight, mBottom);
- mPrivateFlags |= PFLAG_HAS_BOUNDS;
- //如果View尺寸发生改变,将执行View#sizeChange方法,在sizeChange方法内部会调用View#onSizeChanged方法。
- if (sizeChanged) {
- sizeChange(newWidth, newHeight, oldWidth, oldHeight);
- }
- //省略...
- }
- return changed;
- }
在setFrame方法中对mLeft、mTop、mRight 、mBottom进行初始化,mLeft、mTop分别对应View左上角的横坐标和纵坐标,mRight 、mBottom分别对应了View右下角的横坐标和纵坐标,View的四个顶点的坐标确定了,View自身的位置也就确定了;
4、FrameLayout#onLayout
再回到layout方法,在通过setFrame方法确定了自身位置后,接下来会调用onLayout方法,这个方法其实用来确定子View的位置的;
不过View和ViewGroup都没有真正实现onLayout,因为onLayout和onMeasure类似,其过程都与具体的布局有关;
以FrameLayout为例来分析onLayout过程,FrameLayout#onLayout
- @Override
- protected void onLayout(boolean changed, int left, int top, int right, int bottom) {
- layoutChildren(left, top, right, bottom, false /* no force left gravity */);
- }
- 其内部调用了layoutChildren方法
- void layoutChildren(int left, int top, int right, int bottom,
- boolean forceLeftGravity) {
- final int count = getChildCount();//获取子View的数量
- //parentLeft、parentTop分别代表子View所占区域左上角的横坐标和纵坐标
- //parentRight、parentBottom分别代表子View所占区域右下角的横坐标和纵坐标
- final int parentLeft = getPaddingLeftWithForeground();
- final int parentRight = right - left - getPaddingRightWithForeground();
- final int parentTop = getPaddingTopWithForeground();
- final int parentBottom = bottom - top - getPaddingBottomWithForeground();
- mForegroundBoundsChanged = true;
- //遍历子View
- for (int i = 0; i < count; i++) {
- final View child = getChildAt(i);
- if (child.getVisibility() != GONE) {
- final LayoutParams lp = (LayoutParams) child.getLayoutParams();
- //获取子View的测量宽、高
- final int width = child.getMeasuredWidth();
- final int height = child.getMeasuredHeight();
- int childLeft;
- int childTop;
- //获取子View 设置的Gravity,如果子View没有设置Gravity,则用默认的Gravity:DEFAULT_CHILD_GRAVITY。
- int gravity = lp.gravity;
- if (gravity == -1) {
- gravity = DEFAULT_CHILD_GRAVITY;
- }
- final int layoutDirection = getLayoutDirection();
- final int absoluteGravity = Gravity.getAbsoluteGravity(gravity, layoutDirection);
- final int verticalGravity = gravity & Gravity.VERTICAL_GRAVITY_MASK;
- //水平方向上,通过设置的Gravity,来确定childLeft,即每个子View左上角的横坐标
- switch (absoluteGravity & Gravity.HORIZONTAL_GRAVITY_MASK) {
- case Gravity.CENTER_HORIZONTAL:
- childLeft = parentLeft + (parentRight - parentLeft - width) / 2 +
- lp.leftMargin - lp.rightMargin;
- break;
- case Gravity.RIGHT:
- if (!forceLeftGravity) {
- childLeft = parentRight - width - lp.rightMargin;
- break;
- }
- case Gravity.LEFT:
- default:
- childLeft = parentLeft + lp.leftMargin;
- }
- //竖直方向上,通过设置的Gravity,来确定childTop,即每个子View左上角的纵坐标
- switch (verticalGravity) {
- case Gravity.TOP:
- childTop = parentTop + lp.topMargin;
- break;
- case Gravity.CENTER_VERTICAL:
- childTop = parentTop + (parentBottom - parentTop - height) / 2 +
- lp.topMargin - lp.bottomMargin;
- break;
- case Gravity.BOTTOM:
- childTop = parentBottom - height - lp.bottomMargin;
- break;
- default:
- childTop = parentTop + lp.topMargin;
- }
- //调用子View的layout 方法
- child.layout(childLeft, childTop, childLeft + width, childTop + height);
- }
- }
- }
在该方法内部遍历所有子View过程中,通过子View设置的Gravity,获去其childLeft、childTop即子View的左上角的横坐标和纵坐标,最后执行子View的layout方法,来确定子View的位置
5、LinearLayout#onLayout
LinearLayout复写的onLayout()分析
- /**
- * 源码分析:LinearLayout复写的onLayout()
- * 注:复写的逻辑 和 LinearLayout measure过程的 onMeasure()类似
- */
- @Override
- protected void onLayout(boolean changed, int l, int t, int r, int b) {
- // 根据自身方向属性,而选择不同的处理方式
- if (mOrientation == VERTICAL) {
- layoutVertical(l, t, r, b);
- } else {
- layoutHorizontal(l, t, r, b);
- }
- }
- // 由于垂直/水平方向类似,所以此处仅分析垂直方向(Vertical)的处理过程 ->分析1
- /**
- * 分析1:layoutVertical(l, t, r, b)
- */
- void layoutVertical(int left, int top, int right, int bottom) {
- // 子View的数量
- final int count = getVirtualChildCount();
- // 1. 遍历子View
- for (int i = 0; i < count; i++) {
- final View child = getVirtualChildAt(i);
- if (child == null) {
- childTop += measureNullChild(i);
- } else if (child.getVisibility() != GONE) {
- // 2. 计算子View的测量宽 / 高值
- final int childWidth = child.getMeasuredWidth();
- final int childHeight = child.getMeasuredHeight();
- // 3. 确定自身子View的位置
- // 即:递归调用子View的setChildFrame(),实际上是调用了子View的layout() ->分析2
- setChildFrame(child, childLeft, childTop + getLocationOffset(child),
- childWidth, childHeight);
- // childTop逐渐增大,即后面的子元素会被放置在靠下的位置
- // 这符合垂直方向的LinearLayout的特性
- childTop += childHeight + lp.bottomMargin + getNextLocationOffset(child);
- i += getChildrenSkipCount(child, i);
- }
- }
- }
- /**
- * 分析2:setChildFrame()
- */
- private void setChildFrame( View child, int left, int top, int width, int height){
- child.layout(left, top, left ++ width, top + height);
- // setChildFrame()仅仅只是调用了子View的layout()而已
- // 在子View的layout()又通过调用setFrame()确定View的四个顶点
- // 即确定了子View的位置
- // 如此不断循环确定所有子View的位置,最终确定ViewGroup的位置
- }
总结
View的layout流程核心在于覆写ViewGroup的onLayout方法,它的流程是拿到子View的宽高,然后实现自己的布局子View的逻辑,它一般结合onMeasure方法使用。


