前言
WindowManagerService是位于Framework层的窗口管理服务,它的职责是管理系统中的所有窗口,也就是Window,关于Window的介绍,通俗来说,Window就是手机上一块显示区域,也就是Android中的绘制画布Surface,添加一个Window的过程,也就是申请分配一块Surface的过程,而整个流程的管理者正是WindowManagerService;
今天我们来分析下窗口WMS相关的知识点;
一、窗口相关概念
1、WindowManagerService概念
(1)WindowManagerService概念
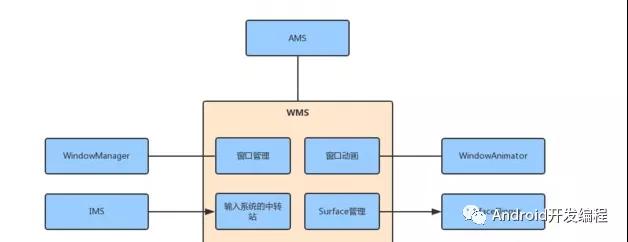
Framework层的窗口管理服务,职责是管理Android系统中所有window。窗口管理服务,继承IWindowManager.Stub,Binder服务端,因此WM与WMS的交互也是一个IPC过程。WMS主要做的事情如下:
- Z-ordered的维护函数
- 输入法管理
- AddWindow/RemoveWindow
- Layerout
- Token管理,AppToken
- 活动窗口管理(FocusWindow)
- 活动应用管理(FocusApp)
- 转场动画
- 系统消息收集线程
- 系统消息分发线程
(2)WindowManager
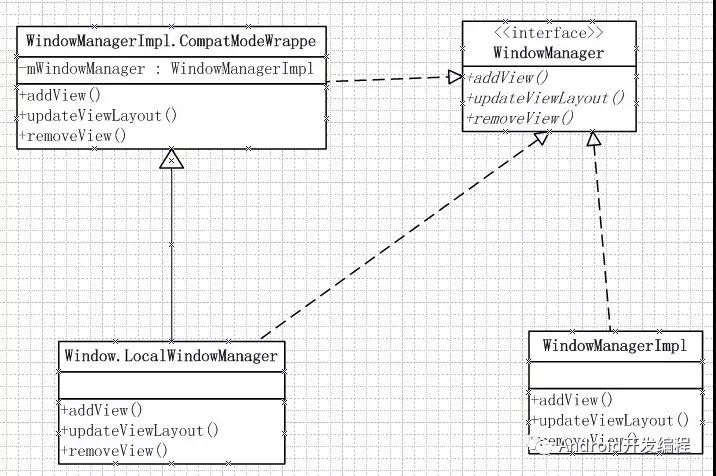
应用与窗口管理服务WindowManagerService交互的接口;
(3)PhoneWindowManager
实现了窗口的各种策略,定义了窗口相关策略,比如:告诉WMS某一个类型Window的Z-Order的值是多少,帮助WMS矫正不合理的窗口属性,为WMS监听屏幕旋转的状态,预处理一些系统按键事件;
(4)Choreographer
用户控制窗口动画、屏幕选择等操作,它拥有从显示子系统获取Vsync同步事件的能力,从而可以在合适的时机通知渲染动作,避免在渲染的过程中因为发生屏幕重绘而导致的画面撕裂。WMS使用Choreographer负责驱动所有的窗口动画、屏幕旋转动画、墙纸动画的渲染;
(5)DisplayContent
用于描述多屏输出相关信息;
根据窗口的显示位置将其分组。隶属于同一个DisplayContent的窗口将会被显示在同一个屏幕中。每个DisplayContent都对应着唯一ID,在添加窗口的时候可以通过指定这个ID决定其将显示在哪个屏幕中;
DisplayContent是一个非常具有隔离性的一个概念。处于不同DisplayContent的两个窗口在布局、显示顺序以及动画处理上不会产生任何耦合;
(6)WindowState
描述窗口的状态信息以及和WindowManagerService进行通信,一般一个窗口对应一个WindowState。它用来表示一个窗口的所有属性;
(7)WindowToken
- 窗口Token,用来做Binder通信;同时也是一种标识;
- 在进行窗口Zorder排序时,属于同一个WindowToken的窗口会被安排在一起,而且在其中定义的一些属性将会影响所有属于此WindowToken的窗口,这些都表明了属于同一个WindowToken的窗口之间的紧密联系;
- 应用组件在需要新的窗口时,必须提供WindowToken以表明自己的身份,并且窗口的类型必须与所持有的WindowToken的类型一致;
- 在创建系统类型的窗口时不需要提供一个有效的Token,WMS会隐式地为其声明一个WindowToken,看起来谁都可以添加个系统级的窗口。难道Android为了内部使用方便而置安全于不顾吗?非也,addWindow()函数一开始的mPolicy.checkAddPermission()的目的就是如此。它要求客户端必须拥有SYSTEM_ALERT_WINDOW或INTERNAL_SYSTEM_WINDOW权限才能创建系;
(8)Session
App进程通过建立Session代理对象和Session对象通信,进而和WMS建立连接;
(9)SurfaceFlinger
SurfaceFlinger负责管理Android系统的帧缓冲区(Frame Buffer),Android设备的显示屏被抽象为一个帧缓冲区,而Android系统中的SurfaceFlinger服务就是通过向这个帧缓冲区写入内容来绘制应用程序中的用户界面的;
(10)InputManager
管理每个窗口的输入事件通道(InputChannel)以及向通道上派发事件;
(11)Animator
所有窗口动画的总管(WindowStateAnimator对象)。在Choreographer的驱动下,逐个渲染所有的动画;
2、Window
- 表示一个窗口的概念,是所有View的直接管理者,任何视图都通过Window呈现(点击事件由Window->DecorView->View;Activity的setContentView底层通过Window完成)
- Window是一个抽象类,具体实现是PhoneWindow;
- 创建Window需要通过WindowManager创建;
- WindowManager是外界访问Window的入口;
- Window的具体实现位于WindowManagerService中;
- WindowManager和WindowManagerService的交互是通过IPC进程间通信完成的;
- 定义窗口样式和行为的抽象基类,用于作为顶层的View加到WindowManager中,其实现类是PhoneWindow;
- 每个Window都需要指定一个Type(应用窗口、子窗口、系统窗口)。Activity对应的窗口是应用窗口;PhoneWindow,ContextMenu,OptionMenu是常用的子窗口;像Toast和系统警告提示框(如ANR)就是系统窗口,还有很多应用的悬浮窗也属于系统窗口;
3、Surface
- 在Android中,一个窗口会独占一个Surface,Surface其实就是一个画布,应用程序通过Canvas或者OpenGL在Surface上绘制内容;
- 在Surface上绘制后,通过SurfaceFlinger将多块Surface的内容按照Z-order进行混合并输出到FrameBuffer,从而将Android页面展示给用户;
- 每个窗口都有一块Surface用于显示自己的ui,必然需要一个角色对窗口进行统一管理,这个时候,WMS应运而生。WMS为所有窗口分配Surface,掌管z-order以及位置、尺寸、窗口的进场出场动画,并且还是输入系统的中转站;
- 布局系统:计算管理窗口的位置和层次;
- 动画系统:根据布局系统的计算渲染窗口动画;
4、Window的Type
- 应用窗口:层级范围是1~99
- 子窗口:层级范围是1000~1999
- 系统窗口:层级范围是2000~2999
5、窗口flags显示属性
- // 窗口特征标记
- public int flags;
- // 当该window对用户可见时,允许锁屏
- public static final int FLAG_ALLOW_LOCK_WHILE_SCREEN_ON = 0x00000001;
- // 窗口后面的所有内容都变暗
- public static final int FLAG_DIM_BEHIND = 0x00000002;
- // 窗口后面的所有内容都变模糊
- public static final int FLAG_BLUR_BEHIND = 0x00000004;
- // 窗口不能获得焦点
- public static final int FLAG_NOT_FOCUSABLE = 0x00000008;
- // 窗口不接受触摸屏事件
- public static final int FLAG_NOT_TOUCHABLE = 0x00000010;
- // 即使在该window可获得焦点情况下,允许该窗口之处的点击事件传递到当前窗口后面的窗口去
- public static final int FLAG_NOT_TOUCH_MODAL = 0x00000020;
- // 当手机处于睡眠状态,如果屏幕被按下,那么该window将第一个收到触摸事件
- public static final int FLAG_TOUCHABLE_WHEN_WAKING = 0x00000040;
- // 当该window对用户可见时,屏幕处于常亮状态
- public static final int FLAG_KEEP_SCREEN_ON = 0x00000080;
- // 让window占满整个屏幕,不留任何边界
- public static final int FLAG_LAYOUT_IN_SCREEN = 0x00000100;
- // 允许窗口超出整个手机屏幕
- public static final int FLAG_LAYOUT_NO_LIMITS = 0x00000200;
- // window全名显示
- public static final int FLAG_FULLSCREEN = 0x00000400;
- // 恢复window非全屏显示
- public static final int FLAG_FORCE_NOT_FULLSCREEN = 0x00000800;
- // 开启窗口抖动
- public static final int FLAG_DITHER = 0x00001000;
- // 安全内容窗口,该窗口显示时不允许截屏
- public static final int FLAG_SECURE = 0x00002000;
- // 一种特殊模式,在该模式下,布局参数用于在将表面合成到屏幕时执行缩放。
- public static final int FLAG_SCALED = 0x00004000;
- public static final int FLAG_IGNORE_CHEEK_PRESSES = 0x00008000;
- public static final int FLAG_LAYOUT_INSET_DECOR = 0x00010000;
- public static final int FLAG_ALT_FOCUSABLE_IM = 0x00020000;
- // 接收单个特殊的MotionEvent,以应对窗口外发生的触摸。
- // 不会收到完整的向下/向上/向上手势,而只会收到第一次向下的位置作为ACTION_OUTSIDE。
- public static final int FLAG_WATCH_OUTSIDE_TOUCH = 0x00040000;
- // 锁屏时显示该窗口
- public static final int FLAG_SHOW_WHEN_LOCKED = 0x00080000;
- // 系统的墙纸显示在该窗口之后
- public static final int FLAG_SHOW_WALLPAPER = 0x00100000;
- // 当window被显示的时候,系统将把它当做一个用户活动事件,以点亮手机屏幕
- public static final int FLAG_TURN_SCREEN_ON = 0x00200000;
- // 该窗口显示,消失键盘
- public static final int FLAG_DISMISS_KEYGUARD = 0x00400000;
- // 当window在可以接受触摸屏情况下,让因在该window之外,而发送到后面的window的
- // 触摸屏可以支持split touch
- public static final int FLAG_SPLIT_TOUCH = 0x00800000;
- // 对该window进行硬件加速,该flag必须在activity或者dialog的content view之前进行设置
- public static final int FLAG_HARDWARE_ACCELERATED = 0x01000000;
- // 让该window占满整个手机屏幕,不留任何边界
- public static final int FLAG_LAYOUT_IN_OVERSCAN = 0x02000000;
- // 透明状态栏
- public static final int FLAG_TRANSLUCENT_STATUS = 0x04000000;
- // 透明导航栏
- public static final int FLAG_TRANSLUCENT_STATUS = 0x04000000;
二、 Window的添加流程
- public final class WindowManagerGlobal {
- public void addView(View view, ViewGroup.LayoutParams params,
- Display display, Window parentWindow) {
- //校验参数的合法性
- ...
- //ViewRootImpl封装了View与WindowManager的交互力促
- ViewRootImpl root;
- View panelParentView = null;
- synchronized (mLock) {
- // Start watching for system property changes.
- if (mSystemPropertyUpdater == null) {
- mSystemPropertyUpdater = new Runnable() {
- @Override public void run() {
- synchronized (mLock) {
- for (int i = mRoots.size() - 1; i >= 0; --i) {
- mRoots.get(i).loadSystemProperties();
- }
- }
- }
- };
- SystemProperties.addChangeCallback(mSystemPropertyUpdater);
- }
- int index = findViewLocked(view, false);
- if (index >= 0) {
- if (mDyingViews.contains(view)) {
- // Don't wait for MSG_DIE to make it's way through root's queue.
- mRoots.get(index).doDie();
- } else {
- throw new IllegalStateException("View " + view
- + " has already been added to the window manager.");
- }
- // The previous removeView() had not completed executing. Now it has.
- }
- // If this is a panel window, then find the window it is being
- // attached to for future reference.
- if (wparams.type >= WindowManager.LayoutParams.FIRST_SUB_WINDOW &&
- wparams.type <= WindowManager.LayoutParams.LAST_SUB_WINDOW) {
- final int count = mViews.size();
- for (int i = 0; i < count; i++) {
- if (mRoots.get(i).mWindow.asBinder() == wparams.token) {
- panelParentView = mViews.get(i);
- }
- }
- }
- //通过上下文构建ViewRootImpl
- root = new ViewRootImpl(view.getContext(), display);
- view.setLayoutParams(wparams);
- //mViews存储着所有Window对应的View对象
- mViews.add(view);
- //mRoots存储着所有Window对应的ViewRootImpl对象
- mRoots.add(root);
- //mParams存储着所有Window对应的WindowManager.LayoutParams对象
- mParams.add(wparams);
- }
- // do this last because it fires off messages to start doing things
- try {
- //调用ViewRootImpl.setView()方法完成Window的添加并更新界面
- root.setView(view, wparams, panelParentView);
- } catch (RuntimeException e) {
- // BadTokenException or InvalidDisplayException, clean up.
- synchronized (mLock) {
- final int index = findViewLocked(view, false);
- if (index >= 0) {
- removeViewLocked(index, true);
- }
- }
- throw e;
- }
- }
- }
在这个方法里有三个重要的成员变量:
- mViews 存储着所有Window对应的View对象;
- mRoots 存储着所有Window对应的ViewRootImpl对象;
- mParams 存储着所有Window对应的WindowManager.LayoutParams对象;
- 这里面提到了一个我们不是很熟悉的类ViewRootImpl,它其实就是一个封装类,封装了View与WindowManager的交互方式,它是View与WindowManagerService通信的桥梁;
- 最后也是调用ViewRootImpl.setView()方法完成Window的添加并更新界面;
我们来看看这个方法的实现
- public final class ViewRootImpl implements ViewParent,
- View.AttachInfo.Callbacks, ThreadedRenderer.HardwareDrawCallbacks {
- public void setView(View view, WindowManager.LayoutParams attrs, View panelParentView) {
- synchronized (this) {
- if (mView == null) {
- mView = view;
- //参数校验与预处理
- ...
- // Schedule the first layout -before- adding to the window
- // manager, to make sure we do the relayout before receiving
- // any other events from the system.
- //1. 调用requestLayout()完成界面异步绘制的请求
- requestLayout();
- if ((mWindowAttributes.inputFeatures
- & WindowManager.LayoutParams.INPUT_FEATURE_NO_INPUT_CHANNEL) == 0) {
- mInputChannel = new InputChannel();
- }
- mForceDecorViewVisibility = (mWindowAttributes.privateFlags
- & PRIVATE_FLAG_FORCE_DECOR_VIEW_VISIBILITY) != 0;
- try {
- mOrigWindowType = mWindowAttributes.type;
- mAttachInfo.mRecomputeGlobalAttributes = true;
- collectViewAttributes();
- //2. 创建WindowSession并通过WindowSession请求WindowManagerService来完成Window添加的过程
- //这是一个IPC的过程。
- res = mWindowSession.addToDisplay(mWindow, mSeq, mWindowAttributes,
- getHostVisibility(), mDisplay.getDisplayId(),
- mAttachInfo.mContentInsets, mAttachInfo.mStableInsets,
- mAttachInfo.mOutsets, mInputChannel);
- } catch (RemoteException e) {
- mAdded = false;
- mView = null;
- mAttachInfo.mRootView = null;
- mInputChannel = null;
- mFallbackEventHandler.setView(null);
- unscheduleTraversals();
- setAccessibilityFocus(null, null);
- throw new RuntimeException("Adding window failed", e);
- } finally {
- if (restore) {
- attrs.restore();
- }
- }
- ...
- }
- }
- }
- 调用requestLayout()完成界面异步绘制的请求,requestLayout()会去调用scheduleTraversals()来完成View的绘制,scheduleTraversals()方法将一个TraversalRunnable提交到工作队列中执行View的绘制。而TraversalRunnable最终调用了performTraversals()方法来完成实际的绘制操作。提到performTraversals()方法我们已经很熟悉了;
- 创建WindowSession并通过WindowSession请求WindowManagerService来完成Window添加的过程这是一个IPC的过程,WindowManagerService作为实际的窗口管理者,窗口的创建、删除和更新都是由它来完成的,它同时还负责了窗口的层叠排序和大小计算等工作;
performTraversals()方法的实现:
- 获取Surface对象,用于图形绘制;
- 调用performMeasure()方法测量视图树各个View的大小;
- 调用performLayout()方法计算视图树各个View的位置,进行布局;
- 调用performMeasure()方法对视图树的各个View进行绘制;
WindowManager与WindowManagerService的跨进程通信。Android的各种服务都是基于C/S结构来设计的,系统层提供服务,应用层使用服务。WindowManager也是一样,它与
WindowManagerService的通信是通过WindowSession来完成的;
首先调用ServiceManager.getService("window")获取WindowManagerService,该方法返回的是IBinder对象,然后调用IWindowManager.Stub.asInterface()方法将WindowManagerService转换为一个IWindowManager对象;
然后调用openSession()方法与WindowManagerService建立一个通信会话,方便后续的跨进程通信。这个通信会话就是后面我们用到的WindowSession;
基本上所有的Android系统服务都是基于这种方式实现的,它是一种基于AIDL实现的IPC的过程;
- public final class WindowManagerGlobal {
- public static IWindowSession getWindowSession() {
- synchronized (WindowManagerGlobal.class) {
- if (sWindowSession == null) {
- try {
- InputMethodManager imm = InputMethodManager.getInstance();
- //获取WindowManagerService对象,并将它转换为IWindowManager类型
- IWindowManager windowManager = getWindowManagerService();
- //调用openSession()方法与WindowManagerService建立一个通信会话,方便后续的
- //跨进程通信。
- sWindowSession = windowManager.openSession(
- new IWindowSessionCallback.Stub() {
- @Override
- public void onAnimatorScaleChanged(float scale) {
- ValueAnimator.setDurationScale(scale);
- }
- },
- imm.getClient(), imm.getInputContext());
- } catch (RemoteException e) {
- throw e.rethrowFromSystemServer();
- }
- }
- return sWindowSession;
- }
- }
- public static IWindowManager getWindowManagerService() {
- synchronized (WindowManagerGlobal.class) {
- if (sWindowManagerService == null) {
- //调用ServiceManager.getService("window")获取WindowManagerService,该方法返回的是IBinder对象
- //,然后调用IWindowManager.Stub.asInterface()方法将WindowManagerService转换为一个IWindowManager对象
- sWindowManagerService = IWindowManager.Stub.asInterface(
- ServiceManager.getService("window"));
- try {
- if (sWindowManagerService != null) {
- ValueAnimator.setDurationScale(sWindowManagerService.getCurrentAnimatorScale());
- }
- } catch (RemoteException e) {
- throw e.rethrowFromSystemServer();
- }
- }
- return sWindowManagerService;
- }
- }
- }
三、 Window的删除流程
Window的删除流程也是在WindowManagerGlobal里完成
- public final class WindowManagerGlobal {
- public void removeView(View view, boolean immediate) {
- if (view == null) {
- throw new IllegalArgumentException("view must not be null");
- }
- synchronized (mLock) {
- //1. 查找待删除View的索引
- int index = findViewLocked(view, true);
- View curView = mRoots.get(index).getView();
- //2. 调用removeViewLocked()完成View的删除, removeViewLocked()方法
- //继续调用ViewRootImpl.die()方法来完成View的删除。
- removeViewLocked(index, immediate);
- if (curView == view) {
- return;
- }
- throw new IllegalStateException("Calling with view " + view
- + " but the ViewAncestor is attached to " + curView);
- }
- }
- private void removeViewLocked(int index, boolean immediate) {
- ViewRootImpl root = mRoots.get(index);
- View view = root.getView();
- if (view != null) {
- InputMethodManager imm = InputMethodManager.getInstance();
- if (imm != null) {
- imm.windowDismissed(mViews.get(index).getWindowToken());
- }
- }
- boolean deferred = root.die(immediate);
- if (view != null) {
- view.assignParent(null);
- if (deferred) {
- mDyingViews.add(view);
- }
- }
- }
- }
我们再来看看ViewRootImpl.die()方法的实现;
- public final class ViewRootImpl implements ViewParent,
- View.AttachInfo.Callbacks, ThreadedRenderer.HardwareDrawCallbacks {
- boolean die(boolean immediate) {
- // Make sure we do execute immediately if we are in the middle of a traversal or the damage
- // done by dispatchDetachedFromWindow will cause havoc on return.
- //根据immediate参数来判断是执行异步删除还是同步删除
- if (immediate && !mIsInTraversal) {
- doDie();
- return false;
- }
- if (!mIsDrawing) {
- destroyHardwareRenderer();
- } else {
- Log.e(mTag, "Attempting to destroy the window while drawing!\n" +
- " window=" + this + ", title=" + mWindowAttributes.getTitle());
- }
- //如果是异步删除,则发送一个删除View的消息MSG_DIE就会直接返回
- mHandler.sendEmptyMessage(MSG_DIE);
- return true;
- }
- void doDie() {
- checkThread();
- if (LOCAL_LOGV) Log.v(mTag, "DIE in " + this + " of " + mSurface);
- synchronized (this) {
- if (mRemoved) {
- return;
- }
- mRemoved = true;
- if (mAdded) {
- //调用dispatchDetachedFromWindow()完成View的删除
- dispatchDetachedFromWindow();
- }
- if (mAdded && !mFirst) {
- destroyHardwareRenderer();
- if (mView != null) {
- int viewVisibility = mView.getVisibility();
- boolean viewVisibilityChanged = mViewVisibility != viewVisibility;
- if (mWindowAttributesChanged || viewVisibilityChanged) {
- // If layout params have been changed, first give them
- // to the window manager to make sure it has the correct
- // animation info.
- try {
- if ((relayoutWindow(mWindowAttributes, viewVisibility, false)
- & WindowManagerGlobal.RELAYOUT_RES_FIRST_TIME) != 0) {
- mWindowSession.finishDrawing(mWindow);
- }
- } catch (RemoteException e) {
- }
- }
- mSurface.release();
- }
- }
- mAdded = false;
- }
- //刷新数据,将当前移除View的相关信息从我们上面说过了三个列表:mRoots、mParms和mViews中移除。
- WindowManagerGlobal.getInstance().doRemoveView(this);
- }
- void dispatchDetachedFromWindow() {
- //1. 回调View的dispatchDetachedFromWindow方法,通知该View已从Window中移除
- if (mView != null && mView.mAttachInfo != null) {
- mAttachInfo.mTreeObserver.dispatchOnWindowAttachedChange(false);
- mView.dispatchDetachedFromWindow();
- }
- mAccessibilityInteractionConnectionManager.ensureNoConnection();
- mAccessibilityManager.removeAccessibilityStateChangeListener(
- mAccessibilityInteractionConnectionManager);
- mAccessibilityManager.removeHighTextContrastStateChangeListener(
- mHighContrastTextManager);
- removeSendWindowContentChangedCallback();
- destroyHardwareRenderer();
- setAccessibilityFocus(null, null);
- mView.assignParent(null);
- mView = null;
- mAttachInfo.mRootView = null;
- mSurface.release();
- if (mInputQueueCallback != null && mInputQueue != null) {
- mInputQueueCallback.onInputQueueDestroyed(mInputQueue);
- mInputQueue.dispose();
- mInputQueueCallback = null;
- mInputQueue = null;
- }
- if (mInputEventReceiver != null) {
- mInputEventReceiver.dispose();
- mInputEventReceiver = null;
- }
- //调用WindowSession.remove()方法,这同样是一个IPC过程,最终调用的是
- //WindowManagerService.removeWindow()方法来移除Window。
- try {
- mWindowSession.remove(mWindow);
- } catch (RemoteException e) {
- }
- // Dispose the input channel after removing the window so the Window Manager
- // doesn't interpret the input channel being closed as an abnormal termination.
- if (mInputChannel != null) {
- mInputChannel.dispose();
- mInputChannel = null;
- }
- mDisplayManager.unregisterDisplayListener(mDisplayListener);
- unscheduleTraversals();
- }
- }
Window的删除流程:
- 查找待删除View的索引(mViews.indexOf(view));
- 调用removeViewLocked()完成View的删除, removeViewLocked()方法继续调用;ViewRootImpl.die()方法来完成View的删除;
- ViewRootImpl.die()方法根据immediate参数来判断是执行异步删除还是同步删除,如果是异步删除则则发送一个删除View的消息MSG_DIE就会直接返回。如果是同步删除,则调用doDie()方法;
- doDie()方法调用dispatchDetachedFromWindow()完成View的删除,在该方法里首先回调View的dispatchDetachedFromWindow方法,通知该View已从Window中移除,然后调用WindowSession.remove()方法,这同样是一个IPC过程,最终调用的是WindowManagerService.removeWindow()方法来移除Window;
四、Window的更新流程
- public final class WindowManagerGlobal {
- public void updateViewLayout(View view, ViewGroup.LayoutParams params) {
- if (view == null) {
- throw new IllegalArgumentException("view must not be null");
- }
- if (!(params instanceof WindowManager.LayoutParams)) {
- throw new IllegalArgumentException("Params must be WindowManager.LayoutParams");
- }
- final WindowManager.LayoutParams wparams = (WindowManager.LayoutParams)params;
- //更新View的LayoutParams参数
- view.setLayoutParams(wparams);
- synchronized (mLock) {
- //查找Viewd的索引,更新mParams里的参数
- int index = findViewLocked(view, true);
- ViewRootImpl root = mRoots.get(index);
- mParams.remove(index);
- mParams.add(index, wparams);
- //调用ViewRootImpl.setLayoutParams()完成重新布局的工作。
- root.setLayoutParams(wparams, false);
- }
- }
- }
- 我们再来看看ViewRootImpl.setLayoutParams()方法的实现。
- public final class ViewRootImpl implements ViewParent,
- void setLayoutParams(WindowManager.LayoutParams attrs, boolean newView) {
- synchronized (this) {
- //参数预处理
- ...
- //如果是新View,调用requestLayout()进行重新绘制
- if (newView) {
- mSoftInputMode = attrs.softInputMode;
- requestLayout();
- }
- // Don't lose the mode we last auto-computed.
- if ((attrs.softInputMode & WindowManager.LayoutParams.SOFT_INPUT_MASK_ADJUST)
- == WindowManager.LayoutParams.SOFT_INPUT_ADJUST_UNSPECIFIED) {
- mWindowAttributes.softInputMode = (mWindowAttributes.softInputMode
- & ~WindowManager.LayoutParams.SOFT_INPUT_MASK_ADJUST)
- | (oldSoftInputMode & WindowManager.LayoutParams.SOFT_INPUT_MASK_ADJUST);
- }
- mWindowAttributesChanged = true;
- //如果不是新View,调用requestLayout()进行重新绘制
- scheduleTraversals();
- }
- }
- }
Window的更新流程:
- 更新View的LayoutParams参数,查找View的索引,更新mParams里的参数;
- 调用ViewRootImpl.setLayoutParams()方法完成重新布局的工作,在setLayoutParams()方法里最终会调用scheduleTraversals();
- 进行解码重绘制,scheduleTraversals()后续的流程就是View的measure、layout和draw流程了;
总结
Window的本质是什么?事实上Window是一个抽象的概念,也就是说它并不是实际存在的,它以View的形式存在,每个Window都对应着一个View和一个ViewRootImpl,Window与View通过ViewRootImpl来建立联系。推而广之,我们可以理解WindowManagerService实际管理的也不是Window,而是View,管理在当前状态下哪个View应该在最上层显示,SurfaceFlinger绘制也同样是View;


