在做鸿蒙自动化测试时,经常会碰到一些让同学头疼的问题,有时会阻碍很久,影响编写自动化脚本进度,那么碰到这些阻碍点,我们该如何下手呢,下面罗列几个常见的坑点机解决方案
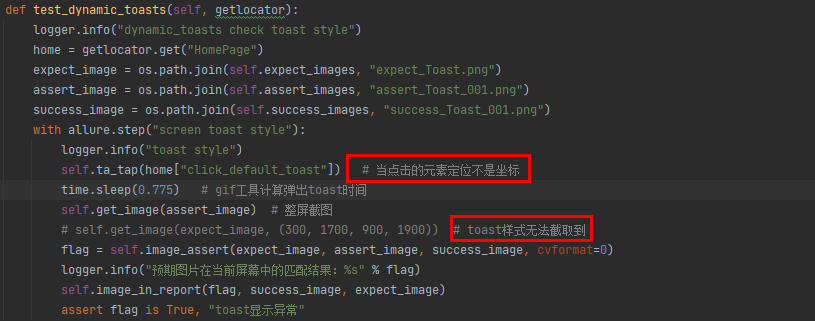
踩坑点一、在点击方法使用的定位元素为非坐标控件的情况时,获取图片方法无法截取到toast!
如何获取toast样式进行自动化?
1.步骤:
- 截取toast样式保存样式图片(点击非元素坐标,无法获取到toast图片)
- 踩坑点:使用gif录制工具,计算点击到弹出toast的时间,使用非元素坐标点击,无法获取到toast截图,正常逻辑思维,改变点击到弹出toast的时间,始终无法获取到toast图片
- 截取整个屏幕的图片
- 将样式图片与整体图片进行对比验证,样式是否存在且一致
2.获取图片方法:
- def get_image(png_path, xy=None):
- """
- 截图,当xy入参有效时则进行裁剪
- :param png_path: 截图的路径
- :param xy: (x1,y1,x2,y2)
- :return:
- """
- conf.driver.get_screenshot_as_file(png_path)
- logger.debug("截屏成功")
- if xy is not None:
- if isinstance(xy, tuple):
- for i in xy:
- if isinstance(i, int):
- pass
- else:
- logger.error("xy的入参必须都是正整数")
- raise (Exception, "xy的入参必须都是正整数")
- try:
- Image.open(png_path).crop(xy).save(png_path)
- logger.debug("图片[%s]裁剪成功,裁剪坐标%s" % (png_path,xy))
- except Exception as e:
- logger.error("截图失败")
- raise e
- else:
- logger.error("xy的入参格式必须是 (x1,y1,x2,y2) ")
- raise (Exception, "xy的入参格式必须是 (x1,y1,x2,y2) ")
3.创建文件名称:
- expect_image = os.path.join(self.expect_images, "expect_Toast.png")
- assert_image = os.path.join(self.assert_images, "assert_Toast_001.png")
- success_image = os.path.join(self.success_images, "success_Toast_001.png")
4.图片对比方法:
- def image_assert(img1, img2, image_path=None, threshold=0.95,cvformat=1):
- """
- 断言图片img1是否在img2中,若断言成功则会将图片保存至本地
- !!! 断言的图片必须用appium截图,可根据需求进行裁剪(该类下的get_image方法截图即可)
- !!! 直接对模拟器手动截图然后与appium的自动截图做对比是无法匹配的,因为分辨率完全不同!!!
- :param img1: 预期的图片
- :param img2: 用例执行时的截图
- :param image_path: 判断后若断言成功则会将对比后的图片保存至本地,本地路径,不入参则不会生成对比图
- :param threshold: 匹配度,建议大于0.9
- :param cvformat: 图片转换格式,入参1-转换为灰度图片,入参非1-转换为RGB格式,对颜色有严格校验需求的要转成RGB格式
- :return: True or False
- """
- if not os.path.exists(img1):
- raise (Exception,"[%s]图片不存在!" % img1)
- if not os.path.exists(img2):
- raise (Exception, "[%s]图片不存在!" % img2)
- scale = 1
- img = cv2.imread(img2) # 要找的大图
- img = cv2.resize(img, (0, 0), fx=scale, fy=scale)
- template = cv2.imread(img1) # 图中的小图
- template = cv2.resize(template, (0, 0), fx=scale, fy=scale)
- template_size = template.shape[:2]
- if int(cvformat) == 1:
- img_gray = cv2.cvtColor(img, cv2.COLOR_BGR2GRAY)
- template_ = cv2.cvtColor(template, cv2.COLOR_BGR2GRAY)
- else:
- img_gray = cv2.cvtColor(img, cv2.COLOR_BGR2RGB)
- template_ = cv2.cvtColor(template, cv2.COLOR_BGR2RGB)
- result = cv2.matchTemplate(img_gray, template_, cv2.TM_CCOEFF_NORMED)
- loc = np.where(result >= threshold)
- # 使用灰度图像中的坐标对原始RGB图像进行标记
- point = ()
- for pt in zip(*loc[::-1]):
- cv2.rectangle(img, pt, (pt[0] + template_size[1], pt[1] + template_size[0]), (0, 0, 255), 2)
- point = pt
- if point == ():
- logger.debug("图片[%s]在图片[%s]中没有匹配到" % (img1, img2))
- return False
- else:
- if image_path is not None:
- cv2.imwrite(image_path, img, [int(cv2.IMWRITE_PNG_COMPRESSION), 3]) # 将图片保存到本地
- logger.debug("图片[%s]在图片[%s]中成功匹配到" % (img1, img2))
- return True
5.点击方法:
- def ta_tap(self, selector, wait_presence=0, wait_visibility=0, timeout=20):
- """
- 模拟手指点击一个元素或坐标
- :param selector: 点击的元素,定位器,要求格式为["元素名称","定位方法","定位表达式"],例如["XXX按钮","XPATH","//a[@text=‘测试定位’]"],["XXX按钮","ID","username"]
- :param wait_presence: 是否需要等待元素加载,0-不需要,1-需要
- :param wait_visibility: 是否需要等待元素可见,0-不需要,1-需要
- :param timeout: 等待的时间,默认20秒
- :return:
- """
- if selector:
- try:
- locator_name = selector[0]
- locator_by = str(selector[1]).upper() # 定位方式
- locator_value = str(selector[2]) # locator的值
- except Exception as e:
- logger.error("ta_tap方法:selector入参格式必须是list<string>,[元素名称,定位方法,定位表达式]")
- raise e
- if str(wait_presence) == "1" and str(wait_visibility) == "1":
- logger.warning("ta_tap方法:请不要同时使用等待元素加载和等待元素可见!!!")
- if locator_by == "XY":
- try:
- x, y = int(locator_value.split(",")[0]), int(locator_value.split(",")[1])
- except Exception as e:
- logger.error("XY坐标值格式错误,正确格式:x,y")
- raise e
- TouchAction(conf.driver).tap(x=x, y=y).release().perform()
- logger.debug("ta_tap模拟手指点击元素:(%s,%s)" % (x, y))
- elif locator_by == "XY%":
- phonesize = self.get_phone_size()
- phonewidth = phonesize["width"]
- phoneheight = phonesize["height"]
- try:
- x, y = float(locator_value.split(",")[0]), float(locator_value.split(",")[1])
- except Exception as e:
- logger.error("XY坐标值格式错误,正确格式:x,y-x和y均是小数(不要填写百分比),例如0.8,0.5")
- raise e
- TouchAction(conf.driver).tap(x=int(x * phonewidth), y=int(y * phoneheight)).release().perform()
- logger.debug("ta_tap模拟手指点击元素:(%s,%s)" % (x * phonewidth, y * phoneheight))
- else:
- if str(wait_presence) == "1":
- self.wait_element_presence(selector, timeout)
- if str(wait_visibility) == "1":
- self.wait_element_visibility(selector, timeout)
- try:
- el = self.xlsxfind_element(selector)
- TouchAction(conf.driver).tap(el).release().perform()
- logger.debug("ta_tap模拟手指点击%s" % locator_name)
- except Exception as e:
- logger.error("tap方法异常,元素名称%s" % locator_name)
- raise e
- else:
- raise Exception("wait_element_presence方法:selector参数是必须的")
6.示例:

踩坑点二、appium版本在1.5以后就不再支持ByName的定位
appium版本在1.5以后就不再支持ByName的定位,在appium1.6.3/1.6.4/1.6.5版本以后如何支持ByName定位,适用于安卓,同样适用于鸿蒙。在使用appium1.5之后的版本时,当我们直接适用ByName方式去查找控件时,一定见过这个错误:
- org.openqa.selenium.InvalidSelectorException: Locator Strategy 'name' is not supported for this session
发现曾经的定位神器居然ByName居然不再支持了,那么怎么解决这个问题呢?以下提供两种解决方式:
- 换其他定位方式,比如用xpath代替
- 使用ByAByAccessibilityId代替,但实践证明这个方法并没有取代ByName
其中第一种是可取的,换其他定位方式,下面给大家一个不用换定位方式,可以无缝解决ByName在升级appium版本定位方法
一招修改源码解决问题根源,修改方法如下:
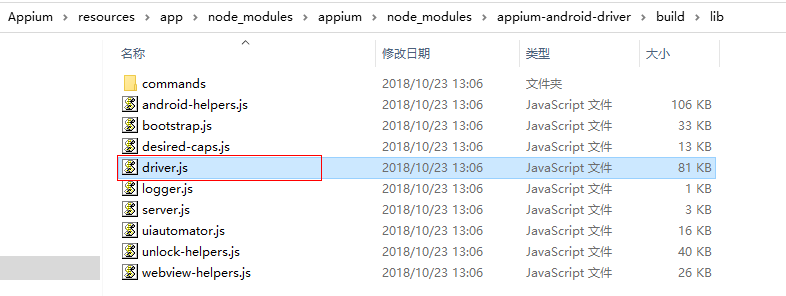
在本地找到Appium路径下的driver.js文件
- Appium\resources\app\node_modules\appium\node_modules\appium-android-driver\build\lib\driver.js
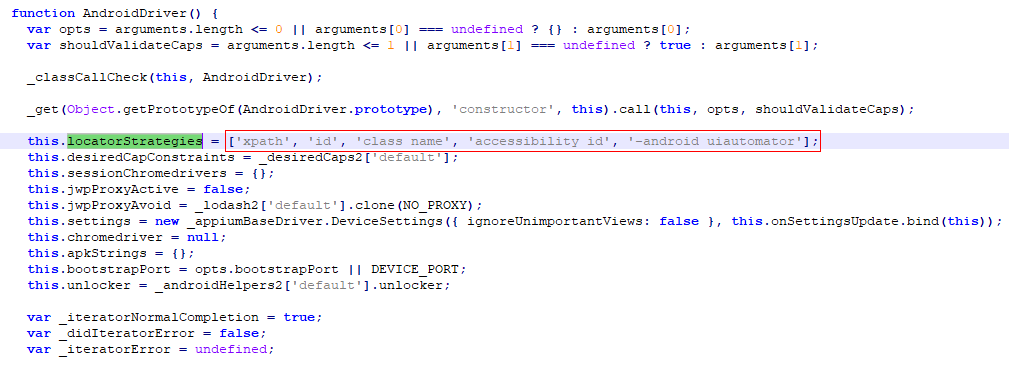
只需要修改其中一行即可

打开driver.js文件

在代码行加上“name”属性
- this.locatorStrategies = ['xpath', 'id', 'class name', 'accessibility id', '-android uiautomator','name'];
修改完成之后,保存,再次重启appium服务,就可以继续使用ByName定位啦
- element = conf.driver.find_element_by_name("name").click()
如果不想用这种方式,也可以使用通用xpath
- element = conf.driver.find_element_by_xpath("//*[@text='name']").click()
踩坑点三、弹窗点击确认或选择选项后,出现脚本无法往下执行的问题
遇到这种问题时,可以通过坐标点击页面弹窗,再点击空白处来释放,就可以继续往下执行
如desCharts组件在弹窗切换图表类型后,脚本会卡住,可以通过坐标点击一个不影响功能的弹窗,再点击空白处让弹窗消失,脚本就可以继续往下执行:
- def exchange(self, elements, chart):
- """
- 切换图表选项(弹窗选择后脚本会卡住,需要释放)
- """
- self.ta_tap(elements["图表切换选项"])
- if chart in ["堆叠折线图", "柱状图", "堆叠柱状图"]:
- self.swipe_xy(452, 680, 450, 150)
- time.sleep(1)
- self.ta_tap(elements[chart])
- time.sleep(1)
- self.ta_tap(elements["释放屏幕坐标"])
- time.sleep(1)
- self.ta_tap(elements["释放屏幕坐标"])
- time.sleep(1)
踩坑点四、在滚动功能无法使用时,需要滑动列表到特定位置。Appium的swipe此时不好用,drag_and_drop方法无法使用坐标点。
解决方法:
1.重写drag_and_drop方法,使它可以使用坐标点
- def drag_and_drop(self, origin_el: Union["WebElement", "dict"], destination_el: Union["WebElement", "dict"]):
- action = TouchAction(self)
- if isinstance(origin_el, dict):
- action.long_press(**origin_el)
- else:
- action.long_press(origin_el)
- if isinstance(destination_el, dict):
- action.move_to(**destination_el)
- else:
- action.move_to(destination_el)
- action.release().perform()
- return self
2.示例:
- @allure.story("MusicBobber")
- @allure.title("MusicBobber_015")
- @allure.tag("L1")
- @allure.severity("normal") # blocker:阻塞缺陷 critical:严重缺陷 normal:一般缺陷 minor:次要缺陷 trivial:轻微缺陷
- @allure.description("删除悬浮挂件")
- @pytest.mark.flaky(reruns=1, reruns_delay=5) # reruns:重试次数 reruns_delay:重试的间隔时间
- def test_MusicBobber_015(self, allow):
- logger.info("MusicBobber_015")
- with allure.step("按返回键"):
- logger.info("按返回键")
- self.keyboard(4)
- time.sleep(1)
- with allure.step("删除悬浮挂件"):
- logger.info("删除悬浮挂件")
- self.drag_and_drop({x:74, y:176}, {x:540, y:2048})
- time.sleep(0.5)
- with allure.step("验证"):
- logger.info("验证")
- expect_image = os.path.join(self.expect_images, f"expect_MusicBobber_015.png")
- assert_image = os.path.join(self.assert_images, f"assert_MusicBobber_015.png")
- contrast_images = os.path.join(self.contrast_images, f"contrast_MusicBobber_015.png")
- self.get_image(contrast_images)
- flag = self.image_assert(expect_image, contrast_images, assert_image)
- self.image_in_report(flag, assert_image, expect_image)
- assert flag is False
结语
其实,在UI自动化实践中我们还会遇到其他不同的阻碍点,Appium本身就存在一些bug,鸿蒙应用的自动化与安卓原理基本一致,我们都是在
摸索中前行,所以,碰到坑点不要慌,在原生不支持的情况下,换一种解决方式,也会使你豁然开朗,希望以上几个问题点及解决方案能对你有所帮助


