前言
我是深圳大学的一名本科生在读生,虽然在学校的课程中已经学习到了最常用的几种编程语言,但是纸上得来终觉浅,觉知此事要躬行。若只是为了学习语言而学习,而缺乏动手实践显然是不行的。恰逢鸿蒙出世,借着这个契机我决定尝试把我课堂上所学习到的东西在鸿蒙上做一些实践。为此加入了深圳大学木棉花鸿蒙小组,与伙伴们一起学习。暑假这段时间以来我在木棉花小组内学习到了一些鸿蒙分布式数据库,分布式任务调度等方面的内容,因此写下这篇文章来记录我这些天学习到的东西。
概述
这个吃豆豆小游戏项目分为单机游戏版和双人游戏版,在单机游戏版中将有两个怪物追赶玩家,玩家在不被追赶上的情况下吃完盘面的豆豆则获胜。双人游戏版则是利用分布式数据库和分布式调度的功能,实现两人联机进行吃豆豆。
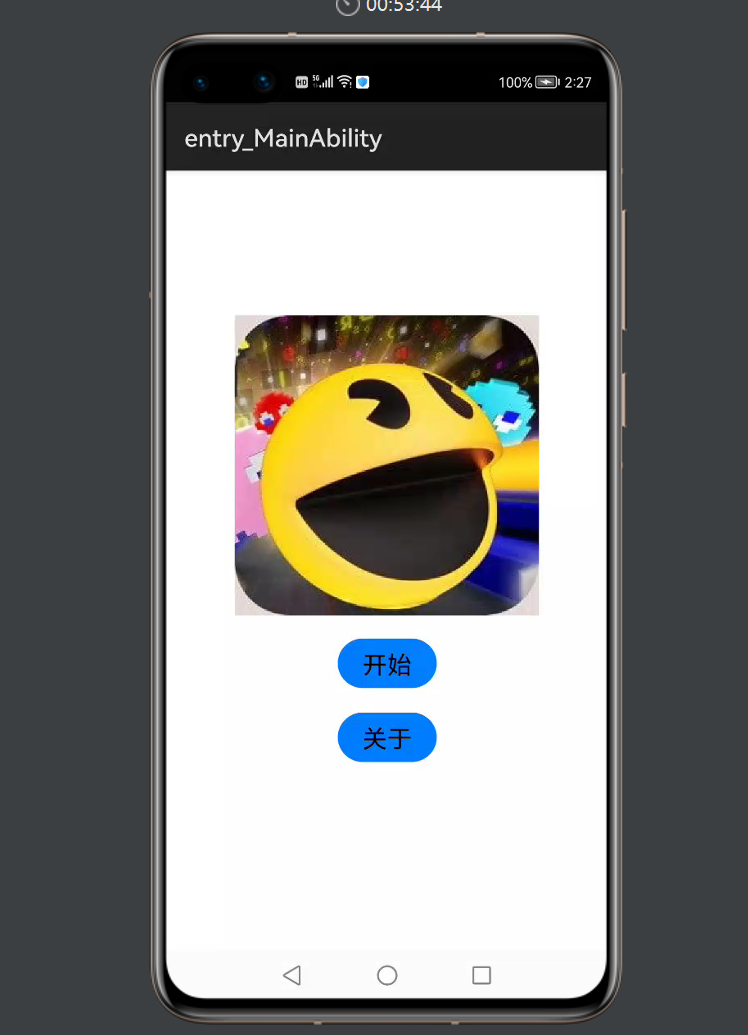
游戏封面如下:
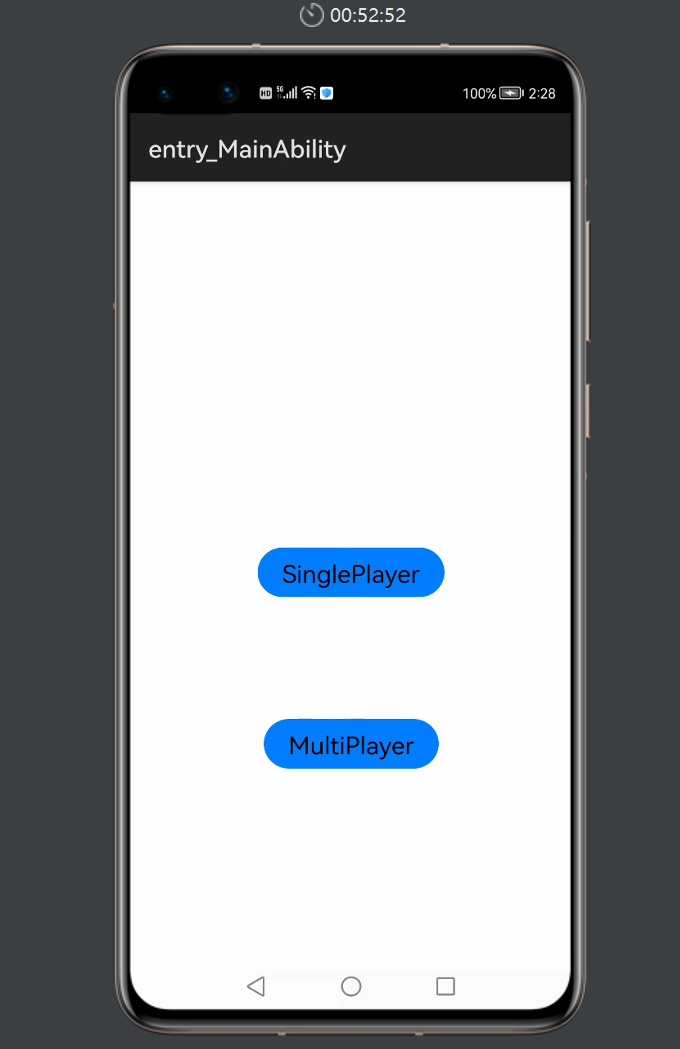
选择游戏模式:
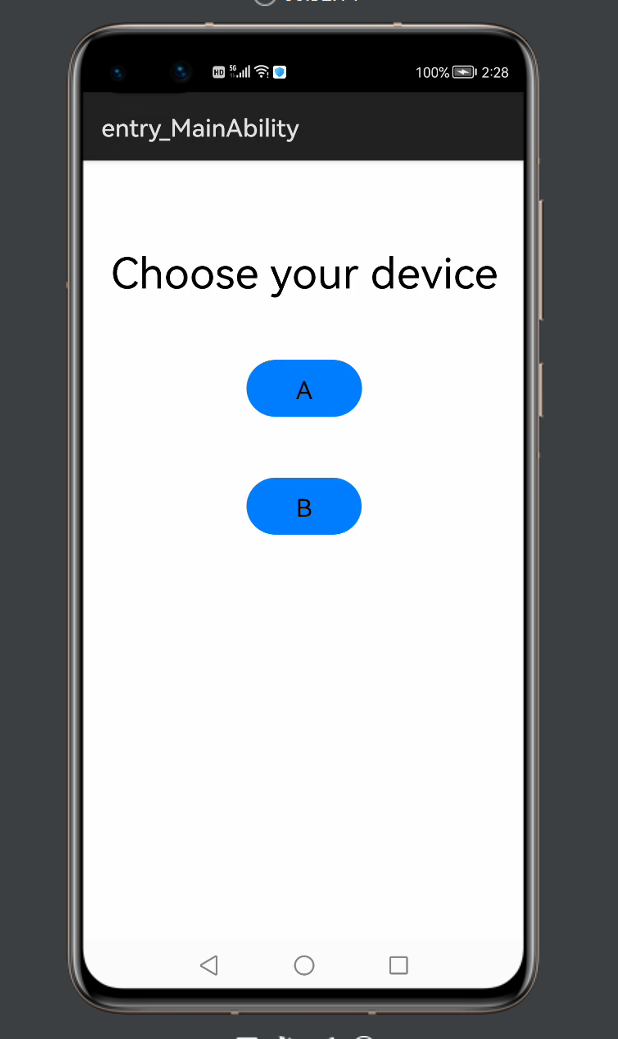
双人模式下设备选择界面:
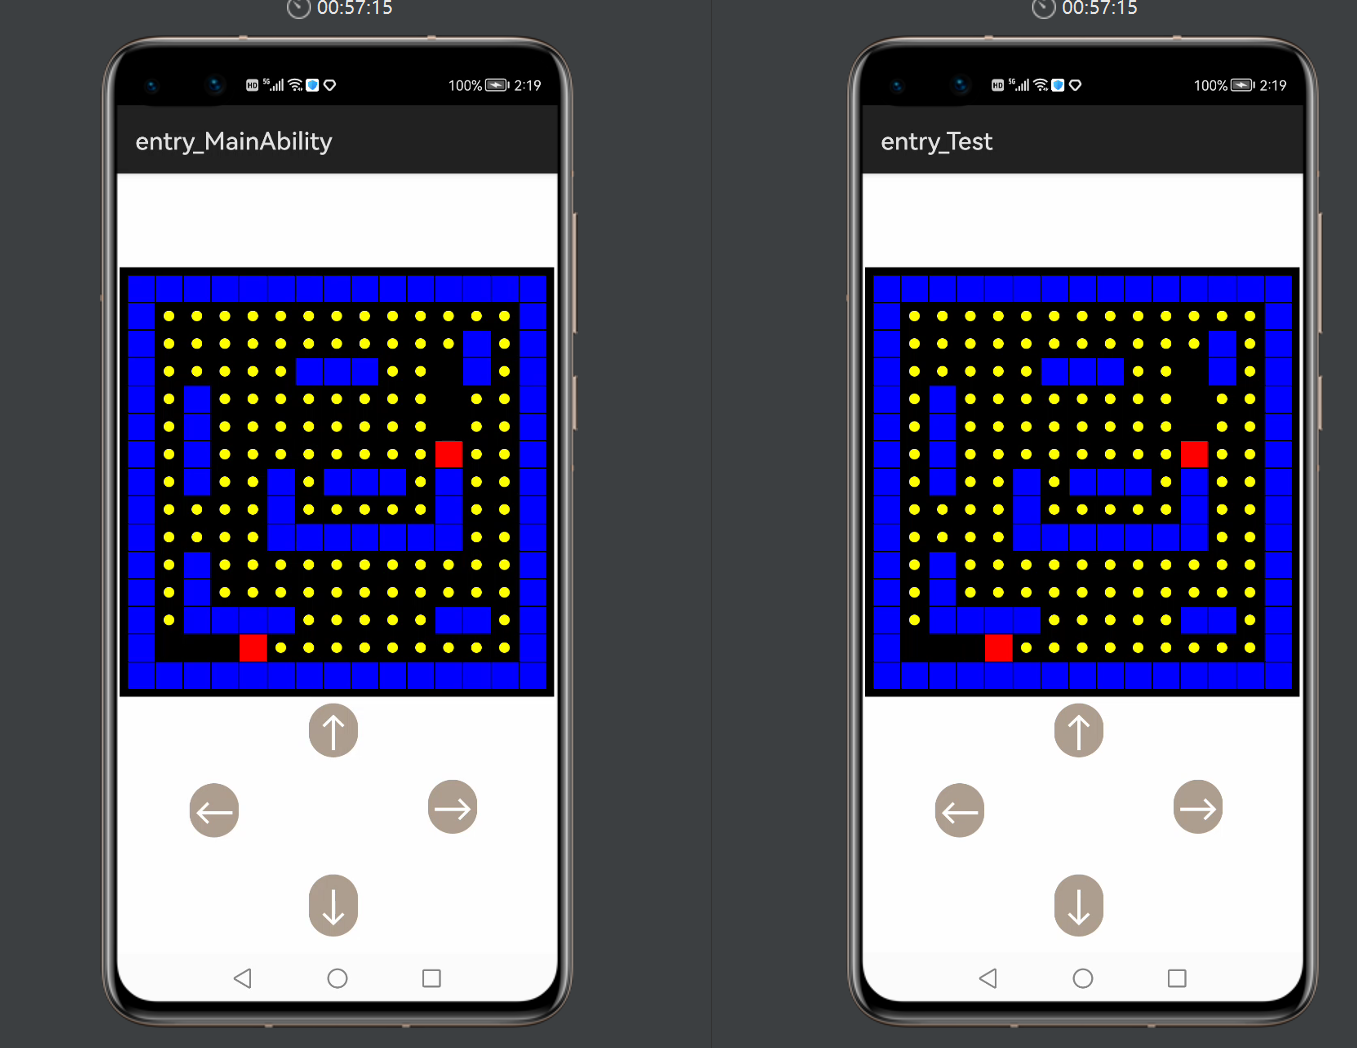
游戏界面截图如下:
单人模式
双人模式
正文
单机游戏
绘制游戏
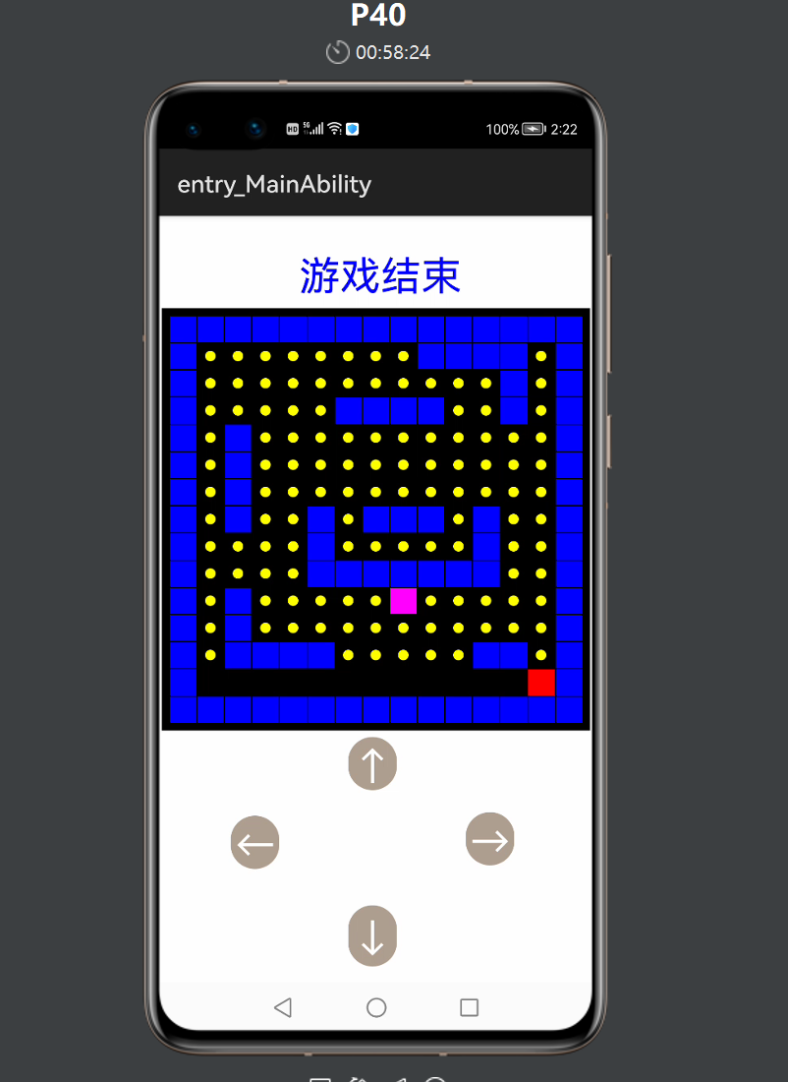
把地图以二维数组的形式存储,其中1是墙,2是玩家,3是怪物,0是豆豆,如下:
- public int[][] grids={
- {1, 1, 1, 1, 1, 1, 1, 1, 1, 1, 1, 1, 1, 1, 1},
- {1, 0, 0, 0, 0, 0, 0, 0, 0, 1, 1, 1, 1, 0, 1},
- {1, 0, 3, 0, 0, 0, 0, 0, 0, 0, 0, 0, 1, 0, 1},
- {1, 0, 0, 0, 0, 0, 1, 1, 1, 1, 0, 0, 1, 0, 1},
- {1, 0, 1, 0, 0, 0, 0, 0, 0, 0, 0, 0, 0, 0, 1},
- {1, 0, 1, 0, 0, 0, 0, 0, 0, 0, 0, 0, 0, 0, 1},
- {1, 0, 1, 0, 0, 0, 0, 0, 0, 0, 0, 0, 0, 0, 1},
- {1, 0, 1, 0, 0, 1, 0, 1, 1, 1, 0, 1, 0, 0, 1},
- {1, 0, 0, 0, 0, 1, 0, 0, 0, 0, 0, 1, 0, 0, 1},
- {1, 0, 0, 0, 0, 1, 1, 1, 1, 1, 1, 1, 0, 0, 1},
- {1, 0, 1, 0, 0, 0, 0, 0, 0, 0, 0, 0, 0, 0, 1},
- {1, 0, 1, 3, 0, 0, 0, 0, 0, 0, 0, 0, 0, 0, 1},
- {1, 0, 1, 1, 1, 1, 0, 0, 0, 0, 0, 1, 1, 0, 1},
- {1, 2, 0, 0, 0, 0, 0, 0, 0, 0, 0, 0, 0, 0, 1},
- {1, 1, 1, 1, 1, 1, 1, 1, 1, 1, 1, 1, 1, 1, 1}};;
绘制游戏面板
- public void drawtable(int grids[][]){
- layout.setLayoutConfig((new ComponentContainer.LayoutConfig(ComponentContainer.LayoutConfig.MATCH_PARENT,ComponentContainer.LayoutConfig.MATCH_PARENT)));
- Component.DrawTask task = new Component.DrawTask() {
- @Override
- public void onDraw(Component component, Canvas canvas) {
- Paint paint=new Paint();
- paint.setColor(Color.BLACK);
- RectFloat rect=new RectFloat(30-20,250-20,length*15+interval*14+30+20,length*15+interval*14+250+20);
- canvas.drawRect(rect,paint);
- for(int row = 0; row < height; row++)
- {
- for(int column = 0; column < width; column++){
- if
- (grids[row][column]==food || grids[row][column]==empty){
- paint.setColor(Color.BLACK);
- }
- else if(grids[row][column]==wall)
- paint.setColor(Color.BLUE);
- else if(grids[row][column]==player1)
- paint.setColor(Color.RED);
- else if(grids[row][column]==monster)
- paint.setColor(Color.MAGENTA);
- RectFloat rectFloat=new RectFloat(30+column*(length+interval),250+row*(length+interval),30+length+column*(length+interval),250+length+row*(length+interval));
- canvas.drawRect(rectFloat,paint);
- if(grids[row][column]==food){
- paint.setColor(Color.YELLOW);
- Circle circle=new Circle(30+column*(length+interval)+length/2,250+row*(length+interval)+length/2,length/5);
- canvas.drawCircle(circle,paint);
- }
- }
- }
- }
- };
- layout.addDrawTask(task);
- setUIContent(layout);
- }
绘制按钮
以下代码分别绘制了四个方向的按钮,并在按钮按下时设置了回调方法,入按下向做的按钮,则把玩家的方向设置成向左,以此类推
- public void drawButton() {
- ShapeElement background = new ShapeElement();
- background.setRgbColor(new RgbColor(174, 158, 143));
- background.setCornerRadius(100);
- Button button1 = new Button(this);
- button1.setText("←");
- button1.setTextAlignment(TextAlignment.CENTER);
- button1.setTextColor(Color.WHITE);
- button1.setTextSize(100);
- button1.setMarginTop(1500);
- button1.setMarginLeft(180);
- button1.setPadding(10,0,10,0);
- button1.setBackground(background);
- button1.setClickedListener(new Component.ClickedListener() {
- @Override
- public void onClick(Component component) {
- player.left();//把玩家的方向设置成向左
- }
- });
- layout.addComponent(button1);
- Button button2 = new Button(this);
- button2.setText("↑");
- button2.setTextAlignment(TextAlignment.CENTER);
- button2.setTextColor(Color.WHITE);
- button2.setTextSize(100);
- button2.setMarginLeft(470);
- button2.setMarginTop(-330);
- button2.setPadding(10,0,10,0);
- button2.setBackground(background);
- button2.setClickedListener(new Component.ClickedListener() {
- @Override
- public void onClick(Component component) {
- player.up();//把玩家的方向设置成向上
- }
- });
- layout.addComponent(button2);
- Button button3 = new Button(this);
- button3.setText("→");
- button3.setTextAlignment(TextAlignment.CENTER);
- button3.setTextColor(Color.WHITE);
- button3.setTextSize(100);
- button3.setMarginLeft(760);
- button3.setMarginTop(55);
- button3.setPadding(10,0,10,0);
- button3.setBackground(background);
- button3.setClickedListener(new Component.ClickedListener() {
- @Override
- public void onClick(Component component) {
- player.right();把玩家的方向设置成向右
- }
- });
- layout.addComponent(button3);
- Button button = new Button(this);
- button.setText("↓");
- button.setTextSize(100);
- button.setTextAlignment(TextAlignment.CENTER);
- button.setTextColor(Color.WHITE);
- button.setMarginTop(100);
- button.setMarginLeft(470);
- button.setPadding(10,10,10,10);
- button.setBackground(background);
- button.setClickedListener(new Component.ClickedListener() {
- @Override
- public void onClick(Component component) {
- player.down();把玩家的方向设置成向下
- }
- });
- layout.addComponent(button);
- }
玩家类
玩家类的属性有方向,玩家的x,y坐标,玩家得分。玩家类的方法有:player_run(),left(),right(),up(),down()等。player_run()将根据玩家实例的方向,在判断玩家实例下一步是否是wall,若不是wall,则行进下一步。而left()等方法则是用于在按下方向键时改变方向时使用。
下面仅贴出部分关键代码:
- public class Player
- {
- private int direction;
- public int player_x;
- public int player_y;
- private static final int food=0;
- private static final int wall=1;
- private static final int player=2;
- private static final int monster=3;
- private static final int empty=4;
- private static final int left=1;
- private static final int up=2;
- private static final int right=3;
- private static final int down=4;
- public Player(int direction,int player_x,int player_y)
- {
- this.direction=direction;
- this.player_x=player_x;
- this.player_y=player_y;
- }
- public int[][] player_run(int [][] grids) {
- int [][]grid=grids;
- if (direction == left) {
- if (grid[player_y][player_x - 1] != wall)
- {
- grid[player_y][player_x - 1] = player;
- grid[player_y][player_x] = empty;
- player_x--;
- }
- } else if (direction == up)
- {
- if (grid[player_y - 1][player_x] != wall)
- {
- grid[player_y - 1][player_x] = food;
- grid[player_y][player_x] = empty;
- player_y--;
- }
- }
- else if (direction == right)
- {
- if (grid[player_y][player_x + 1] != wall)
- {
- grid[player_y][player_x + 1] = player;
- grid[player_y][player_x] = empty;
- player_x++;
- }
- } else if (direction == down) {
- if (grid[player_y + 1][player_x] != wall)
- {
- grid[player_y + 1][player_x] = player;
- grid[player_y][player_x] = empty;
- player_y++;
- }
- }
- return grid;
- }
- public void left()
- {
- this.direction=left;
- }
- public void up()
- {
- this.direction=up;
- }
- public void right()
- {
- this.direction=right;
- }
- public void down()
- {
- this.direction=down;
- }
- }
怪物类
怪物类主要实现的是追赶玩家,这里采用的方法是:计算怪物当前坐标与玩家当前坐标的差,以此来做出追赶。追赶是这个游戏里最复杂的地方,需要注意的地方有:
1.需要防止两个怪物重叠在一起
2.怪物经过有食物的格子时不能够把食物吃掉,因此要判断当前格子是否说食物格。为此设置了布尔类型的标志isfood;
Monster类的属性和构造方法如下:
- public class Monster {
- private int monster_x;
- private int monster_y;
- private int x_difference;//列差
- private int y_difference;//行差
- private int x_distance;//行距离
- private int y_distance;//列距离
- private final int wall = 1;
- private final int player = 2;
- private final int monster = 3;
- private final int food=0;
- private final int empty=4;
- private boolean isfood=true;
- public Monster(int monster_x, int monster_y) {
- this.monster_x = monster_x;
- this.monster_y = monster_y;
- }
追赶方法:计算当前怪物与玩家的x,y方向上的距离,选择其中距离更大的一个方向优先追赶,如若在这个方向上怪物无法行进(两边都是wall),那么则转成朝另一个方向进行追赶。
- public int[][] chase1(int[][] grids, Player player) {
- int[][] grid = grids;
- this.x_difference = monster_x - player.getPlayer_x();
- this.y_difference = monster_y - player.getPlayer_y();
- this.x_distance = Math.abs(x_difference);
- this.y_distance = Math.abs(y_difference);
- //判断当前位置是否是食物,若是食物,则先将当前位置置成是食物,再走下一步
- //若不是食物,则把当前位置置空,然后走下一步
- if(isfood==true)
- grid[monster_y][monster_x]=food;
- else if(isfood==false)
- grid[monster_y][monster_x]=empty;
- if (y_distance < x_distance)//如果y方向上的距离更小,则先从x方向上靠近它
- {
- if (x_difference > 0 && grid[monster_y][monster_x - 1] != wall && grid[monster_y][monster_x - 1] != monster)
- {
- monster_x--;
- if(grid[monster_y][monster_x]==food)//如果下一步是食物,设置标志
- {
- isfood=true;
- grid[monster_y][monster_x] = monster;
- }
- else if(grids[monster_y][monster_x]==4)
- {
- isfood=false;
- grid[monster_y][monster_x] = monster;
- }
- }
- else if (x_difference < 0 && grid[monster_y][monster_x +1] != wall && grid[monster_y][monster_x - 1] != monster) {
- monster_x++;
- if(grid[monster_y][monster_x]==0)//判断下一步要走的格子有没有食物,若有则把标志位置true;反之,置false
- {
- isfood=true;
- grid[monster_y][monster_x] = monster;
- }
- else if(grids[monster_y][monster_x]==4)
- {
- isfood=false;
- grid[monster_y][monster_x] = monster;
- }
- }
- else //如果x的方向走不通,则转而向y方向进行追赶
- {
- if (y_difference > 0 && grid[monster_y - 1][monster_x] != wall && grid[monster_y - 1][monster_x] != monster) {
- monster_y--;
- if(grid[monster_y][monster_x]==0)
- {
- isfood=true;
- grid[monster_y][monster_x] = monster;
- }
- else if(grids[monster_y][monster_x]==4)
- {
- isfood=false;
- grid[monster_y][monster_x] = monster;
- }
- }
- else if (y_difference < 0 && grid[monster_y + 1][monster_x] != wall && grid[monster_y + 1][monster_x] != monster)
- {
- monster_y++;
- if(grid[monster_y][monster_x]==0)
- {
- isfood=true;
- grid[monster_y][monster_x] = monster;
- }
- else if(grids[monster_y][monster_x]==4)
- {
- isfood=false;
- grid[monster_y][monster_x] = monster;
- }
- }
- }
- }
- else//x方向上的距离更小或二者相等,则先在y方向上进行追赶
- {
- if (y_difference > 0 && grid[monster_y - 1][monster_x] != wall && grid[monster_y - 1][monster_x] != monster) {
- monster_y--;
- if(grid[monster_y][monster_x]==0)
- {
- isfood=true;
- grid[monster_y][monster_x] = monster;
- }
- else if(grids[monster_y][monster_x]==4)
- {
- isfood=false;
- grid[monster_y][monster_x] = monster;
- }
- }
- else if (y_difference < 0 && grid[monster_y + 1][monster_x] != wall && grid[monster_y + 1][monster_x] != monster) {
- monster_y++;
- if(grid[monster_y][monster_x]==0)
- {
- isfood=true;
- grid[monster_y][monster_x] = monster;
- }
- else if(grids[monster_y][monster_x]==4)
- {
- isfood=false;
- grid[monster_y][monster_x] = monster;
- }
- }
- else
- {
- if (x_difference > 0 && grid[monster_y][x_distance - 1] != wall && grid[monster_y ][monster_x-1] != monster) {
- monster_x--;
- if(grid[monster_y][monster_x]==0)
- {
- isfood=true;
- grid[monster_y][monster_x] = monster;
- }
- else if(grids[monster_y][monster_x]==4)
- {
- isfood=false;
- grid[monster_y][monster_x] = monster;
- }
- }
- else if (x_difference < 0 && grid[monster_y][monster_x + 1] != wall && grid[monster_y ][monster_x+1] != monster)
- {
- monster_x++;
- if(grid[monster_y][monster_x]==0)
- {
- isfood=true;
- grid[monster_y][monster_x] = monster;
- }
- else if(grids[monster_y][monster_x]==4)
- {
- isfood=false;
- grid[monster_y][monster_x] = monster;
- }
- }
- }
- }
- return grid;
- }
绘制游戏结束或游戏成功
首先需要判断游戏结束或成功,我们定义被怪物追上为游戏结束,即玩家的x,y坐标同时与其中一个怪物相同的情况。定义当盘面所有豆豆都被吃完的情况为游戏成功。判断游戏结束和游戏成功的代码如下:
- private boolean gamesucess()
- {
- for(int row = 0; row < height; row++)
- {
- for (int column = 0; column < width; column++)
- {
- if (grids[row][column] == 0)
- return false;
- }
- }
- return true;
- }
- private boolean game_over(Player player,Monster monster1,Monster monster2)
- {
- if((player.getPlayer_x()==monster1.getMonster_x() && player.getPlayer_y()==monster1.getMonster_y()) || (player.getPlayer_x()==monster2.getMonster_x() && player.getPlayer_y()==monster2.getMonster_y()))
- return true;
- else
- return false;
- }
绘制游戏结果的代码如下:
- private void drawGame_over()
- {
- timer.cancel();
- Text text=new Text(this);
- text.setText("游戏结束");
- text.setTextSize(100);
- text.setTextColor(Color.BLUE);
- text.setTextAlignment(TextAlignment.CENTER);
- text.setMarginsTopAndBottom(-1800,0);
- text.setMarginsLeftAndRight(350,0);
- layout.addComponent(text);
- setUIContent(layout);
- }
- private void drawGamesuccess()
- {
- timer.cancel();
- Text text=new Text(this);
- text.setText("游戏成功");
- text.setTextSize(100);
- text.setTextColor(Color.BLUE);
- text.setTextAlignment(TextAlignment.CENTER);
- text.setMarginsTopAndBottom(-1800,0);
- text.setMarginsLeftAndRight(350,0);
- layout.addComponent(text);
- setUIContent(layout);
- }
双人游戏
分布式任务调度与页面跳转
双人游戏模式下,我设置了一个设备选择的页面。选择设备A的一方将操纵player1,而同时另一方将自动地设置为B方,操纵player2。更重要的是,我希望在两台设备的其中之一做出选择之后,两台设备将自动地同时跳转到游戏页面。于是我采用了带有参数的分布式任务调度来操纵另一台机器的任务拉起,采用带有参数的同Page页面跳转(也就是present语句)来实现本机的跳转。具体代码如下:
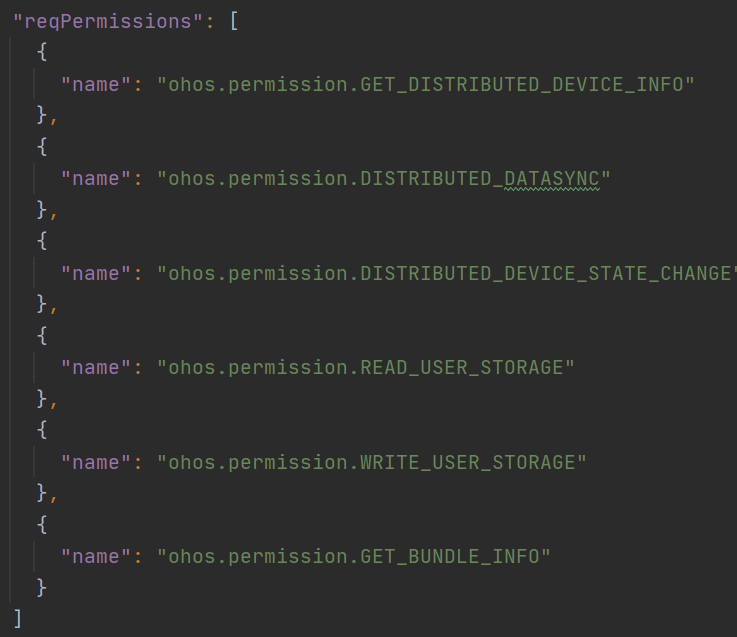
首先需要在config.json文件中声明所需要的权限,在"module"代码块中添加:
然后我们在MainAbility类中对敏感权限进行显式声明:
- public class MainAbility extends Ability
- {
- @Override
- public void onStart(Intent intent) {
- super.onStart(intent);
- String[] permissions = {
- "ohos.permission.READ_USER_STORAGE",//读取数据库权限
- "ohos.permission.WRITE_USER_STORAGE",//写入数据库权限
- "ohos.permission.DISTRIBUTED_DATASYNC"//分布式数据同步权限
- };
- requestPermissionsFromUser(permissions, 0);
- super.setMainRoute(MainAbilitySlice.class.getName());
- }
- }
下面使用分布式调度的方法完成对另一个设备的拉起,利用页面跳转来完成本地设备的跳转,这两个跳转都为带参数的跳转,目的是方便后面对设备操作对象的绑定。
分布式调度有两个地方需要注意:
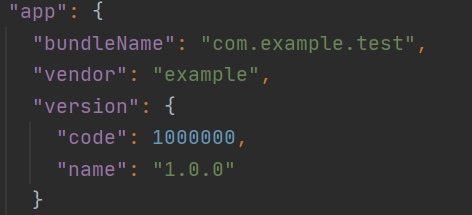
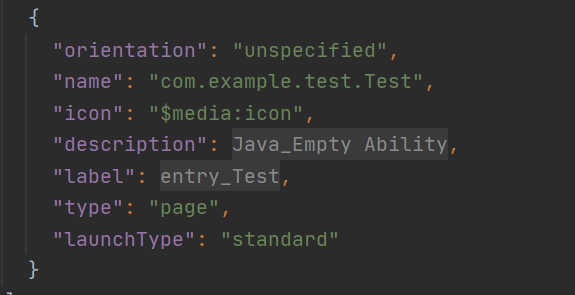
1.BUNDLE_NAME和ABILITY_NAME的设置
可以在config文件的app代码块中找到BUNDLE_NAME
可以在module代码块的abilities部分找到ABILITY_NAME
2.分布式调度只能够调度Ability类而不能够调度AbilitySlice类,若想要调度AbilitySlice类,可先调度Ability类再由里面的super.setMainRoute()方法跳转到AbilitySlice类。笔者在一开始时就反了这个错误,导致调度失败。
分布式调度与页面调度的代码如下:
- public class ChooseAB_Ability extends AbilitySlice {
- private static final String BUNDLE_NAME = "com.example.test";
- private static final String ABILITY_NAME = "com.example.test.Test";
- public void onStart(Intent intent) {
- super.onStart(intent);
- super.setUIContent(ResourceTable.Layout_ability_third);
- //获取联网设备
- List<DeviceInfo> deviceInfoList = DeviceManager.getDeviceList(DeviceInfo.FLAG_GET_ONLINE_DEVICE);
- if(deviceInfoList.size()==0)
- return ;
- String deviceID=deviceInfoList.get(0).getDeviceId();
- Button buttonA = (Button) findComponentById(ResourceTable.Id_A_btn);
- buttonA.setClickedListener(component -> {
- // 远程启动FA
- Intent remoteIntent = new Intent();
- Operation operation = new Intent.OperationBuilder().withDeviceId(deviceID)
- .withBundleName(BUNDLE_NAME)
- .withAbilityName(ABILITY_NAME)
- .withFlags(Intent.FLAG_ABILITYSLICE_MULTI_DEVICE)
- .build();
- remoteIntent.setOperation(operation);
- remoteIntent.setParam("device","B");//设值跳转参数,"device"是键,"B"是值
- try {
- // 目标设备是否包含指定FA
- List<AbilityInfo> abilityInfoList = getBundleManager().queryAbilityByIntent(remoteIntent, 0, 0);
- if (abilityInfoList != null && !abilityInfoList.isEmpty()) {
- startAbility(remoteIntent);//调度另一台设备
- }
- } catch (RemoteException e) {
- //处理错误
- }
- //带参数的页面跳转
- Intent intent1=new Intent();
- intent1.setParam("device","A");//设置参数
- present(new MultiGameAbility_3(),intent1);页面跳转
- });
- //另一个按键的代码与上面基本相同,只是传递的参数不同
- Button buttonB = (Button) findComponentById(ResourceTable.Id_B_btn);
- buttonB.setClickedListener(new Component.ClickedListener() {
- @Override
- public void onClick(Component component) {
- Intent remoteIntent = new Intent();
- Operation operation = new Intent.OperationBuilder().withDeviceId(deviceID)
- .withBundleName(BUNDLE_NAME)
- .withAbilityName(ABILITY_NAME)
- .withFlags(Intent.FLAG_ABILITYSLICE_MULTI_DEVICE)
- .build();
- remoteIntent.setOperation(operation);
- remoteIntent.setParam("device","A");
- try {
- // 目标设备是否包含指定FA
- List<AbilityInfo> abilityInfoList = getBundleManager().queryAbilityByIntent(remoteIntent, 0, 0);
- if (abilityInfoList != null && !abilityInfoList.isEmpty()) {
- startAbility(remoteIntent);
- }
- } catch (RemoteException e) {
- //处理错误
- }
- Intent intent1=new Intent();
- intent1.setParam("device","B");
- present(new MultiGameAbility_3(),intent1);
- }
- });
- }
- }
分布式数据库的建立
定义全局变量如下:
- private static final String STORE_ID = "distributed_db";
- private SingleKvStore singleKvStore;
- private KvManager kvManager;
建立数据库的过程如下:
- private void initDbManager()
- {
- kvManager=createManager();
- singleKvStore=createDb(kvManager);
- subscribeDb(singleKvStore);
- }
- private KvManager createManager()
- {
- KvManagerConfig config = new KvManagerConfig(this);
- KvManager manager = KvManagerFactory.getInstance().createKvManager(config);
- return manager;
- }
- //利用KvManager创建数据库
- private SingleKvStore createDb(KvManager kvManager)
- {
- SingleKvStore kvStore=null;
- try{
- Options options=new Options();
- options.setCreateIfMissing(true).setEncrypt(false).setKvStoreType(KvStoreType.SINGLE_VERSION);
- kvStore=kvManager.getKvStore(options,STORE_ID);
- }
- catch (KvStoreException exception)
- {
- //错误处理
- }
- return kvStore;
- }
- //订阅数据库的变化
- private void subscribeDb(SingleKvStore singleKvStore)
- {
- class KvStoreObserverClient implements KvStoreObserver
- {
- public void onChange(ChangeNotification notification)
- {
- if(queryContact_Int("player1_d")!=error)
- direction1=queryContact_Int("player1_d");
- if(queryContact_Int("player2_d")!=error)
- direction2=queryContact_Int("player2_d");
- if(queryContact_String("array")!=null)
- array=queryContact_String("array");
- if(queryContact_Int("A_Score")!=error)
- A_Score=queryContact_Int("A_Score");
- if(queryContact_Int("A_Score")!=error)
- B_Score=queryContact_Int("A_Score");
- }
- }
- KvStoreObserver kvStoreObserverClient=new KvStoreObserverClient();
- singleKvStore.subscribe(SubscribeType.SUBSCRIBE_TYPE_ALL,kvStoreObserverClient);
- }
数据库的增、删、改、查
阅读文档我们会发现,分布式数据库的插入和修改操作是同一个语句,若关键字未存在于数据库中,则作插入操作;若数据库存在于数据库中,则作更新操作。这样在一定程度上会显得更智能和便利,但是我更倾向于把这两个功能分开,这样会更加清晰。在学习的过程中,我们曾犯过的错是:先入为主,默认查询是成功的,导致程序的闪退;事实上,它是一个Throws类,其中会抛出的一个错误就是关键字不存在的错误,所以对于所有的Throws类都严格地采用try+catch形式是很重要的。
字符串的增、改、查如下:
- //字符串的插入
- private void inputData_String(String key,String value)
- {
- if(key==null||key.isEmpty()||value==null||value.isEmpty())
- ;//如果是关键字是空的话,则不做操作
- else
- {//当关键字不是空,且这个关键字没有值的时候,才进行putString操作
- if (queryContact_String(key) == null)
- {
- singleKvStore.putString(key, value);
- }
- }
- }
- //字符串的修改
- private void update_String(String key,String value)
- {
- if(key==null||key.isEmpty()||value==null||value.isEmpty()||queryContact_String(key)==null)
- ;//如果关键字是空的,不做操作
- else
- singleKvStore.putString(key,value);
- }
- //字符串的查询
- private String queryContact_String(String key)
- {
- try {
- return singleKvStore.getString(key);
- }
- catch (KvStoreException exception)
- {
- return null;//如果出问题了,返回一个null,以便后续的操作
- }
- }
整型的增、改、查
- private int queryContact_Int(String key)
- {
- try {
- return singleKvStore.getInt(key);
- }
- catch (KvStoreException exception)
- {
- return error;//此处error我定义为程序中不会出现的负整数(-1)
- }
- }
- private void update_Int(String key,int value)
- {
- if (key == null || key.isEmpty()||queryContact_Int(key)==error)
- ;
- else
- singleKvStore.putInt(key, value);
- }
- private void inputData_Int(String key,int value)
- {
- if(queryContact_Int(key)==error)
- {
- singleKvStore.putInt(key,value);
- }
- else
- ;
- }
联网设备ID绑定
对ID进行绑定,我们的方法是借助数据库来进行绑定,往数据库中传入设备ID与对应的值。
(”A“或”B“)。因为这两个设备运行的是同一个程序,可以说是镜像的,如果仅仅在本地进行操作则或产生”覆盖“的情况,所以需要一个第三地方的公共的区域来进行绑定操作,因此我们选择数据库。
首先需要获取本地设备ID以及联网的另一设备的ID。
- private String self;//全部变量
- private String other;//全局变量
- public void getId()
- {
- self = KvManagerFactory.getInstance().createKvManager(new KvManagerConfig(this)).getLocalDeviceInfo().getId();//获取自己的id
- List<DeviceInfo> onlineDevices = DeviceManager.getDeviceList(DeviceInfo.FLAG_GET_ONLINE_DEVICE);
- if (onlineDevices.size() == 0)
- return;
- other = onlineDevices.get(0).getDeviceId();//获取联网中另一设备的id
- }
利用上面分布式调度和页面跳转中intent类所带有的参数,并配合分布式数据库进行设备的绑定,代码如下:
- if(intent!=null) {
- //绑定设备
- if (intent.getStringParam("device").equals("A")) {
- inputData_String(self, "A");
- inputData_String(other, "B");
- } else if (intent.getStringParam("device").equals("B")) {
- inputData_String(self, "B");
- inputData_String(other, "A");
- }
- }
至此,我们就完成了ID的同步了。
操作界面
相较于单机模式,双人模式按钮与操作对象绑定,按钮的回调方法改变如下(以其中一个按钮为例):
- button_left.setClickedListener(new Component.ClickedListener() {
- @Override
- public void onClick(Component component) {
- if(queryContact_String(self).equals("A")) {
- player1.left();
- update_Int("player1_d",player1.getDirection());
- }
- else if(queryContact_String(self).equals("B"))
- {
- player2.left();
- update_Int("player2_d",player2.getDirection());
- }
- }
- });
同步游戏的方法
同步游戏的方法有多种,说白了就是往数据库传什么类型的值,一下是我们想到的三种方法。
1.最直接的想法是传byte类型的数组,由于只能够传一维数组,可以把二维数组的行下标作为关键字,再把列作用一维数组传入。但是经过我的尝试,传数组容易造成程序闪退的问题。我们猜测由于数据的读取与写入是需要时间的,设备难以在小游戏高刷新速度的情况下完成数组的传递。
2.把二维数组先转化成字符串,再把字符串传到分布式数据库。在本地完成数组和字符串之间的转换,速度应该是很快的,这样只需要向数据库读写一次,设备能够完成。
3.传递玩家的坐标和方向,这种方法不需要进行字符串和数组之间的转换,且对数据库的读取量也较少,设备能够完成。
那么下面仅放出第二种实现代码,第三种的实现代码将在后续的完整代码中放出。
以下为数组和字符串之间转换的方法
- private String Array_to_String(int grids[][])
- {
- StringBuilder builder=new StringBuilder();
- for(int i=0;i<15;i++)
- {
- for(int j=0;j<15;j++)
- {
- builder.append(grids[i][j]);
- }
- }
- return builder.toString();
- }
- private int[][] String_to_Array(String value)
- {
- int [][] grid=grids;
- for(int i=0;i<15;i++)
- {
- for(int j=0;j<15;j++)
- {
- grid[i][j]= Integer.parseInt(value.substring(i*15+j,i*15+j+1));
- }
- }
- return grid;
- }
程序初始化:在启动时向数据库写入一些初始值
- public void initialize(){
- layout = new DirectionalLayout(this);
- inputData_Int("player1_d",direction1);//分别把两个玩家的初始方向上传数据库
- inputData_Int("player2_d",direction2);
- inputData_Int("A_score",0);
- inputData_Int("B_Score",0);
- array=Array_to_String(grids);//把数组转化成字符串
- inputData_String("array",array);//把字符串写入数据库*/
- drawButton();
- drawtable();
- }
视觉上的同步
想要把分布式数据库上的数据同步体现在视觉上,就需要创建一个以较高速度回调的时间对象,不断地调用画图方法以达到视觉上的同步。同时,在单机版的时候我们本来也有一个时间对象来回调player_run()。
- public void run()
- {
- timer1=new Timer();
- timer1.schedule(new TimerTask() {
- @Override
- public void run() {
- getUITaskDispatcher().asyncDispatch(()->
- {
- if(!(game_over(player1,monster1,monster2)||game_over(player2,monster1,monster2)||gamesucess()))
- {
- if(queryContact_String("array")!=null)
- {
- player1.setDirection(queryContact_Int("player1_d")); player2.setDirection(queryContact_Int("player2_d"));
- array = queryContact_String("array");
- grids = String_to_Array(array);
- player1.setScore(queryContact_Int("A_Score"));
- player2.setScore(queryContact_Int("B_Score"));
- }
- drawtable_test();
- }
- else
- ;
- });
- }
- },0,70);
- timer2=new Timer();
- timer2.schedule(new TimerTask() {
- @Override
- public void run()
- {
- getUITaskDispatcher().asyncDispatch(()->{
- {
- if(game_over(player1,monster1,monster2)||game_over(player2,monster1,monster2))
- {
- drawGame_over();
- }
- else if(gamesucess())
- {
- drawGamesuccess();
- }
- else
- {
- player1.setDirection(queryContact_Int("player1_d"));
- player2.setDirection(queryContact_Int("player2_d"));
- if(queryContact_String("array")!=null)
- {
- array = queryContact_String("array");
- grids = String_to_Array(array);
- }
- grids= player1.player_run_test(grids);
- grids=player2.player_run_test(grids);
- array=Array_to_String(grids);
- update_String("array",array);
- }
- }
- });
- }
- },0,2000);
- }
小结
本次学习笔记记录了吃豆豆的游戏实现,最近学习到的UI设置,页面跳转,分布式数据库,分布式任务调度等内容。作为我的第一个实践的项目,项目或多或少会有小问题和一些还没有解决的问题。例如在双人模式下取消了怪物的设定就是因为在怪物存在的情况下,常常会出现”怪物分身的问题“,我尝试过去解决但是都没有很好的效果,猜测是与数据库的读写有关。完整代码会在稍后作一些修改后放出,希望届时大家多加指证其中的错误。我当然也会继续去尝试解决本项目中未解决的问题。