你会不会对“云原生”很有兴趣,却不知道从何入手?
本文会在window环境下,构建一套基于k8s的istio环境,并且通过skaffold完成镜像的构建和项目部署到集群环境。其实对于实验环境有限的朋友们,完全可以在某里云上,按量付费搞3台”突发性能实例“,玩一晚,也就是杯咖啡钱。
好吧,让我开始吧!
执行流程
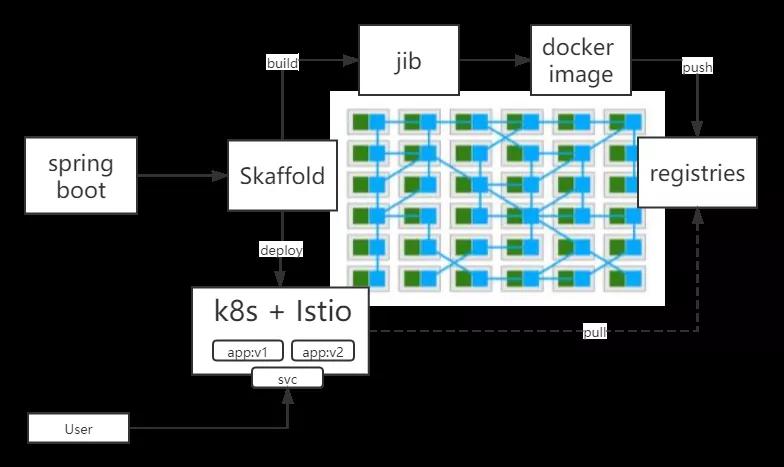
整体流程的话,如下图所示,通过 Skaffold+jib 将开发的应用打包成镜像,提交到本地仓库,并且将应用部署到集群中。k8s中部署2个pod,模拟应用不同的版本,并且配置访问权重20%:80%。
环境选择
我之前有文章详细介绍过minikube。本次实验,开始的时候,我就一直沉溺在使用kind的便捷上,而且直接可以在docker上部署集群,可以说非常方便。但是由于我对K8S的理解并不足够,导致后面遇到了很多问题,所以,在这里建议新上手的小伙伴,还是使用minikube吧。k3s和RKE都需要多台虚拟机,碍于机器性能,这种方案暂时不考虑了。
下面表格,对比了minikube、kind、k3s 部署环境,以及支持情况,方便大家选择。
| minikube | kind | k3s | |
|---|---|---|---|
| runtime | VM | container | native |
| supported architectures | AMD64 | AMD64 | AMD64, ARMv7, ARM64 |
| supported container runtimes | Docker,CRI-O,containerd,gvisor | Docker | Docker, containerd |
| startup time initial/following | 5:19 / 3:15 | 2:48 / 1:06 | 0:15 / 0:15 |
| memory requirements | 2GB | 8GB (Windows, MacOS) | 512 MB |
| requires root? | no | no | yes (rootless is experimental) |
| multi-cluster support | yes | yes | no (can be achieved using containers) |
| multi-node support | no | yes | yes |
| project page | https://minikube.sigs.k8s.io/ | https://kind.sigs.k8s.io/ |
[1] 表格引用自:http://jiagoushi.pro/minikube-vs-kind-vs-k3s-what-should-i-use
docker desktop 没有特殊要求。其他的自己用的顺手就好,还是需要特别说一下minikube,别用最新的coredns一直都拉不下来,除非你的魔法,可以完全搞定,否则,还是用阿里编译的minikube版本吧,别跟自己较劲,别问我为什么...
我用的版本罗列在下面了:
➜ ~ istioctl version
client version: 1.10.2
control plane version: 1.10.2
data plane version: 1.10.2 (10 proxies)

➜ ~ minikube version
minikube version: v1.18.1
commit: 511aca80987826051cf1c6527c3da706925f7909

➜ ~ skaffold version
v1.29.0
- 1.
- 2.
- 3.
- 4.
- 5.
- 6.
- 7.
- 8.
- 9.
- 10.
- 11.
环境搭建
使用minikube创建集群
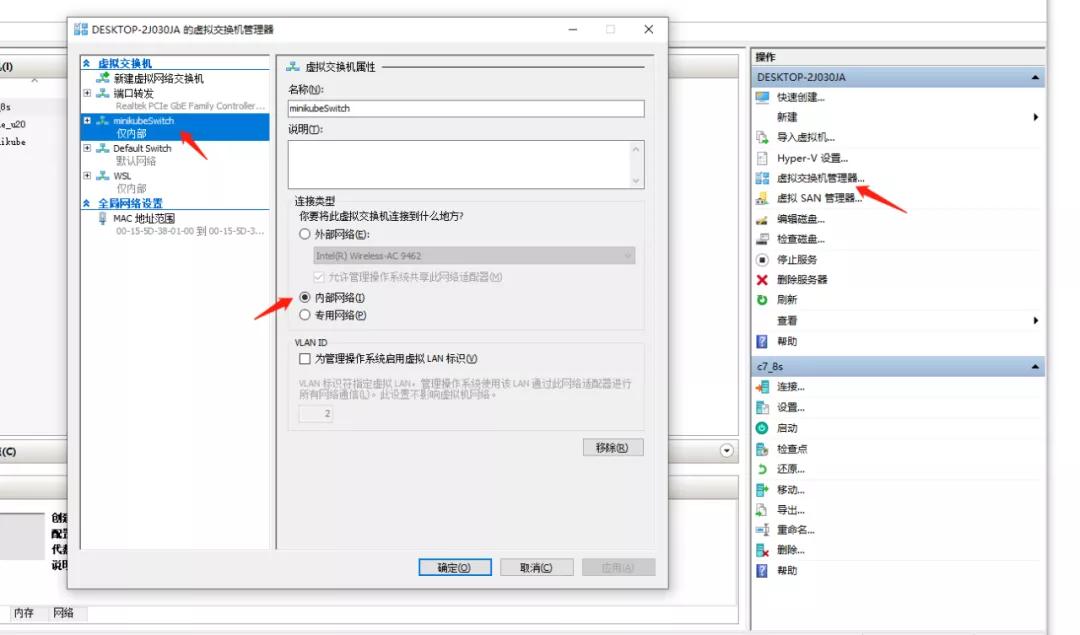
使用 hyperv 作为引擎 , 内存 8192M cup 4核,不能再少了,否则拉不起来 istio。
➜ ~ minikube start --image-mirror-country='cn' --registry-mirror=https://hq0igpc0.mirror.aliyuncs.com --vm-driver="hyperv" --memory=8192 --cpus=4 --hyperv-virtual-switch="minikubeSwitch" --image-repository=registry.cn-hangzhou.aliyuncs.com/google_containers
- 1.
还要在 hyperv里创建一个虚拟路由,这里我构建了一个内部网络,这样可以通过设置网卡的ip,将内部网络的网段固定下来,否则,每次重启都会变化ip。
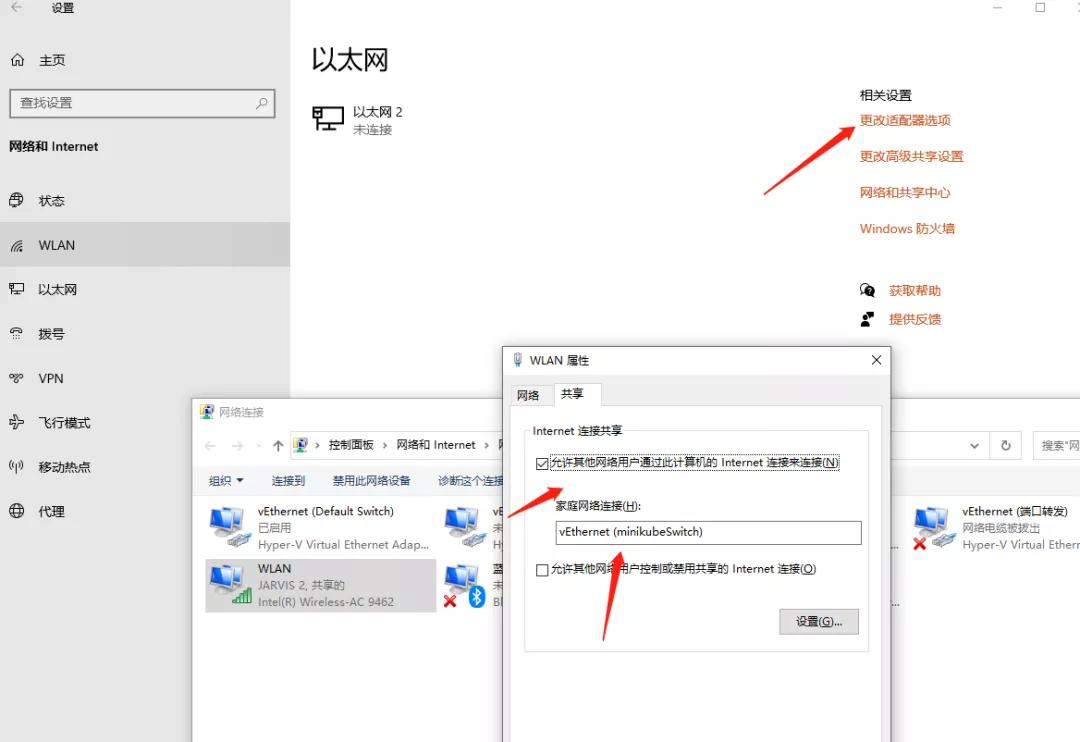
配置让内部网络,共享访问互联网。
启动成功:
➜ istio-1.10.2 minikube start
😄 Microsoft Windows 10 Pro 10.0.19042 Build 19042 上的 minikube v1.18.1
🎉 minikube 1.20.0 is available! Download it: https://github.com/kubernetes/minikube/releases/tag/v1.20.0

✨ 根据现有的配置文件使用 hyperv 驱动程序
👍 Starting control plane node minikube in cluster minikube
🔄 Restarting existing hyperv VM for "minikube" ...
🐳 正在 Docker 20.10.3 中准备 Kubernetes v1.20.2…
🔎 Verifying Kubernetes components...
  ▪ Using image registry.cn-hangzhou.aliyuncs.com/google_containers/storage-provisioner:v4 (global image repository)
  ▪ Using image registry.hub.docker.com/kubernetesui/dashboard:v2.1.0
  ▪ Using image registry.hub.docker.com/kubernetesui/metrics-scraper:v1.0.4
  ▪ Using image registry.cn-hangzhou.aliyuncs.com/google_containers/metrics-server-amd64:v0.2.1 (global image repository)
🌟 Enabled addons: metrics-server, storage-provisioner, dashboard, default-storageclass
🏄 Done! kubectl is now configured to use "minikube" cluster and "default" namespace by default
- 1.
- 2.
- 3.
- 4.
- 5.
- 6.
- 7.
- 8.
- 9.
- 10.
- 11.
- 12.
- 13.
- 14.
- 15.
部署 istio
创建 istio-system 的命名空间
kubectl create namespace istio-system
安装 istio
istioctl manifest apply --set profile=demo
安装完成后,执行命令 kubectl get svc -n istio-system
➜ ~ kubectl get svc -n istio-system
NAME                   TYPE           CLUSTER-IP       EXTERNAL-IP   PORT(S)                                                                     AGE
istio-egressgateway   ClusterIP      10.105.31.73     <none>        80/TCP,443/TCP                                                               8d
istio-ingressgateway   LoadBalancer   10.103.61.73     <pending>     15021:31031/TCP,80:31769/TCP,443:30373/TCP,31400:31833/TCP,15443:32411/TCP   8d
istiod                 ClusterIP      10.110.109.205   <none>        15010/TCP,15012/TCP,443/TCP,15014/TCP                                       8d
- 1.
- 2.
- 3.
- 4.
- 5.
部署 bookinfo
部署 bookinfo demo 验证环境
执行命令
kubectl label namespace default istio-injection=enabled

kubectl apply -f samples/bookinfo/platform/kube/bookinfo.yaml
- 1.
- 2.
- 3.
等待pod都启动起来以后,添加bookinfo网络配置,用于访问 kubectl apply -f .\samples\bookinfo\networking\bookinfo-gateway.yaml
➜ istio-1.10.2 kubectl apply -f .\samples\bookinfo\networking\bookinfo-gateway.yaml

gateway.networking.istio.io/bookinfo-gateway created

virtualservice.networking.istio.io/bookinfo created
- 1.
- 2.
- 3.
- 4.
- 5.
使用命令查看service : kubectl get services
➜ ~ kubectl get services
NAME             TYPE       CLUSTER-IP       EXTERNAL-IP   PORT(S)         AGE
callme-service   NodePort    10.106.26.24     <none>        8080:30101/TCP   8d
details         ClusterIP   10.110.253.19   <none>        9080/TCP         8d
kubernetes       ClusterIP   10.96.0.1       <none>        443/TCP         8d
productpage     ClusterIP   10.96.246.175   <none>        9080/TCP         8d
ratings         ClusterIP   10.99.234.109   <none>        9080/TCP         8d
reviews         ClusterIP   10.103.177.123   <none>        9080/TCP         8d
- 1.
- 2.
- 3.
- 4.
- 5.
- 6.
- 7.
- 8.
查看pods状态 kubectl get pods
➜ ~ kubectl get pods
NAME                                 READY   STATUS   RESTARTS   AGE
callme-service-v1-76dd76ddcc-znb62   2/2     Running   0         4h59m
callme-service-v2-679db76bbc-m4svm   2/2     Running   0         4h59m
details-v1-79f774bdb9-qk9q8          2/2     Running   8         8d
productpage-v1-6b746f74dc-p4xcb      2/2     Running   8         8d
ratings-v1-b6994bb9-dlvjm            2/2     Running   8         8d
reviews-v1-545db77b95-sgdzq          2/2     Running   8         8d
reviews-v2-7bf8c9648f-t6s8z          2/2     Running   8         8d
reviews-v3-84779c7bbc-4p8hv          2/2     Running   8         8d
- 1.
- 2.
- 3.
- 4.
- 5.
- 6.
- 7.
- 8.
- 9.
- 10.
查看集群ip 以及 端口
➜ ~ kubectl get po -l istio=ingressgateway -n istio-system -o 'jsonpath={.items[0].status.hostIP}'
192.168.137.115


➜ istio-1.10.2 kubectl get svc istio-ingressgateway -n istio-system

NAME         TYPE     CLUSTER-IP   EXTERNAL-IP PORT(S)                                   AGE

istio-ingressgateway LoadBalancer  10.110.228.32 <pending>   15021:32343/TCP,80:30088/TCP,443:31869/TCP,31400:32308/TCP,15443:32213/TCP 3m17s
- 1.
- 2.
- 3.
- 4.
- 5.
- 6.
- 7.
- 8.
- 9.
- 10.
于是访问地址: http://192.168.137.115:31769/productpage
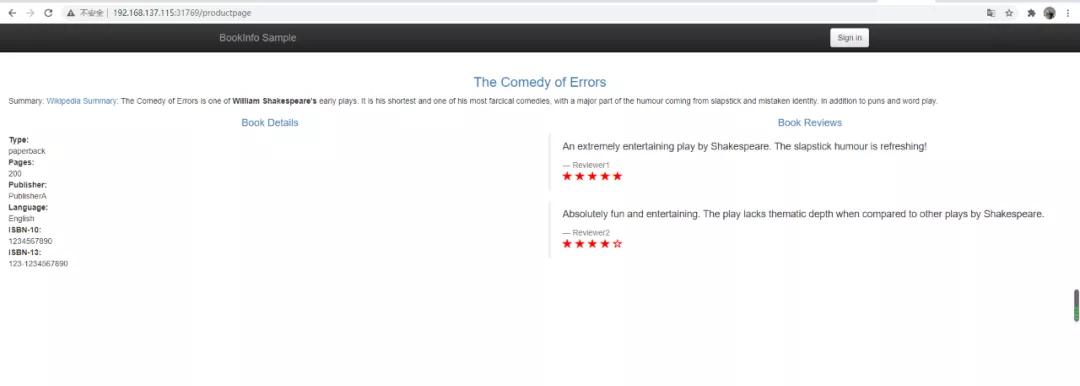
我们 bookinfo 就部署成功了。接下来我们创建应用。
构建应用
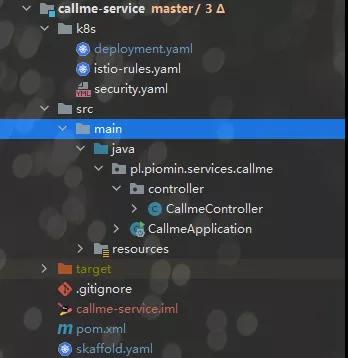
构建一个普通的springboot工程,添加编译插件,这里我们使用了本地的docker仓库存储镜像。
<build>
      <plugins>
          <plugin>
              <groupId>org.springframework.boot</groupId>
              <artifactId>spring-boot-maven-plugin</artifactId>
              <executions>
                  <execution>
                      <goals>
                          <goal>build-info</goal>
                          <goal>repackage</goal>
                      </goals>
                  </execution>
              </executions>
          </plugin>
          <plugin>
              <groupId>com.google.cloud.tools</groupId>
              <artifactId>jib-maven-plugin</artifactId>
              <version>3.1.1</version>
              <configuration>
                  <to>
                      <image>127.0.0.1:9001/${project.artifactId}:${project.version}</image>
                      <auth>
                          <username>
                              xxx
                          </username>
                          <password>
                              xxx
                          </password>
                      </auth>
                  </to>
                  <allowInsecureRegistries>true</allowInsecureRegistries>
              </configuration>
          </plugin>
      </plugins>
  </build>
- 1.
- 2.
- 3.
- 4.
- 5.
- 6.
- 7.
- 8.
- 9.
- 10.
- 11.
- 12.
- 13.
- 14.
- 15.
- 16.
- 17.
- 18.
- 19.
- 20.
- 21.
- 22.
- 23.
- 24.
- 25.
- 26.
- 27.
- 28.
- 29.
- 30.
- 31.
- 32.
- 33.
- 34.
- 35.
构建一个简单的rest,现实一个构建名称,以及配置的一个版本号。
@Autowired
BuildProperties buildProperties;
@Value("${VERSION}")
private String version;

@GetMapping("/ping")
public String ping() {
   LOGGER.info("Ping: name={}, version={}", buildProperties.getName(), version);
   return "I'm callme-service " + version;
}
- 1.
- 2.
- 3.
- 4.
- 5.
- 6.
- 7.
- 8.
- 9.
- 10.
创建 skaffold.xml 用于给 skafflod 编译镜像,提交集群使用。
kind: Config
build:
artifacts:
  - image: 127.0.0.1:9001/callme-service
    jib: {}
tagPolicy:
  gitCommit: {}
- 1.
- 2.
- 3.
- 4.
- 5.
- 6.
- 7.
创建k8s的部署描述k8s/deployment.yml,以及service用于访问。
apiVersion: apps/v1
kind: Deployment
metadata:
name: callme-service-v1
spec:
replicas: 1
selector:
  matchLabels:
    app: callme-service
    version: v1
template:
  metadata:
    labels:
      app: callme-service
      version: v1
  spec:
    containers:
      - name: callme-service
        image: 127.0.0.1:9001/callme-service
        imagePullPolicy: IfNotPresent
        ports:
          - containerPort: 8080
        env:
          - name: VERSION
            value: "v1"
---
apiVersion: apps/v1
kind: Deployment
metadata:
name: callme-service-v2
spec:
replicas: 1
selector:
  matchLabels:
    app: callme-service
    version: v2
template:
  metadata:
    labels:
      app: callme-service
      version: v2
  spec:
    containers:
      - name: callme-service
        image: 127.0.0.1:9001/callme-service
        imagePullPolicy: IfNotPresent
        ports:
          - containerPort: 8080
        env:
          - name: VERSION
            value: "v2"
---
apiVersion: v1
kind: Service
metadata:
name: callme-service
labels:
  app: callme-service
spec:
type: NodePort
ports:
- port: 8080
  name: http
  nodePort: 30101
selector:
  app: callme-service
- 1.
- 2.
- 3.
- 4.
- 5.
- 6.
- 7.
- 8.
- 9.
- 10.
- 11.
- 12.
- 13.
- 14.
- 15.
- 16.
- 17.
- 18.
- 19.
- 20.
- 21.
- 22.
- 23.
- 24.
- 25.
- 26.
- 27.
- 28.
- 29.
- 30.
- 31.
- 32.
- 33.
- 34.
- 35.
- 36.
- 37.
- 38.
- 39.
- 40.
- 41.
- 42.
- 43.
- 44.
- 45.
- 46.
- 47.
- 48.
- 49.
- 50.
- 51.
- 52.
- 53.
- 54.
- 55.
- 56.
- 57.
- 58.
- 59.
- 60.
- 61.
- 62.
- 63.
- 64.
- 65.
- 66.
创建 istio描述文件 k8s\istio-rules.yaml:
apiVersion: networking.istio.io/v1beta1
kind: DestinationRule
metadata:
name: callme-service-destination
spec:
host: callme-service
subsets:
  - name: v1
    labels:
      version: v1
  - name: v2
    labels:
      version: v2
# trafficPolicy: # --- enable for adding circuit breaker into DestinationRule
#   connectionPool:
#     http:
#       http1MaxPendingRequests: 1
#       maxRequestsPerConnection: 1
#       maxRetries: 0
#   outlierDetection:
#     consecutive5xxErrors: 3
#     interval: 30s
#     baseEjectionTime: 1m
#     maxEjectionPercent: 100
---
apiVersion: networking.istio.io/v1beta1
kind: VirtualService
metadata:
name: callme-service-route
spec:
hosts:
  - callme-service
http:
  - route:
    - destination:
        host: callme-service
        subset: v2
      weight: 80
    - destination:
        host: callme-service
        subset: v1
      weight: 20
    retries:
      attempts: 3
      retryOn: gateway-error,connect-failure,refused-stream
    timeout: 0.5s
#     fault: # --- enable for inject fault into the route
#       delay:
#         percentage:
#           value: 33
#         fixedDelay: 3s
- 1.
- 2.
- 3.
- 4.
- 5.
- 6.
- 7.
- 8.
- 9.
- 10.
- 11.
- 12.
- 13.
- 14.
- 15.
- 16.
- 17.
- 18.
- 19.
- 20.
- 21.
- 22.
- 23.
- 24.
- 25.
- 26.
- 27.
- 28.
- 29.
- 30.
- 31.
- 32.
- 33.
- 34.
- 35.
- 36.
- 37.
- 38.
- 39.
- 40.
- 41.
- 42.
- 43.
- 44.
- 45.
- 46.
- 47.
- 48.
- 49.
- 50.
- 51.
运行 skaffold 进行编译,提交镜像,并部署应用 skaffold run --tail。
➜ callme-service git:(master) ✗ skaffold run --tail
Generating tags...

- 127.0.0.1:9001/callme-service -> 127.0.0.1:9001/callme-service:e9c731f-dirty
  Checking cache...
- 127.0.0.1:9001/callme-service: Found Locally
  Starting test...
  Tags used in deployment:
- 127.0.0.1:9001/callme-service -> 127.0.0.1:9001/callme-service:60f1bf39367673fd0d30ec1305d8a02cb5a1ed43cf6603e767a98dc0523c65f3
  Starting deploy...
- deployment.apps/callme-service-v1 configured
- deployment.apps/callme-service-v2 configured
- service/callme-service configured
- destinationrule.networking.istio.io/callme-service-destination configured
- virtualservice.networking.istio.io/callme-service-route configured
  Waiting for deployments to stabilize...
- deployment/callme-service-v1: waiting for init container istio-init to start
  - pod/callme-service-v1-76dd76ddcc-znb62: waiting for init container istio-init to start
- deployment/callme-service-v2: waiting for init container istio-init to start
  - pod/callme-service-v2-679db76bbc-m4svm: waiting for init container istio-init to start
- deployment/callme-service-v2 is ready. [1/2 deployment(s) still pending]
- deployment/callme-service-v1 is ready.
  Deployments stabilized in 45.671 seconds
- 1.
- 2.
- 3.
- 4.
- 5.
- 6.
- 7.
- 8.
- 9.
- 10.
- 11.
- 12.
- 13.
- 14.
- 15.
- 16.
- 17.
- 18.
- 19.
- 20.
- 21.
- 22.
- 23.
访问查看结果:
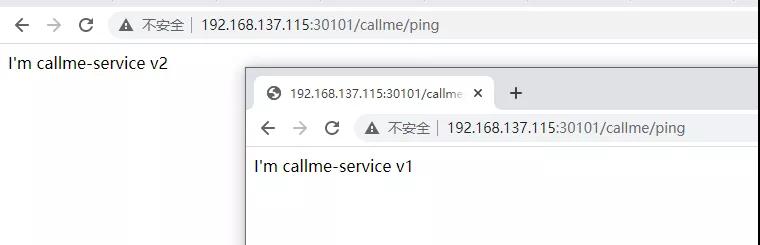
致此,我们初级的环境搭建基本完成了,对应云原生,感觉懂了一点,好像又没有懂,需要理解的东西还有很多,这个系列也会持续下去,希望大家和我交流,也欢迎关注,转发。
参考链接;
https://piotrminkowski.com/2020/02/14/local-java-development-on-kubernetes/
https://pklinker.medium.com/integrating-a-spring-boot-application-into-an-istio-service-mesh-a55948666fd
https://blog.csdn.net/xixingzhe2/article/details/88537038
https://blog.csdn.net/chenleiking/article/details/86716049
本文转载自微信公众号「麒思妙想」,可以通过以下二维码关注。转载本文请联系麒思妙想公众号。