1. 介绍
HarmonyOS支持应用以Ability为单位进行部署,Ability可以分为FA(Feature Ability)和PA(Particle Ability)两种类型,本篇Codelab将会使用到Page Ability以及Service Ability来进行开发,其中Page Ability是FA唯一支持的模板,用于提供与用户交互的能力,Service Ability是PA(Particle Ability)的一种,用于提供后台运行任务的能力。除此之外,您还将使用到HarmonyOS中的常用控件如:ListContainer,Image等,以及跨设备拉起FA的能力来共同实现一个基于分布式的HarmonyOS简易新闻客户端。
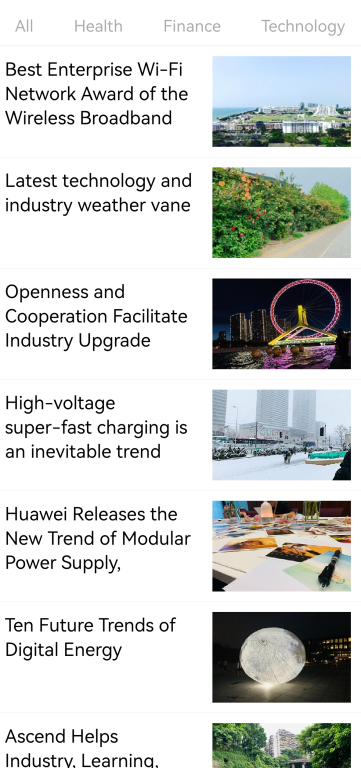
最终效果预览
我们最终会构建一个简易的HarmonyOS新闻客户端。应用包含两级页面,分别是主页面和详情页面,两个页面都展示了丰富的HarmonyOS组件,其中详情页的实现逻辑中还展示了如何通过调用相应接口,实现跨设备拉起FA。本篇Codelab我们将会一起完成这个客户端,其中包括:
1.顶部ListContainer以及新闻列表ListContainer
2.每条新闻的文本框以及图像
3.布局及页面跳转
4.设备发现以及跨设备拉起FA
2. 搭建HarmonyOS环境
安装DevEco Studio,详情请参考DevEco Studio下载。
设置DevEco Studio开发环境,DevEco Studio开发环境需要依赖于网络环境,需要连接上网络才能确保工具的正常使用,可以根据如下两种情况来配置开发环境:
如果可以直接访问Internet,只需进行下载HarmonyOS SDK操作。
如果网络不能直接访问Internet,需要通过代理服务器才可以访问,请参考配置开发环境。
说明:
如需要在手机中运行程序,则需要提前申请证书,如使用模拟器可忽略。
你可以通过如下设备完成Codelab:
开启开发者模式的HarmonyOS真机
DevEco Studio中的手机模拟器(模拟器暂不支持分布式调试)
3. 代码结构解读
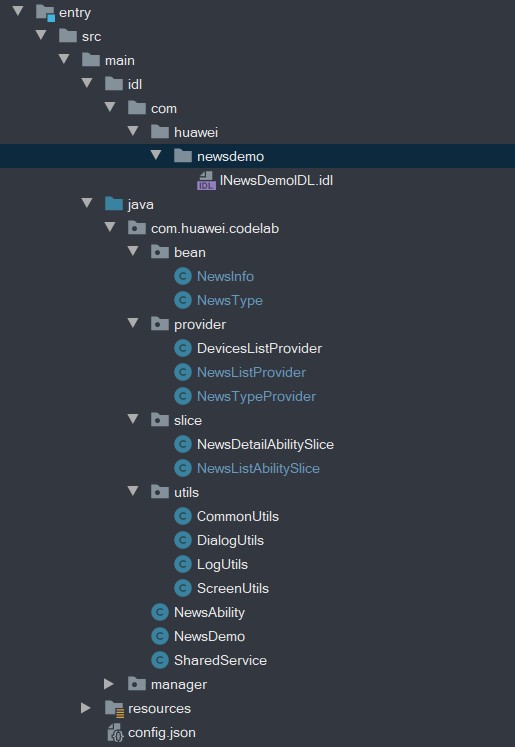
本篇Codelab只对核心代码进行讲解,对于完整代码,我们会在参考中提供下载方式,接下来我们会用一小节来讲解整个工程的代码结构:
- INewsDemoIDL.idl:存放在entry\src\main\idl\com\huawei\newsdemo目录下,接口中定义了tranShare方法用来实现不同设备之间的通信。
- bean:NewsInfo封装了新闻信息,NewsType封装了新闻类型。
- provider:DevicesListProvider,NewsListProvider,NewsTypeProvider,分别为设备列表,主页新闻列表以及新闻类型的provider,主要作用为高效传递和使用相关数据。
- slice:NewsListAbilitySlice,NewsDetailAbilitySlice分别为进入应用的主页面和详情页面,同时里面也展现了我们大部分的逻辑实现。
- utils:存放所有封装好的公共方法,如CommonUtils,DialogUtils等。
- NewsAbility:动态权限的申请以及页面路由信息处理。
- SharedService:供远端连接的Service Ability。
- manager:该目录下的文件为INewsDemoIDL.idl在编译时自行生成,初始生成位置为entry\build\generated\source\idl\com\huawei\newsdemo。
- resources:存放工程使用到的资源文件,其中resources\base\layout下存放xml布局文件;resources\base\media下存放图片资源;resources\rawfile下存放应用使用的新闻数据json文件。
- config.json:配置文件
4. 添加主页顶部新闻类型
首先为我们的应用添加顶部新闻类型,用于切换不同类别的新闻,我们会使用到ListContainer控件,有关ListContainer的更多知识,可以参考HarmonyOS JAVA通用组件。
首先需要在布局文件中对控件进行声明,在resources\base\layout\news_list_layout.xml布局文件中有如下代码:
- <ListContainer
- ohos:id="$+id:selector_list"
- ohos:width="match_parent"
- ohos:height="40vp"
- ohos:orientation="horizontal"
- />
此外我们还定义了selectorListContainer变量进行关联,在NewsListAbilitySlice.java的initView()方法中有如下代码:
- selectorListContainer = (ListContainer) findComponentById(ResourceTable.Id_selector_list);
添加监听
在切换不同类别新闻的时候,下面展示的新闻列表项会跟随切换,所以我们需要为这个ListContainer设置一个监听,在NewsListAbilitySlice.java的initListener()方法中添加:
- selectorListContainer.setItemClickedListener(
- (listContainer, component, position, id) -> {
- // 设置选中后的放大效果
- setCategorizationFocus(false);
- selectText = (Text) component.findComponentById(ResourceTable.Id_news_type_text);
- setCategorizationFocus(true);
- newsDataList.clear();
- for (NewsInfo mTotalNewsData : totalNewsDataList) {
- if (selectText.getText().equals(mTotalNewsData.getType()) || id == 0) {
- newsDataList.add(mTotalNewsData);
- }
- }
- updateListView();
- });
声明NewsTypeProvider
为了方便我们的应用更加高效和便捷的使用数据,我们将应用中用到的新闻数据事先预置在resources/rawfile目录下的两个json文件中,此外我们还声明了一些Provider,便于数据的获取和传递,其中获取新闻类别的NewsTypeProvider如下:
- @Override
- public Component getComponent(int position, Component component, ComponentContainer componentContainer) {
- ViewHolder viewHolder;
- Component temp = component;
- if (temp == null) {
- temp = LayoutScatter.getInstance(context).parse(ResourceTable.Layout_item_news_type_layout, null, false);
- // 将所有子组件通过ViewHolder绑定到列表项实例
- viewHolder = new ViewHolder();
- viewHolder.title = (Text) temp.findComponentById(ResourceTable.Id_news_type_text);
- component.setTag(viewHolder);
- } else {
- viewHolder = (ViewHolder) temp.getTag();
- }
- viewHolder.title.setText(mNewsTypeList.get(position).getName());
- return temp;
- }
我们定义了initData方法来解析json文件中的新闻数据,并将这些数据传递给provider,在NewsListAbilitySlice.java的initData()添加如下代码:
- private void initData() {
- Gson gson = new Gson();
- List<NewsType> newsTypeList =
- gson.fromJson(
- CommonUtils.getStringFromJsonPath(this, "entry/resources/rawfile/news_type_datas.json"),
- new TypeToken<List<NewsType>>(){ }.getType());
- newsTypeProvider = new NewsTypeProvider(newsTypeList, this);
- }
添加切换效果
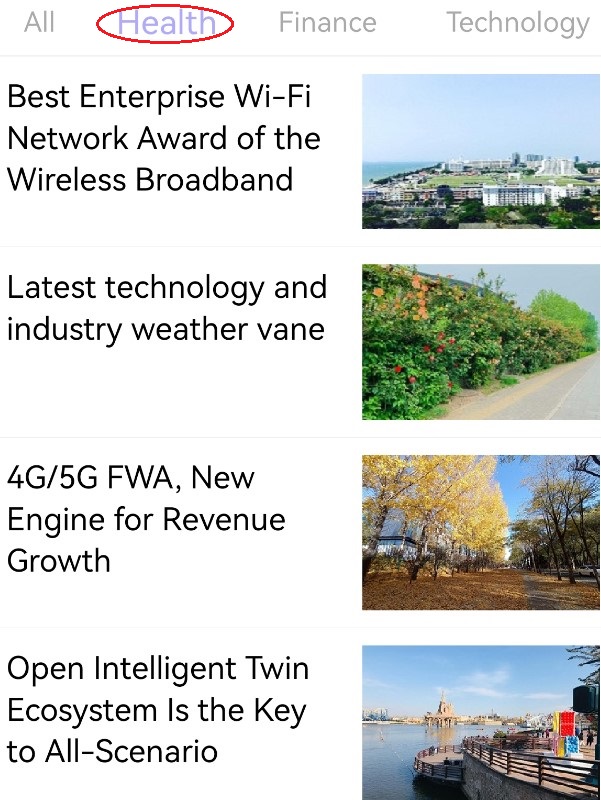
在切换不同类别新闻的时候,增加了一个放大效果,在setCategorizationFocus()中添加如下代码:
- private void setCategorizationFocus(boolean isFocus) {
- if (selectText == null) {
- return;
- }
- if (isFocus) {
- selectText.setTextColor(
- new Color(CommonUtils.getColor(NewsListAbilitySlice.this, ResourceTable.Color_news_type_text_on)));
- selectText.setScaleX(FOCUS_TEXT_SIZE);
- selectText.setScaleY(FRCUS_TEXT_SIZE);
- } else {
- selectText.setTextColor(
- new Color(CommonUtils.getColor(NewsListAbilitySlice.this, ResourceTable.Color_news_type_text_off)));
- selectText.setScaleX(UNFOCUS_TEXT_SIZE);
- selectText.setScaleY(UNFOCUS_TEXT_SIZE);
- }
所以在进行类别切换的时候,将会得到如下效果:
5. 添加主页新闻列表项
新闻列表项布局
主页面的布局除了有上方的顶部栏,还由下方的新闻列表项构成,整个新闻列表项是一个ListContainer,同样我们先来看看在new_list_layout.xml中是如何定义的:
- <ListContainer
- ohos:id="$+id:news_container"
- ohos:width="match_parent"
- ohos:height="match_parent"/>
整个新闻列表项由多个新闻item构成,每个item又由标题和图片构成,每个item在item_news_layout.xml布局中是这样定义的:
- <DirectionalLayout
- ohos:height="109.5vp"
- ohos:width="match_parent"
- ohos:orientation="horizontal"
- ohos:padding="10vp">
- <Text
- ohos:id="$+id:item_news_title"
- ohos:height="match_content"
- ohos:width="0vp"
- ohos:max_text_lines="3"
- ohos:multiple_lines="true"
- ohos:right_padding="20vp"
- ohos:text_size="18vp"
- ohos:weight="3"/>
- <Image
- ohos:id="$+id:item_news_image"
- ohos:height="match_parent"
- ohos:width="0vp"
- ohos:scale_mode="stretch"
- ohos:weight="2"/>
- </DirectionalLayout>
声明NewsListProvider
和顶部新闻类型一样,每个新闻item中的title和image也是利用provider传递的,在NewsListProvider.java中有如下代码:
- @Override
- public Component getComponent(int position, Component component, ComponentContainer componentContainer) {
- ViewHolder viewHolder;
- Component temp = component;
- if (temp == null) {
- component = LayoutScatter.getInstance(context).parse(ResourceTable.Layout_item_news_layout, null, false);
- // 将所有子组件通过ViewHolder绑定到列表项实例
- viewHolder = new ViewHolder();
- viewHolder.title = (Text) temp.findComponentById(ResourceTable.Id_item_news_title);
- viewHolder.image = (Image) temp.findComponentById(ResourceTable.Id_item_news_image);
- temp.setTag(viewHolder);
- } else {
- viewHolder = (ViewHolder) temp.getTag();
- }
- viewHolder.title.setText(newsInfoList.get(i).getTitle());
- viewHolder.image.setPixelMap(CommonUtils.getPixelMapFromPath(context, newsInfoList.get(i).getImgUrl()));
- return temp;
- }
同样,newsListProvider的数据也是在initData的时候进行赋值的,所以需要在NewsListAbilitySlice的initData()中添加:
- totalNewsDataList =
- gson.fromJson(
- CommonUtils.getStringFromJsonPath(this, "entry/resources/rawfile/news_datas.json"),
- new TypeToken<List<NewsInfo>>(){ }.getType());
- newsDataList = new ArrayList<>();
- newsDataList.addAll(totalNewsDataList);
- newsListProvider = new NewsListProvider(newsDataList, this);
到此我们完成了数据的加载和解析,接下来是为item添加点击事件。
添加监听
我们点击某个具体新闻item的时,应用会跳转到全局详情页面,这时要为新闻item添加一个监听,在NewsListAbilitySlice.java的initListener()中添加:
- newsListContainer.setItemClickedListener(
- (listContainer, component, position, id) -> {
- Intent intent = new Intent();
- Operation operation =
- new Intent.OperationBuilder()
- .withBundleName(getBundleName())
- .withAbilityName(NewsAbility.class.getName())
- .withAction("action.detail")
- .build();
- intent.setOperation(operation);
- intent.setParam(NewsDetailAbilitySlice.INTENT_TITLE, newsDataList.get(position).getTitle());
- intent.setParam(NewsDetailAbilitySlice.INTENT_READ, newsDataList.get(position).getReads());
- intent.setParam(NewsDetailAbilitySlice.INTENT_LIKE, newsDataList.get(position).getLikes());
- intent.setParam(NewsDetailAbilitySlice.INTENT_CONTENT, newsDataList.get(position).getContent());
- intent.setParam(NewsDetailAbilitySlice.INTENT_IMAGE, newsDataList.get(position).getImgUrl());
- startAbility(intent);
- });
这里的startAbility()是我们页面跳转的关键方法,参数intent里面存放了要跳转的bundle name,ability name,详情页面的title,imgurl等重要参数。
6. 详情页页面布局
新闻详情页的布局相比于新闻主页稍微有些复杂,整体由DependentLayout布局嵌套DirectionalLayout布局、ScrollView和其他控件构成,我们把整体页面分为顶部,底部,和中部。并在resources\base\layout\new_detail_laylout.xml中实现详情页的布局。
顶部
顶部是由DirectionalLayout加上Text组件构成,分别对应了左侧的图标和NewsDemo以及右侧的reads和likes,实现效果及布局部分代码如下:

- <DirectionalLayout
- ohos:width="match_parent"
- ohos:height="match_content"
- ohos:alignment="vertical_center"
- ohos:orientation="horizontal">
- <Text
- ohos:id="$+id:title_icon"
- ohos:width="match_content"
- ohos:height="match_content"
- ohos:weight="1"
- ohos:text="NewsDemo"
- ohos:text_size="20fp"/>
- <Text
- ohos:id="$+id:read_num"
- ohos:width="match_content"
- ohos:height="match_content"
- ohos:text_size="10fp"
- ohos:right_margin="10vp"/>
- <Text
- ohos:id="$+id:like_num"
- ohos:width="match_content"
- ohos:height="match_content"
- ohos:text_size="10fp"/>
- </DirectionalLayout>
中部
页面的中间部分由新闻标题Text,缩略图Image,新闻内容Text构成,实现效果及布局部分代码如下:

- <Text
- ohos:id="$+id:title_text"
- ohos:width="match_parent"
- ohos:height="match_content"
- ohos:text_size="18fp"
- ohos:max_text_lines="4"
- ohos:multiple_lines="true"
- ohos:text_color="#000000"
- ohos:top_margin="10vp"/>
- <Image
- ohos:id="$+id:image_content"
- ohos:width="match_parent"
- ohos:scale_mode="stretch"
- ohos:height="300vp"
- ohos:top_margin="10vp"/>
- <Text
- ohos:id="$+id:title_content"
- ohos:width="match_parent"
- ohos:height="match_content"
- ohos:multiple_lines="true"
- ohos:text_color="#708090"
- ohos:text_size="16vp"
- ohos:text_alignment="center_horizontal"
- ohos:top_margin="5vp"/>
底部
页面的底部由DirectionalLayout加上TextField和Image控件构成,对应输入评论和几个按钮,具体效果和部分布局代码如下:

- <DirectionalLayout
- ohos:id="$+id:bottom_layout"
- ohos:align_parent_bottom="true"
- ohos:width="match_parent"
- ohos:height="50vp"
- ohos:orientation="horizontal"
- ohos:background_element="#ffffff"
- ohos:alignment="vertical_center"
- ohos:left_padding="20vp"
- ohos:right_padding="20vp"
- >
- <TextField
- ohos:id="$+id:text_file"
- ohos:width="160vp"
- ohos:height="30vp"
- ohos:left_padding="5vp"
- ohos:right_padding="10vp"
- ohos:text_alignment="vertical_center"
- ohos:text_size="15vp"
- ohos:hint="Enter a comment."
- ohos:background_element="$graphic:corner_bg_comment"/>
- <Image
- ohos:id="$+id:button1"
- ohos:width="20vp"
- ohos:height="20vp"
- ohos:image_src="$media:message_icon"
- ohos:scale_mode="stretch"
- ohos:left_margin="20vp"/>
- <Image
- ohos:id="$+id:button2"
- ohos:width="20vp"
- ohos:height="20vp"
- ohos:image_src="$media:collect_icon"
- ohos:scale_mode="stretch"
- ohos:left_margin="20vp"/>
- <Image
- ohos:id="$+id:button3"
- ohos:width="20vp"
- ohos:height="20vp"
- ohos:image_src="$media:like_icon"
- ohos:scale_mode="stretch"
- ohos:left_margin="20vp"/>
- <Image
- ohos:id="$+id:button4"
- ohos:width="20vp"
- ohos:height="20vp"
- ohos:image_src="$media:share_icon"
- ohos:scale_mode="stretch"
- ohos:left_margin="20vp"/>
- </DirectionalLayout>
7. 详情页数据初始化
接受来自NewsListAbilitySlice页面的数据
我们在添加新闻列表项那一节中说明了新闻页面的title,imgurl等重要参数是如何存放的,现在我们一起看下在详情页是如何获取的。在NewsDetailAbilitySlice.java的onStart()中有如下代码:
- public void onStart(Intent intent) {
- super.onStart(intent);
- super.setUIContent(ResourceTable.Layout_news_detail_layout);
- reads = intent.getStringParam(INTENT_READ);
- likes = intent.getStringParam(INTENT_LIKE);
- title = intent.getStringParam(INTENT_TITLE);
- content = intent.getStringParam(INTENT_CONTENT);
- image = intent.getStringParam(INTENT_IMAGE);
- }
之前存放在intent中的参数,现在在onStart()中逐一进行取出。
布局和控件的初始化
除了需要声明xml来实现布局以外,还需要在NewsDetailAbilitySlice.java的onStart()中添加initView()方法进行初始化:
- private void initView() {
- parentLayout = (DependentLayout) findComponentById(ResourceTable.Id_parent_layout);
- commentFocus = (TextField) findComponentById(ResourceTable.Id_text_file);
- iconShared = (Image) findComponentById(ResourceTable.Id_button4);
- Text newsRead = (Text) findComponentById(ResourceTable.Id_read_num);
- Text newsLike = (Text) findComponentById(ResourceTable.Id_like_num);
- Text newsTitle = (Text) findComponentById(ResourceTable.Id_title_text);
- Text newsContent = (Text) findComponentById(ResourceTable.Id_title_content);
- Image newsImage = (Image) findComponentById(ResourceTable.Id_image_content);
- newsRead.setText("reads: " + reads);
- newsLike.setText("likes: " + likes);
- newsTitle.setText("Original title: " + title);
- newsContent.setText(content);
- newsImage.setPixelMap(CommonUtils.getPixelMapFromPath(this, image));
- }
添加监听
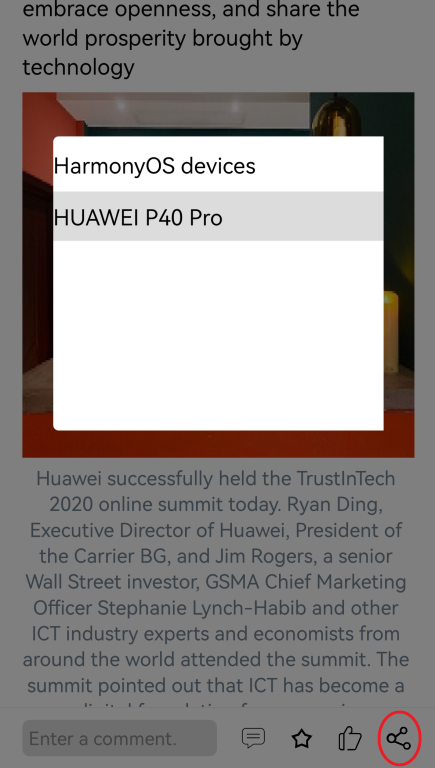
我们在点击页面底部右下角的分享按钮的时候,会进行设备发现操作,并将发现的设备列表进行展示,此处我们设置了两个监听,在NewsDetailAbilitySlice.java的onStart()中添加initListener():
- private void initListener() {
- parentLayout.setTouchEventListener(
- (component, touchEvent) -> {
- if (commentFocus.hasFocus()) {
- commentFocus.clearFocus();
- }
- return true;
- });
- iconShared.setClickedListener(
- v -> {
- initDevices();
- showDeviceList();
- });
- }
parentLayout的监听事件用来监听触控焦点是否在设备列表Dialog上,iconShared的监听事件用来监听分享按钮被是否被点击。
8. 设备发现
上一节我们了解到当分享按钮被点击的时候会触发监听,进行设备发现,那么触发监听后,是如何进行设备发现的?
在initListener()中有两个有关设备发现的方法:initDevices()和showDeviceList()。initDevices()方法调用接口实现设备发现,并将发现到的设备存储到List中,需要如下代码实现:
- private void initDevices() {
- if (devices.size() > 0) {
- devices.clear();
- }
- List<DeviceInfo> deviceInfos =
- DeviceManager.getDeviceList(DeviceInfo.FLAG_GET_ONLINE_DEVICE);
- devices.addAll(deviceInfos);
- }
发现到的设备,通过Dialog进行显示,您可以选择一个目标设备进行跨设备流转,需要在NewsDetailAbilitySlice.java的showDeviceList()中添加如下代码:
- private void showDeviceList() {
- // 设备列表dialog
- dialog = new CommonDialog(NewsDetailAbilitySlice.this);
- dialog.setAutoClosable(true);
- dialog.setTitleText("HarmonyOS devices");
- dialog.setSize(DIALOG_SIZE_WIDTH, DIALOG_SIZE_HEIGHT);
- ListContainer devicesListContainer = new ListContainer(getContext());
- DevicesListAdapter devicesListProvider = new DevicesListProvider(devices, this);
- devicesListContainer.setItemProvider(devicesListAdapter);
- devicesListContainer.setItemClickedListener(
- (listContainer, component, position, id) -> {
- dialog.destroy()
- // 跨设备拉起FA
- startAbilityFA(devices.get(position).getDeviceId());
- });
- devicesListAdapter.notifyDataChanged();
- dialog.setContentCustomComponent(devicesListContainer);
- dialog.show();
- }
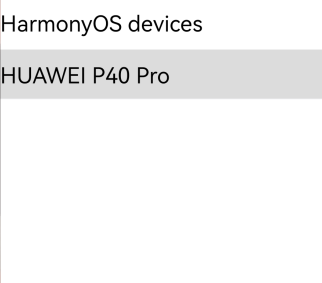
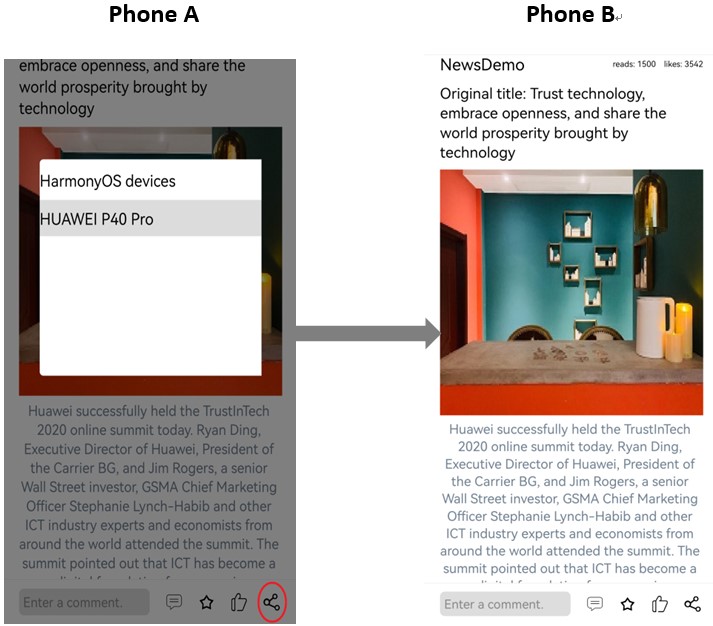
当我们选择某个设备的时候,被选择的设备会拉起指定的FA页面,被拉起的FA页面会和发起请求的那一端保持一致。
9. 跨设备协同
连接Service Ability
那么跨设备协同又是如何实现的?发现的设备列表也是通过一个ListContainer来展示的,设备列表也有对应的xml和变量声明,这里不再赘述。对于每一个设备item,我们添加了监听用来进行跨设备拉起FA,需要在NewsDetailAbilitySlice的showDeviceList()中添加startAlibityFA()方法,具体代码如下:
- private void startAbilityFA(StringdevicesId) {
- Intent intent = new Intent();
- Operation operation =
- new Intent.OperationBuilder()
- .withDeviceId(devicesId)
- .withBundleName(getBundleName())
- .withAbilityName(SharedService.class.getName())
- // 该FLAG用于分布式跨设备场景
- .withFlags(Intent.FLAG_ABILITYSLICE_MULTI_DEVICE)
- .build();
- intent.setOperation(operation);
- boolean connectFlag =
- // 连接远端 Service Ability
- connectAbility(
- intent,
- new IAbilityConnection() {
- @Override
- public void onAbilityConnectDone(
- ElementName elementName, IRemoteObject iRemoteObject, int i) {
- INewsDemoIDL sharedManager = NewsDemoIDLStub.asInterface(iRemoteObject);
- try {
- sharedManager.tranShare(title, reads, likes, content, image);
- } catch (RemoteException e) {
- LogUtil.i(TAG, "connect successful,but have remote exception");
- }
- }
- @Override
- public void onAbilityDisconnectDone(ElementName elementName, int i) {
- disconnectAbility(this);
- }
- });
- DialogUtil.toast(
- this, connectFlag ? "Sharing succeeded!" : "Sharing failed. Please try again later.", WAIT_TIME);
- }
方法中我们为intent设置了bundlename,abilityname,devicesId等参数,通过connectAbility方法实现与远端Service Ability进行连接,连接成功后,会在onAbilityConnectDone中调用tranShare方法将对端需要的数据传递过去。
远端Service Ability的定义
本端通过connectAbility连接远端的Service Ability,那么远端的Service Ability又是如何定义的?需要在SharedService.java中添加tranShare()方法,代码如下:
- public void tranShare(String title, String reads, String likes, String content, String image) {
- Intent intent = new Intent();
- Operation operation =
- new Intent.OperationBuilder()
- .withBundleName(getBundleName())
- .withAbilityName(NewsAbility.class.getName())
- .withAction("action.detail")
- .build();
- intent.setOperation(operation);
- intent.setParam(NewsDetailAbilitySlice.INTENT_TITLE, title);
- intent.setParam(NewsDetailAbilitySlice.INTENT_READ, reads);
- intent.setParam(NewsDetailAbilitySlice.INTENT_LIKE, likes);
- intent.setParam(NewsDetailAbilitySlice.INTENT_CONTENT, content);
- intent.setParam(NewsDetailAbilitySlice.INTENT_IMAGE, image);
- startAbility(intent);
说明:
以上代码仅demo演示参考使用
这样便通过startAbility方法拉起了指定的FA,并将intent携带的参数一并传递过去。
—-结束
当前实现远程启动FA,需要至少两个设备处于同一个分布式网络中,可以通过操作如下配置实现:
所有设备接入同一网络,
所有设备登陆相同华为账号,
所有设备上开启"设置->更多连接->多设备协同 "
10. 回顾和总结
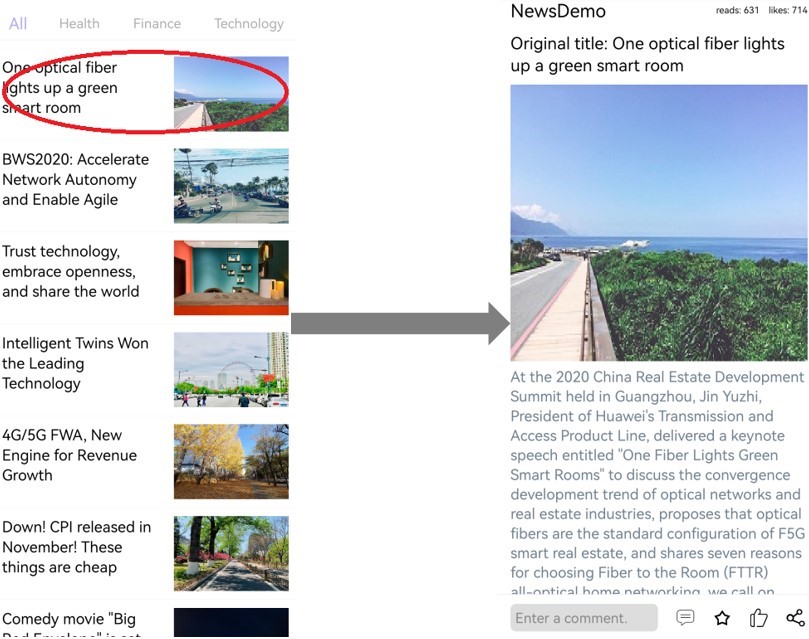
在本篇Codelab中我们介绍了应用的主页面和详情页,在主页面可以通过顶部的新闻类型切换不同类别的新闻,同时下面整个新闻列表项也会跟随切换。点击下方某个具体新闻item的时候,会进行跳转到新闻详情页面;在新闻详情页可以上下滑动查看新闻,并且点击下方分享按钮可以实现FA的跨设备协同,整体效果如下图1和图2:
11. 恭喜你
目前你已经成功完成了Codelab并且学到了:
如何使用ListContainer等常用控件
如何进行布局编写及页面跳转
如何进行设备发现以及FA的跨设备协同
12. 参考


