主要内容
- 1 ELK概念
- 2 K8S需要收集哪些日志
- 3 ELK Stack日志方案
- 4 容器中的日志怎么收集
- 5 部署操作步骤
准备环境
一套正常运行的k8s集群,kubeadm安装部署或者二进制部署即可
1 ELK概念
ELK是Elasticsearch、Logstash、Kibana三大开源框架首字母大写简称。市面上也被称为Elastic Stack。其中Elasticsearch是一个基于Lucene、分布式、通过Restful方式进行交互的近实时搜索平台框架。像类似百度、谷歌这种大数据全文搜索引擎的场景都可以使用Elasticsearch作为底层支持框架,可见Elasticsearch提供的搜索能力确实强大,市面上很多时候我们简称Elasticsearch为es。Logstash是ELK的中央数据流引擎,用于从不同目标(文件/数据存储/MQ)收集的不同格式数据,经过过滤后支持输出到不同目的地(文件/MQ/redis/elasticsearch/kafka等)。Kibana可以将elasticsearch的数据通过友好的页面展示出来,提供实时分析的功能。
通过上面对ELK简单的介绍,我们知道了ELK字面意义包含的每个开源框架的功能。市面上很多开发只要提到ELK能够一致说出它是一个日志分析架构技术栈总称,但实际上ELK不仅仅适用于日志分析,它还可以支持其它任何数据分析和收集的场景,日志分析和收集只是更具有代表性。并非唯一性。我们本教程主要也是围绕通过ELK如何搭建一个生产级的日志分析平台来讲解ELK的使用。
官方网站:https://www.elastic.co/cn/products/
2 日志管理平台
在过往的单体应用时代,我们所有组件都部署到一台服务器中,那时日志管理平台的需求可能并没有那么强烈,我们只需要登录到一台服务器通过shell命令就可以很方便的查看系统日志,并快速定位问题。随着互联网的发展,互联网已经全面渗入到生活的各个领域,使用互联网的用户量也越来越多,单体应用已不能够支持庞大的用户的并发量,尤其像中国这种人口大国。那么将单体应用进行拆分,通过水平扩展来支持庞大用户的使用迫在眉睫,微服务概念就是在类似这样的阶段诞生,在微服务盛行的互联网技术时代,单个应用被拆分为多个应用,每个应用集群部署进行负载均衡,那么如果某项业务发生系统错误,开发或运维人员还是以过往单体应用方式登录一台一台登录服务器查看日志来定位问题,这种解决线上问题的效率可想而知。日志管理平台的建设就显得极其重要。通过Logstash去收集每台服务器日志文件,然后按定义的正则模板过滤后传输到Kafka或redis,然后由另一个Logstash从KafKa或redis读取日志存储到elasticsearch中创建索引,最后通过Kibana展示给开发者或运维人员进行分析。这样大大提升了运维线上问题的效率。除此之外,还可以将收集的日志进行大数据分析,得到更有价值的数据给到高层进行决策。
3 K8S中的ELK Stack日志采集方案

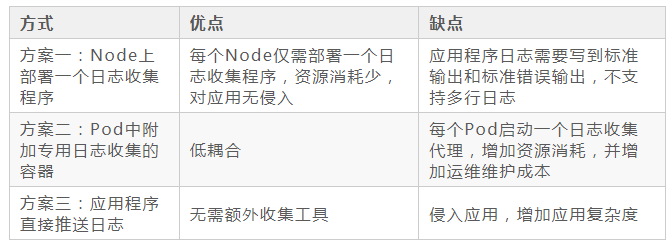
方案一:Node上部署一个日志收集程序 使用DaemonSet的方式去给每一个node上部署日志收集程序logging-agent 然后使用这个agent对本node节点上的/var/log和/var/lib/docker/containers/两个目录下的日志进行采集 或者把Pod中容器日志目录挂载到宿主机统一目录上,这样进行收集
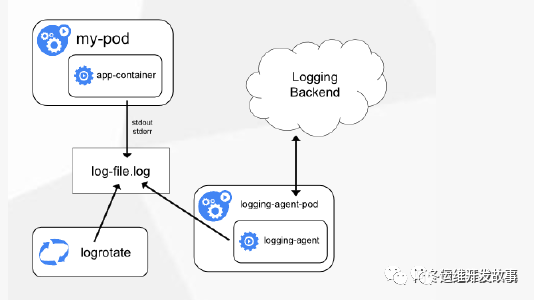
因为使用stdout的方式,只需要在宿主机上收集每个容器中的日志/var/log和/var/lib/docker/containers (目录要根据docker info中的dir进行修改,容器会将日志转化为JSON格式,是docker中的配置起的作用)
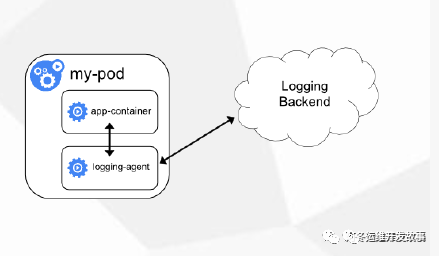
方案二:Pod中附加专用日志收集的容器 每个运行应用程序的Pod中增加一个日志收集容器,使用emtyDir共享日志目录让日志收集程序读取到。
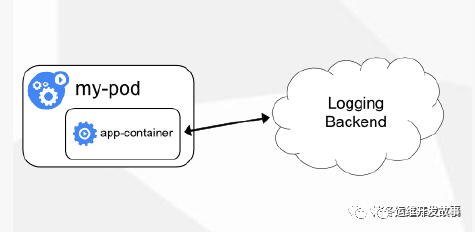
方案三:应用程序直接推送日志 这个方案需要开发在代码中修改直接把应用程序直接推送到远程的存储上,不再输入出控制台或者本地文件了,使用不太多,超出Kubernetes范围
4 K8S中日志采集应该注意的问题
问题1: 一个K8S集群我们需要收集哪些日志?
这里只是以主要收集日志为例:
K8S系统的组件日志
K8S Cluster里面部署的应用程序日志 -标准输出 -日志文件
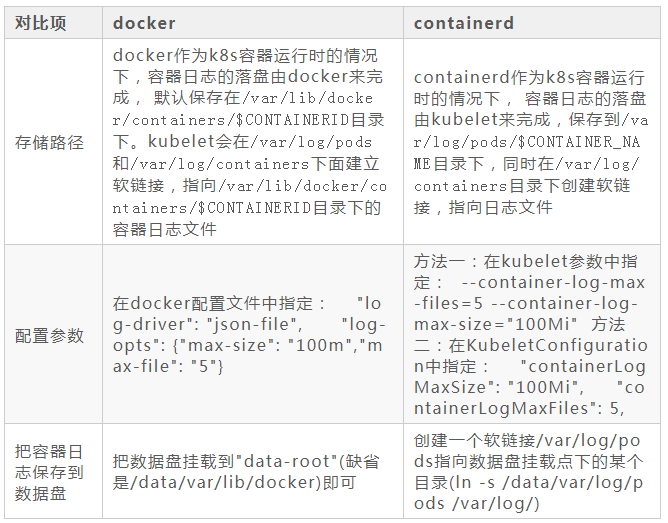
问题2: 我们需要收集的日志在哪里,如何去收集当下比较常用的runtime?
docker和containerd的容器日志及相关参数
问题3: 是否需要做日志的标准化规范
基本格式
采用json格式输出,为了方便采集,日志应该使用一行输出
定义
所有运行在k8s集群内的业务应用所输出的所有日志。
必要字段
- level
日志等级字段,字段值统一为小写。
- debug :指明细致的事件信息,对调试应用最有用。
- info:指明描述信息,从粗粒度上描述了应用运行过程
- warn:指明潜在的有害状况。
- error: 指明错误事件,但应用可能还能继续运行
- fatal:指明非常严重的错误事件,可能会导致应用终止执行。
日志等级会作为日志采集和日志报警的依据。在生产系环境日志采集器只会采集INFO以上等级的日志,日志报警会拉取error级别以上进行告警。
- msg
日志主要内容。
- remote_ip
请求的源ip
- project
服务名加版本号,如srv-oc-task@1.0.0-cb5d0af
- time
日志打印时间,统一使用 UTC 时间格式。
- func
日志所在代码里的目录和行数
可选字段(可选字段按需使用,日志采集后会解析下列字段)
- request_url
该请求的url
- status
该请求返回http状态码
- cost
本次请求花费时间,单位为ms
- method
该条请求的http方法
- _id
日志id
ingress日志
统一使用nginx-ingress暴露业务,因此在集群初始化之后,部署的nginx-ingress需要规定一下字段,采用json格式输出,为了方便采集,日志应该使用一行输出。
- 字段要求
- log-format-upstream: '{"@timestamp":"$time_iso8601","host":"$server_addr", "clientip"
- : "$remote_addr", "size" : "$body_bytes_sent" ,"requesttime":"$request_time","upstremtime":"$upstream_response_time","upstremhost":"$upstream_addr","httphost":"$host","referer":"$http_referer","xff":"$http_x_forwarded_for","agent":"$http_user_agent","clientip":"$remote_addr","request":"$request","uri":"$uri","status":"$status"}'
5 部署操作步骤
本次部署采集方案采用为方案一:在Node上部署一个日志收集程序
支持的cpu架构
- amd64
- arm64
支持k8s的runtime类别
- docker
- containerd
ELK Stack各组件版本
- elasticsearch:7.9.3
- filebeat:7.9.3
- kibana:7.9.3
- logstash:7.9.3
支持的k8s版本
- v1.15.0+以上版本
本次部署的yaml见项目地址: https://github.com/sunsharing-note/ELK-Stack
5.1 单节点方式部署ES
单节点部署ELK的方法较简单,可以参考下面的yaml编排文件,整体就是创建一个es,然后创建kibana的可视化展示,创建一个es的service服务,然后通过ingress的方式对外暴露域名访问
- 首先,编写es的yaml,这里部署的是单机版,在k8s集群内中,通常当日志量每天超过20G以上的话,还是建议部署在k8s集群外部,支持分布式集群的架构,这里使用的是有状态部署的方式,并且使用的是hostpath才持久化,因此需要给node打上es的落盘节点标签,才能运行该yaml
- #需要提前给es落盘节点打上标签
- kubectl label node xxxx es=data
- [root@k8s-master fek]# cat es.yaml
- ---
- apiVersion: v1
- kind: Service
- metadata:
- name: elasticsearch-logging
- namespace: kube-system
- labels:
- k8s-app: elasticsearch-logging
- kubernetes.io/cluster-service: "true"
- addonmanager.kubernetes.io/mode: Reconcile
- kubernetes.io/name: "Elasticsearch"
- spec:
- ports:
- - port: 9200
- protocol: TCP
- targetPort: db
- selector:
- k8s-app: elasticsearch-logging
- ---
- # RBAC authn and authz
- apiVersion: v1
- kind: ServiceAccount
- metadata:
- name: elasticsearch-logging
- namespace: kube-system
- labels:
- k8s-app: elasticsearch-logging
- kubernetes.io/cluster-service: "true"
- addonmanager.kubernetes.io/mode: Reconcile
- ---
- kind: ClusterRole
- apiVersion: rbac.authorization.k8s.io/v1
- metadata:
- name: elasticsearch-logging
- labels:
- k8s-app: elasticsearch-logging
- kubernetes.io/cluster-service: "true"
- addonmanager.kubernetes.io/mode: Reconcile
- rules:
- - apiGroups:
- - ""
- resources:
- - "services"
- - "namespaces"
- - "endpoints"
- verbs:
- - "get"
- ---
- kind: ClusterRoleBinding
- apiVersion: rbac.authorization.k8s.io/v1
- metadata:
- namespace: kube-system
- name: elasticsearch-logging
- labels:
- k8s-app: elasticsearch-logging
- kubernetes.io/cluster-service: "true"
- addonmanager.kubernetes.io/mode: Reconcile
- subjects:
- - kind: ServiceAccount
- name: elasticsearch-logging
- namespace: kube-system
- apiGroup: ""
- roleRef:
- kind: ClusterRole
- name: elasticsearch-logging
- apiGroup: ""
- ---
- # Elasticsearch deployment itself
- apiVersion: apps/v1
- kind: StatefulSet #使用statefulset创建Pod
- metadata:
- name: elasticsearch-logging #pod名称,使用statefulSet创建的Pod是有序号有顺序的
- namespace: kube-system #命名空间
- labels:
- k8s-app: elasticsearch-logging
- kubernetes.io/cluster-service: "true"
- addonmanager.kubernetes.io/mode: Reconcile
- srv: srv-elasticsearch
- spec:
- serviceName: elasticsearch-logging #与svc相关联,这可以确保使用以下DNS地址访问Statefulset中的每个pod (es-cluster-[0,1,2].elasticsearch.elk.svc.cluster.local)
- replicas: 1 #副本数量,单节点
- selector:
- matchLabels:
- k8s-app: elasticsearch-logging #和pod template配置的labels相匹配
- template:
- metadata:
- labels:
- k8s-app: elasticsearch-logging
- kubernetes.io/cluster-service: "true"
- spec:
- serviceAccountName: elasticsearch-logging
- containers:
- - image: docker.io/library/elasticsearch:7.9.3
- name: elasticsearch-logging
- resources:
- # need more cpu upon initialization, therefore burstable class
- limits:
- cpu: 1000m
- memory: 2Gi
- requests:
- cpu: 100m
- memory: 500Mi
- ports:
- - containerPort: 9200
- name: db
- protocol: TCP
- - containerPort: 9300
- name: transport
- protocol: TCP
- volumeMounts:
- - name: elasticsearch-logging
- mountPath: /usr/share/elasticsearch/data/ #挂载点
- env:
- - name: "NAMESPACE"
- valueFrom:
- fieldRef:
- fieldPath: metadata.namespace
- - name: "discovery.type" #定义单节点类型
- value: "single-node"
- - name: ES_JAVA_OPTS #设置Java的内存参数,可以适当进行加大调整
- value: "-Xms512m -Xmx2g"
- volumes:
- - name: elasticsearch-logging
- hostPath:
- path: /data/es/
- nodeSelector: #如果需要匹配落盘节点可以添加nodeSelect
- es: data
- tolerations:
- - effect: NoSchedule
- operator: Exists
- # Elasticsearch requires vm.max_map_count to be at least 262144.
- # If your OS already sets up this number to a higher value, feel free
- # to remove this init container.
- initContainers: #容器初始化前的操作
- - name: elasticsearch-logging-init
- image: alpine:3.6
- command: ["/sbin/sysctl", "-w", "vm.max_map_count=262144"] #添加mmap计数限制,太低可能造成内存不足的错误
- securityContext: #仅应用到指定的容器上,并且不会影响Volume
- privileged: true #运行特权容器
- - name: increase-fd-ulimit
- image: busybox
- imagePullPolicy: IfNotPresent
- command: ["sh", "-c", "ulimit -n 65536"] #修改文件描述符最大数量
- securityContext:
- privileged: true
- - name: elasticsearch-volume-init #es数据落盘初始化,加上777权限
- image: alpine:3.6
- command:
- - chmod
- - -R
- - "777"
- - /usr/share/elasticsearch/data/
- volumeMounts:
- - name: elasticsearch-logging
- mountPath: /usr/share/elasticsearch/data/
- 使用刚才编写好的yaml文件创建Elasticsearch,然后检查是否启动,如下所示能看到一个elasticsearch-0 的pod副本被创建,正常运行;如果不能正常启动可以使用kubectl describe查看详细描述,排查问题
- [root@k8s-master fek]# kubectl get pod -n kube-system
- NAME READY STATUS RESTARTS AGE
- coredns-5bd5f9dbd9-95flw 1/1 Running 0 17h
- elasticsearch-0 1/1 Running 1 16m
- 然后,需要部署一个Kibana来对搜集到的日志进行可视化展示,使用Deployment的方式编写一个yaml,seivice中使用的是nodeport 25601端口对外进行暴露访问,直接引用了es,也可以选择使用ingress进行暴露
- [root@k8s-master fek]# cat kibana.yaml
- ---
- apiVersion: v1
- kind: Service
- metadata:
- name: kibana
- namespace: kube-system
- labels:
- k8s-app: kibana
- kubernetes.io/cluster-service: "true"
- addonmanager.kubernetes.io/mode: Reconcile
- kubernetes.io/name: "Kibana"
- srv: srv-kibana
- spec:
- type: NodePort #采用nodeport方式进行暴露,端口默认为25601
- ports:
- - port: 5601
- nodePort: 25601
- protocol: TCP
- targetPort: ui
- selector:
- k8s-app: kibana
- ---
- apiVersion: apps/v1
- kind: Deployment
- metadata:
- name: kibana
- namespace: kube-system
- labels:
- k8s-app: kibana
- kubernetes.io/cluster-service: "true"
- addonmanager.kubernetes.io/mode: Reconcile
- srv: srv-kibana
- spec:
- replicas: 1
- selector:
- matchLabels:
- k8s-app: kibana
- template:
- metadata:
- labels:
- k8s-app: kibana
- annotations:
- seccomp.security.alpha.kubernetes.io/pod: 'docker/default'
- spec:
- containers:
- - name: kibana
- image: docker.io/kubeimages/kibana:7.9.3 #该镜像支持arm64和amd64两种架构
- resources:
- # need more cpu upon initialization, therefore burstable class
- limits:
- cpu: 1000m
- requests:
- cpu: 100m
- env:
- - name: ELASTICSEARCH_HOSTS
- value: http://elasticsearch-logging:9200
- ports:
- - containerPort: 5601
- name: ui
- protocol: TCP
- ---
- apiVersion: extensions/v1beta1
- kind: Ingress
- metadata:
- name: kibana
- namespace: kube-system
- spec:
- rules:
- - host: kibana.ctnrs.com
- http:
- paths:
- - path: /
- backend:
- serviceName: kibana
- servicePort: 5601
- 使用刚才编写好的yaml创建kibana,可以看到最后生成了一个kibana-b7d98644-lshsz的pod,并且正常运行
- [root@k8s-master fek]# kubectl apply -f kibana.yaml
- deployment.apps/kibana created
- service/kibana created
- [root@k8s-master fek]# kubectl get pod -n kube-system
- NAME READY STATUS RESTARTS AGE
- coredns-5bd5f9dbd9-95flw 1/1 Running 0 17h
- elasticsearch-0 1/1 Running 1 16m
- kibana-b7d98644-48gtm 1/1 Running 1 17h
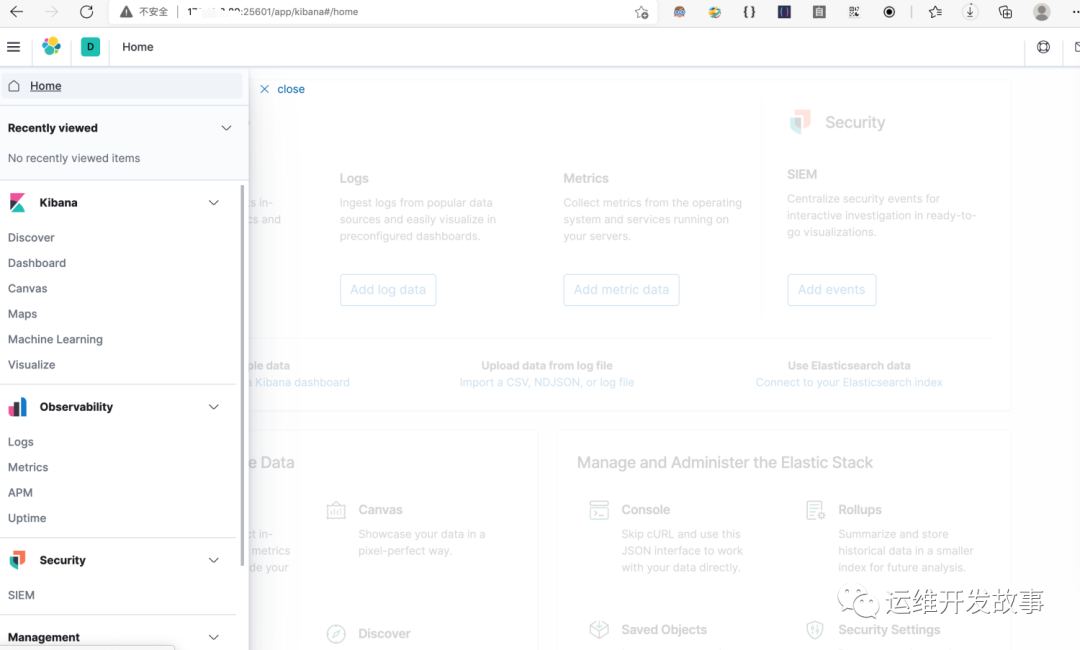
- 最后在浏览器中,输入http://(任意一节点的ip):25601,就会进入kibana的web界面,已设置了不需要进行登陆,当前页面都是全英文模式,可以修改上网搜一下修改配置文件的位置,建议使用英文版本
5.2 Node上部署一个filebeat采集器采集k8s组件日志
- es和kibana部署好了之后,我们如何采集pod日志呢,我们采用方案一的方式,是要在每一个node上中部署一个filebeat的采集器,采用的是7.9.3版本,除此之外我已经按照文中4小节里面的问题2中对docker或者containerd的runtime进行了标准的日志落盘
- [root@k8s-master fek]# cat filebeat.yaml
- ---
- apiVersion: v1
- kind: ConfigMap
- metadata:
- name: filebeat-config
- namespace: kube-system
- labels:
- k8s-app: filebeat
- data:
- filebeat.yml: |-
- filebeat.inputs:
- - type: container
- paths:
- - /var/log/containers/*.log #这里是filebeat采集挂载到pod中的日志目录
- processors:
- - add_kubernetes_metadata: #添加k8s的字段用于后续的数据清洗
- host: ${NODE_NAME}
- matchers:
- - logs_path:
- logs_path: "/var/log/containers/"
- #output.kafka: #如果日志量较大,es中的日志有延迟,可以选择在filebeat和logstash中间加入kafka
- # hosts: ["kafka-log-01:9092", "kafka-log-02:9092", "kafka-log-03:9092"]
- # topic: 'topic-test-log'
- # version: 2.0.0
- output.logstash: #因为还需要部署logstash进行数据的清洗,因此filebeat是把数据推到logstash中
- hosts: ["logstash:5044"]
- enabled: true
- ---
- # Source: filebeat/templates/filebeat-service-account.yaml
- apiVersion: v1
- kind: ServiceAccount
- metadata:
- name: filebeat
- namespace: kube-system
- labels:
- k8s-app: filebeat
- ---
- # Source: filebeat/templates/filebeat-role.yaml
- apiVersion: rbac.authorization.k8s.io/v1beta1
- kind: ClusterRole
- metadata:
- name: filebeat
- labels:
- k8s-app: filebeat
- rules:
- - apiGroups: [""] # "" indicates the core API group
- resources:
- - namespaces
- - pods
- verbs:
- - get
- - watch
- - list
- ---
- # Source: filebeat/templates/filebeat-role-binding.yaml
- apiVersion: rbac.authorization.k8s.io/v1beta1
- kind: ClusterRoleBinding
- metadata:
- name: filebeat
- subjects:
- - kind: ServiceAccount
- name: filebeat
- namespace: kube-system
- roleRef:
- kind: ClusterRole
- name: filebeat
- apiGroup: rbac.authorization.k8s.io
- ---
- # Source: filebeat/templates/filebeat-daemonset.yaml
- apiVersion: apps/v1
- kind: DaemonSet
- metadata:
- name: filebeat
- namespace: kube-system
- labels:
- k8s-app: filebeat
- spec:
- selector:
- matchLabels:
- k8s-app: filebeat
- template:
- metadata:
- labels:
- k8s-app: filebeat
- spec:
- serviceAccountName: filebeat
- terminationGracePeriodSeconds: 30
- containers:
- - name: filebeat
- image: docker.io/kubeimages/filebeat:7.9.3 #该镜像支持arm64和amd64两种架构
- args: [
- "-c", "/etc/filebeat.yml",
- "-e","-httpprof","0.0.0.0:6060"
- ]
- #ports:
- # - containerPort: 6060
- # hostPort: 6068
- env:
- - name: NODE_NAME
- valueFrom:
- fieldRef:
- fieldPath: spec.nodeName
- - name: ELASTICSEARCH_HOST
- value: elasticsearch-logging
- - name: ELASTICSEARCH_PORT
- value: "9200"
- securityContext:
- runAsUser: 0
- # If using Red Hat OpenShift uncomment this:
- #privileged: true
- resources:
- limits:
- memory: 1000Mi
- cpu: 1000m
- requests:
- memory: 100Mi
- cpu: 100m
- volumeMounts:
- - name: config #挂载的是filebeat的配置文件
- mountPath: /etc/filebeat.yml
- readOnly: true
- subPath: filebeat.yml
- - name: data #持久化filebeat数据到宿主机上
- mountPath: /usr/share/filebeat/data
- - name: varlibdockercontainers #这里主要是把宿主机上的源日志目录挂载到filebeat容器中,如果没有修改docker或者containerd的runtime进行了标准的日志落盘路径,可以把mountPath改为/var/lib
- mountPath: /data/var/
- readOnly: true
- - name: varlog #这里主要是把宿主机上/var/log/pods和/var/log/containers的软链接挂载到filebeat容器中
- mountPath: /var/log/
- readOnly: true
- - name: timezone
- mountPath: /etc/localtime
- volumes:
- - name: config
- configMap:
- defaultMode: 0600
- name: filebeat-config
- - name: varlibdockercontainers
- hostPath: #如果没有修改docker或者containerd的runtime进行了标准的日志落盘路径,可以把path改为/var/lib
- path: /data/var/
- - name: varlog
- hostPath:
- path: /var/log/
- # data folder stores a registry of read status for all files, so we don't send everything again on a Filebeat pod restart
- - name: inputs
- configMap:
- defaultMode: 0600
- name: filebeat-inputs
- - name: data
- hostPath:
- path: /data/filebeat-data
- type: DirectoryOrCreate
- - name: timezone
- hostPath:
- path: /etc/localtime
- tolerations: #加入容忍能够调度到每一个节点
- - effect: NoExecute
- key: dedicated
- operator: Equal
- value: gpu
- - effect: NoSchedule
- operator: Exists
- 部署之后,检查是否成功创建,能看到两个命名为filebeat-xx的pod副本分别创建在两个nodes上
- [root@k8s-master elk]# kubectl apply -f filebeat.yaml
- [root@k8s-master elk]# kubectl get pod -n kube-system
- NAME READY STATUS RESTARTS AGE
- coredns-5bd5f9dbd9-8zdn5 1/1 Running 0 10h
- elasticsearch-0 1/1 Running 1 13h
- filebeat-2q5tz 1/1 Running 0 13h
- filebeat-k6m27 1/1 Running 2 13h
- kibana-b7d98644-tllmm 1/1 Running 0 10h
5.3 增加logstash来对采集到的原始日志进行业务需要的清洗
- 这里主要是结合业务需要和对日志的二次利用,grafana展示,所以加入了logstash进行日志的清洗,需要是对ingrss的字段类型进行了转换,业务服务日志进行了字段的变更和类型转换,大家可以根据自己的业务需求进行调整
- [root@k8s-master fek]# cat logstash.yaml
- ---
- apiVersion: v1
- kind: Service
- metadata:
- name: logstash
- namespace: kube-system
- spec:
- ports:
- - port: 5044
- targetPort: beats
- selector:
- type: logstash
- clusterIP: None
- ---
- apiVersion: apps/v1
- kind: Deployment
- metadata:
- name: logstash
- namespace: kube-system
- spec:
- selector:
- matchLabels:
- type: logstash
- template:
- metadata:
- labels:
- type: logstash
- srv: srv-logstash
- spec:
- containers:
- - image: docker.io/kubeimages/logstash:7.9.3 #该镜像支持arm64和amd64两种架构
- name: logstash
- ports:
- - containerPort: 5044
- name: beats
- command:
- - logstash
- - '-f'
- - '/etc/logstash_c/logstash.conf'
- env:
- - name: "XPACK_MONITORING_ELASTICSEARCH_HOSTS"
- value: "http://elasticsearch-logging:9200"
- volumeMounts:
- - name: config-volume
- mountPath: /etc/logstash_c/
- - name: config-yml-volume
- mountPath: /usr/share/logstash/config/
- - name: timezone
- mountPath: /etc/localtime
- resources: #logstash一定要加上资源限制,避免对其他业务造成资源抢占影响
- limits:
- cpu: 1000m
- memory: 2048Mi
- requests:
- cpu: 512m
- memory: 512Mi
- volumes:
- - name: config-volume
- configMap:
- name: logstash-conf
- items:
- - key: logstash.conf
- path: logstash.conf
- - name: timezone
- hostPath:
- path: /etc/localtime
- - name: config-yml-volume
- configMap:
- name: logstash-yml
- items:
- - key: logstash.yml
- path: logstash.yml
- ---
- apiVersion: v1
- kind: ConfigMap
- metadata:
- name: logstash-conf
- namespace: kube-system
- labels:
- type: logstash
- data:
- logstash.conf: |-
- input {
- beats {
- port => 5044
- }
- }
- filter{
- # 处理ingress日志
- if [kubernetes][container][name] == "nginx-ingress-controller" {
- json {
- source => "message"
- target => "ingress_log"
- }
- if [ingress_log][requesttime] {
- mutate {
- convert => ["[ingress_log][requesttime]", "float"]
- }
- }
- if [ingress_log][upstremtime] {
- mutate {
- convert => ["[ingress_log][upstremtime]", "float"]
- }
- }
- if [ingress_log][status] {
- mutate {
- convert => ["[ingress_log][status]", "float"]
- }
- }
- if [ingress_log][httphost] and [ingress_log][uri] {
- mutate {
- add_field => {"[ingress_log][entry]" => "%{[ingress_log][httphost]}%{[ingress_log][uri]}"}
- }
- mutate{
- split => ["[ingress_log][entry]","/"]
- }
- if [ingress_log][entry][1] {
- mutate{
- add_field => {"[ingress_log][entrypoint]" => "%{[ingress_log][entry][0]}/%{[ingress_log][entry][1]}"}
- remove_field => "[ingress_log][entry]"
- }
- }
- else{
- mutate{
- add_field => {"[ingress_log][entrypoint]" => "%{[ingress_log][entry][0]}/"}
- remove_field => "[ingress_log][entry]"
- }
- }
- }
- }
- # 处理以srv进行开头的业务服务日志
- if [kubernetes][container][name] =~ /^srv*/ {
- json {
- source => "message"
- target => "tmp"
- }
- if [kubernetes][namespace] == "kube-system" {
- drop{}
- }
- if [tmp][level] {
- mutate{
- add_field => {"[applog][level]" => "%{[tmp][level]}"}
- }
- if [applog][level] == "debug"{
- drop{}
- }
- }
- if [tmp][msg]{
- mutate{
- add_field => {"[applog][msg]" => "%{[tmp][msg]}"}
- }
- }
- if [tmp][func]{
- mutate{
- add_field => {"[applog][func]" => "%{[tmp][func]}"}
- }
- }
- if [tmp][cost]{
- if "ms" in [tmp][cost]{
- mutate{
- split => ["[tmp][cost]","m"]
- add_field => {"[applog][cost]" => "%{[tmp][cost][0]}"}
- convert => ["[applog][cost]", "float"]
- }
- }
- else{
- mutate{
- add_field => {"[applog][cost]" => "%{[tmp][cost]}"}
- }
- }
- }
- if [tmp][method]{
- mutate{
- add_field => {"[applog][method]" => "%{[tmp][method]}"}
- }
- }
- if [tmp][request_url]{
- mutate{
- add_field => {"[applog][request_url]" => "%{[tmp][request_url]}"}
- }
- }
- if [tmp][meta._id]{
- mutate{
- add_field => {"[applog][traceId]" => "%{[tmp][meta._id]}"}
- }
- }
- if [tmp][project] {
- mutate{
- add_field => {"[applog][project]" => "%{[tmp][project]}"}
- }
- }
- if [tmp][time] {
- mutate{
- add_field => {"[applog][time]" => "%{[tmp][time]}"}
- }
- }
- if [tmp][status] {
- mutate{
- add_field => {"[applog][status]" => "%{[tmp][status]}"}
- convert => ["[applog][status]", "float"]
- }
- }
- }
- mutate{
- rename => ["kubernetes", "k8s"]
- remove_field => "beat"
- remove_field => "tmp"
- remove_field => "[k8s][labels][app]"
- }
- }
- output{
- elasticsearch {
- hosts => ["http://elasticsearch-logging:9200"]
- codec => json
- index => "logstash-%{+YYYY.MM.dd}" #索引名称以logstash+日志进行每日新建
- }
- }
- ---
- apiVersion: v1
- kind: ConfigMap
- metadata:
- name: logstash-yml
- namespace: kube-system
- labels:
- type: logstash
- data:
- logstash.yml: |-
- http.host: "0.0.0.0"
- xpack.monitoring.elasticsearch.hosts: http://elasticsearch-logging:9200
5.4 在kibana的web界面进行配置日志可视化
首先登录kibana界面之后,打开菜单中的stack management模块
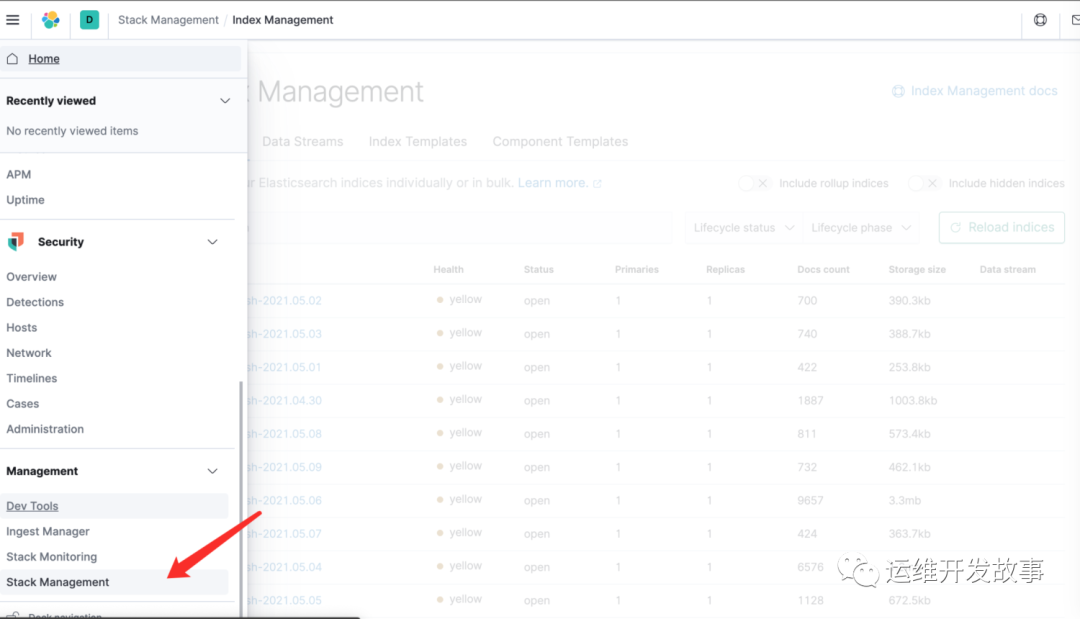
点开索引管理,可以发现,已经有采集到的日志索引了
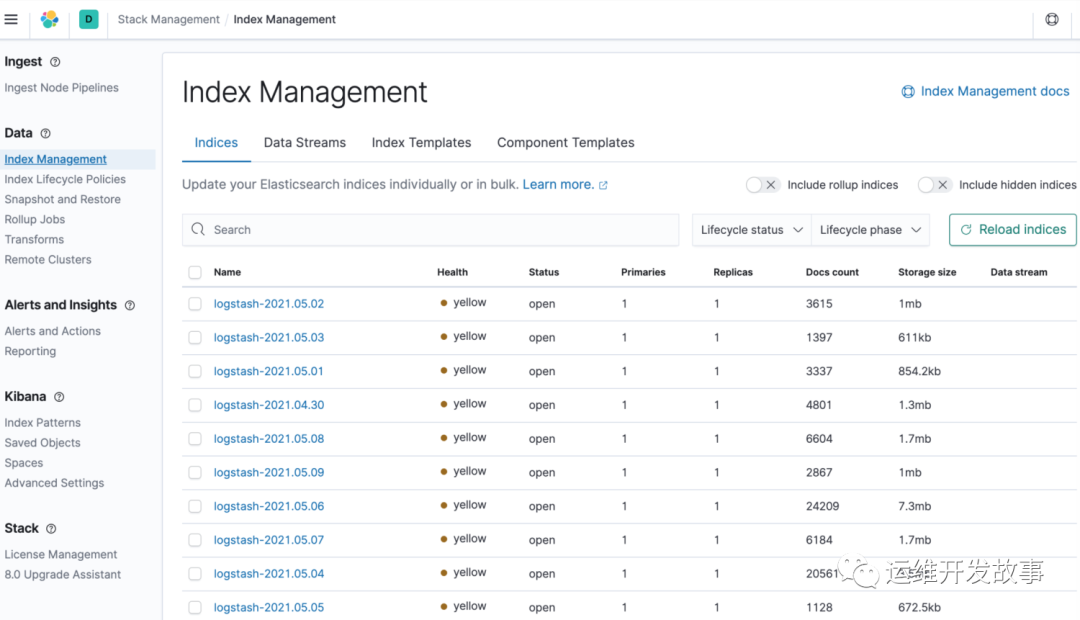
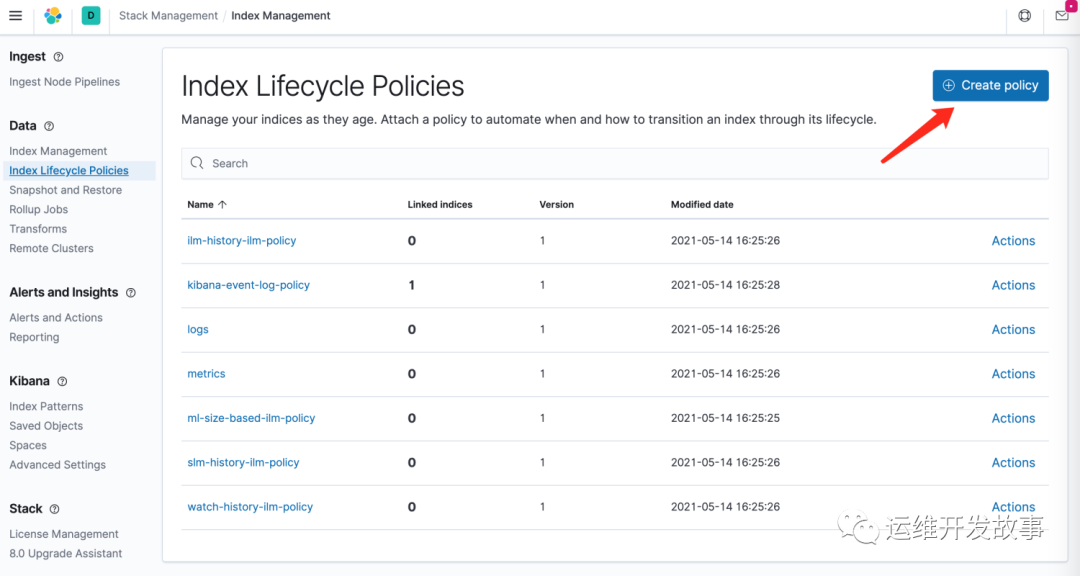
为避免es日志占用磁盘空间越来越大,因此我们可以根据业务需要增加一个索引生命周期策略,点击index lifecycle policites
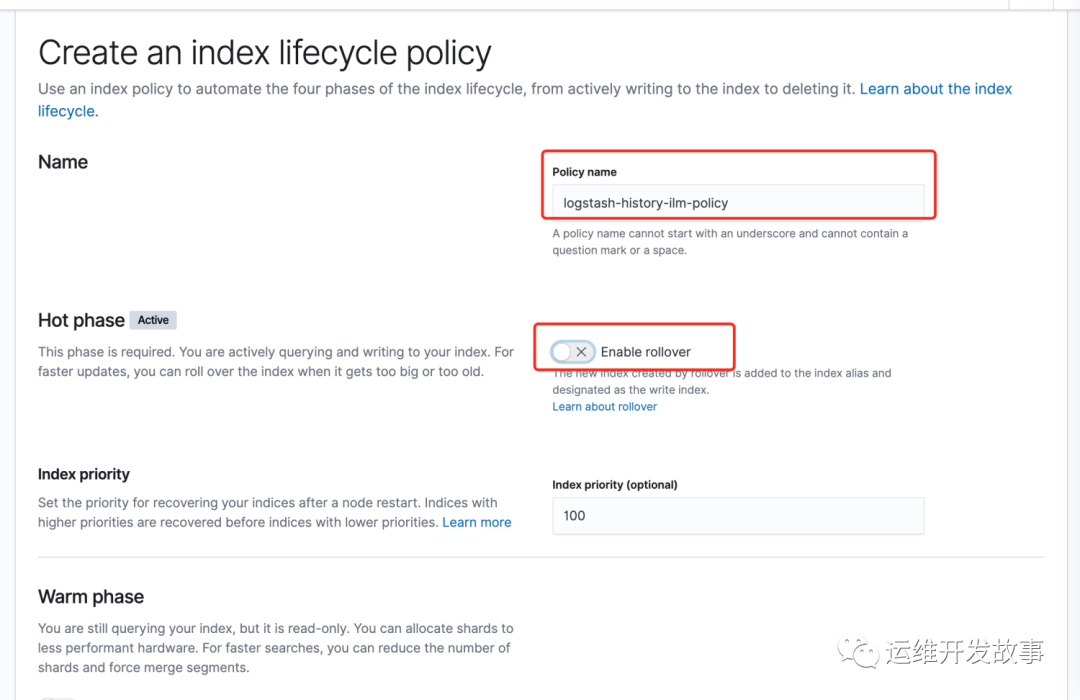
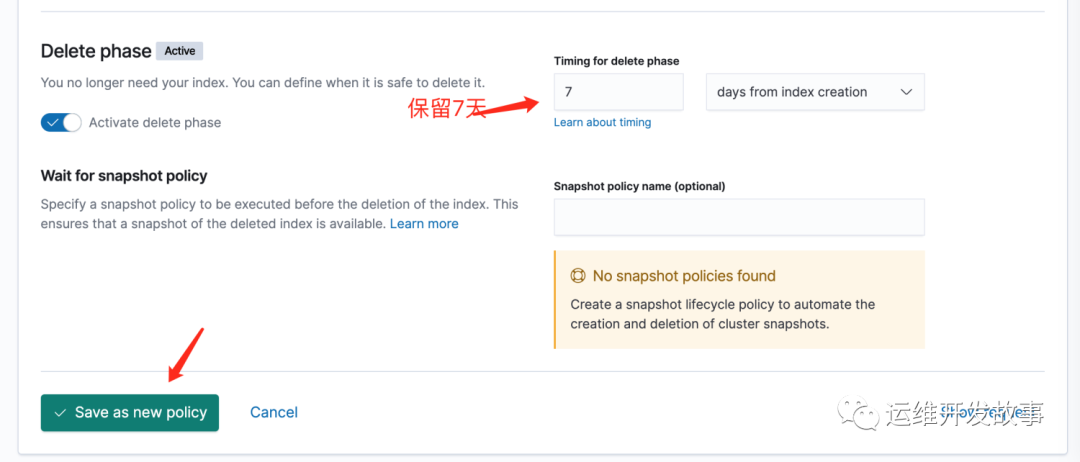
Policy name写为logstash-history-ilm-policy,不能随意更改,后续的模版中会引用
为了能够在kibana中能够discover查看日志,因此需要设置一个索引匹配,选择index patterns,然后创建
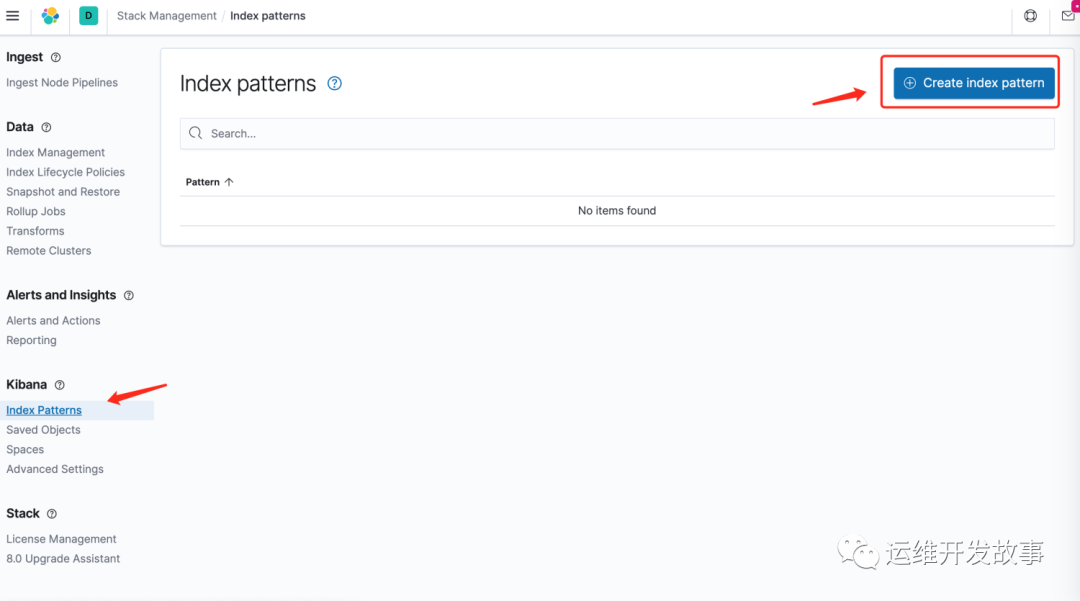
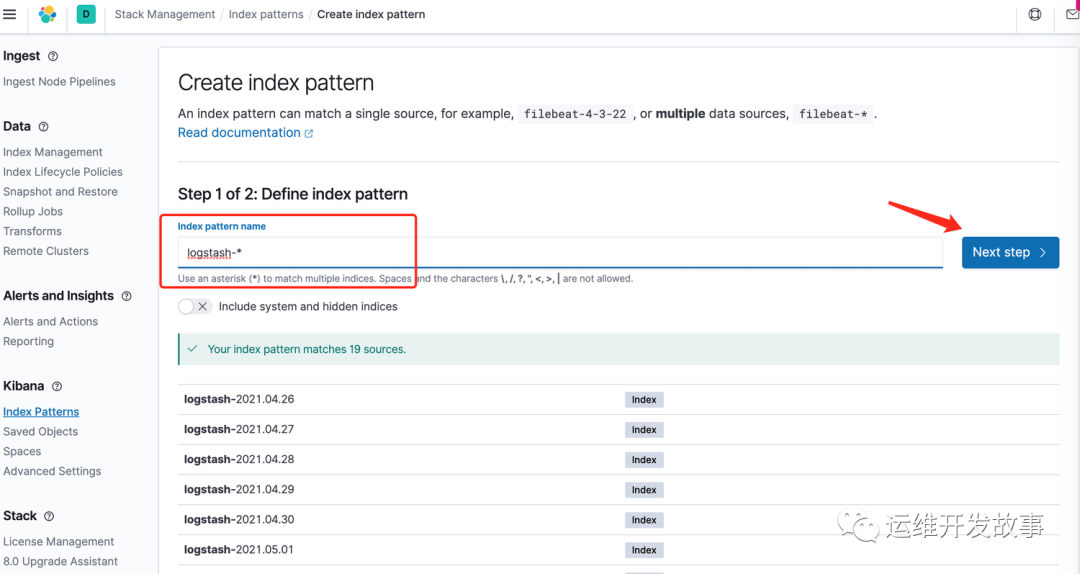
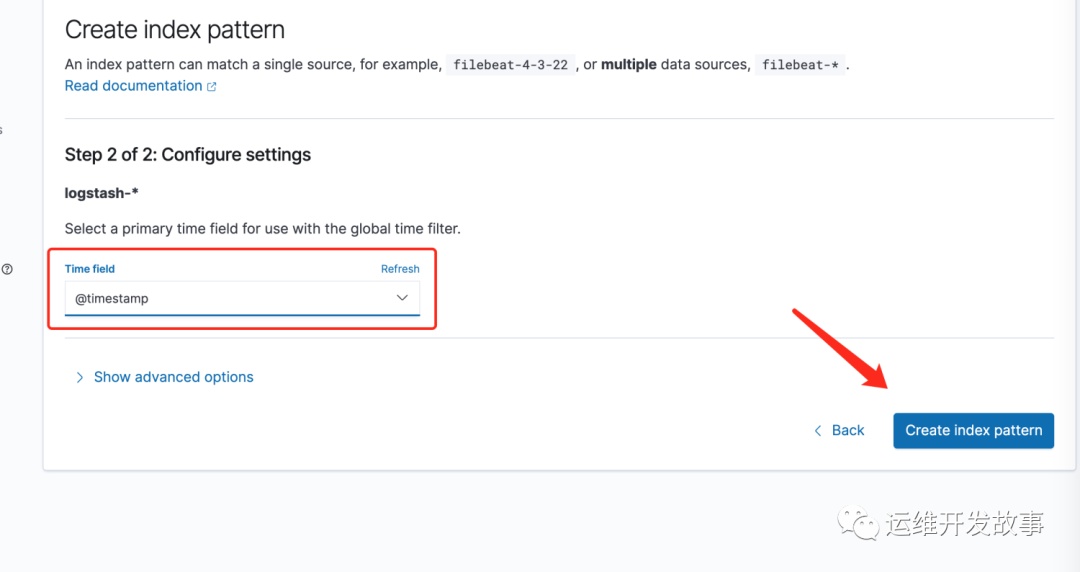
由于我们是部署的单节点,因此创建的索引使用默认的索引模版会产生一个1副本,所以会发现索引都是yellow,解决办法如下
在菜单中打开,dev tools
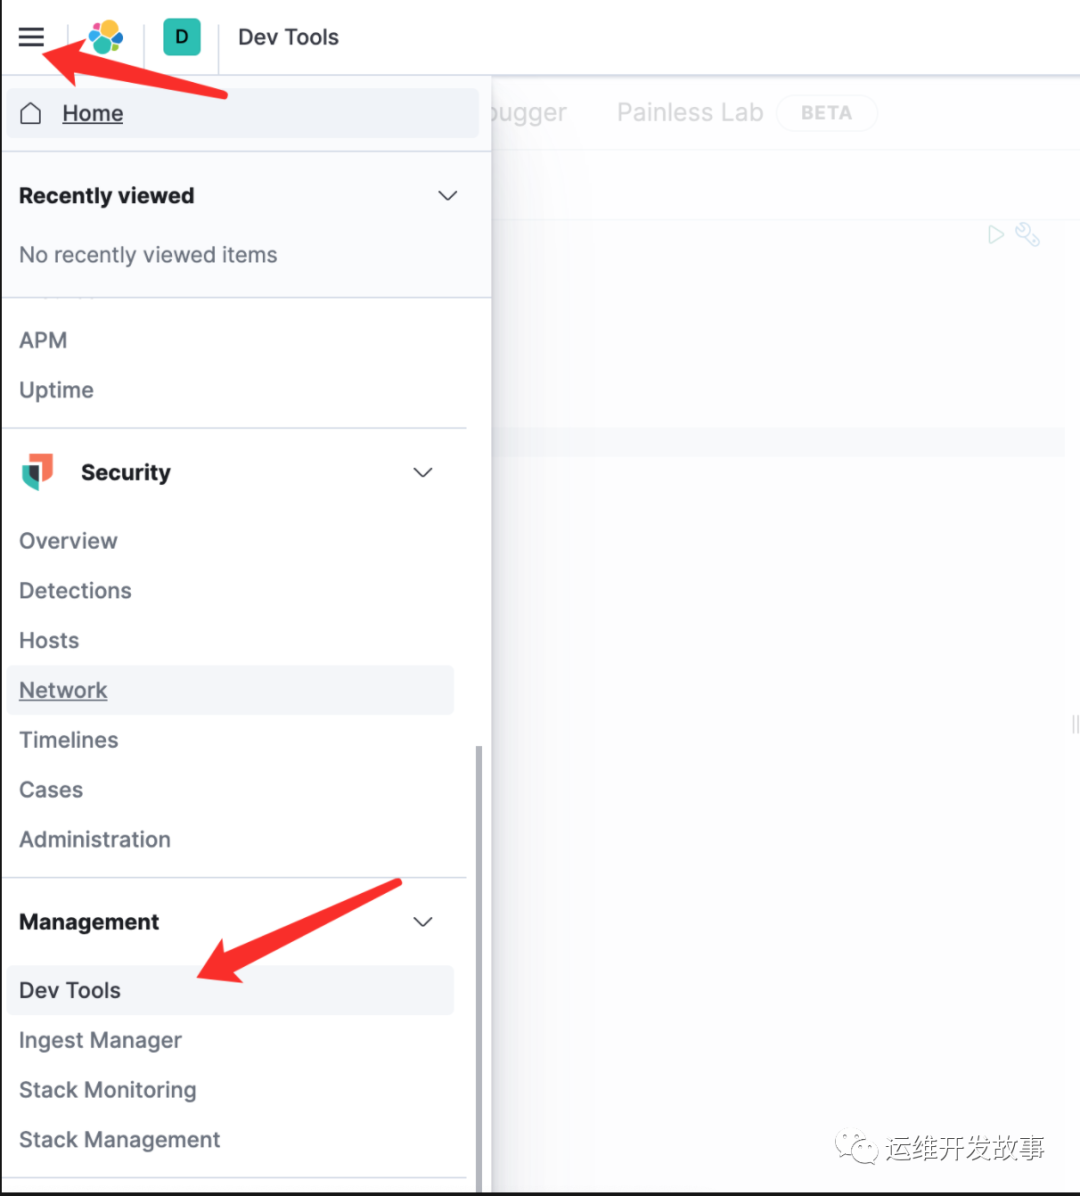
然后调用api进行更改,会把所有的索引副本数全部改为0

- PUT _all/_settings
- {
- "number_of_replicas": 0
- }
为了根本解决和链接索引生命周期策略,标准化日志字段中的map类型,因此我们需要修改默认的template
- PUT _template/logstash
- {
- "order": 1,
- "index_patterns": [
- "logstash-*"
- ],
- "settings": {
- "index": {
- "lifecycle" : {
- "name" : "logstash-history-ilm-policy"
- },
- "number_of_shards": "2",
- "refresh_interval": "5s",
- "number_of_replicas" : "0"
- }
- },
- "mappings": {
- "properties": {
- "@timestamp": {
- "type": "date"
- },
- "applog": {
- "dynamic": true,
- "properties": {
- "cost": {
- "type": "float"
- },
- "func": {
- "type": "keyword"
- },
- "method": {
- "type": "keyword"
- }
- }
- },
- "k8s": {
- "dynamic": true,
- "properties": {
- "namespace": {
- "type": "keyword"
- },
- "container": {
- "dynamic": true,
- "properties": {
- "name": {
- "type": "keyword"
- }
- }
- },
- "labels": {
- "dynamic": true,
- "properties": {
- "srv": {
- "type": "keyword"
- }
- }
- }
- }
- },
- "geoip": {
- "dynamic": true,
- "properties": {
- "ip": {
- "type": "ip"
- },
- "latitude": {
- "type": "float"
- },
- "location": {
- "type": "geo_point"
- },
- "longitude": {
- "type": "float"
- }
- }
- }
- }
- },
- "aliases": {}
- }
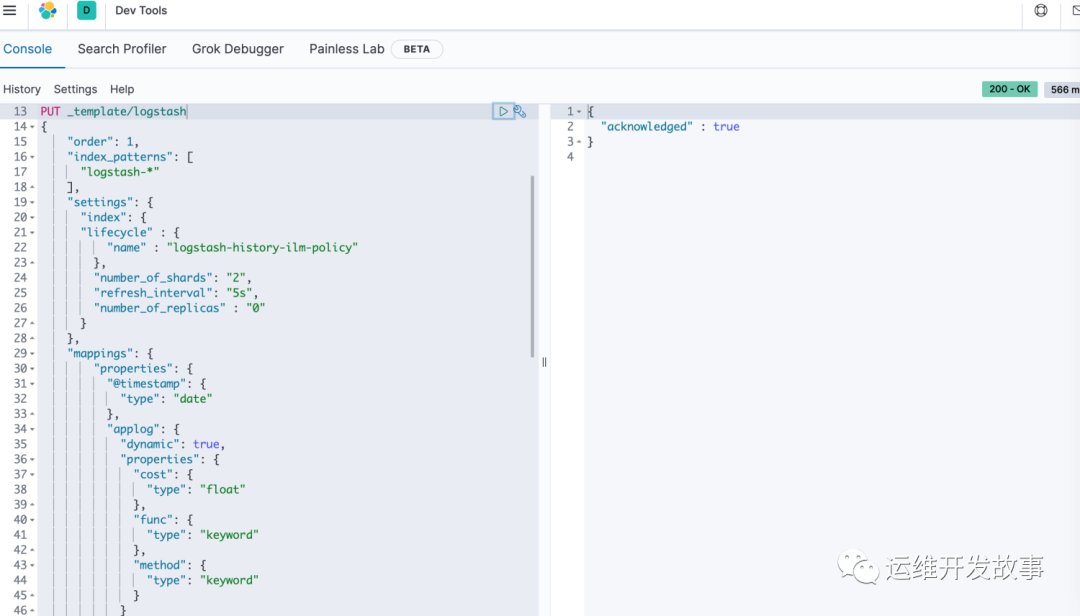
最后验证索引和discover
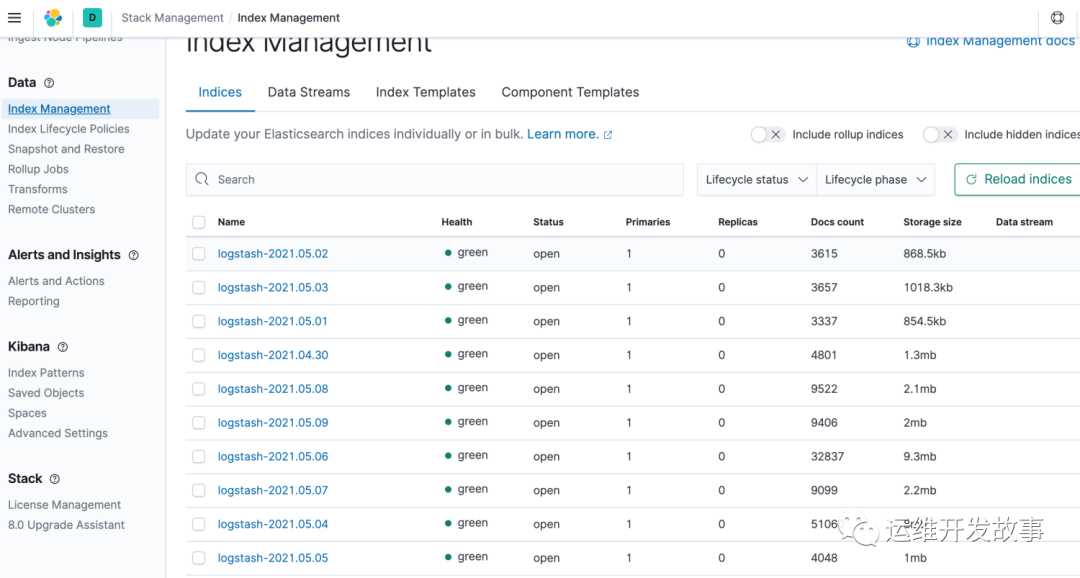
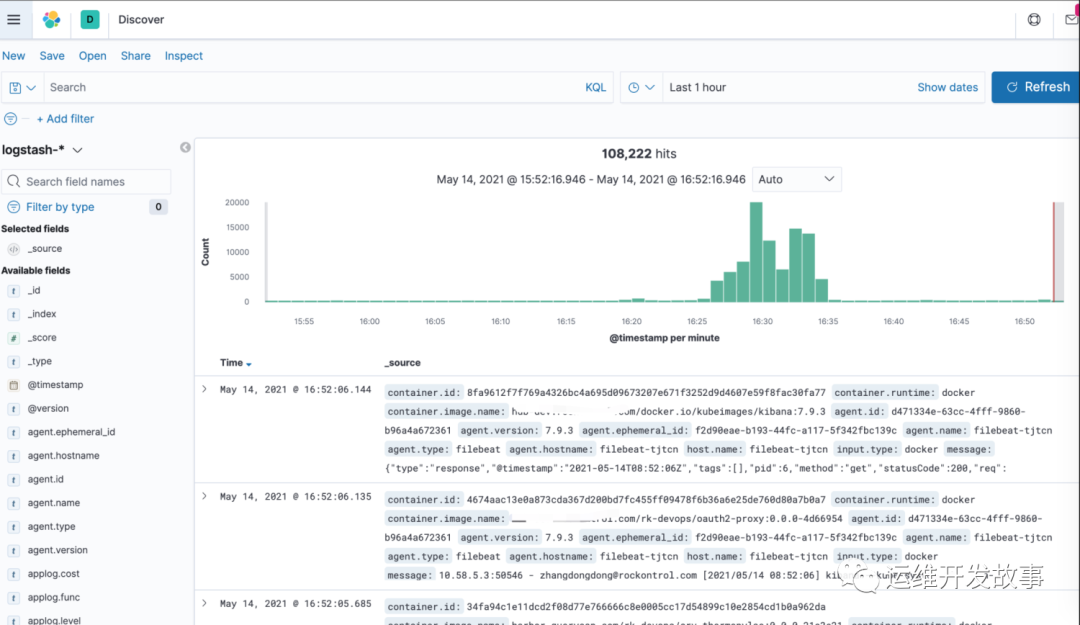
写在最后
日志采集只是业务可观测性中的一部分,并且对于日志不光有Elastic Stack,也有Loki、Splunk或者托管云上的日志收集方案等,条条大路通罗马,不管怎么做,最终到达效果即可,没有哪个方案绝对的好,只能是在什么业务场景最适合,最能反应出业务的问题,快速排查到业务上问题才是好的
本文转载自微信公众号「运维开发故事」,可以通过以下二维码关注。转载本文请联系运维开发故事公众号。


