本文转载自微信公众号「Python技术」,作者派森酱。转载本文请联系Python技术公众号。
人类和动物最本质的区别就是人类懂的制造并使用工具,这是由上古时代一直延续至今的基因所决定的。
前段时间朋友的一个业务需要大量的原创短视频,问我是否可以帮忙弄下,我了解了具体需求之后发现不需要很高质量的内容,操作也不是很复杂,完全可以通过 Python 实现自动化操作,也是就把这个事给应承了下来。
我们知道 PyAutoGUI 是一个通过编程方式来控制鼠标和键盘的 Python 库,那么就从它身上下手了。
安装
Win 和 macOS 的安装命令有所不同。
- ## windows
- py -m pip install pyautogui
- ## macOS
- python3 -m pip install pyautogui
屏幕位置
屏幕上的位置由笛卡尔坐标表示,X 坐标从左上角的 0 开始,向右增加,与数学不同,Y 坐标从左上角 0 开始,向下增加。
因此左上角的像素位于坐标(0,0),如果你的屏幕分辨率为 1920 x 1080,则右下角的像素将为(1919, 1079),因为像素是从坐标 0 开始的。屏幕分辨率大小可以通过 size() 函数获得,当前鼠标位置则可以通过 position() 函数获得。
- 0,0 X increases -->
- +---------------------------+
- | | Y increases
- | | |
- | 1920 x 1080 screen | |
- | | V
- | |
- | |
- +---------------------------+ 1919, 1079
- import pyautogui
- x, y = pyautogui.position()
- print(x, y)
- x, y = pyautogui.size()
- print(x, y)
- ## 输出结果
- 545 437
- 1440 900
鼠标移动
鼠标的移动则分为绝对坐标移动和相对坐标移动。
比如你想将鼠标移动到坐标(100,100)处,直接调用 moveTo 函数即可。
- import pyautogui
- # 将鼠标移动至(100,200)坐标处
- pyautogui.moveTo(100, 200)
- # 将鼠标移动至(100,500 坐标处
- pyautogui.moveTo(None, 500)
- # 将鼠标移动至(600,500)坐标处
- pyautogui.moveTo(600, None)
- # 将鼠标移动至(100,200)坐标处,该移动过程是一个持续性过程,耗时 2 秒
- pyautogui.moveTo(100, 200, 2)
而 move 函数则是简单的相对移动。
- import pyautogui
- # 将鼠标移动至(100,200)坐标处
- pyautogui.moveTo(100, 200)
- # 将鼠标向下移动 50 像素
- pyautogui.move(0, 50)
- # 将鼠标向左移动 30 像素
- pyautogui.move(-30, 0)
- # 将鼠标向左移动 30 像素
- pyautogui.move(-30, None)
鼠标拖拽
和鼠标移动相比,鼠标拖拽同样分为绝对坐标拖拽和相对坐标拖拽。同样 dragTo 函数使用绝对坐标,drag 使用相对坐标。
- import pyautogui
- # 按住鼠标左键将目标拖拽至(100,200)坐标处
- pyautogui.dragTo(100, 200, button='left')
- # 按住鼠标左键将目标拖拽至(100,200)坐标处,该移动过程是一个持续性过程,耗时 2 秒
- pyautogui.dragTo(100, 200, 2, button='left')
- # 按住鼠标右键将目标向右移动 30 个像素,该移动过程是一个持续性过程,耗时 2 秒
- pyautogui.drag(30, 0, 2, button='right')
鼠标点击
我们可以通过 click() 函数模拟鼠标单击。
- import pyautogui
- # 在当前位置单击左键
- pyautogui.click()
- # 将鼠标移动至(100,200)坐标处,然后单击左键
- # 但是这个方法有点奇怪,有时候会失灵,可以使用 moveTo + click
- pyautogui.click(x=100, y=200)
- # 在当前位置单双击左键
- pyautogui.doubleClick()
控制键盘
键盘控制一般常用的就是输入字符串,按下某个按键以及组合键。
- import pyautogui
- # 输入 “Hello World”
- pyautogui.write('Hello world!')
- # 按下 enter / F1 键
- pyautogui.press('enter')
- pyautogui.press('f1')
- # 组合按键 command + a
- pyautogui.hotkey('command', 'a')
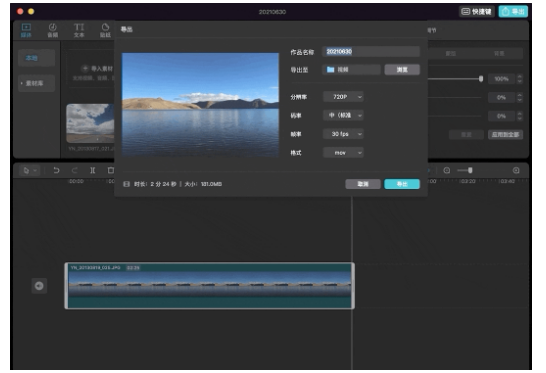
制作视频
有了以上的基础,就可以开始我们的视频制作了,这次使用的是剪映软件。
这里你需要熟悉一下剪映的操作步骤,基本分为三块:将指定图片拖入视频轨道、调整视频时长、导出。
最终效果如下:
- # coding=utf-8
- import time
- import pyautogui
- # 将图片拖入轨道
- def drag_img_to_track():
- # 选中图片
- pyautogui.moveTo(170, 270)
- pyautogui.doubleClick()
- # 拖拽图片至轨道
- pyautogui.dragTo(120, 600, 1, button='left')
- # 调整视频时长
- def drag_img_to_3_min():
- # 选中轨道中的第一张图
- pyautogui.moveTo(125, 600)
- pyautogui.click()
- # 拖拽至第三分钟
- pyautogui.moveTo(135, 600)
- pyautogui.dragTo(700, 600, 1, button='left')
- # 删除旧的素材
- def delete_top_img():
- # 删除轨道中的第二张图片
- pyautogui.moveTo(300, 160)
- pyautogui.doubleClick()
- pyautogui.press("backspace")
- # enter yes
- pyautogui.moveTo(650, 470)
- time.sleep(0.5)
- pyautogui.click()
- # 导出
- def export(name):
- pyautogui.moveTo(126, 600)
- pyautogui.click()
- pyautogui.hotkey('command', 'e')
- pyautogui.write(name)
- time.sleep(1)
- pyautogui.moveTo(800, 393)
- pyautogui.click()
- time.sleep(20)
- pyautogui.click()
- index = 0
- count = 2
- while index < count:
- drag_img_to_track()
- drag_img_to_3_min()
- delete_top_img()
- export(str(index))
- time.sleep(2)
- index += 1
- print("end..." + str(index))
总结
今天我们通过 pyautogui 实现了全自动制作视频,我们只需要将素材导入到剪映中即可。
由于 gif 大小限制,只录制了一小部分,你可以通过调整主函数中的 count 值来控制制作视频的个数。