项目环境搭建
运行 vue create [project-name] 来创建一个新项目。选择 "Manually selectfeatures" 和 "UnitTesting",以及 "Jest" 作为 test runner。
一旦安装完成,cd 进入项目目录中并运行 yarn test:unit。
通过 jest 配置文件:
\jest.config.js ==> node_modules\@vue\cli-plugin-unit-jest\jest-preset.js ==> \node_modules\@vue\cli-plugin-unit-jest\presets\default\jest-preset.js
jest-preset.js 文件就是 Vue 项目创建后,默认的 jest 配置文件:
- module.exports= {
- // 可加载模块的后缀名
- moduleFileExtensions: [
- 'js',
- 'jsx',
- 'json',
- // tell Jest to handle *.vue files
- 'vue'
- ],
- // 转换方式
- transform: {
- // process *.vue files with vue-jest
- // 如果.vue结尾的,使用vue-jest进行转换
- '^.+\\.vue$': require.resolve('vue-jest'),
- '.+\\.(css|styl|less|sass|scss|svg|png|jpg|ttf|woff|woff2)$':
- require.resolve('jest-transform-stub'),
- '^.+\\.jsx?$': require.resolve('babel-jest')
- },
- // 转换时忽略文件夹
- transformIgnorePatterns: ['/node_modules/'],
- // support the same @ -> src alias mapping in source code
- // webpack 的别名映射转换
- moduleNameMapper: {
- '^@/(.*)$':'<rootDir>/src/$1'
- },
- // 指定测试环境为 jsdom
- testEnvironment:'jest-environment-jsdom-fifteen',
- // serializer for snapshots
- // 快照序列化器
- // 使用 jest-serializer-vue 进行组件快照的序列化方式
- // 就是将组件转为字符串,后面进行快照测试时,就可以看到了
- snapshotSerializers: [
- 'jest-serializer-vue'
- ],
- // 测试代码文件在哪里
- testMatch: [
- '**/tests/unit/**/*.spec.[jt]s?(x)',
- '**/__tests__/*.[jt]s?(x)'
- ],
- // https://github.com/facebook/jest/issues/6766
- testURL:'http://localhost/',
- // 监视模式下的插件
- watchPlugins: [
- require.resolve('jest-watch-typeahead/filename'),
- require.resolve('jest-watch-typeahead/testname')
- ]
- }
快速体验
默认测试用例:tests\unit\example.spec.js
- //tests\unit\example.spec.js
- // 导入组件挂载器,不用手动写vue入口
- import { shallowMount } from'@vue/test-utils'
- // 导入要测试的组件
- import HelloWorld from'@/components/HelloWorld.vue'
- describe('HelloWorld.vue', () => {
- it('rendersprops.msg when passed', () => {
- const msg ='newmessage'
- const wrapper =shallowMount(HelloWorld, {
- props: { msg }
- })
- expect(wrapper.text()).toMatch(msg)
- })
- })
- $ npm runtest:unit
搭建完基本的 Vue 测试环境,在正式开始 Vue 测试之前,我们先了解一下测试开发的方法。
测试开发方式
测试不仅能够验证软件功能、保证代码质量,也能够影响软件开发的模式。
测试开发有两个流派:
- TDD:测试驱动开发,先写测试后实现功能
- BDD:行为驱动开发,先实现功能后写测试
什么是TDD
TDD(Test-driven development),就是测试驱动开发,是敏捷开发中的一项核心实践和技术,也是一种软件设计方法论。
它的原理就是在编写代码之前先编写测试用例,由测试来决定我们的代码。而且 TDD 更多地需要编写独立的测试用例,比如只测试一个组件的某个功能点,某个工具函数等。
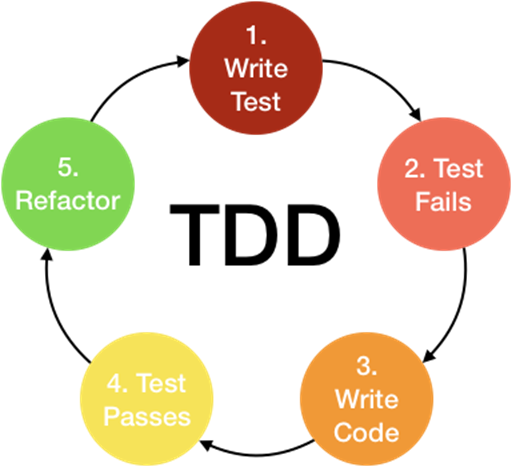
TDD开发流程:
- 编写测试用例
- 运行测试
- 编写代码使测试通过
- 重构/优化代码
- 新增功能,重复上述步骤
- // tests\unit\example.spec.js
- // 导入组件挂载器,不用手动写vue入口
- import { shallowMount } from'@vue/test-utils'
- // 导入要测试的组件
- import HelloWorld from'@/components/HelloWorld.vue'
- import {add} from'@/utiles/math.js'
- // 输入:1,2
- // 输出:3
- test('sum', () => {
- expect(add(1,2)).toBe(3)
- })
单纯运行测试代码肯定报错,有了测试代码,为了通过测试,再具体写 math 模块中的 add() 方法:
- // math.js
- functionadd (a, b) {
- return a + b
- }
- exportdefault add
Vue 3 的 TDD 测试用例
src\components\TodoHeader.vue 组件内容
- <template>
- <header>
- <h1>Todos</h1>
- <input
- v-model="inputValue"
- placeholder="What needs to be done?"
- data-testid="todo-input"
- @keyup.enter="handleNewTodo"
- />
- </header>
- </template>
测试用例:
tests\unit\example.spec.js
- // 导入组件挂载器,不用手动写vue入口
- import { shallowMount } from'@vue/test-utils'
- // 导入要测试的组件
- import HelloWorld from'@/components/HelloWorld.vue'
- import TodoHeader from'@/components/TodoHeader.vue'
- test('unit: new todo',async () => {
- const wrapper =shallowMount(TodoHeader) // 挂载渲染组件
- const input = wrapper.find('[data-testid="todo-input"]') // 查找input
- // 给input设置一个值
- const text ='helloworld'
- await input.setValue(text)
- // 触发事件
- await input.trigger('keyup.enter')
- // =========
- // 以上是具体操作,输入内容按下回车后,希望做什么?↓👇
- // =========
- // 验证应该发布一个对外的 new-todo 的事件
- expect(wrapper.emitted()['new-todo']).toBeTruthy()
- // 验证导出事件的参数是否是传入的值
- expect(wrapper.emitted()['new-todo'][0][0]).toBe(text)
- // 验证文本框内容是否清空
- expect(input.element.value).toBe('')
- })
src\components\TodoHeader.vue 组件内容
- exportdefault {
- data(){
- return {
- inputValue:''
- }
- },
- methods:{
- handleNewTodo(){
- if(this.inputValue.trim().length){
- // 发布对外的 new-todo 事件值为文本框输入内容
- this.$emit('new-todo',this.inputValue)
- this.inputValue=''
- }
- }
- }
- };


