内核驱动在安全方面占据重要的地位。本文实现一个枚举进程的函数。枚举进程不能在用户态下进行,需要到内核态下进行,这样就必须使用驱动程序来完成。先用WinDbg完成一次手动的枚举过程,再通过代码来完成。
1. 配置VMware和WinDbg进行驱动调试
使用WinDbg调试驱动程序或内核,需要双机进行调试。所谓双机,就是两台电脑。通常情况下,大部分人往往只有一台电脑。那么,解决的方法就是安装虚拟机,然后对虚拟机进行一些设置,也是可以通过WinDbg进行调试的。虚拟机选择使用VMware,下面介绍如何对虚拟机进行配置。
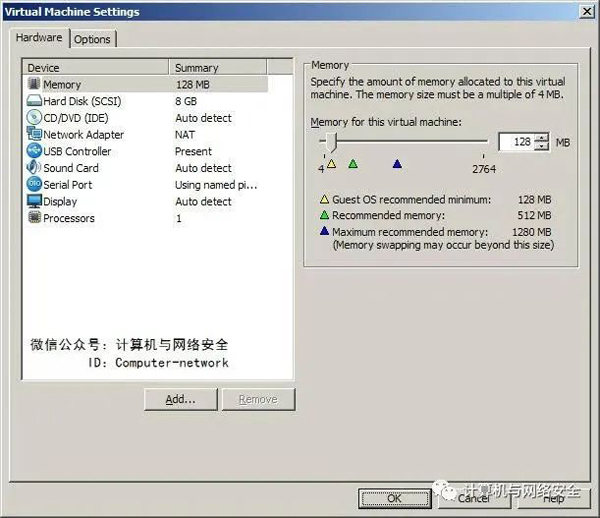
安装好VMware,并在VMware中安装好操作系统,然后对安装好的虚拟机进行一些设置。通过此设置可以达到调试器与虚拟机的连接。单击菜单“VM”→“Settings”命令,弹出“Virtual Machine Settings”对话框,如图1所示。
图1 “Virtual Machine Settings”对话框
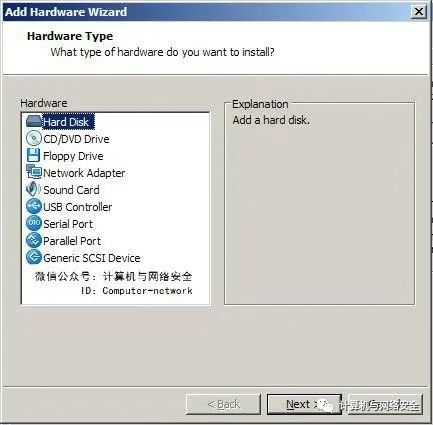
单击“Add”按钮,打开“Add Hardware Wizard”(添加硬件向导)对话框,如图2所示。
图2 “Add Hardware Wizard”对话框1
在该对话框中选择“Serial Port”选项,也就是串口,然后单击“Next”按钮,弹出“Add Hardware Wizard”对话框的第二个界面,如图3所示。
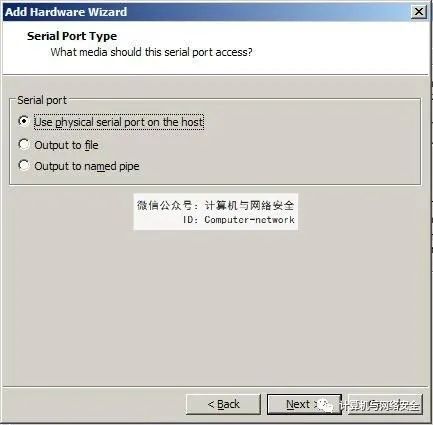
图3 “Add Hardware Wizard”对话框2
在该界面中选择“Output to named pipe”单选按钮,也就是命名管道。命名管道是Windows下进程通信的一种方法。选中该项后继续单击“Next”按钮,进入下一个界面,也是设置的最后一个界面,如图4所示。
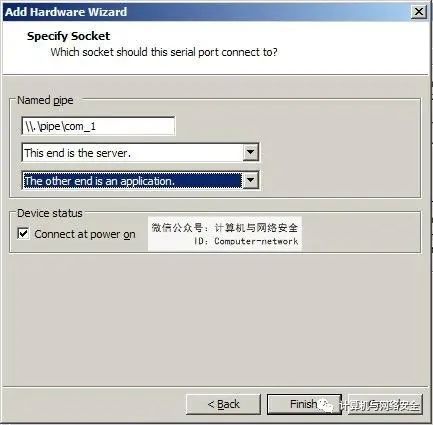
图4 “Add Hardware Wizard”对话框3
在这个界面中对命名管道进行设置,然后单击“Finish”按钮即可。至此,已经完成了一半的设置。接着,启动虚拟机配置Windows的Boot.ini文件。Boot.ini文件原内容如下:
- [boot loader]
- timeout=30
- default=multi(0)disk(0)rdisk(0)partition(1)\WINDOWS
- [operating systems]
- multi(0)disk(0)rdisk(0)partition(1)\WINDOWS="Microsoft Windows XP Professional" /fa
- stdetect /NoExecute=AlwaysOff
将最后一行复制,然后放到最后面,并进行修改。修改后的内容如下:
- [boot loader]
- timeout=30
- default=multi(0)disk(0)rdisk(0)partition(1)\WINDOWS
- [operating systems]
- multi(0)disk(0)rdisk(0)partition(1)\WINDOWS="Microsoft Windows XP Professional" /fa
- stdetect /NoExecute=AlwaysOff
- multi(0)disk(0)rdisk(0)partition(1)\WINDOWS="Microsoft Windows XP Professional" /fa
- stdetect /NoExecute=optin /debug /debugport=com1 /baudrate=115200
去掉Boot.ini文件的只读属性,然后保存Boot.ini文件。在下次需要对驱动进行调试,或者对内核进行调试时,选择启动Debug模式的Windows。
这里只介绍了针对Windows XP系统的配置方法。关于其他版本系统的配置方法,请自行参考相关内容。
至此,所有的配置工作都做好了,但是使用WinDbg进行连接时,还是要有连接参数的。先在桌面上创建一个WinDbg的快捷方式,然后在WinDbg快捷方式上单击右键,在弹出的快捷菜单中选择“属性”命令,弹出“属性”对话框,将“目标”位置改为:
- F:\WinDDK\7600.16385.0\Debuggers\windbg.exe -b -k com:port=\\.\pipe\com_1,baud= 115200,pipe
这样就可以用WinDbg连接虚拟机中调试状态下的Windows XP了。
2. EPROCESS和手动遍历进程
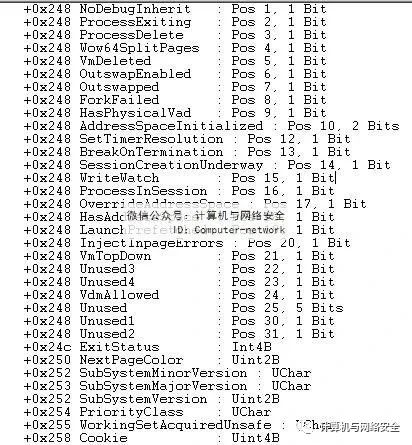
Windows中有一个非常大的与进程有关的结构体——EPROCESS。每个进程对应一个EPROCESS结构,但EPROCESS是一个系统未公开的结构体,在WDK中只能找到说明,而找不到其结构体的具体定义,因此需要通过WinDbg来查看。这次使用WinDbg和VMware进行调试。按照前面的方法,使WinDbg和VMware可以连接。当WinDbg出现调试界面时,在其命令处输入dt _eprocess命令来查看该结构体,如图5所示。
图5 WinDbg显示的部分EPROCESS结构体
从图中可以看出,EPROCESS结构体显示出非常多的内容,从WinDbg调试界面只能看到部分成员变量,而且偏移已经到了0x258,非常多。看一下WinDbg的全部内容。
- kd> dt _eprocess
- nt!_EPROCESS
- +0x000 Pcb : _KPROCESS // 进程控制块
- +0x06c ProcessLock : _EX_PUSH_LOCK
- +0x070 CreateTime : _LARGE_INTEGER
- +0x078 ExitTime : _LARGE_INTEGER
- +0x080 RundownProtect : _EX_RUNDOWN_REF
- +0x084 UniqueProcessId : Ptr32 Void // 进程 ID
- +0x088 ActiveProcessLinks : _LIST_ENTRY // 活动进程链表
- +0x090 QuotaUsage : [3] Uint4B
- +0x09c QuotaPeak : [3] Uint4B
- +0x0a8 CommitCharge : Uint4B
- +0x0ac PeakVirtualSize : Uint4B
- +0x0b0 VirtualSize : Uint4B
- +0x0b4 SessionProcessLinks : _LIST_ENTRY
- +0x0bc DebugPort : Ptr32 Void
- +0x0c0 ExceptionPort : Ptr32 Void
- +0x0c4 ObjectTable : Ptr32 _HANDLE_TABLE
- +0x0c8 Token : _EX_FAST_REF
- +0x0cc WorkingSetLock : _FAST_MUTEX
- +0x0ec WorkingSetPage : Uint4B
- +0x0f0 AddressCreationLock : _FAST_MUTEX
- +0x110 HyperSpaceLock : Uint4B
- +0x114 ForkInProgress : Ptr32 _ETHREAD
- +0x118 HardwareTrigger : Uint4B
- +0x11c VadRoot : Ptr32 Void
- +0x120 VadHint : Ptr32 Void
- +0x124 CloneRoot : Ptr32 Void
- +0x128 NumberOfPrivatePages : Uint4B
- +0x12c NumberOfLockedPages : Uint4B
- +0x130 Win32Process : Ptr32 Void
- +0x134 Job : Ptr32 _EJOB
- +0x138 SectionObject : Ptr32 Void
- +0x13c SectionBaseAddress : Ptr32 Void
- +0x140 QuotaBlock : Ptr32 _EPROCESS_QUOTA_BLOCK
- +0x144 WorkingSetWatch : Ptr32 _PAGEFAULT_HISTORY
- +0x148 Win32WindowStation : Ptr32 Void
- +0x14c InheritedFromUniqueProcessId : Ptr32 Void
- +0x150 LdtInformation : Ptr32 Void
- +0x154 VadFreeHint : Ptr32 Void
- +0x158 VdmObjects : Ptr32 Void
- +0x15c DeviceMap : Ptr32 Void
- +0x160 PhysicalVadList : _LIST_ENTRY
- +0x168 PageDirectoryPte : _HARDWARE_PTE
- +0x168 Filler : Uint8B
- +0x170 Session : Ptr32 Void
- +0x174 ImageFileName : [16] UChar // 进程名
- +0x184 JobLinks : _LIST_ENTRY
- +0x18c LockedPagesList : Ptr32 Void
- +0x190 ThreadListHead : _LIST_ENTRY
- +0x198 SecurityPort : Ptr32 Void
- +0x19c PaeTop : Ptr32 Void
- +0x1a0 ActiveThreads : Uint4B
- +0x1a4 GrantedAccess : Uint4B
- +0x1a8 DefaultHardErrorProcessing : Uint4B
- +0x1ac LastThreadExitStatus : Int4B
- +0x1b0 Peb : Ptr32 _PEB // 进程环境块
- +0x1b4 PrefetchTrace : _EX_FAST_REF
- +0x1b8 ReadOperationCount : _LARGE_INTEGER
- +0x1c0 WriteOperationCount : _LARGE_INTEGER
- +0x1c8 OtherOperationCount : _LARGE_INTEGER
- +0x1d0 ReadTransferCount : _LARGE_INTEGER
- +0x1d8 WriteTransferCount : _LARGE_INTEGER
- +0x1e0 OtherTransferCount : _LARGE_INTEGER
- +0x1e8 CommitChargeLimit : Uint4B
- +0x1ec CommitChargePeak : Uint4B
- +0x1f0 AweInfo : Ptr32 Void
- +0x1f4 SeAuditProcessCreationInfo : _SE_AUDIT_PROCESS_CREATION_INFO
- +0x1f8 Vm : _MMSUPPORT
- +0x238 LastFaultCount : Uint4B
- +0x23c ModifiedPageCount : Uint4B
- +0x240 NumberOfVads : Uint4B
- +0x244 JobStatus : Uint4B
- +0x248 Flags : Uint4B
- +0x248 CreateReported : Pos 0, 1 Bit
- +0x248 NoDebugInherit : Pos 1, 1 Bit
- +0x248 ProcessExiting : Pos 2, 1 Bit
- +0x248 ProcessDelete : Pos 3, 1 Bit
- +0x248 Wow64SplitPages : Pos 4, 1 Bit
- +0x248 VmDeleted : Pos 5, 1 Bit
- +0x248 OutswapEnabled : Pos 6, 1 Bit
- +0x248 Outswapped : Pos 7, 1 Bit
- +0x248 ForkFailed : Pos 8, 1 Bit
- +0x248 HasPhysicalVad : Pos 9, 1 Bit
- +0x248 AddressSpaceInitialized : Pos 10, 2 Bits
- +0x248 SetTimerResolution : Pos 12, 1 Bit
- +0x248 BreakOnTermination : Pos 13, 1 Bit
- +0x248 SessionCreationUnderway : Pos 14, 1 Bit
- +0x248 WriteWatch : Pos 15, 1 Bit
- +0x248 ProcessInSession : Pos 16, 1 Bit
- +0x248 OverrideAddressSpace : Pos 17, 1 Bit
- +0x248 HasAddressSpace : Pos 18, 1 Bit
- +0x248 LaunchPrefetched : Pos 19, 1 Bit
- +0x248 InjectInpageErrors : Pos 20, 1 Bit
- +0x248 VmTopDown : Pos 21, 1 Bit
- +0x248 Unused3 : Pos 22, 1 Bit
- +0x248 Unused4 : Pos 23, 1 Bit
- +0x248 VdmAllowed : Pos 24, 1 Bit
- +0x248 Unused : Pos 25, 5 Bits
- +0x248 Unused1 : Pos 30, 1 Bit
- +0x248 Unused2 : Pos 31, 1 Bit
- +0x24c ExitStatus : Int4B
- +0x250 NextPageColor : Uint2B
- +0x252 SubSystemMinorVersion : UChar
- +0x253 SubSystemMajorVersion : UChar
- +0x252 SubSystemVersion : Uint2B
- +0x254 PriorityClass : UChar
- +0x255 WorkingSetAcquiredUnsafe : UChar
- +0x258 Cookie : Uint4B
上面就是EPROCESS结构体的全部。对于遍历进程列表来说,有用的只有几个内容,首先是偏移0x84处的进程ID,然后是偏移0x88处的进程链表,最后一个是偏移0x174的进程名。下面手动进行一次遍历。
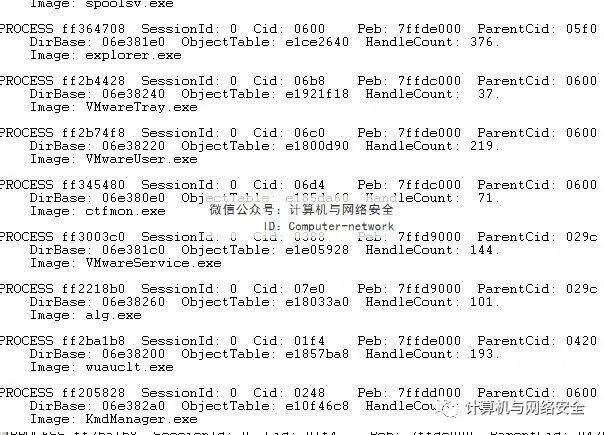
在WinDbg的命令输入提示处输入! Process 0 0命令,得到进程的列表,如图6所示。
图6 进程信息
PROCESS后面给出的值就是当前进程中EPROCESS的地址,选择explorer.exe进程给出的地址0xff364708来解析EPROCESS。输入命令dt _eprocess ff364708,输出如下:
- kd> dt _eprocess ff364708
- nt!_EPROCESS
- +0x000 Pcb : _KPROCESS
- +0x06c ProcessLock : _EX_PUSH_LOCK
- +0x070 CreateTime : _LARGE_INTEGER 0x1cb6af5`91d56cea
- +0x078 ExitTime : _LARGE_INTEGER 0x0
- +0x080 RundownProtect : _EX_RUNDOWN_REF
- +0x084 UniqueProcessId : 0x00000600
- +0x088 ActiveProcessLinks : _LIST_ENTRY [ 0xff2b44b0 - 0xff3640a8 ]
- <部分省略>
- +0x174 ImageFileName : [16] "explorer.exe"
- <部分省略>
- +0x1b0 Peb : 0x7ffde000 _PEB
- <后面省略>
可以看到,按照EPROCESS结构体解析ff364708地址,输出了需要的内容。接着,通过ActiveProcessLinks获取下一个进程的信息。输入命令dd ff364708 + 0x88,输出如下:
- kd> dd ff364708 + 0x88
- ff364790 ff2b44b0 ff3640a8 00002940 00021944
- ff3647a0 00000a92 00003940 00024cb4 00000bf8
- ff3647b0 00000a92 05e04000 0563a000 ff2b44dc
- ff3647c0 ff3640d4 00000000 e15b6eb8 e1ce2640
- ff3647d0 e166f389 00000001 f39a5440 00000000
- ff3647e0 00040001 00000000 ff3647e8 ff3647e8
- ff3647f0 0000003d 000059ca 00000001 f39a5440
- ff364800 00000000 00040001 00000000 ff36480c
ff364790地址处保存了下一个EPROCESS结构体ActiveProcessLinks的地址。要得到下一个EPROCESS的地址,必须减去0x88才行。输入命令dt _eprocess (ff2b44b0 – 0x88),输出如下:
- kd> dt _eprocess (ff2b44b0 - 0x88)
- nt!_EPROCESS
- +0x000 Pcb : _KPROCESS
- +0x06c ProcessLock : _EX_PUSH_LOCK
- +0x070 CreateTime : _LARGE_INTEGER 0x1cb6af5`95026ecc
- +0x078 ExitTime : _LARGE_INTEGER 0x0
- +0x080 RundownProtect : _EX_RUNDOWN_REF
- +0x084 UniqueProcessId : 0x000006b8
- +0x088 ActiveProcessLinks : _LIST_ENTRY [ 0xff2b7580 - 0xff364790 ]
- <后面省略>
- +0x174 ImageFileName : [16] "VMwareTray.exe"
- <后面省略>
将输出结果和图6中的结果对比,explorer.exe的下一个进程为VMwareTray.exe。可见遍历方法是正确的。
3. 编程实现进程遍历
上面介绍的手动遍历过程就是指导用户如何编写代码的,只要能够掌握上面的手动遍历过程,那么代码的编写也就不是问题了。下面直接看代码:
- NTSTATUS DriverEntry(
- PDRIVER_OBJECT pDriverObject,
- PUNICODE_STRING pRegistryPath)
- {
- PEPROCESS pEprocess = NULL;
- PEPROCESS pFirstEprocess = NULL;
- ULONG ulProcessName = 0;
- ULONG ulProcessId = 0;
- pDriverObject->DriverUnloadDriverUnload = DriverUnload;
- pEprocess = PsGetCurrentProcess();
- if ( pEprocess == 0 )
- {
- KdPrint(("PsGetcurrentProcess Error ! \r\n"));
- return STATUS_SUCCESS;
- }
- pFirstEprocess = pEprocess;
- while ( pEprocess != NULL )
- {
- ulProcessName = (ULONG)pEprocess + 0x174;
- ulProcessId = *(ULONG *)((ULONG)pEprocess + 0x84);
- KdPrint(("ProcessName = %s, ProcessId = %d \r\n", ulProcessName, ulProcessId));
- pEprocess = (ULONG)( *(ULONG *)((ULONG)pEprocess + 0x88) - 0x88);
- if ( pEprocess == pFirstEprocess || (*(LONG *)((LONG)pEprocess + 0x84)) < 0 )
- {
- break ;
- }
- }
- return STATUS_SUCCESS;
- }
代码中用到了一个函数,就是PsGetCurrentProcess()。这个函数是用来获取当前进程的EPROCESS指针的,其定义如下:
- PEPROCESS PsGetCurrentProcess(VOID);
通过PsGetCurrentProcess()函数获得的是system进程的EPROCESS,大多数内核模式系统线程都在system进程中。除了这个函数没有接触过以外,剩下的部分就是对EPROCESS结构体的操作,这里不做过多的介绍。实现进程内DLL文件的隐藏方法是将指定DLL在DLL链表中“脱链”。为了隐藏进程,同样可以将指定进程的EPROCESS结构体在进程链表中“脱链”,以达到隐藏的目的。


