tapable 是一个类似于 Node.js 中的 EventEmitter 的库,但更专注于自定义事件的触发和处理。webpack 通过 tapable 将实现与流程解耦,所有具体实现通过插件的形式存在。
Tapable 和 webpack 的关系
webpack 是什么?
本质上,webpack 是一个用于现代 JavaScript 应用程序的 静态模块打包工具。当 webpack 处理应用程序时,它会在内部构建一个 依赖图(dependency graph),此依赖图对应映射到项目所需的每个模块,并生成一个或多个 bundle。
webpack 的重要模块
- 入口(entry)
- 输出(output)
- loader(对模块的源代码进行转换)
- plugin(webpack 构建流程中的特定时机注入扩展逻辑来改变构建结果或做你想要的事)
插件(plugin)是 webpack 的支柱功能。webpack 自身也是构建于你在 webpack 配置中用到的相同的插件系统之上。
webpack 的构建流程
webpack 本质上是一种事件流的机制,它的工作流程就是将各个插件串联起来,而实现这一切的核心就是 Tapable。webpack 中最核心的负责编译的 Compiler 和负责创建 bundle 的 Compilation 都是 Tapable 的实例(webpack5 前)。webpack5 之后是通过定义属性名为 hooks 来调度触发时机。Tapable 充当的就是一个复杂的发布订阅者模式
以 Compiler 为例:
// webpack5 前,通过继承
...
const {
 Tapable,
 SyncHook,
 SyncBailHook,
 AsyncParallelHook,
 AsyncSeriesHook
} = require("tapable");
...
class Compiler extends Tapable {
 constructor(context) {
  super();
  ...
 }
}

// webpack5
...
const {
 SyncHook,
 SyncBailHook,
 AsyncParallelHook,
 AsyncSeriesHook
} = require("tapable");
...
class Compiler {
 constructor(context) {
  this.hooks = Object.freeze({
   /** @type {SyncHook<[]>} */
   initialize: new SyncHook([]),

   /** @type {SyncBailHook<[Compilation], boolean>} */
   shouldEmit: new SyncBailHook(["compilation"]),
   ...
  })
 }
 ...
}
- 1.
- 2.
- 3.
- 4.
- 5.
- 6.
- 7.
- 8.
- 9.
- 10.
- 11.
- 12.
- 13.
- 14.
- 15.
- 16.
- 17.
- 18.
- 19.
- 20.
- 21.
- 22.
- 23.
- 24.
- 25.
- 26.
- 27.
- 28.
- 29.
- 30.
- 31.
- 32.
- 33.
- 34.
- 35.
- 36.
- 37.
- 38.
- 39.
Tapable 的使用姿势
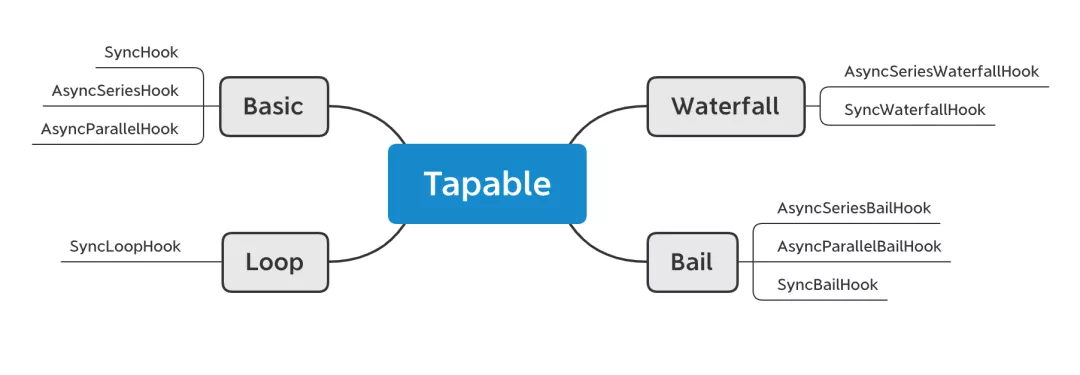
tapable 对外暴露了 9 种 Hooks 类。这些 Hooks 类的作用就是通过实例化来创建一个执行流程,并提供注册和执行方法,Hook 类的不同会导致执行流程的不同。
const {
 SyncHook,
 SyncBailHook,
 SyncWaterfallHook,
 SyncLoopHook,
 AsyncParallelHook,
 AsyncParallelBailHook,
 AsyncSeriesHook,
 AsyncSeriesBailHook,
 AsyncSeriesWaterfallHook
 } = require("tapable");
- 1.
- 2.
- 3.
- 4.
- 5.
- 6.
- 7.
- 8.
- 9.
- 10.
- 11.
每个 hook 都能被注册多次,如何被触发取决于 hook 的类型
按同步、异步(串行、并行)分类
- Sync:只能被同步函数注册,如 myHook.tap()
- AsyncSeries:可以被同步的,基于回调的,基于 promise 的函数注册,如 myHook.tap(),myHook.tapAsync() , myHook.tapPromise()。执行顺序为串行
- AsyncParallel:可以被同步的,基于回调的,基于 promise 的函数注册,如 myHook.tap(),myHook.tapAsync() , myHook.tapPromise()。执行顺序为并行

按执行模式分类
- Basic:执行每一个事件函数,不关心函数的返回值

- Bail:执行每一个事件函数,遇到第一个结果 result !== undefined 则返回,不再继续执行
- Waterfall:如果前一个事件函数的结果 result !== undefined,则 result 会作为后一个事件函数的第一个参数

- Loop:不停的循环执行事件函数,直到所有函数结果 result === undefined

使用方式
Hook 类
使用简单来说就是下面步骤
- 实例化构造函数 Hook
- 注册(一次或者多次)
- 执行(传入参数)
- 如果有需要还可以增加对整个流程(包括注册和执行)的监听-拦截器
以最简单的 SyncHook 为例:
// 简单来说就是实例化 Hooks 类
// 接收一个可选参数,参数是一个参数名的字符串数组
const hook = new SyncHook(["arg1", "arg2", "arg3"]);
// 注册
// 第一个入参为注册名
// 第二个为注册回调方法
hook.tap("1", (arg1, arg2, arg3) => {
  console.log(1, arg1, arg2, arg3);
  return 1;
});
hook.tap("2", (arg1, arg2, arg3) => {
  console.log(2, arg1, arg2, arg3);
  return 2;
});
hook.tap("3", (arg1, arg2, arg3) => {
  console.log(3, arg1, arg2, arg3);
  return 3;
});
// 执行
// 执行顺序则是根据这个实例类型来决定的
hook.call("a", "b", "c");

//------输出------
// 先注册先触发
1 a b c
2 a b c
3 a b c
- 1.
- 2.
- 3.
- 4.
- 5.
- 6.
- 7.
- 8.
- 9.
- 10.
- 11.
- 12.
- 13.
- 14.
- 15.
- 16.
- 17.
- 18.
- 19.
- 20.
- 21.
- 22.
- 23.
- 24.
- 25.
- 26.
- 27.
上面的例子为同步的情况,若注册异步则:
let { AsyncSeriesHook } = require("tapable");
let queue = new AsyncSeriesHook(["name"]);
console.time("cost");
queue.tapPromise("1", function (name) {
  return new Promise(function (resolve) {
    setTimeout(function () {
      console.log(1, name);
      resolve();
    }, 1000);
  });
});
queue.tapPromise("2", function (name) {
  return new Promise(function (resolve) {
    setTimeout(function () {
      console.log(2, name);
      resolve();
    }, 2000);
  });
});
queue.tapPromise("3", function (name) {
  return new Promise(function (resolve) {
    setTimeout(function () {
      console.log(3, name);
      resolve();
    }, 3000);
  });
});
queue.promise("weiyi").then((data) => {
  console.log(data);
  console.timeEnd("cost");
});
- 1.
- 2.
- 3.
- 4.
- 5.
- 6.
- 7.
- 8.
- 9.
- 10.
- 11.
- 12.
- 13.
- 14.
- 15.
- 16.
- 17.
- 18.
- 19.
- 20.
- 21.
- 22.
- 23.
- 24.
- 25.
- 26.
- 27.
- 28.
- 29.
- 30.
- 31.
HookMap 类使用
A HookMap is a helper class for a Map with Hooks
官方推荐将所有的钩子实例化在一个类的属性 hooks 上,如:
class Car {
 constructor() {
  this.hooks = {
   accelerate: new SyncHook(["newSpeed"]),
   brake: new SyncHook(),
   calculateRoutes: new AsyncParallelHook(["source", "target", "routesList"])
  };
 }
 /* ... */
 setSpeed(newSpeed) {
  // following call returns undefined even when you returned values
  this.hooks.accelerate.call(newSpeed);
 }
}
- 1.
- 2.
- 3.
- 4.
- 5.
- 6.
- 7.
- 8.
- 9.
- 10.
- 11.
- 12.
- 13.
- 14.
注册&执行:
const myCar = new Car();

myCar.hooks.accelerate.tap("LoggerPlugin", newSpeed => console.log(`Accelerating to ${newSpeed}`));

myCar.setSpeed(1)
- 1.
- 2.
- 3.
- 4.
- 5.
而 HookMap 正是这种推荐写法的一个辅助类。具体使用方法:
const keyedHook = new HookMap(key => new SyncHook(["arg"]))

keyedHook.for("some-key").tap("MyPlugin", (arg) => { /* ... */ });
keyedHook.for("some-key").tapAsync("MyPlugin", (arg, callback) => { /* ... */ });
keyedHook.for("some-key").tapPromise("MyPlugin", (arg) => { /* ... */ });

const hook = keyedHook.get("some-key");
if(hook !== undefined) {
 hook.callAsync("arg", err => { /* ... */ });
}
- 1.
- 2.
- 3.
- 4.
- 5.
- 6.
- 7.
- 8.
- 9.
- 10.
MultiHook 类使用
A helper Hook-like class to redirect taps to multiple other hooks
相当于提供一个存放一个 hooks 列表的辅助类:
const { MultiHook } = require("tapable");

this.hooks.allHooks = new MultiHook([this.hooks.hookA, this.hooks.hookB]);
- 1.
- 2.
- 3.
Tapable 的原理
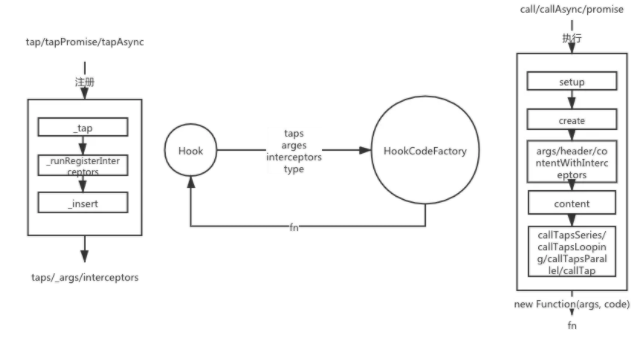
核心就是通过 Hook 来进行注册的回调存储和触发,通过 HookCodeFactory 来控制注册的执行流程。
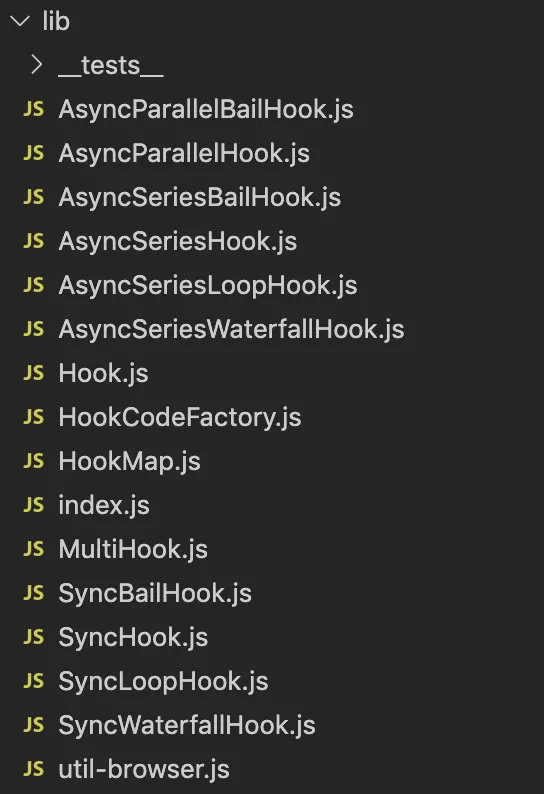
首先来观察一下 tapable 的 lib 文件结构,核心的代码都是存放在 lib 文件夹中。其中 index.js 为所有可使用类的入口。Hook 和 HookCodeFactory 则是核心类,主要的作用就是注册和触发流程。还有两个辅助类 HookMap 和 MultiHook 以及一个工具类 util-browser。其余均是以 Hook 和 HookCodeFactory 为基础类衍生的以上分类所提及的 9 种 Hooks。整个结构是非常简单清楚的。如图所示:
接下来讲一下最重要的两个类,也是 tapable 的源码核心。
Hook
首先看 Hook 的属性,可以看到属性中有熟悉的注册的方法:tap、tapAsync、tapPromise。执行方法:call、promise、callAsync。以及存放所有的注册项 taps。constructor 的入参就是每个钩子实例化时的入参。从属性上就能够知道是 Hook 类为继承它的子类提供了最基础的注册和执行的方法
class Hook {
 constructor(args = [], name = undefined) {
  this._args = args;
  this.name = name;
  this.taps = [];
  this.interceptors = [];
  this._call = CALL_DELEGATE;
  this.call = CALL_DELEGATE;
  this._callAsync = CALL_ASYNC_DELEGATE;
  this.callAsync = CALL_ASYNC_DELEGATE;
  this._promise = PROMISE_DELEGATE;
  this.promise = PROMISE_DELEGATE;
  this._x = undefined;

  this.compile = this.compile;
  this.tap = this.tap;
  this.tapAsync = this.tapAsync;
  this.tapPromise = this.tapPromise;
 }
 ...
}
- 1.
- 2.
- 3.
- 4.
- 5.
- 6.
- 7.
- 8.
- 9.
- 10.
- 11.
- 12.
- 13.
- 14.
- 15.
- 16.
- 17.
- 18.
- 19.
- 20.
- 21.
那么 Hook 类是如何收集注册项的?如代码所示:
class Hook {
 ...
 tap(options, fn) {
  this._tap("sync", options, fn);
 }

 tapAsync(options, fn) {
  this._tap("async", options, fn);
 }

 tapPromise(options, fn) {
  this._tap("promise", options, fn);
 }

 _tap(type, options, fn) {
  if (typeof options === "string") {
   options = {
    name: options.trim()
   };
  } else if (typeof options !== "object" || options === null) {
   throw new Error("Invalid tap options");
  }
  if (typeof options.name !== "string" || options.name === "") {
   throw new Error("Missing name for tap");
  }
  if (typeof options.context !== "undefined") {
   deprecateContext();
  }
  // 合并参数
  options = Object.assign({ type, fn }, options);
  // 执行注册的 interceptors 的 register 监听,并返回执行后的 options
  options = this._runRegisterInterceptors(options);
  // 收集到 taps 中
  this._insert(options);
 }
 _runRegisterInterceptors(options) {
  for (const interceptor of this.interceptors) {
   if (interceptor.register) {
    const newOptions = interceptor.register(options);
    if (newOptions !== undefined) {
     options = newOptions;
    }
   }
  }
  return options;
 }
 ...
}
- 1.
- 2.
- 3.
- 4.
- 5.
- 6.
- 7.
- 8.
- 9.
- 10.
- 11.
- 12.
- 13.
- 14.
- 15.
- 16.
- 17.
- 18.
- 19.
- 20.
- 21.
- 22.
- 23.
- 24.
- 25.
- 26.
- 27.
- 28.
- 29.
- 30.
- 31.
- 32.
- 33.
- 34.
- 35.
- 36.
- 37.
- 38.
- 39.
- 40.
- 41.
- 42.
- 43.
- 44.
- 45.
- 46.
- 47.
- 48.
可以看到三种注册的方法都是通过_tap 来实现的,只是传入的 type 不同。_tap 主要做了两件事。
- 执行 interceptor.register,并返回 options
- 收集注册项到 this.taps 列表中,同时根据 stage 和 before 排序。(stage 和 before 是注册时的可选参数)
收集完注册项,接下来就是执行这个流程:
const CALL_DELEGATE = function(...args) {
 this.call = this._createCall("sync");
 return this.call(...args);
};
const CALL_ASYNC_DELEGATE = function(...args) {
 this.callAsync = this._createCall("async");
 return this.callAsync(...args);
};
const PROMISE_DELEGATE = function(...args) {
 this.promise = this._createCall("promise");
 return this.promise(...args);
};
class Hook {
 constructor() {
  ...
  this._call = CALL_DELEGATE;
  this.call = CALL_DELEGATE;
  this._callAsync = CALL_ASYNC_DELEGATE;
  this.callAsync = CALL_ASYNC_DELEGATE;
  this._promise = PROMISE_DELEGATE;
  this.promise = PROMISE_DELEGATE;
  ...
 }
 compile(options) {
  throw new Error("Abstract: should be overridden");
 }

 _createCall(type) {
  return this.compile({
   taps: this.taps,
   interceptors: this.interceptors,
   args: this._args,
   type: type
  });
 }
}
- 1.
- 2.
- 3.
- 4.
- 5.
- 6.
- 7.
- 8.
- 9.
- 10.
- 11.
- 12.
- 13.
- 14.
- 15.
- 16.
- 17.
- 18.
- 19.
- 20.
- 21.
- 22.
- 23.
- 24.
- 25.
- 26.
- 27.
- 28.
- 29.
- 30.
- 31.
- 32.
- 33.
- 34.
- 35.
- 36.
执行流程可以说是殊途同归,最后都是通过_createCall 来返回一个 compile 执行后的值。从上文可知,tapable 的执行流程有同步,异步串行,异步并行、循环等,因此 Hook 类只提供了一个抽象方法 compile,那么 compile 具体是怎么样的呢。这就引出了下一个核心类 HookCodeFactory。
HookCodeFactory
见名知意,该类是一个返回 hookCode 的工厂。首先来看下这个工厂是如何被使用的。这是其中一种 hook 类 AsyncSeriesHook 使用方式:
const HookCodeFactory = require("./HookCodeFactory");

class AsyncSeriesHookCodeFactory extends HookCodeFactory {
 content({ onError, onDone }) {
  return this.callTapsSeries({
   onError: (i, err, next, doneBreak) => onError(err) + doneBreak(true),
   onDone
  });
 }
}

const factory = new AsyncSeriesHookCodeFactory();
// options = {
//   taps: this.taps,
//   interceptors: this.interceptors,
//   args: this._args,
//   type: type
// }
const COMPILE = function(options) {
 factory.setup(this, options);
 return factory.create(options);
};

function AsyncSeriesHook(args = [], name = undefined) {
 const hook = new Hook(args, name);
 hook.constructor = AsyncSeriesHook;
 hook.compile = COMPILE;
 ...
 return hook;
}
- 1.
- 2.
- 3.
- 4.
- 5.
- 6.
- 7.
- 8.
- 9.
- 10.
- 11.
- 12.
- 13.
- 14.
- 15.
- 16.
- 17.
- 18.
- 19.
- 20.
- 21.
- 22.
- 23.
- 24.
- 25.
- 26.
- 27.
- 28.
- 29.
- 30.
HookCodeFactory 的职责就是将执行代码赋值给 hook.compile,从而使 hook 得到执行能力。来看看该类内部运转逻辑是这样的:
class HookCodeFactory {
 constructor(config) {
  this.config = config;
  this.options = undefined;
  this._args = undefined;
 }
 ...
 create(options) {
  ...
  this.init(options);
  // type
  switch (this.options.type) {
   case "sync": fn = new Function(省略...);break;
   case "async": fn = new Function(省略...);break;
   case "promise": fn = new Function(省略...);break;
  }
  this.deinit();
  return fn;
 }
 init(options) {
  this.options = options;
  this._args = options.args.slice();
 }

 deinit() {
  this.options = undefined;
  this._args = undefined;
 }
}
- 1.
- 2.
- 3.
- 4.
- 5.
- 6.
- 7.
- 8.
- 9.
- 10.
- 11.
- 12.
- 13.
- 14.
- 15.
- 16.
- 17.
- 18.
- 19.
- 20.
- 21.
- 22.
- 23.
- 24.
- 25.
- 26.
- 27.
- 28.
- 29.
最终返回给 compile 就是 create 返回的这个 fn,fn 则是通过 new Function()进行创建的。那么重点就是这个 new Function 中了。
先了解一下 new Function 的语法
new Function ([arg1[, arg2[, ...argN]],] functionBody)
- arg1, arg2, ... argN:被函数使用的参数的名称必须是合法命名的。参数名称是一个有效的 JavaScript 标识符的字符串,或者一个用逗号分隔的有效字符串的列表;例如“×”,“theValue”,或“a,b”。
- functionBody:一个含有包括函数定义的 JavaScript 语句的字符串。
基本用法:
const sum = new Function('a', 'b', 'return a + b');
console.log(sum(2, 6));
// expected output: 8
- 1.
- 2.
- 3.
使用 Function 构造函数的方法:
class HookCodeFactory {
 create() {
  ...
  fn = new Function(this.args({...}), code)
  ...
  return fn
 }
 args({ before, after } = {}) {
  let allArgs = this._args;
  if (before) allArgs = [before].concat(allArgs);
  if (after) allArgs = allArgs.concat(after);
  if (allArgs.length === 0) {
   return "";
  } else {
   return allArgs.join(", ");
  }
 }
}
- 1.
- 2.
- 3.
- 4.
- 5.
- 6.
- 7.
- 8.
- 9.
- 10.
- 11.
- 12.
- 13.
- 14.
- 15.
- 16.
- 17.
- 18.
这个 this.args()就是返回执行时传入参数名,为后面 code 提供了对应参数值。
fn = new Function(
 this.args({...}),
 '"use strict";\n' +
  this.header() +
  this.contentWithInterceptors({
   onError: err => `throw ${err};\n`,
   onResult: result => `return ${result};\n`,
   resultReturns: true,
   onDone: () => "",
   rethrowIfPossible: true
  })
)
header() {
 let code = "";
 if (this.needContext()) {
  code += "var _context = {};\n";
 } else {
  code += "var _context;\n";
 }
 code += "var _x = this._x;\n";
 if (this.options.interceptors.length > 0) {
  code += "var _taps = this.taps;\n";
  code += "var _interceptors = this.interceptors;\n";
 }
 return code;
}

contentWithInterceptors() {
 // 由于代码过多这边描述一下过程
 // 1. 生成监听的回调对象如:
 // {
 //  onError,
 //  onResult,
 //  resultReturns,
 //  onDone,
 //  rethrowIfPossible
 // }
  // 2. 执行 this.content({...}),入参为第一步返回的对象
 ...
}
- 1.
- 2.
- 3.
- 4.
- 5.
- 6.
- 7.
- 8.
- 9.
- 10.
- 11.
- 12.
- 13.
- 14.
- 15.
- 16.
- 17.
- 18.
- 19.
- 20.
- 21.
- 22.
- 23.
- 24.
- 25.
- 26.
- 27.
- 28.
- 29.
- 30.
- 31.
- 32.
- 33.
- 34.
- 35.
- 36.
- 37.
- 38.
- 39.
- 40.
而对应的 functionBody 则是通过 header 和 contentWithInterceptors 共同生成的。this.content 则是根据钩子类型的不同调用不同的方法如下面代码则调用的是 callTapsSeries:
class SyncHookCodeFactory extends HookCodeFactory {
 content({ onError, onDone, rethrowIfPossible }) {
  return this.callTapsSeries({
   onError: (i, err) => onError(err),
   onDone,
   rethrowIfPossible
  });
 }
}
- 1.
- 2.
- 3.
- 4.
- 5.
- 6.
- 7.
- 8.
- 9.
HookCodeFactory 有三种生成 code 的方法:
// 串行
callTapsSeries() {...}
// 循环
callTapsLooping() {...}
// 并行
callTapsParallel() {...}
// 执行单个注册回调,通过判断 sync、async、promise 返回对应 code
callTap() {...}
- 1.
- 2.
- 3.
- 4.
- 5.
- 6.
- 7.
- 8.
- 并行(Parallel)原理:并行的情况只有在异步的时候才发生,因此执行所有的 taps 后,判断计数器是否为 0,为 0 则执行结束回调(计数器为 0 有可能是因为 taps 全部执行完毕,有可能是因为返回值不为 undefined,手动设置为 0)
- 循环(Loop)原理:生成 do{}while(__loop)的代码,将执行后的值是否为 undefined 赋值给_loop,从而来控制循环
- 串行:就是按照 taps 的顺序来生成执行的代码
- callTap:执行单个注册回调
- sync:按照顺序执行
var _fn0 = _x[0];
_fn0(arg1, arg2, arg3);
var _fn1 = _x[1];
_fn1(arg1, arg2, arg3);
var _fn2 = _x[2];
_fn2(arg1, arg2, arg3);
- 1.
- 2.
- 3.
- 4.
- 5.
- 6.
- async 原理:将单个 tap 封装成一个_next[index]函数,当前一个函数执行完成即调用了 callback,则会继续执行下一个_next[index]函数,如生成如下 code:
function _next1() {
  var _fn2 = _x[2];
  _fn2(name, (function (_err2) {
    if (_err2) {
      _callback(_err2);
    } else {
      _callback();
    }
  }));
}

function _next0() {
  var _fn1 = _x[1];
  _fn1(name, (function (_err1) {
    if (_err1) {
      _callback(_err1);
    } else {
      _next1();
    }
  }));
}
var _fn0 = _x[0];
_fn0(name, (function (_err0) {
  if (_err0) {
    _callback(_err0);
  } else {
    _next0();
  }
}));
- 1.
- 2.
- 3.
- 4.
- 5.
- 6.
- 7.
- 8.
- 9.
- 10.
- 11.
- 12.
- 13.
- 14.
- 15.
- 16.
- 17.
- 18.
- 19.
- 20.
- 21.
- 22.
- 23.
- 24.
- 25.
- 26.
- 27.
- 28.
- 29.
- promise:将单个 tap 封装成一个_next[index]函数,当前一个函数执行完成即调用了 promise.then(),then 中则会继续执行下一个_next[index]函数,如生成如下 code:
function _next1() {
  var _fn2 = _x[2];
  var _hasResult2 = false;
  var _promise2 = _fn2(name);
  if (!_promise2 || !_promise2.then)
    throw new Error('Tap function (tapPromise) did not return promise (returned ' + _promise2 + ')');
  _promise2.then((function (_result2) {
    _hasResult2 = true;
    _resolve();
  }), function (_err2) {
    if (_hasResult2) throw _err2;
    _error(_err2);
  });
}

function _next0() {
  var _fn1 = _x[1];
  var _hasResult1 = false;
  var _promise1 = _fn1(name);
  if (!_promise1 || !_promise1.then)
    throw new Error('Tap function (tapPromise) did not return promise (returned ' + _promise1 + ')');
  _promise1.then((function (_result1) {
    _hasResult1 = true;
    _next1();
  }), function (_err1) {
    if (_hasResult1) throw _err1;
    _error(_err1);
  });
}
var _fn0 = _x[0];
var _hasResult0 = false;
var _promise0 = _fn0(name);
if (!_promise0 || !_promise0.then)
  throw new Error('Tap function (tapPromise) did not return promise (returned ' + _promise0 + ')');
_promise0.then((function (_result0) {
  _hasResult0 = true;
  _next0();
}), function (_err0) {
  if (_hasResult0) throw _err0;
  _error(_err0);
});
- 1.
- 2.
- 3.
- 4.
- 5.
- 6.
- 7.
- 8.
- 9.
- 10.
- 11.
- 12.
- 13.
- 14.
- 15.
- 16.
- 17.
- 18.
- 19.
- 20.
- 21.
- 22.
- 23.
- 24.
- 25.
- 26.
- 27.
- 28.
- 29.
- 30.
- 31.
- 32.
- 33.
- 34.
- 35.
- 36.
- 37.
- 38.
- 39.
- 40.
- 41.
将以上的执行顺序以及执行方式来进行组合,就得到了现在的 9 种 Hook 类。若后续需要更多的模式只需要增加执行顺序或者执行方式就能够完成拓展。
如图所示:
如何助力 webpack
插件可以使用 tapable 对外暴露的方法向 webpack 中注入自定义构建的步骤,这些步骤将在构建过程中触发。
webpack 将整个构建的步骤生成一个一个 hook 钩子(即 tapable 的 9 种 hook 类型的实例),存储在 hooks 的对象里。插件可以通过 Compiler 或者 Compilation 访问到对应的 hook 钩子的实例,进行注册(tap,tapAsync,tapPromise)。当 webpack 执行到相应步骤时就会通过 hook 来进行执行(call, callAsync,promise),从而执行注册的回调。以 ConsoleLogOnBuildWebpackPlugin 自定义插件为例:
const pluginName = 'ConsoleLogOnBuildWebpackPlugin';

class ConsoleLogOnBuildWebpackPlugin {
  apply(compiler) {
    compiler.hooks.run.tap(pluginName, (compilation) => {
      console.log('webpack 构建过程开始!');
    });
  }
}

module.exports = ConsoleLogOnBuildWebpackPlugin;
- 1.
- 2.
- 3.
- 4.
- 5.
- 6.
- 7.
- 8.
- 9.
- 10.
- 11.
可以看到在 apply 中通过 compiler 的 hooks 注册(tap)了在 run 阶段时的回调。从 Compiler 类中可以了解到在 hooks 对象中对 run 属性赋值 AsyncSeriesHook 的实例,并在执行的时候通过 this.hooks.run.callAsync 触发了已注册的对应回调:
class Compiler {
 constructor(context) {
  this.hooks = Object.freeze({
    ...
    run: new AsyncSeriesHook(["compiler"]),
    ...
  })
 }
 run() {
  ...
  const run = () => {
   this.hooks.beforeRun.callAsync(this, err => {
    if (err) return finalCallback(err);

    this.hooks.run.callAsync(this, err => {
     if (err) return finalCallback(err);

     this.readRecords(err => {
      if (err) return finalCallback(err);

      this.compile(onCompiled);
     });
    });
   });
  };
  ...
 }
}
- 1.
- 2.
- 3.
- 4.
- 5.
- 6.
- 7.
- 8.
- 9.
- 10.
- 11.
- 12.
- 13.
- 14.
- 15.
- 16.
- 17.
- 18.
- 19.
- 20.
- 21.
- 22.
- 23.
- 24.
- 25.
- 26.
- 27.
- 28.
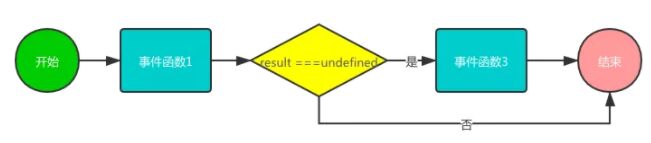
如图所示,为该自定义插件的执行过程:

总结
- tapable 对外暴露 9 种 hook 钩子,核心方法是注册、执行、拦截器
- tapable 实现方式就是根据钩子类型以及注册类型来拼接字符串传入 Function 构造函数创建一个新的 Function 对象
- webpack 通过 tapable 来对整个构建步骤进行了流程化的管理。实现了对每个构建步骤都能进行灵活定制化需求。
参考资料
[1]webpack 官方文档中对于 plugin 的介绍:
https://webpack.docschina.org/concepts/plugins/
[2]tapable 相关介绍:
http://www.zhufengpeixun.com/grow/html/103.7.webpack-tapable.html
[3]tabpable 源码:
https://github.com/webpack/tapable
[4]webpack 源码:
https://github.com/webpack/webpack