本文转载自微信公众号「运维开发故事」,作者老郑。转载本文请联系运维开发故事公众号。
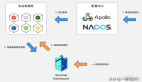
在前面一篇文章我已经对 Sentinel 做了一个简单的介绍,相信大家对 Sentinel 有一个简单的了解,本次主要是讲 Sentinel 的使用。在 sentinel-dashboard 配置流控规则,以及使用 Sentinel 整合 RestTemplate、OpenFeign 进行流控使用(建议网页版阅读)。
安装 sentinel dashboard
我使用的 sentinel 版本是: sentinel-dashboard-1.8.0
启动控制台命令:
java -jar sentinel-dashboard-1.8.0.jar
- 1.
默认启动的是 8080 端口, 登录账号和密码默认都是: sentinel。 如果需要修改启动端口可以在启动命令前面加 -Dserver.port=9999 进行修改。
使用介绍
通常我们在项目中对于 Sentinel 最常用的场景,就是默认的流控对接口的访问添加流控规则。Sentinel 也提供了对于 RestTemplate 、OpenFegin 的支持。
简单案例
1. 导入依赖
如果我们需要使用 Sentinel ,首先我们需要在业务服务中,导入 Sentinel 客户端的依赖。下面是 Maven 的 pom 依赖。 我们可以直接使用 spring-coud-starter-alibaba-sentinel 进行快速整合。
<dependency>
  <groupId>com.alibaba.cloud</groupId>
  <artifactId>spring-cloud-starter-alibaba-sentinel</artifactId>
</dependency>
- 1.
- 2.
- 3.
- 4.
对于 spring-cloud-alibaba 相关的版本依赖信息如下:
<properties>
  <spring-boot.version>2.3.10.RELEASE</spring-boot.version>
  <spring-cloud.version>Hoxton.SR8</spring-cloud.version>
  <spring-cloud-alibaba.version>2.2.5.RELEASE</spring-cloud-alibaba.version>
</properties>
<dependencyManagement>
  <dependencies>
    <dependency>
      <groupId>org.springframework.boot</groupId>
      <artifactId>spring-boot-dependencies</artifactId>
      <version>${spring-boot.version}</version>
      <type>pom</type>
      <scope>import</scope>
    </dependency>
    <dependency>
      <groupId>org.springframework.cloud</groupId>
      <artifactId>spring-cloud-dependencies</artifactId>
      <version>${spring-cloud.version}</version>
      <type>pom</type>
      <scope>import</scope>
    </dependency>

    <dependency>
      <groupId>com.alibaba.cloud</groupId>
      <artifactId>spring-cloud-alibaba-dependencies</artifactId>
      <version>${spring-cloud-alibaba.version}</version>
      <type>pom</type>
      <scope>import</scope>
    </dependency>
  </dependencies>
</dependencyManagement>
- 1.
- 2.
- 3.
- 4.
- 5.
- 6.
- 7.
- 8.
- 9.
- 10.
- 11.
- 12.
- 13.
- 14.
- 15.
- 16.
- 17.
- 18.
- 19.
- 20.
- 21.
- 22.
- 23.
- 24.
- 25.
- 26.
- 27.
- 28.
- 29.
- 30.
- 31.
2. YML 配置
我们在业务服务中导入了依赖过后,我们需要修改 application.yml 文件让服务启动过后自动注册到 sentinel-dashboard 服务上。
spring:
  cloud:
    sentinel:
      transport:
        port: 8719
        dashboard: localhost:8080
- 1.
- 2.
- 3.
- 4.
- 5.
- 6.
3. 测试接口定义
首先我们需要定义对外开放的接口。
@RestController
public class HelloController {

    @GetMapping("/hello")
    public String hello () {
        return "OK";
    }
}
- 1.
- 2.
- 3.
- 4.
- 5.
- 6.
- 7.
- 8.
4. 通过控制台配置流控规则
注意:如果已经启动 snetinel-dashboard 后并且启动业务服务,在 sentinel-dashboard 后台还是没有服务的话,我们可以先访问一下业务服务的接口,然后在刷新snetinel-dashboard 观察是否正常。如果还是不正常请考虑 sentinel 的 client 版本和 dashboard 是否匹配。
首先选择自己对应服务展开,然后选择【簇点链路】 菜单。选择需要流控的接口 /hello 然后选择 【流控】按钮进行流控配置
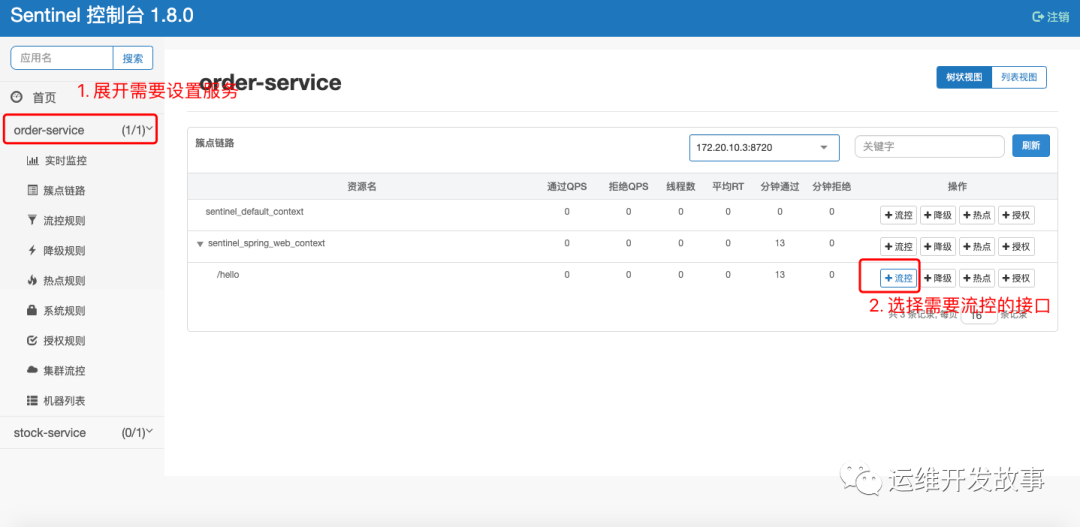
我们可以配置, 我们选择【阀值类型】选择【QPS】,然后设置【单机阀值】 填入 1 。表示该接口每秒钟只能接受一个 QPS ,如果超过阈值过后就会触发 【流控】默认 Sentinel 返回 Blocked by Sentinel (flow limiting)

5. 流控规则触发
如果我们需要触发流控规则我们频繁访问 /hello 接口即可。
~ curl http://127.0.0.1:8066/hello
OK%                                                                                                                                                   ~ curl http://127.0.0.1:8066/hello
~ curl http://127.0.0.1:8066/hello
Blocked by Sentinel (flow limiting)%
- 1.
- 2.
- 3.
- 4.
通过上面的结果我们可以看到当单位时间内超过阈值过后, 就会触发 flow limit
整合 RestTemplate
1. YML 配置
Sentinel 整合 Resttemplate 除了需要导入 spring-cloud-starter-alibaba-sentinel 开需要开启 Sentinel 对 Resttemplate 的支持。
resttemplate:
  sentinel:
    enabled: true
- 1.
- 2.
- 3.
2. 创建 RestTemplate
如果 RestTemplate 在使用的时候需要使用到 Sentinel 的流控规则,首先需要在创建 RestTemplate 的时候添加 @SentinelRestTemplate 注解。注意: SentinelExceptionHandler 中的方法都是 static 方法
@Configuration
public class RestTemplateConfig {
    @Bean
    @ConditionalOnMissingBean(RestTemplate.class)
    @LoadBalanced
    @SentinelRestTemplate(
            blockHandler = "handlerException", blockHandlerClass = SentinelExceptionHandler.class,
            fallback = "handleFallback", fallbackClass = SentinelExceptionHandler.class)
    public RestTemplate restTemplate() {
        return new RestTemplate();
    }
}
// 异常处理类
public class SentinelExceptionHandler {

    //限流熔断业务逻辑
    public static SentinelClientHttpResponse handlerException(HttpRequest request, byte[] body, ClientHttpRequestExecution execution, BlockException ex) {
        String message = JSON.toJSONString(CommonResult.error(-100,"系统错误 (限流熔断业务逻辑)"));
        return new SentinelClientHttpResponse(message);
    }
    //异常降级业务逻辑
    public static SentinelClientHttpResponse handleFallback(HttpRequest request, byte[] body, ClientHttpRequestExecution execution, BlockException ex) {
        String message = JSON.toJSONString(CommonResult.error(-100,"系统错误 (异常降级业务逻辑)"));
        return new SentinelClientHttpResponse(message);
    }
}
- 1.
- 2.
- 3.
- 4.
- 5.
- 6.
- 7.
- 8.
- 9.
- 10.
- 11.
- 12.
- 13.
- 14.
- 15.
- 16.
- 17.
- 18.
- 19.
- 20.
- 21.
- 22.
- 23.
- 24.
- 25.
- 26.
3. 接口定义
下面就是我们使用的代码,可能写得稍微有点复杂,我来解释一下。首先我是通过 RestTemplate 访问 stock-service 服务的 /getStockDetail 接口然后将接口的返回数据解析,通过CommonResult
@Autowired
private RestTemplate restTemplate;
@GetMapping("/hello2")
public CommonResult<OrderModel> hello2() {
  ParameterizedTypeReference<CommonResult<StockModel>> typeRef =
    new ParameterizedTypeReference<CommonResult<StockModel>>() {
  };
  ResponseEntity<CommonResult<StockModel>>
    forEntity = restTemplate.exchange("http://stock-service/getStockDetail", HttpMethod.GET,
                                      HttpEntity.EMPTY, typeRef);
  OrderModel orderModel = new OrderModel();
  orderModel.setId(100);
  orderModel.setCode("100-100");
  if (Objects.equals(forEntity.getStatusCode(), HttpStatus.OK) && Objects.nonNull(forEntity.getBody())) {
    CommonResult<StockModel> result = forEntity.getBody();
    if (result.getCode() != 1) {
      return CommonResult.error(null, result.getCode(), result.getMessage());
    }
    orderModel.setStockModel(result.getData());
  }
  return CommonResult.success(orderModel);
}
- 1.
- 2.
- 3.
- 4.
- 5.
- 6.
- 7.
- 8.
- 9.
- 10.
- 11.
- 12.
- 13.
- 14.
- 15.
- 16.
- 17.
- 18.
- 19.
- 20.
- 21.
- 22.
4. 流控触发
如果我们频繁的访问我们的接口 /hello2 就会出现限流的逻辑
~ curl http://127.0.0.1:8066/hello2
{"code":1,"message":"this is a success message","data":{"id":100,"code":"100-100","stockModel":{"id":1,"code":"STOCK==>1000"}}}
~ curl http://127.0.0.1:8066/hello2
{"code":-100,"message":"系统错误 (限流熔断业务逻辑)","data":null}
整合 OpenFegin
1. 导入 openfeign 依赖
Sentinel 整合 Openfeign 需要导入 spring-cloud-starter-openfeign
<dependency>
  <groupId>org.springframework.cloud</groupId>
  <artifactId>spring-cloud-starter-openfeign</artifactId>
</dependency>
- 1.
- 2.
- 3.
- 4.
2. YML 配置
Sentinel 整合 Openfeign 需要开启对 feign 的支持,配置如下:
feign:
  sentinel:
    enabled: true
- 1.
- 2.
- 3.
注意:启动类上要增加 @EnableFeignClients 来配置 Openfeign 的启用
3. 调用代码
Feign 接口调服务 stock-service 的 /getStockDetail 接口,如果触发流控规则就会执行 FallbackFactory 中返回 StockFeign 的本地存根方法。
@FeignClient(name = "stock-service", fallbackFactory = StockFeignFallbackFactory.class)
public interface StockFeign {
    @GetMapping("/getStockDetail")
    CommonResult<StockModel> getStockDetail();
}
- 1.
- 2.
- 3.
- 4.
- 5.
StockFeignFallbackFactory 类是服务降级的处理。
@Component
public class StockFeignFallbackFactory implements FallbackFactory<StockFeign> {
    private Logger log = LoggerFactory.getLogger(StockFeignFallbackFactory.class);
    @Override
    public StockFeign create(Throwable throwable) {
        return new StockFeign() {
            @Override
            public CommonResult<StockModel> getStockDetail() {
                log.error("调用查询库存详情降级", throwable);
                return CommonResult.error(null, -100, "调用查询库存详情降级");
            }
        };
    }
}
- 1.
- 2.
- 3.
- 4.
- 5.
- 6.
- 7.
- 8.
- 9.
- 10.
- 11.
- 12.
- 13.
- 14.
Controller 调用代码
@Autowired
private StockFeign stockFeign;
@GetMapping("/hello1")
public CommonResult<OrderModel> hello() {
  CommonResult<StockModel> result = stockFeign.getStockDetail();
  if (result.getCode() != 1) {
    return CommonResult.error(null, result.getCode(), result.getMessage());
  }
  StockModel stockDetail = result.getData();
  OrderModel orderModel = new OrderModel();
  orderModel.setStockModel(stockDetail);
  return CommonResult.success(orderModel);
}
- 1.
- 2.
- 3.
- 4.
- 5.
- 6.
- 7.
- 8.
- 9.
- 10.
- 11.
- 12.
- 13.
4. 业务执行
如果我们多次访问,Sentinel 就会触发降级策略。然后执行 StockFeignFallbackFactory 的本地存根方法返回
源码地址
gitee: https://gitee.com/zhengsh/excavator
参考
https://spring-cloud-alibaba-group.github.io/github-pages/hoxton/en-us/index.html#_spring_cloud_alibaba_sentinel
https://segmentfault.com/a/1190000019070557