本文转载自微信公众号「问其」,作者陈少文 。转载本文请联系问其公众号。
1. 为什么需要物理构建机
在文章《如何接入远程 macOS 物理机进行 Jenkins 流水线构建》中,我描述了在 Jenkins 中添加物理构建机的方法。这并不是我拍脑袋想的需求,而是当时真的有 ToB 的商业客户在咨询方案。
对于多端开发商来说,构建 Android、IOS、macOS、Arm 、Windows、X86 应用是常见的需求。
好的方面是 GitHub Actions 提供了 macOS 构建环境、AWS 提供了 macOS 虚拟机,而华为提供了 ARM 主机。在云原生背景下,更多使用的是 Kubernetes 运行时,在 Kubernetes 不支持的处理器架构和操作系统面前,持续集成 (CI) 显得很无力。持续集成需要支持物理构建机。
本文希望讨论的问题是在 Kubernetes 下,如何接入物理机进行 CI 的构建。本文以 Tekton 为例,其他引擎在处理逻辑上类似。
2. Tekton 如何与物理机交互
Kuberntes 对物理机或者虚拟机的管理,实际上是一个典型的 Operator 场景。我们可以定义一个 CRD 用来描述相关字段,通过写 Controller 处理 Pod 与构建机之间的逻辑。
也可以写 Tekton 的 Task 封装,本文将使用这种方式。由此也给我带来另一个疑问,Tekton 能否代替部分 Operator 的场景,在后续的文章中我会给出思考。
这里仅做原型验证,不会太关注产品化的细节。
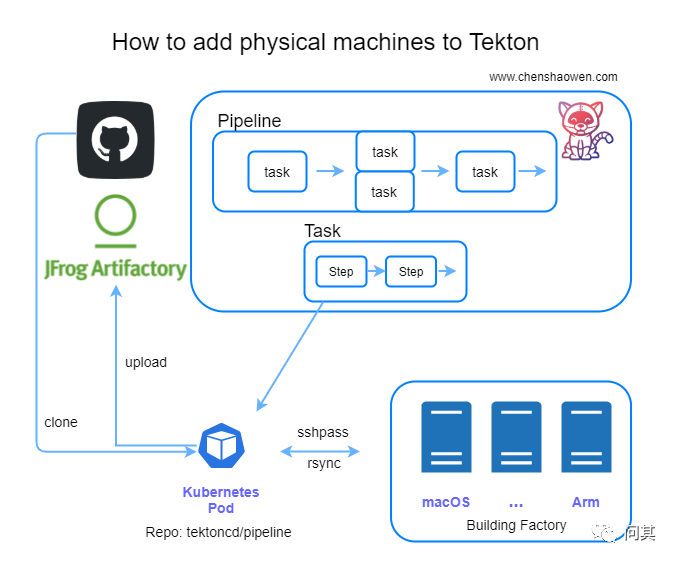
在 Tekton 中,每个流水线由很多个 Task 构成,Task 可以并行。一个 Task 包含很多个串行的 step 步骤,对应着一个 Pod 包含很多个容器。
这里的关键是要将 Pod 与构建机关联起来。我选择的是使用 rsync 同步 Pod 与构建机之间的文件,在 Pod 中使用 sshpass 执行物理机的构建命令。
主要分为如下步骤 (以下命令都是在容器中执行):
- 克隆代码
- 执行 rsync 将代码同步到构建机
- 执行 sshpass 在构建机上执行构建命令
- 执行 rsync 将构建机中的构建产物同步到容器
- 归档构建产物(示例中, 这一步会被省略,仅验证能拿到构建产物)
可以看到整个过程其实和 Tekton 没有直接关系,对于任意容器与构建机直连的环境都是可行的。下面以 Tekton 为例进行演示。
3. 资源准备清单
- 一个 Kubernetes 集群。用来运行 Tekton,最新的 Tekton 0.23 要求 Kubernetes 不低于 1.17
- 一台物理机或虚拟机。用于构建应用
3.1 查看 Kubernetes 版本
- kubectl version
- Client Version: version.Info{Major:"1", Minor:"19", GitVersion:"v1.19.7", GitCommit:"1dd5338295409edcfff11505e7bb246f0d325d15", GitTreeState:"clean", BuildDate:"2021-01-13T13:23:52Z", GoVersion:"go1.15.5", Compiler:"gc", Platform:"darwin/amd64"}
- Server Version: version.Info{Major:"1", Minor:"20", GitVersion:"v1.20.2", GitCommit:"faecb196815e248d3ecfb03c680a4507229c2a56", GitTreeState:"clean", BuildDate:"2021-01-21T01:11:42Z", GoVersion:"go1.15.5", Compiler:"gc", Platform:"linux/amd64"}
3.2 物理机准备
- 操作系统是 CentOS 7.6
- uname -a
- Linux test 3.10.0-957.21.3.el7.x86_64 #1 SMP Tue Jun 18 16:35:19 UTC 2019 x86_64 x86_64 x86_64 GNU/Linux
- 预装 Golang 的编译环境
原计划是选择一个 macOS 的构建示例,但是无法提供直通的网络环境,因此换成 Golang 的构建示例。
- go version
- go version go1.13 linux/amd64
4. 准备 Tekton 以及 Pipeline 资源
4.1 部署 Tekton Pipeline
- 创建负载
Tekton 默认使用的是 gcr.io 镜像,如果是国内环境可以替换为 gcr.azk8s.cn 镜像。
- kubectl apply -f https://github.com/tektoncd/pipeline/releases/download/v0.23.0/release.notags.yaml
- 查看资源
4.2 资源规划
- kubectl -n tekton-pipelines get all
- NAME READY STATUS RESTARTS AGE
- pod/tekton-pipelines-controller-86c487c965-p6s5t 1/1 Running 0 51s
- pod/tekton-pipelines-webhook-7b775d9cd8-fzdrq 1/1 Running 0 51s
- NAME TYPE CLUSTER-IP EXTERNAL-IP PORT(S) AGE
- service/tekton-pipelines-controller ClusterIP 10.233.61.46 <none> 9090/TCP,8080/TCP 51s
- service/tekton-pipelines-webhook ClusterIP 10.233.46.233 <none> 9090/TCP,8008/TCP,443/TCP,8080/TCP 51s
- NAME READY UP-TO-DATE AVAILABLE AGE
- deployment.apps/tekton-pipelines-controller 1/1 1 1 51s
- deployment.apps/tekton-pipelines-webhook 1/1 1 1 51s
- NAME DESIRED CURRENT READY AGE
- replicaset.apps/tekton-pipelines-controller-86c487c965 1 1 1 51s
- replicaset.apps/tekton-pipelines-webhook-7b775d9cd8 1 1 1 51s
- NAME REFERENCE TARGETS MINPODS MAXPODS REPLICAS AGE
- horizontalpodautoscaler.autoscaling/tekton-pipelines-webhook Deployment/tekton-pipelines-webhook <unknown>/100% 1 5 1 51s
需要的流水线资源清单:
- 一个 task, 用于克隆代码
- 一个 pv, 用于共享 task 之间的文件
- 一个自定义的 task, 用于将代码同步到构建机,构建完成之后,再同步回来
- 一个 pipeline, 用于描述流水线,编排 task
- 一个 pipelinerun, 用于实例化 pipeline, 提供构建时必要的参数
4.2 编写同步文件、执行脚本的 Task
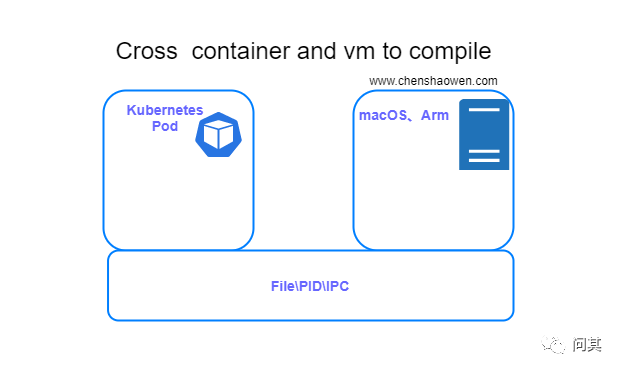
如上图,这里的 Task 就是用于打通 container 和 vm 直接的文件和进程,实现类似交叉编译的效果。
- ---
- apiVersion: tekton.dev/v1beta1
- kind: Task
- metadata:
- name: remote-shell
- labels:
- app.kubernetes.io/version: "0.1"
- annotations:
- tekton.dev/pipelines.minVersion: "0.12.1"
- tekton.dev/tags: git
- tekton.dev/displayName: "remote shell"
- spec:
- description: >-
- This task can be used to run shell in remote machine
- workspaces:
- - name: source
- params:
- - name: remote-ip
- type: string
- - name: remote-port
- type: string
- - name: remote-username
- type: string
- - name: remote-password
- type: string
- - name: remote-workspace
- type: string
- - name: remote-script
- type: string
- steps:
- - name: remote-shell
- image: shaowenchen/rsync-sshpass:v1
- workingDir: $(workspaces.source.path)
- script: |
- sshpass -p "$(params.remote-password)" ssh -o StrictHostKeyChecking=no "$(params.remote-username)"@"$(params.remote-ip)" -p "$(params.remote-port)" "mkdir -p $(params.remote-workspace)"
- rsync -ratlz --progress --rsh="sshpass -p $(params.remote-password) ssh -o StrictHostKeyChecking=no -l $(params.remote-username)" ./ "$(params.remote-ip)":"$(params.remote-workspace)"
- sshpass -p "$(params.remote-password)" ssh -o StrictHostKeyChecking=no "$(params.remote-username)"@"$(params.remote-ip)" -p "$(params.remote-port)" "$(params.remote-script)"
- rsync -ratlz --progress --rsh="sshpass -p $(params.remote-password) ssh -o StrictHostKeyChecking=no -l $(params.remote-username)" "$(params.remote-ip)":"$(params.remote-workspace)"/ .
在写法上,可以参考 Tekton 提供的示例。主要分为几步:
- 定义参数
- 编写 step 流程
- 写 script
这就是一个串脚本的过程,只不过借助容器镜像,省去了安装各种工具的步骤。
4.3 准备 Tekton 的 pipeline 描述
- 克隆代码 Task
Tekton 已经正式上线 Hub 服务,用于共享 Task,这里直接使用 https://hub.tekton.dev/tekton/task/git-clone
- kubectl apply -f https://raw.githubusercontent.com/tektoncd/catalog/main/task/git-clone/0.3/git-clone.yaml
- 构建一个工具箱镜像 shaowenchen/rsync-sshpass:v1
Dockerfile 为:
- ARG alpine_ver=3.13
- FROM alpine:${alpine_ver}.5
- RUN apk update \
- && apk upgrade \
- && apk add --no-cache \
- rsync \
- openssh-client \
- openssh \
- sshpass \
- ca-certificates \
- && update-ca-certificates \
- && rm -rf /var/cache/apk/*
- pipeline
- apiVersion: tekton.dev/v1beta1
- kind: Pipeline
- metadata:
- name: remote-build-pipeline
- spec:
- params:
- - name: repo-url
- type: string
- - name: branch-name
- type: string
- - name: remote-ip
- type: string
- - name: remote-port
- type: string
- - name: remote-username
- type: string
- - name: remote-password
- type: string
- - name: remote-workspace
- type: string
- - name: remote-script
- type: string
- workspaces:
- - name: shared-data
- tasks:
- - name: fetch-repo
- taskRef:
- name: git-clone
- workspaces:
- - name: output
- workspace: shared-data
- params:
- - name: url
- value: $(params.repo-url)
- - name: revision
- value: $(params.branch-name)
- - name: remote-build
- taskRef:
- name: remote-shell
- runAfter: ["fetch-repo"]
- workspaces:
- - name: source
- workspace: shared-data
- params:
- - name: remote-ip
- value: $(params.remote-ip)
- - name: remote-port
- value: $(params.remote-port)
- - name: remote-username
- value: $(params.remote-username)
- - name: remote-password
- value: $(params.remote-password)
- - name: remote-workspace
- value: $(params.remote-workspace)
- - name: remote-script
- value: $(params.remote-script)
pipeline 包含两个 task,一个 task 克隆代码,一个 task 执行远程构建。
- pipelinerun
- ---
- apiVersion: tekton.dev/v1beta1
- kind: PipelineRun
- metadata:
- name: remote-build-pipelinerun-1
- spec:
- pipelineRef:
- name: remote-build-pipeline
- workspaces:
- - name: shared-data
- volumeClaimTemplate:
- spec:
- accessModes:
- - ReadWriteOnce
- resources:
- requests:
- storage: 10Gi
- params:
- - name: repo-url
- value: https://github.com/shaowenchen/terraform-provider-qingcloud.git
- - name: branch-name
- value: master
- - name: subdirectory
- value: terraform-provider-qingcloud-001
- - name: remote-ip
- value: 0.0.0.0
- - name: remote-port
- value: "22"
- - name: remote-username
- value: root
- - name: remote-password
- value: YourPassword
- - name: remote-workspace
- value: ~/workspaces/terraform-provider-qingcloud-001
- - name: remote-script
- value: |
- cd ~/workspaces/terraform-provider-qingcloud-001
- make
这里将克隆代码到 pv 的 terraform-provider-qingcloud-001 目录,同步到构建机的 ~/workspaces/terraform-provider-qingcloud-001 目录。也就是说,这两个目录最终的文件会保持一致,而构建的二进制是在构建机上生成的。
- 查看 Tekton 资源定义
以上资源全部 apply 之后,就可以查看相关的资源和流水线状态了。
- kubectl get task
- NAME AGE
- git-clone 18m
- remote-shell 5m47s
- kubectl get pipelinerun
- NAME SUCCEEDED REASON STARTTIME COMPLETIONTIME
- remote-build-pipelinerun-1 True Succeeded 6m15s 5m42s
执行成功,接着继续验证功能是否符合预期。
5. 功能验证
- 查看相关负载
- kubectl get pod
- NAME READY STATUS RESTARTS AGE
- remote-build-pipelinerun-1-fetch-repo-56ws8-pod-mgx77 0/1 Completed 0 8m49s
- remote-build-pipelinerun-1-remote-build-wxtms-pod-bcn6r 0/1 Completed 0 8m35s
- 在物理构建机上,查看构建目录
- pwd
- /root/workspaces/terraform-provider-qingcloud-001
- ls
- CHANGELOG.md glide.yaml go.sum main.go qingcloud scripts terraform-provider-qingcloud website
- dev.md go.mod LICENSE Makefile README.md terraform vendor
- 查看 Kubernetes PV 的构建目录
- kubectl get pv
- NAME CAPACITY ACCESS MODES RECLAIM POLICY STATUS CLAIM STORAGECLASS
- pvc-860016bb-14b6-414a-9c5a-1a71d7290ba8 10Gi RWO Delete Bound default/pvc-e7ceb0582a openebs-hostpath 2m12s
- 查找 PV 存储路径
- kubectl describe pv pvc-860016bb-14b6-414a-9c5a-1a71d7290ba8 |grep Path
- Path: /var/openebs/local/pvc-860016bb-14b6-414a-9c5a-1a71d7290ba8
- 查看 PV 目录文件结构
- ls /var/openebs/local/pvc-860016bb-14b6-414a-9c5a-1a71d7290ba8
- CHANGELOG.md glide.yaml go.sum main.go qingcloud scripts terraform-provider-qingcloud website
- dev.md go.mod LICENSE Makefile README.md terraform vendor
在两个目录中,都存在构建产物 terraform-provider-qingcloud,符合预期,也说明我们达成了目标。
6. 总结
传统的 CICD 引擎通常是一个 C/S 架构。它需要一个 S 端,用于解析流程,对流水线进行调度; 需要很多个 C 端,用于执行高负载的构建任务。这种方式的扩展性并不是线性的,在云原生下、业务量大时很容易遇到瓶颈。因此,我们需要更加云原生的构建引擎。在新的引擎下我们需要解决一些老的问题,支持物理机构建就是其中之一。
本文主要以 Tekton 为例,提供了一种利用 rsync 和 sshpass 接入物理机进行构建的思路。其中的关键点如下:
- 使用 rsync\sshpass 的目的主要是将容器与物理机绑定,文件双向同步,进程空间互通。
- 不限于 Tekton, 任意的引擎都可以使用这种方式。
- 这里仅是作为方案验证,如果落地到产品,还需要考虑缓存、秘钥安全、数据安全、租户隔离等问题。


