本文转载自微信公众号「全栈修仙之路」,作者阿宝哥。转载本文请联系全栈修仙之路公众号。
在 Axios 如何取消重复请求? 这篇文章中,阿宝哥介绍了在 Axios 中如何取消重复请求及 CancelToken 的工作原理。本文将介绍在 Axios 中如何通过增强默认适配器来缓存请求数据。那么为什么要缓存请求数据呢?这是因为在缓存未失效时,我们可以直接使用已缓存的数据,而不需发起请求从服务端获取数据,这样不仅可以减少 HTTP 请求而且还能减少等待时间从而提高用户体验。
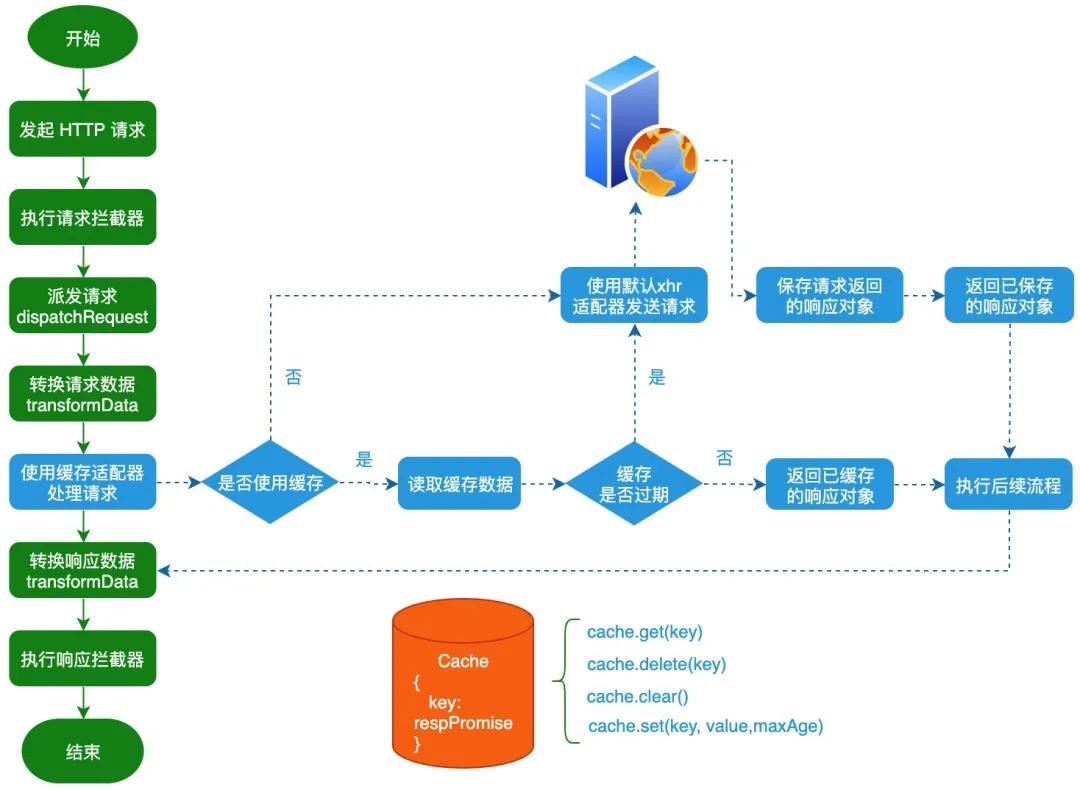
因为本文将使用 Axios 提供的默认适配器来实现缓存请求数据的功能,所以如果你对 Axios 适配器还不熟悉的话,建议先阅读 77.9K 的 Axios 项目有哪些值得借鉴的地方 这篇文章。为了让大家能够更好地理解后续的内容,我们先来看一下整体的流程图:
上图中蓝色部分的工作流程,就是本文的重点。接下来,阿宝哥将从如何设计缓存开始,带大家一起来开发缓存请求数据的功能。
一、如何设计缓存
在计算中,缓存是一个高速数据存储层,其中存储了数据子集,且通常是 短暂性 存储,这样日后再次请求该数据时,速度要比访问数据的主存储位置快。通过缓存,你可以高效地重用之前检索或计算的数据。了解完缓存的作用之后,我们来设计缓存的 API:
- get(key):从缓存中获取指定 key 对应的值;
- delete(key):从缓存中删除指定 key 对应的值;
- clear():清空已缓存的数据;
- set(key, value, maxAge):保存键值对,同时支持设置缓存的最大时间,即 maxAge 单位为毫秒。
基于上述的缓存 API,我们可以实现一个简单的缓存功能,具体代码如下所示:
- const MemoryCache = {
- data: {},
- set(key, value, maxAge) { // 保存数据
- this.data[key] = {
- maxAge: maxAge || 0,
- value,
- now: Date.now(),
- };
- },
- get(key) { // 从缓存中获取指定 key 对应的值。
- const cachedItem = this.data[key];
- if (!cachedItem) return null;
- const isExpired = Date.now() - cachedItem.now > cachedItem.maxAge;
- isExpired && this.delete(key);
- return isExpired ? null : cachedItem.value;
- },
- delete(key) { // 从缓存中删除指定 key 对应的值。
- return delete this.data[key];
- },
- clear() { // 清空已缓存的数据。
- this.data = {};
- },
- };
其实除了自定义缓存对象之外,你也可以使用成熟的第三方库,比如 lru-cache。
LRU 缓存淘汰算法就是一种常用策略。LRU 的全称是 Least Recently Used,也就是说我们认为最近使用过的数据应该是是「有用的」,很久都没用过的数据应该是无用的,内存满了就优先删那些很久没用过的数据。
二、如何增强默认适配器
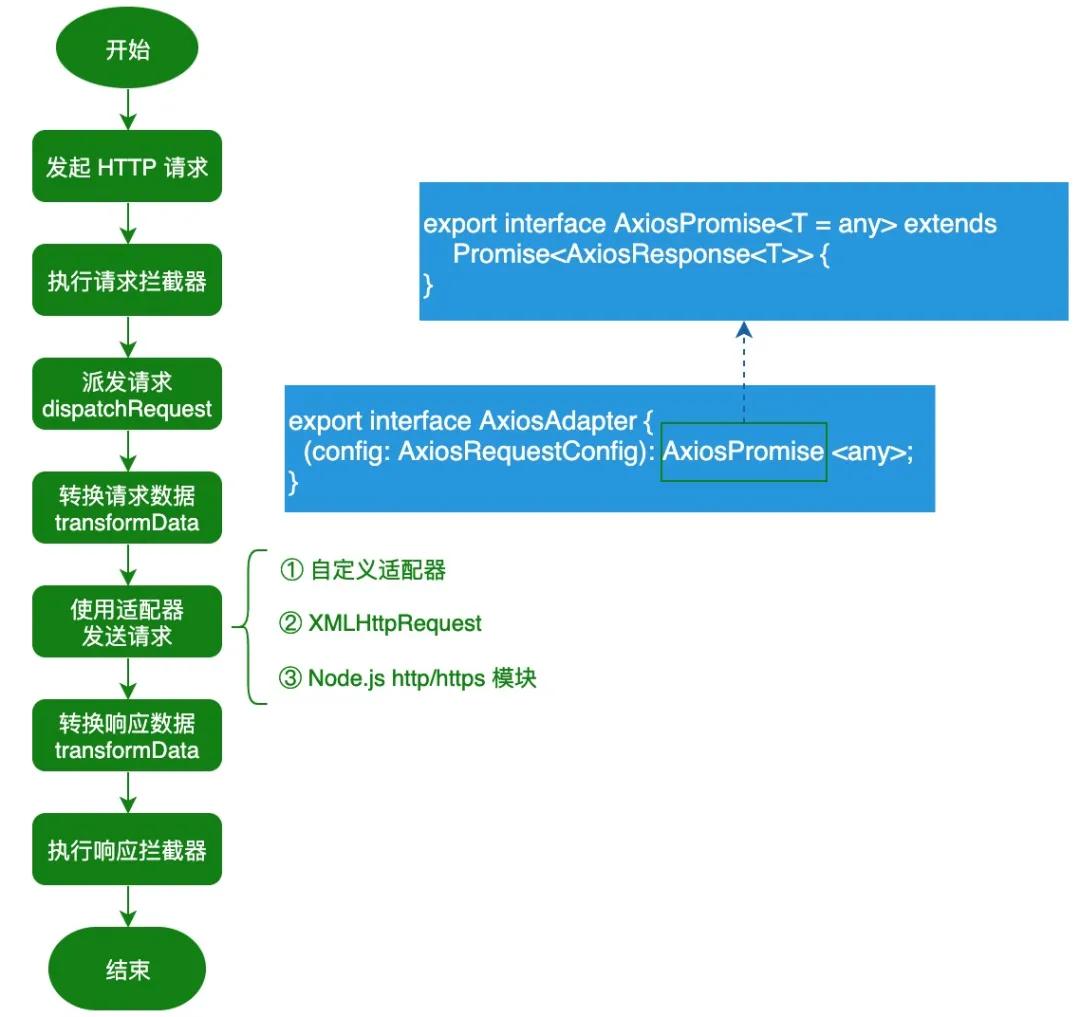
Axios 引入了适配器,使得它可以同时支持浏览器和 Node.js 环境。对于浏览器环境来说,它通过封装 XMLHttpRequest API 来发送 HTTP 请求,而对于 Node.js 环境来说,它通过封装 Node.js 内置的 http 和 https 模块来发送 HTTP 请求。
在介绍如何增强默认适配器之前,我们先来回顾一下 Axios 完整请求的流程:
了解完 Axios 完整请求的流程之后,我们再来看一下 Axios 内置的 xhrAdapter 适配器,它被定义在 lib/adapters/xhr.js 文件中:
- // lib/adapters/xhr.js
- module.exports = function xhrAdapter(config) {
- return new Promise(function dispatchXhrRequest(resolve, reject) {
- var requestData = config.data;
- var requestHeaders = config.headers;
- var request = new XMLHttpRequest();
- // 省略大部分代码
- var fullPath = buildFullPath(config.baseURL, config.url);
- request.open(config.method.toUpperCase(), buildURL(fullPath, config.params, config.paramsSerializer), true);
- // Set the request timeout in MS
- request.timeout = config.timeout;
- // Listen for ready state
- request.onreadystatechange = function handleLoad() { ... }
- // Send the request
- request.send(requestData);
- });
- };
很明显 xhrAdapter 适配器是一个函数对象,它接收一个 config 参数并返回一个 Promise 对象。而在 xhrAdapter 适配器内部,最终会使用 XMLHttpRequest API 来发送 HTTP 请求。为了实现缓存请求数据的功能,我们就可以考虑通过高阶函数来增强 xhrAdapter 适配器的功能。
2.1 定义辅助函数
2.1.1 定义 generateReqKey 函数
在增强 xhrAdapter 适配器之前,我们先来定义一个 generateReqKey 函数,该函数用于根据当前请求的信息,生成请求 Key;
- function generateReqKey(config) {
- const { method, url, params, data } = config;
- return [method, url, Qs.stringify(params), Qs.stringify(data)].join("&");
- }
通过 generateReqKey 函数生成的请求 key,将作为缓存项的 key,而对应的 value 就是默认 xhrAdapter 适配器返回的 Promise 对象。
2.1.2 定义 isCacheLike 函数
isCacheLike 函数用于判断传入的 cache 参数是否实现了前面定义的 Cache API,利用该函数,我们允许用户为每个请求自定义 Cache 对象。
- function isCacheLike(cache) {
- return !!(cache.set && cache.get && cache.delete && cache.clear
- && typeof cache.get === 'function' && typeof cache.set === 'function'
- && typeof cache.delete === 'function' && typeof cache.clear === 'function'
- );
- }
2.2 定义 cacheAdapterEnhancer 函数
为了让用户能够更灵活地控制数据缓存的功能,我们定义了一个 cacheAdapterEnhancer 函数,该函数支持两个参数:
adapter:预增强的 Axios 适配器对象;
options:缓存配置对象,该对象支持 4 个属性,分别用于配置不同的功能:
maxAge:全局设置缓存的最大时间;
enabledByDefault:是否启用缓存,默认为 true;
cacheFlag:缓存标志,用于配置请求 config 对象上的缓存属性;
defaultCache:用于设置使用的缓存对象。
了解完 cacheAdapterEnhancer 函数的参数之后,我们来看一下该函数的具体实现:
- function cacheAdapterEnhancer(adapter, options) {
- const { maxAge, enabledByDefault = true,
- cacheFlag = "cache", defaultCache = MemoryCache,
- } = options;
- return (config) => {
- const { url, method, params, forceUpdate } = config;
- let useCache = config[cacheFlag] !== undefined && config[cacheFlag] !== null
- ? config[cacheFlag]
- : enabledByDefault;
- if (method === "get" && useCache) {
- const cache = isCacheLike(useCache) ? useCache : defaultCache;
- let requestKey = generateReqKey(config); // 生成请求Key
- let responsePromise = cache.get(requestKey); // 从缓存中获取请求key对应的响应对象
- if (!responsePromise || forceUpdate) { // 缓存未命中/失效或强制更新时,则重新请求数据
- responsePromise = (async () => {
- try {
- return await adapter(config); // 使用默认的xhrAdapter发送请求
- } catch (reason) {
- cache.delete(requestKey);
- throw reason;
- }
- })();
- cache.set(requestKey, responsePromise, maxAge); // 保存请求返回的响应对象
- return responsePromise; // 返回已保存的响应对象
- }
- return responsePromise;
- }
- return adapter(config); // 使用默认的xhrAdapter发送请求
- };
- }
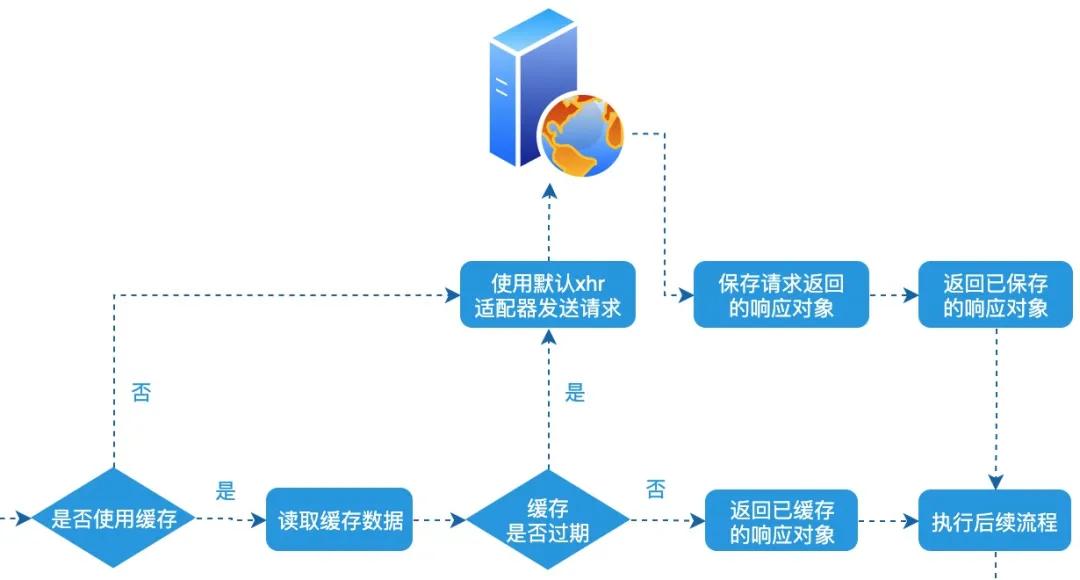
以上的代码并不会复杂,核心的处理逻辑如下图所示:
2.3 使用 cacheAdapterEnhancer 函数
2.3.1 创建 Axios 对象并配置 adapter 选项
- const http = axios.create({
- baseURL: "https://jsonplaceholder.typicode.com",
- adapter: cacheAdapterEnhancer(axios.defaults.adapter, {
- enabledByDefault: false, // 默认禁用缓存
- maxAge: 5000, // 缓存时间为5s
- }),
- });
2.3.2 使用 http 对象发送请求
- // 使用缓存
- async function requestWithCache() {
- const response = await http.get("/todos/1", { cache: true });
- console.dir(response);
- }
- // 不使用缓存
- async function requestWithoutCache() {
- const response = await http.get("/todos/1", { cache: false });
- console.dir(response);
- }
其实 cache 属性除了支持布尔值之外,我们可以配置实现 Cache API 的缓存对象,具体的使用示例如下所示:
- const customCache = { get() {/*...*/}, set() {/*...*/}, delete() {/*...*/}, clear() {/*...*/}};
- async function requestForceUpdate() {
- const response = await http.get("/todos/1", {
- cache: customCache,
- forceUpdate: true,
- });
- console.dir(response);
- }
好了,如何通过增强 xhrAdapter 适配器来实现 Axios 缓存请求数据的功能已经介绍完了。由于完整的示例代码内容比较多,阿宝哥就不放具体的代码了。感兴趣的小伙伴,可以访问以下地址浏览示例代码。
完整的示例代码:https://gist.github.com/semlinker/b8a7bd5a0a16c2d04011c2c4a8167fbd
三、总结
本文介绍了在 Axios 中如何缓存请求数据及如何设计缓存对象,基于文中定义的 cacheAdapterEnhancer 函数,你可以轻松地扩展缓存的功能。在后续的文章中,阿宝哥将会介绍在 Axios 中如何实现请求重试功能,感兴趣的小伙伴不要错过哟。


