https://harmonyos.51cto.com/#zz
牛年将至,祝大家行行无bug,页页so easy~
在微信小程序中,提供了form组件,可以将input、picker、slider、button等全部放在form中,并设置name属性实现类似html的表单提交功能。

鸿蒙js目前是没有form组件的,因此我们需要在提交时手动获取输入框、选择框等的值,自行构建数据对象。
1、登录模块
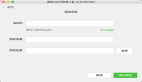
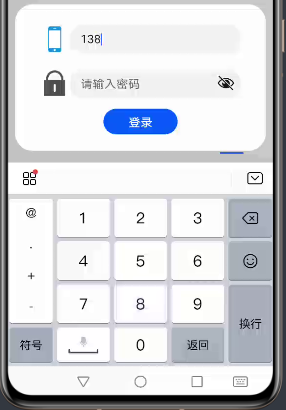
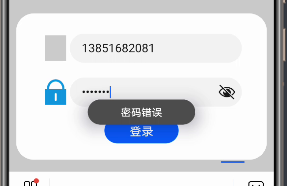
这里接着上一篇,通过dialog组件实现了模态登录和注册的窗口。登录窗口的效果如下:

每一行中,放置图标和input输入框。input使用的是默认样式,看起来还是很清爽的。
hml视图层:
<dialog id="loginDialog">
                 <div class="loginDialog">
                     <div class="formItem">
                         <image src="{{ phone ? (imgUrl + 'phone.png') : (imgUrl + 'phone1.png') }}"></image>
                         <input id="phoneInput" type="number" placeholder="请输入手机号" onchange="inputPhone"></input>
                     </div>
                     <div class="formItem">
                         <image src="{{ pwd ? (imgUrl + 'password.png') : (imgUrl + 'password1.png') }}"></image>
                         <input id="pwdInput" type="password" placeholder="请输入密码" onchange="inputPwd"></input>
                     </div>
                     <button class="inputBtn" onclick="login">登录</button>
                 </div>
             </dialog>
- 1.
- 2.
- 3.
- 4.
- 5.
- 6.
- 7.
- 8.
- 9.
- 10.
- 11.
- 12.
- 13.
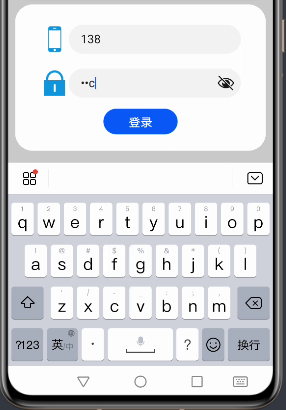
手机号的input设置type="number",在获取焦点后键盘自动弹出为数字键盘。密码框type="password",弹出普通键盘,且输入的字符会变为圆点,也可点击右侧眼睛图标查看密码内容。
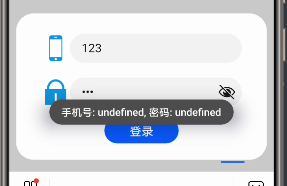
在最开始使用input时,尝试使用this.$element("id").value获取,但这样是获取不到的。
// 登录
 login() {
     prompt.showToast({
         message: "手机号: " + this.$element("phoneInput").value +
         ", 密码: " + this.$element("pwdInput").value,
         duration: 5000
     })
 }
- 1.
- 2.
- 3.
- 4.
- 5.
- 6.
- 7.
- 8.
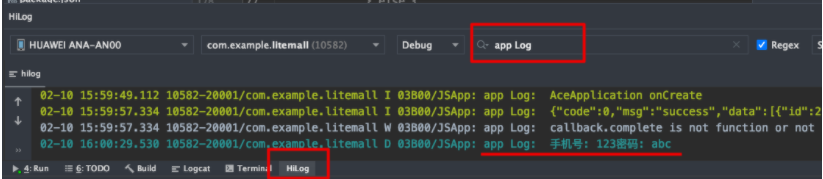
因此需要使用input的onchange属性绑定值改变的事件,通过e.value取到改变后的值,并赋给data中的变量。
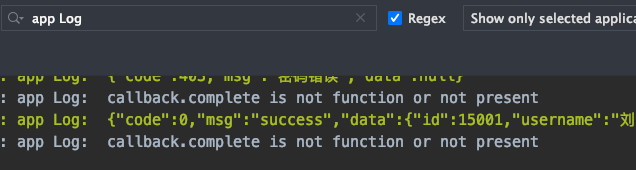
顺便提一下,今天突然找到了console打印日志的查看方式。需在最下方打开"HiLog"视图,搜索"app Log"后即可查看。console.log()的内容需设置日志等级"debug",console.info()则在"info"等级即可查看。
// 手机号输入框
 inputPhone(e) {
     this.phone = e.value;
 },
 // 密码输入框
 inputPwd(e) {
     this.pwd = e.value;
 },
 // 登录
 login() {
     console.log("手机号: " + this.phone + "密码: " + this.pwd);
 }
- 1.
- 2.
- 3.
- 4.
- 5.
- 6.
- 7.
- 8.
- 9.
- 10.
- 11.
- 12.
这里能够正常获取输入框的值了,就可以在点击按钮后将值传给后台服务器,进行登录的校验。按钮的点击方法通过onclick进行绑定。
// 登录
login() {
fetch.fetch({
url: this.url + "/litemall/user/login?phone=" + this.phone + "&pwd=" + this.pwd,
responseType: "json",
success: res => {
let data = JSON.parse(res.data);
console.info(JSON.stringify(data));
if (0 != data.code) {
prompt.showToast({
message: data.msg,
duration: 3000
})
} else {
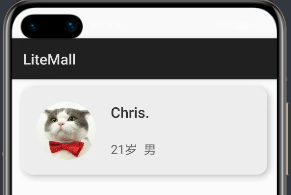
let userInfo = data.data;
userInfo.age = this.getAge(userInfo.birthday);
this.userInfo = userInfo;
this.$element("loginDialog").close();
}
}
})
}
- 1.
- 2.
- 3.
- 4.
- 5.
- 6.
- 7.
- 8.
- 9.
- 10.
- 11.
- 12.
- 13.
- 14.
- 15.
- 16.
- 17.
- 18.
- 19.
- 20.
- 21.
- 22.
登录失败,用提示框提示用户失败原因:

登录成功,用户信息赋值给页面并关闭dialog:
这里日志的打印需要使用JSON.stringify(),否则会打印"object"。
input组件和button组件都提供了丰富的type可供选择,具体可参考官方文档。
https://developer.harmonyos.com/cn/docs/documentation/doc-references/js-components-basic-input-0000000000611673
css渲染层:
.loginDialog {
    width: 80%;
    height: 400px;
    display: flex;
    flex-direction: column;
    align-items: center;
    justify-content: center;
}
.formItem {
    width: 100%;
    height: 100px;
    display: flex;
    align-items: center;
    justify-content: space-between;
    margin-bottom: 20px;
}
.formItem>image {
    width: 70px;
    height: 70px;
    margin: 0 10px 0 10px;
}
input {
    flex: 1;
}
.inputBtn {
    width: 200px;
    height: 70px;
}
- 1.
- 2.
- 3.
- 4.
- 5.
- 6.
- 7.
- 8.
- 9.
- 10.
- 11.
- 12.
- 13.
- 14.
- 15.
- 16.
- 17.
- 18.
- 19.
- 20.
- 21.
- 22.
- 23.
- 24.
- 25.
- 26.
- 27.
- 28.
2、注册模块
注册模块同样使用dialog弹窗,内容比登录要更丰富一些:

hml视图层:
<dialog id="registerDialog">
                 <div class="registerDialog">
                     <div class="formItem">
                         <image src="{{ phone ? (imgUrl + 'phone.png') : (imgUrl + 'phone1.png') }}"></image>
                         <input type="number" placeholder="请输入手机号" onchange="inputPhone"></input>
                     </div>
                     <div class="formItem">
                         <image src="{{ pwd ? (imgUrl + 'password.png') : (imgUrl + 'password1.png') }}"></image>
                         <input type="password" placeholder="请输入密码" onchange="inputPwd"></input>
                     </div>
                     <div class="formItem">
                         <image src="{{ username ? (imgUrl + 'username.png') : (imgUrl + 'username1.png') }}"></image>
                         <input type="text" placeholder="请输入姓名" onchange="inputUsername"></input>
                     </div>
                     <div class="formItem">
                         <image src="{{ nickname ? (imgUrl + 'nickname.png') : (imgUrl + 'nickname1.png') }}"></image>
                         <input type="text" placeholder="请输入昵称" onchange="inputNickname"></input>
                     </div>
                     <div class="formItem">
                         <image src="{{ genderVal ? (imgUrl + 'gender.png') : (imgUrl + 'gender1.png') }}"></image>
                         <picker type="text" range="{{ genders }}" onchange="chooseGender">{{ gender }}</picker>
                     </div>
                     <div class="formItem">
                         <image src="{{ birthdayVal ? (imgUrl + 'birthday.png') : (imgUrl + 'birthday1.png') }}"></image>
                         <picker type="date" start="1900-1-1" selected="2000-1-1" onchange="chooseBirthday">{{ birthday }}</picker>
                     </div>
                     <button class="inputBtn" onclick="register">注册</button>
                 </div>
             </dialog>
- 1.
- 2.
- 3.
- 4.
- 5.
- 6.
- 7.
- 8.
- 9.
- 10.
- 11.
- 12.
- 13.
- 14.
- 15.
- 16.
- 17.
- 18.
- 19.
- 20.
- 21.
- 22.
- 23.
- 24.
- 25.
- 26.
- 27.
- 28.
- 29.
上面四个依然是input输入框,随后两个使用了picker选择框组件。需注意,选择框组件标记中需放置文本内容,通过点击这里的文本在页面下方弹出选择框。
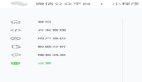
type="text"是文本选择框,通过range属性绑定一个字符串数组,效果如下:
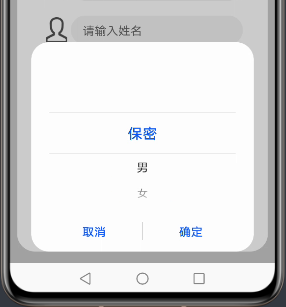
onchange属性绑定选择一项后的处理方法,e.newValue是选项值,e.newSelected是选项下标。
性别选择框js逻辑层代码:
export default {
    data: {
        ...
        gender: "点击选择性别",
        genderVal: "",
        genders: ['保密', '男', '女'],
        ...
    },
    ...
    // 性别选择器
    chooseGender(e) {
        this.gender = e.newValue;
        this.genderVal = e.newSelected;
    },
    ...
}
- 1.
- 2.
- 3.
- 4.
- 5.
- 6.
- 7.
- 8.
- 9.
- 10.
- 11.
- 12.
- 13.
- 14.
- 15.
- 16.
type="date"是日期选择器,可以通过属性指定开始、结束、当前日期,通过onchange绑定选择后的处理方法。效果如下:
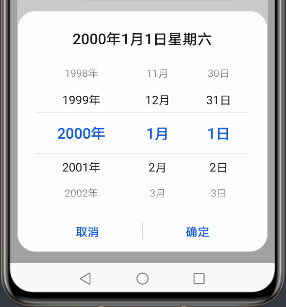
e.year/month/day分别为选择的年/月/日,注意month比实际月份小1。
生日选择框js逻辑层:
export default {
    data: {
       ...
        birthday: "点击选择生日",
        birthdayVal: ""
    },
    ...
    // 生日选择器
    chooseBirthday(e) {
        let month = (e.month + 1) + "";
        if (month.length == 1) {
            month = "0" + month;
        }
        let day = e.day + "";
        if (day.length == 1) {
            day = "0" + day;
        }
        let birthday = e.year + "-" + month + "-" + day;
        this.birthday = birthday;
        this.birthdayVal = birthday;
    },
    ...
}
- 1.
- 2.
- 3.
- 4.
- 5.
- 6.
- 7.
- 8.
- 9.
- 10.
- 11.
- 12.
- 13.
- 14.
- 15.
- 16.
- 17.
- 18.
- 19.
- 20.
- 21.
- 22.
- 23.
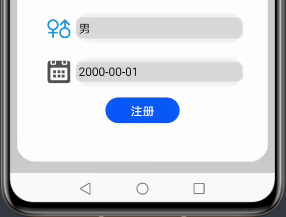
这里开发者工具有一个bug,type="date"在提示时错误拼写成了"data"。

选择器还有time, datetime, multi-text三种,鸿蒙的封装确实很好看好用。
注册的方法:
// 注册
 register() {
     fetch.fetch({
         url: this.url + "/litemall/user/register",
         method: "POST",
         data: {
             username: this.username,
             password: this.pwd,
             gender: this.genderVal,
             birthday: this.birthdayVal,
             nickname: this.nickname,
             mobile: this.phone
         },
         header: {
             "Content-Type": "application/json;charset=UTF-8"
         },
         responseType: "json",
         success: res => {
             let data = JSON.parse(res.data);
             console.info(JSON.stringify(data));
             if (0 != data.code) {
                 prompt.showToast({
                     message: data.msg,
                     duration: 3000
                 });
             } else {
                 prompt.showToast({
                     message: "注册成功",
                     duration: 3000
                 });
                 this.$element("registerDialog").close();
             }
         }
     })
 }
- 1.
- 2.
- 3.
- 4.
- 5.
- 6.
- 7.
- 8.
- 9.
- 10.
- 11.
- 12.
- 13.
- 14.
- 15.
- 16.
- 17.
- 18.
- 19.
- 20.
- 21.
- 22.
- 23.
- 24.
- 25.
- 26.
- 27.
- 28.
- 29.
- 30.
- 31.
- 32.
- 33.
- 34.
- 35.
还需要注意,如果使用fetch发送请求,且data给的是一个对象时,请求头的Content-Type自动设置为application/x-www-form-urlencoded。如果服务器接收json数据,则需要设置请求头,否则会报如下错误。
Resolved [org.springframework.web.HttpMediaTypeNotSupportedException: Content type 'application/x-www-form-urlencoded;charset=UTF-8' not supported]
- 1.
注册一下:

https://harmonyos.51cto.com/#zz