https://harmonyos.51cto.com/#zz
1.前言:
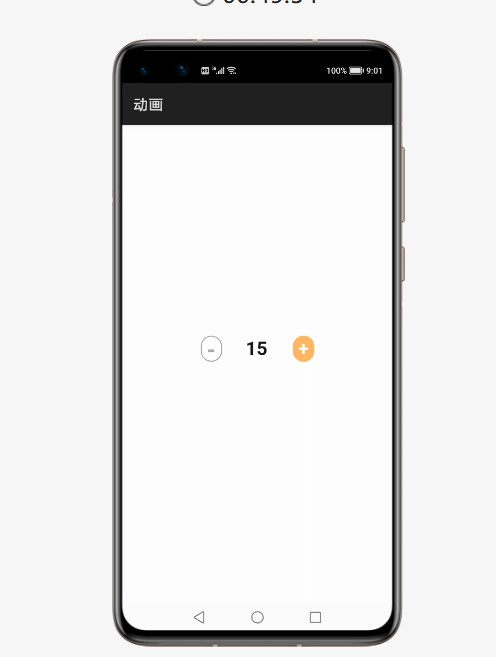
在第九篇文章购物车做好后,还忘记了一个至关重要的计算组件.在鸿蒙的组件中并没有提供这样一个计算功能的组件,因此我们今天来自定义一个,这个组件和之前做的购物车的小项目放在一起.直男缺乏美感,我们就模仿别人的就行:

2.组件介绍:
这里(以后也要用到)要用到一个标签:<input> .这个标签会与表单用在一起,比如搜索框,登录页面等都会用到<input>.input>.input>标签规定用户可输入数据的输入字段.type属性规定 input元素的类型, 根据不同的 type 属性,输入字段有多种形态.输入字段可以是文本字段、复选框、密码字段、单选按钮、按钮等等,今天所用到的是文本字段、复选框字段和密码字段.
3.js业务逻辑层:
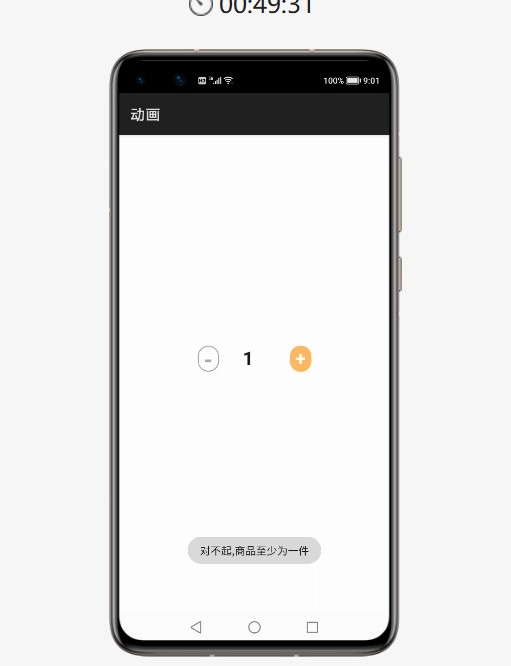
点击事件onclick后,执行+的操作可以没有上限,但执行-操作在实际应用(例如购物车商品的数量)当中一般是减1后就停止.这里我们做一个提示框,用来表示已经减到最小。
- import prompt from '@system.prompt';
- export default {
- data: {
- title: 'World',
- num:1,
- },
- addnum(){
- ++this.num;
- },
- reducenum(){
- if(this.num>1){
- --this.num;
- }
- else{
- prompt.showToast({
- message:"对不起,商品至少为一件",
- duration:5000,
- })
- }
- }
- }
4.视图层:
这里type的value可以是接收text,同样也可以是number 读者可以自行尝试。
- <div class="container">
- <div class="countview">
- <text class="tv1" onclick="reducenum">-</text>
- <input class="inputview" type="text" value="{{num}}"></input>
- <text class="tv2" onclick="addnum">+</text>
- </div>
- </div>
5.css属性设置:
- .container {
- width: 100%;
- height:1200px;
- display: flex;
- justify-content: center;
- align-items: center;
- }
- .countview{
- width: 300px;
- height: 120px;
- /**border: 3px solid red;**/
- display: flex;
- justify-content: center;
- align-items: center;
- border-radius: 100px;
- }
- .tv1{
- width: 70px;
- height: 70px;
- font-size: 60px;
- font-weight: bold;
- text-align: center;
- border:3px solid darkgray;
- border-radius: 35px;
- background-color: white;
- color:darkgrey ;
- }
- .tv2{
- width: 70px;
- height: 70px;
- font-size: 50px;
- font-weight: bold;
- text-align: center;
- border:4px solid #FFB964;
- border-radius: 35px;
- background-color: #FFB964;
- color: white;
- }
- .inputview{
- width: 200px;
- height: 100%;
- background-color: white;
- font-weight: bold;
- font-size: 50px;
- margin-left: 30px;
- }
6.效果呈现:


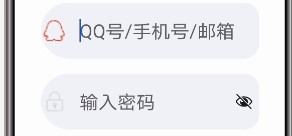
这里用到的 input 的type属性的文本字段和密码字段.利用这两个可以制作一个登录页面。
大家都知道在点击输入框时光标会闪烁,也即是需要获取焦点.而获取焦点的事件是 onfocus.取消焦点事件为onblur. 当我们点击input的父容器时就获得焦点,也就可以输入字段,为了更直观的看到获取焦点成功,我设置了图标的颜色,未获取时图标为灰色,获取成功后为红色.如下图:

placeholder是用户名密码框未输入内容时,默认显示的灰色文字。当未输入字段时显示,当在输入字段获得焦点时消失。


js业务逻辑层:
- export default {
- data: {
- title: 'World',
- flag:false,
- },
- click(){
- this.flag=true;
- },
- click1(){
- this.flag=false;
- }
- }
视图层:
- <div class="container">
- <div class="one" onblur="click1" onfocus="click">
- <image class="img1"src="{{flag?'common/qqs.png':'common/qqu.png'}}"></image>
- <input style="background-color:rgb(242, 243, 247);" class="input1" type="text" placeholder="QQ号/手机号/邮箱"> </input>
- </div>
- <div onblur="click1" class="one" onfocus="click">
- <image class="img1"src="{{flag?'common/mimas.png':'common/mimau.png'}}"></image>
- <input style="background-color:rgb(242, 243, 247);" class="input1" type="password" placeholder="输入密码"> </input>
- </div>
- <div class="but">
- <button class="bottom">登录</button>
- </div>
- </div>
css属性设置:
- .container {
- width: 100%;
- height: 1200px;
- display: flex;
- justify-content: center;
- align-items: center;
- flex-direction: column;
- }
- .one{
- width: 80%;
- height: 150px;
- background-color: rgb(242, 243, 247);
- border-radius: 100px;
- margin: 20px;
- display: flex;
- align-items: center;
- }
- .img1{width: 80px;
- height: 80px;
- }
- .input1{
- height: 100%;
- font-size: 50px;
- focus-color: rgb(109, 131, 170);
- }
- .bottom{
- width: 280px;
- height: 280px;
- border-radius: 140px;
- background-color: rgb(192, 192, 190);
- margin: 60px;
- font-size: 100px;
- }
- .but{
- display: flex;
- justify-content: center;
- }
欢迎读者朋友订阅我的专栏:[HarmonyOS开发从0到1]
https://harmonyos.51cto.com/column/35
https://harmonyos.51cto.com/#zz


