写在前面:设计模式源于生活,而又高于生活!
什么是适配器模式
定义:将一个系统的接口转换成另外一种形式,从而使原来不能直接调用的接口变得可以调用。
适配器模式角色划分
适配器模式涉及3个角色:
- 源(Adaptee):需要被适配的对象或类型,相当于插头。
- 适配器(Adapter):连接目标和源的中间对象,相当于插头转换器。
- 目标(Target):期待得到的目标,相当于插座。
适配器模式包括3种形式:类适配器模式、对象适配器模式、接口适配器模式(或又称作缺省适配器模式)。
适配器模式应用场景
- 新老版本接口的兼容
- Mybatis多种日志框架的整合
适配器创建的方式
- 对象适配器(组合模式)
- 类适配器(继承模式)
适配器快速入门例子
比如早期的时候V1版本订单接口的入参为Map类型,随着业务的更新和迭代在V2版本的时候该订单接口的入参需要支持List的类型?请问不改变的该接口代码的情况下,如何支持List类型。
1.源(Adaptee):需要被适配的对象或类型,相当于插头。
public void froOrderMap(Map map) {
    for (int i = 0; i < map.size(); i++) {
        // 使用I作为MapKey获取数据
        String value = (String) map.get(i);
        System.out.println("value:" + value);
    }
}
- 1.
- 2.
- 3.
- 4.
- 5.
- 6.
- 7.
2.目标(Target):期待得到的目标,相当于插座。
public interface List<E> extends Collection<E> {
    ......
    int size();
    E get(int index);
    E set(int index, E element);
}
- 1.
- 2.
- 3.
- 4.
- 5.
- 6.
3.适配器(Adapter):连接目标和源的中间对象,相当于插头转换器
public class ListAdapter extends HashMap {
    private List list;
    public ListAdapter(List list) {
        this.list = list;
    }
    @Override
    public int size() {
        return list.size();
    }
    @Override
    public Object get(Object key) {
        return list.get(Integer.valueOf(key.toString()).intValue());
    }
}
- 1.
- 2.
- 3.
- 4.
- 5.
- 6.
- 7.
- 8.
- 9.
- 10.
- 11.
- 12.
- 13.
- 14.
测试运行效果
public class Test {
    public static void main(String[] args) {
        // 1.获取集合类型用户
        List member = new MemberService().getMember();
        //new OrderService().froOrderMap(member);
        ListAdapter listAdapter = new ListAdapter(member);
        new OrderService().froOrderMap(listAdapter);
    }
}
- 1.
- 2.
- 3.
- 4.
- 5.
- 6.
- 7.
- 8.
- 9.
使用适配器模式实现日志收集
比如设计一个日志收集系统,可能会考虑文件写入、也可能考虑写入MQ、也可能考虑写入数据库等。
对象适配器方式实现
定义基本实体类
@Data
public class LogBean {
    /**
     * 日志ID
     */
    private String logId;
    /**
     * 日志内容
     */
    private String logText;
}
- 1.
- 2.
- 3.
- 4.
- 5.
- 6.
- 7.
- 8.
- 9.
- 10.
- 11.
1.源目标接口
public interface LogWriteFileService {
    /**
     * 将日志写入到文件中
     */
    void logWriteFile();
    /**
     * 从本地文件中读取日志
     *
     * @return
     */
    List<LogBean> readLogFile();
}
- 1.
- 2.
- 3.
- 4.
- 5.
- 6.
- 7.
- 8.
- 9.
- 10.
- 11.
- 12.
2.源目标接口实现类
public class LogWriteFileServiceImpl implements LogWriteFileService {
    @Override
    public void logWriteFile() {
        System.out.println(">>>将日志写入文件中...");
    }
  @Override
    public List<LogBean> readLogFile() {
        LogBean log1 = new LogBean();
        log1.setLogId("0001");
        log1.setLogText("Tomcat启动成功..");
        LogBean log2 = new LogBean();
        log2.setLogId("0002");
        log2.setLogText("Jetty启动成功..");
        List<LogBean> listArrayList = new ArrayList<LogBean>();
        listArrayList.add(log1);
        listArrayList.add(log2);
        return listArrayList;
    }
}
- 1.
- 2.
- 3.
- 4.
- 5.
- 6.
- 7.
- 8.
- 9.
- 10.
- 11.
- 12.
- 13.
- 14.
- 15.
- 16.
- 17.
- 18.
- 19.
3.目标接口
public interface LogWriteDbService {
    /**
     * 将日志写入到数据库中
     */
   public void writeDbFile(LogBean logBean);
}
- 1.
- 2.
- 3.
- 4.
- 5.
- 6.
4.适配器
//LogAdapter :适配器
//LogWriteDbService:目标
public class LogAdapter implements LogWriteDbService {
    //源接口
    private LogWriteFileService logWriteFileService;
    public LogAdapter(LogWriteFileService logWriteFileService) {
        this.logWriteFileService = logWriteFileService;
    }
    @Override
    public void writeDbFile(LogBean logBean) {
        // 1.从文件中读取日志文件
        List<LogBean> logBeans = logWriteFileService.readLogFile();
        //目标
        // 2.写入到数据库中
        logBeans.add(logBean);
        System.out.println(">>>将数据写入到数据库中..");
        // 3.写入到本地文件中
        logWriteFileService.logWriteFile();
    }
}
- 1.
- 2.
- 3.
- 4.
- 5.
- 6.
- 7.
- 8.
- 9.
- 10.
- 11.
- 12.
- 13.
- 14.
- 15.
- 16.
- 17.
- 18.
- 19.
- 20.
适配器模式优缺点
适配器模式的优点
- 更好的复用性
- 系统需要使用现有的类,而此类的接口不符合系统的需要。那么通过适配器模式就可以让这些功能得到更好的复用。
- 更好的扩展性
- 在实现适配器功能的时候,可以调用自己开发的功能,从而自然地扩展系统的功能。
适配器模式的缺点
- 过多的使用适配器,会让系统非常零乱,不易整体进行把握。比如,明明看到调用的是A接口,其实内部被适配成了B接口的实现,一个系统如果太多出现这种情况,无异于一场灾难。因此如果不是很有必要,可以不使用适配器,而是直接对系统进行重构。
Mbatis 日志收集分析
Java开发中经常用到的日志框架有很多,Log4j、Log4j2、slf4j等等,Mybatis定义了一套统一的日志接口供上层使用,并为上述常用的日志框架提供了相应的适配器
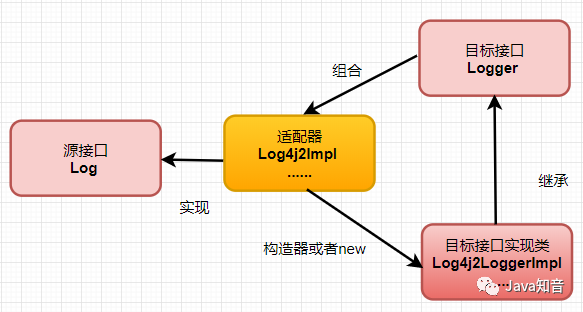
在Mybatis的日志模块中就是使用了适配器模式。Mybatis内部在使用日志模块时,使用了其内部接口 org.apache.ibatis.logging.Log,但是常用的日志框架的对外接口各不相同,Mybatis为了复用和集成这些第三方日志组件,在其日志模块中,提供了多种Adapter,将这些第三方日志组件对外接口适配成org.apache.ibatis.logging.Log,这样Myabtis 就可以通过Log接口调用第三方日志了
源码分析图
源码剖析
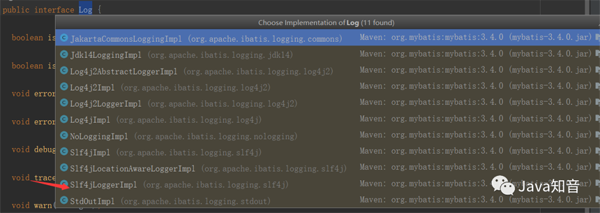
Mybatis Log接口:相当于源接口
package org.apache.ibatis.logging;
public interface Log {
  boolean isDebugEnabled();
  boolean isTraceEnabled();
  void error(String s, Throwable e);
  void error(String s);
  void debug(String s);
  void trace(String s);
  void warn(String s);
}
- 1.
- 2.
- 3.
- 4.
- 5.
- 6.
- 7.
- 8.
- 9.
- 10.
Mybatis源接口实现类
适配器第一种
package org.apache.ibatis.logging.slf4j;
import org.apache.ibatis.logging.Log;
import org.slf4j.Logger;
//Slf4jLoggerImpl :相当于适配器
//Log :相当于源接口
class Slf4jLoggerImpl implements Log {
  //Logger:相当于目标接口
  private Logger log;
  public Slf4jLoggerImpl(Logger logger) {
    //源=目标
    log = logger;
  }
- 1.
- 2.
- 3.
- 4.
- 5.
- 6.
- 7.
- 8.
- 9.
- 10.
- 11.
- 12.
适配器第二种
package org.apache.ibatis.logging.log4j2;
import org.apache.ibatis.logging.Log;
import org.apache.logging.log4j.LogManager;
import org.apache.logging.log4j.Logger;
import org.apache.logging.log4j.spi.AbstractLogger;
//Log4j2Impl :相当于适配器
//Log :相当于源接口
public class Log4j2Impl implements Log {
  private Log log;
  //构造器
  public Log4j2Impl(String clazz) {
    //目标接口
    Logger logger = LogManager.getLogger(clazz);
    //判断类型去实现:相当于目标
    if (logger instanceof AbstractLogger) {
      log = new Log4j2AbstractLoggerImpl((AbstractLogger) logger);
    } else {
      //源=目标
      log = new Log4j2LoggerImpl(logger);
    }
  }
- 1.
- 2.
- 3.
- 4.
- 5.
- 6.
- 7.
- 8.
- 9.
- 10.
- 11.
- 12.
- 13.
- 14.
- 15.
- 16.
- 17.
- 18.
- 19.
- 20.
- 21.
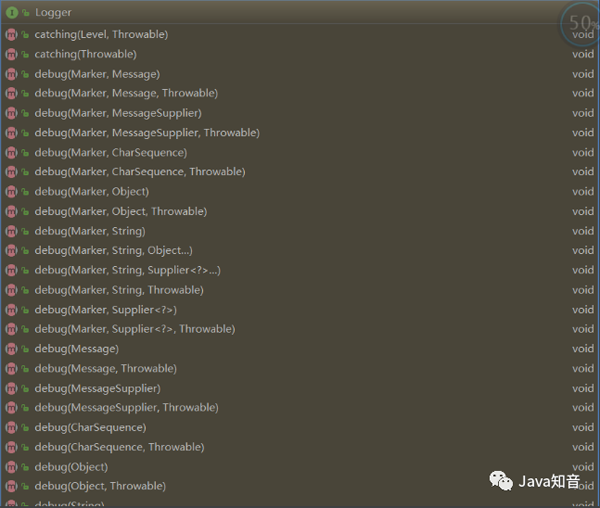
目标接口:Logger