背景
当我在公寓里寻找我下一篇文章要分析的对象时,惊喜地发现了一个尚未拆封的XBox One控制器,具体如下图所示:
实际上,我很少玩XBox,所以,倒不如把这个控制器拆开,看看能否从中提取出什么有趣的信息。
目标
当评估一个嵌入式平台时,实际上有很多事情可以去尝试;不过,在这篇文章,我们将尝试下列事情:
1. 能否从目标机上提取固件?
2. 能否对目标机进行调试或检测,从而深入了解其内部运行机制?
3. 能否通过软件或硬件方式来修改固件?
为了回答这些问题,第一步就是硬件拆解。
硬件拆解
打开机箱,可以看到如下PCB:
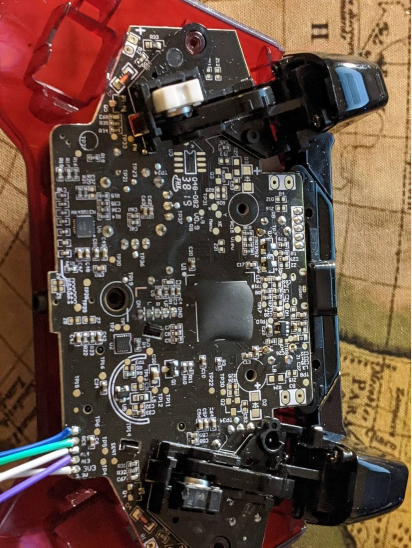
请注意,这里主芯片被环氧树脂覆盖了。幸运的是,有很多测试点都带有标签,但有标签的似乎是各种按键的测试点,所以没有什么令人兴奋的地方。
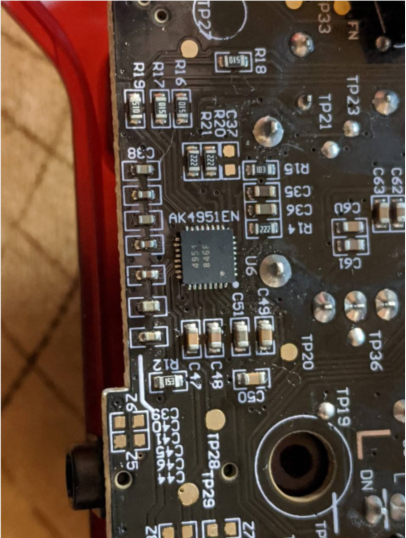
在板子的底部有一个标有AK4961的IC,实际上,这是一个音频编解码芯片。相关的数据手册可以从这里找到。这款芯片是一款低功耗24位立体声CODEC,带有麦克风、耳机和扬声器放大器。
然而,如果我们往右边看,则会发现一组带有丝印标签的测试点。
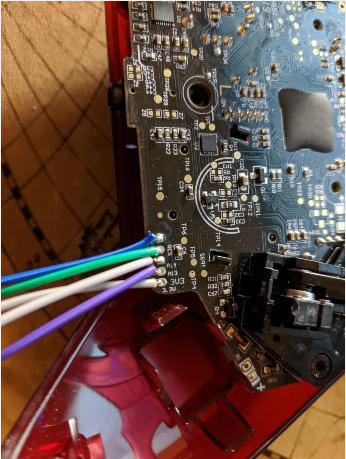
这里,我们看到标签3V3、A13、A14、RES。这些是值得关注的,尤其是看过我之前写的关于路由器拆机和发现UART的文章的读者,可能已经猜到接下来要如何操作了。首先,我们可以通过万用表测量一下各引脚的电压。
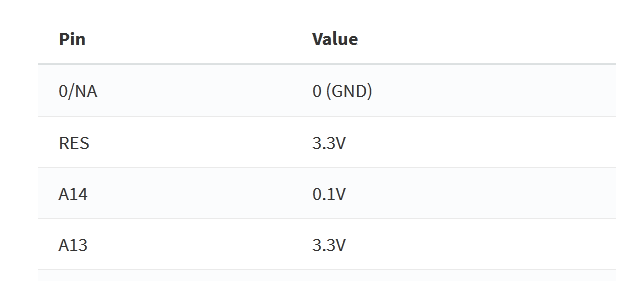
其中,在RES、A14或A13引脚上没有测到电压的变化,那么,这些到底是做什么用的呢?其中一个标签是RES(它可能代表system reset即系统重置),那么,它很有可能用于JTAG或SWD接头。
我们可以通过用10K电阻拉低RES引脚来测试它是否真的复位了目标(记住,我们在这里是反向的,所以,注意不要短路)。如果您不熟悉这些类型的接头或系统复位引脚的典型工作原理,那么就要注意了——它们通常为低电平有效,这意味着它们在高电平时处于空闲状态,所以,必须拉低才能激活。因此,如果我们监控DMESG-W的输出,并用一个10K电阻将此线路切换为低电平,我们会看到什么?
- [ 2108.588884] usb 1-6.4: new full-speed USB device number 10 using xhci_hcd
- [ 2108.691108] usb 1-6.4: New USB device found, idVendor=0e6f, idProduct=02a2, bcdDevice= 1.0f
- [ 2108.691113] usb 1-6.4: New USB device strings: Mfr=1, Product=2, SerialNumber=3
- [ 2108.691116] usb 1-6.4: Product: PDP Wired Controller for Xbox One - Crimson Red
- [ 2108.691119] usb 1-6.4: Manufacturer: Performance Designed Products
- [ 2108.691122] usb 1-6.4: SerialNumber: 0000AE38D7650465
- [ 2108.698675] input: Generic X-Box pad as /devices/pci0000:00/0000:00:14.0/usb1/1-6/1-6.4/1-6.4:1.0/input/input25
- [ 2131.403862] usb 1-6.4: USB disconnect, device number 10
- [ 2133.420350] usb 1-6.4: new full-speed USB device number 11 using xhci_hcd
- [ 2133.522469] usb 1-6.4: New USB device found, idVendor=0e6f, idProduct=02a2, bcdDevice= 1.0f
- [ 2133.522474] usb 1-6.4: New USB device strings: Mfr=1, Product=2, SerialNumber=3
- [ 2133.522478] usb 1-6.4: Product: PDP Wired Controller for Xbox One - Crimson Red
- [ 2133.522480] usb 1-6.4: Manufacturer: Performance Designed Products
- [ 2133.522483] usb 1-6.4: SerialNumber: 0000AE38D7650465
- [ 2133.530103] input: Generic X-Box pad as /devices/pci0000:00/0000:00:14.0/usb1/1-6/1-6.4/1-6.4:1.0/input/input26
太好了,这样做会使控制器复位,即弄清楚了1个引脚的作用,还剩下2个引脚需要处理。
当看到这样的调试接头时,通常的假设是它用于JTAG或其他形式的硬件级调试。但是,JTAG规范要求至少有4个引脚,即TDO、TDI、TMS和TCK。但是,我们的目标上只有两个引脚,因此,它很可能是一个单线调试(SWD)端口。
关于SWD
SWD是用于ARM Cortex目标设备的通用调试接口。顾名思义,SWD仅需要一条数据线和一条时钟线,但是我们如何确定到底是哪一条呢?在此之前,我们应该多了解一些SWD的工作原理,以及可以使用哪些工具与之交互。
首先,SWD与称为“调试访问端口”(DAP)的接口连接。DAP用于访问各种“访问端口”(AP),这些端口提供的功能包括典型的硬件调试,旧式JTAG内核以及其他高性能内存总线。下图给出了DAP和AP的结构的直观表示。
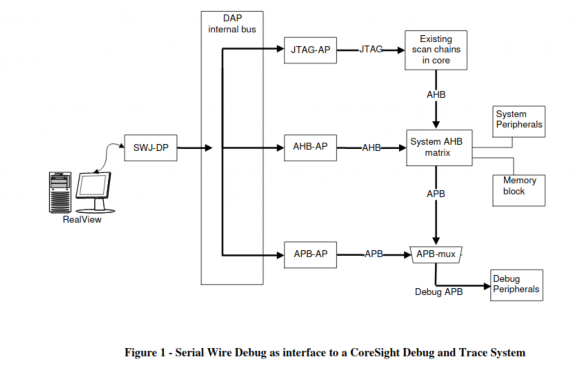
这些AP均由64个32位寄存器组成,其中一个寄存器用于标识AP的类型。AP的功能和特性决定了访问和利用这些寄存器的方式,详情可以参阅这篇文档。另外,ARM接口规范默认定义了两个AP,分别是JTAG-AP和MEM-AP。其中,MEM-AP还提供了发现与其连接的组件的相关机制。
SWD协议
如前所述,SWD是JTAG的伪替代品。使用SWD时,引脚数从4个减少到2个,并且提供了许多与JTAG相同的功能。但是,SWD的一个缺点是无法将设备以菊花链方式链接在一起,这正是JTAG所允许的。SWD中使用的两个引脚如下所示:
引脚 用途
SWCLK 提供给CPU的时钟信号,确定何时进行数据采样并通过SWDIO发送
SWDIO 双向数据引脚,用于与目标CPU之间的数据传输
SWD 利用基于数据包的协议读写DAP/AP中的寄存器,它们包括以下阶段:
- 从主机向目标发送数据包请求
- 总线转换
- 目标为主机返回确认响应
- 数据传输阶段
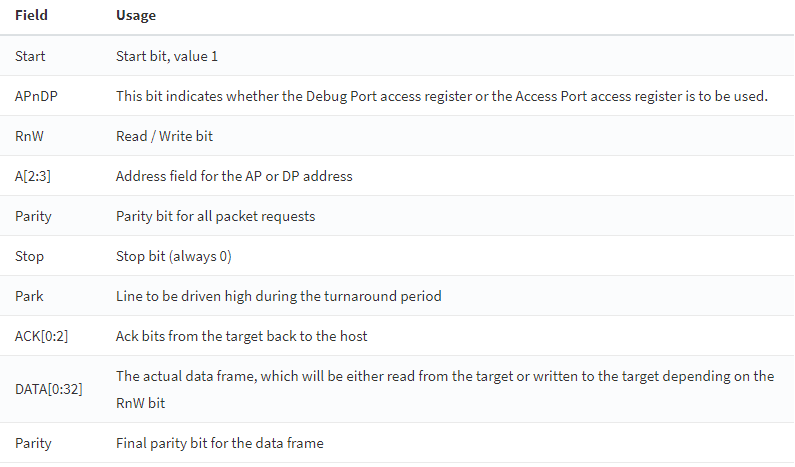
数据包的结构如下所示:
在park位(从主机到目标机)之后,有一个转换期,基本上意味着目标机现在将在同一条线上做出响应。
从一个较高的层次来看,SWD端口使用这些数据包与DAP进行交互,而DAP又允许访问MEM-AP,MEM-AP提供访问调试以及内存读/写功能。在本篇文章中,我们将使用一个名为OpenOCD的工具来执行这些事务。接下来我们将为读者介绍如何构建和使用OpenOCD。
OpenOCD
安装依赖库:
- sudo apt-get install build-essential libusb-1.0-0-dev automake libtool gdb-multiarch
克隆存储库,并完成相应的配置和构建工作!
- wrongbaud@115201:~/blog$ git clone https://git.code.sf.net/p/openocd/code openocd-code
- cd openocd-code
- ./bootstrap
- ./configure
- make -j$(nproc)
在构建好了OpenOCD之后,我们可以尝试在SWD上调试这个控制器。为此,我们至少需要告诉OpenOCD两件事:
- 我们使用什么进行调试(我们要使用哪个调试适配器)
- 我们调试的目标是什么
为了进行调试,我们将使用FT2232H,我们曾在前一篇文章中通过它来转储SPI闪存。有了这个接口,我们就可以让OpenOCD通过SWD查询有关目标的信息了,这一点非常重要,因为在逆向工程的这个阶段,我们甚至还不知道目标CPU到底是什么!
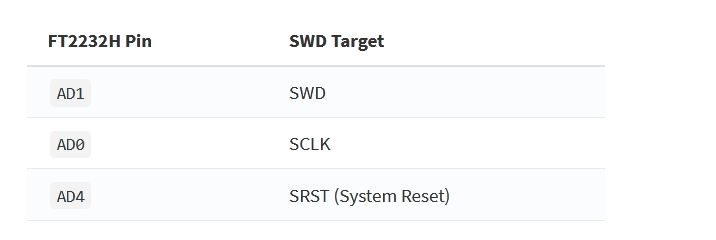
下表用于确定FT2232H上需要连接到SWD目标的引脚:
最后,为了将FT2232H用作SWD适配器,必须在FT2232H上的AD1/AD2之间放置一个470欧姆的电阻。
一旦我们将FT2232H上的引脚连接到目标,我们就可以使用以下脚本查询DAP控制器上的DPIDR寄存器了:
- # We are using an FT2232H so specify this here
- interface ftdi
- # Provide the VID/PID of the FT2232H
- ftdi_vid_pid 0x0403 0x6010
- # There are two channels, this is the default
- ftdi_channel 0
- # To the best of my knowledge, this is used to properly set and confiture the state of the lines we are using
- ftdi_layout_init 0x0018 0x05fb
- # Enable SWD for the lines that we are using, and the port
- ftdi_layout_signal SWD_EN -data 0
- # This is used to specify the sRST pin, in our case we're using
- ftdi_layout_signal nSRST -data 0x0010
- # Here we are selecting SWD as opposed to another transport layer such as JTAG
- transport select swd
- # Set the speed of the adapter, this will vary based on what your hardware supports
- adapter_khz 100
- # Create a new dap, (TAP for JTAG terms) with name chip and role CPU, -enable let's OpenOCD to know to add it to the scan
- swd newdap chip cpu -enable
- # Create the DAP instance, this must be explicitly created according to the OpenOCD docs
- dap create chip.dap -chain-position chip.cpu
我们可以使用openocd运行这个脚本,输出如下图所示(注意,第一次运行时并没有输出,交换SWD/SCLK线后,才会输出下面的结果)。从FT2232到控制器的连接方法见下表。
- wrongbaud@wubuntu:~/blog/stm32-xbox$ sudo openocd -f openocd.cfg
- Open On-Chip Debugger 0.10.0+dev-01040-ge7e681ac (2020-01-27-18:55)
- Licensed under GNU GPL v2
- For bug reports, read
- http://openocd.org/doc/doxygen/bugs.html
- Info : FTDI SWD mode enabled
- Info : Listening on port 6666 for tcl connections
- Info : Listening on port 4444 for telnet connections
- Info : clock speed 100 kHz
- Info : SWD DPIDR 0x2ba01477
- Warn : gdb services need one or more targets defined
太棒了!我们发现了一个芯片ID即0x2BA01477,如果我们搜索这个ID,我们会发现许多Cortex M/STM32器件——这说明该处理器系列支持SWD。现在,我们可以与DAP进行通信,看看是否可以确定正在使用的处理器的具体型号——如果这是一个具有配置文件的处理器,我们就能够转储闪存内容,并从目标处理器获得其他辅助信息。有了这些额外的信息,我们就可以让OpenOCD创建一个目标,使用带有Cortex M定义的芯片,以更好地利用DAP来访问一些更通用的特性,同时,还可以帮我们进一步确定目标CPU的型号:
- # Set up the GDB target for the CPU, cortex_m is the CPU type,
- target create chip.cpu cortex_m -dap chip.dap
- # init reads out all of the necessary information from the DAP, kicks off the debugging session, etc
- init
- # Read out the information from the DAP, including the ROM table
- dap info
当我们使用这个配置文件运行openocd时,会看到以下结果:
- wrongbaud@wubuntu:~/blog/stm32-xbox$ sudo openocd -f openocd.cfg
- Open On-Chip Debugger 0.10.0+dev-01040-ge7e681ac (2020-01-27-18:55)
- Licensed under GNU GPL v2
- For bug reports, read
- http://openocd.org/doc/doxygen/bugs.html
- Info : FTDI SWD mode enabled
- Info : clock speed 100 kHz
- Info : SWD DPIDR 0x2ba01477
- Info : chip.cpu: hardware has 6 breakpoints, 4 watchpoints
- Info : chip.cpu: external reset detected
- Info : Listening on port 3333 for gdb connections
- AP ID register 0x24770011
- Type is MEM-AP AHB3
- MEM-AP BASE 0xe00ff003
- Valid ROM table present
- Component base address 0xe00ff000
- Peripheral ID 0x00000a0411
- Designer is 0x0a0, STMicroelectronics
- Part is 0x411, Unrecognized
- Component class is 0x1, ROM table
- MEMTYPE system memory present on bus
- ROMTABLE[0x0] = 0xfff0f003
- Component base address 0xe000e000
- Peripheral ID 0x04000bb00c
- Designer is 0x4bb, ARM Ltd.
- Part is 0xc, Cortex-M4 SCS (System Control Space)
- Component class is 0xe, Generic IP component
- ROMTABLE[0x4] = 0xfff02003
- Component base address 0xe0001000
- Peripheral ID 0x04003bb002
- Designer is 0x4bb, ARM Ltd.
- Part is 0x2, Cortex-M3 DWT (Data Watchpoint and Trace)
- Component class is 0xe, Generic IP component
- ROMTABLE[0x8] = 0xfff03003
- Component base address 0xe0002000
- Peripheral ID 0x04002bb003
- Designer is 0x4bb, ARM Ltd.
- Part is 0x3, Cortex-M3 FPB (Flash Patch and Breakpoint)
- Component class is 0xe, Generic IP component
- ROMTABLE[0xc] = 0xfff01003
- Component base address 0xe0000000
- Peripheral ID 0x04003bb001
- Designer is 0x4bb, ARM Ltd.
- Part is 0x1, Cortex-M3 ITM (Instrumentation Trace Module)
- Component class is 0xe, Generic IP component
- ROMTABLE[0x10] = 0xfff41003
- Component base address 0xe0040000
- Peripheral ID 0x04000bb9a1
- Designer is 0x4bb, ARM Ltd.
- Part is 0x9a1, Cortex-M4 TPIU (Trace Port Interface Unit)
- Component class is 0x9, CoreSight component
- Type is 0x11, Trace Sink, Port
- ROMTABLE[0x14] = 0xfff42003
- Component base address 0xe0041000
- Peripheral ID 0x04000bb925
- Designer is 0x4bb, ARM Ltd.
- Part is 0x925, Cortex-M4 ETM (Embedded Trace)
- Component class is 0x9, CoreSight component
- Type is 0x13, Trace Source, Processor
- ROMTABLE[0x18] = 0x0
- End of ROM table
- Info : Listening on port 6666 for tcl connections
- Info : Listening on port 4444 for telnet connections
这样的话,我们不仅可以与DAP和MEM-AP进行交互,还可以通过GDB对目标进行调试。由于MEM-AP条目中的零件号0x411,我们还可以确定目标CPU属于STM32F2X系列:
- MEM-AP BASE 0xe00ff003
- Valid ROM table present
- Component base address 0xe00ff000
- Peripheral ID 0x00000a0411
- Designer is 0x0a0, STMicroelectronics
- Part is 0x411, Unrecognized
- Component class is 0x1, ROM table
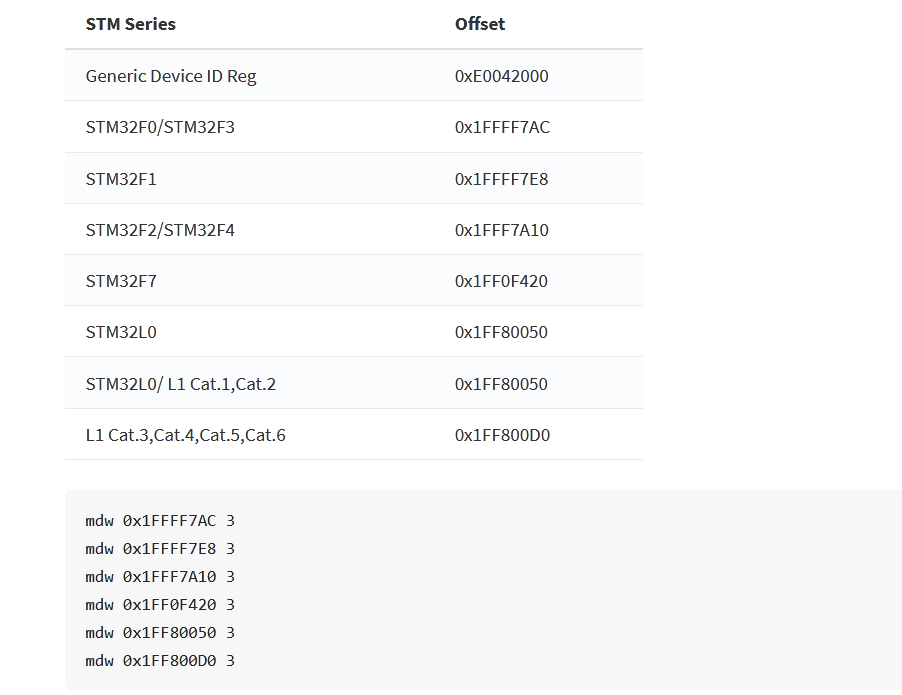
不过,假如我们没有访问DAP的权限的话,能否通过内存读写来找出我们的目标是什么呢?为了弄清这一点,需要借助于STM32 CPU中常见的一些内存区域,其中存储了ID和闪存信息。有了这些信息,我们可以修改OpenOCD脚本来读取这些区域并查找相关的ID信息!下表包含ID信息的相关偏移量:
当我们运行升级后的OpenOCd脚本和以上命令时,我们会看到以下结果:
- > mdw 0x1FFFF7AC 3
- 0x1ffff7ac: ffffffff ffffffff ffffffff
- > mdw 0x1FFFF7E8 3
- 0x1ffff7e8: ffffffff ffffffff ffffffff
- > mdw 0x1FFF7A10 3
- 0x1fff7a10: 006c0028 31385114 30373639
- > mdw 0x1FF0F420 3
- SWD DPIDR 0x2ba01477
- Failed to read memory at 0x1ff0f424
- > mdw 0x1FF80050 3
- SWD DPIDR 0x2ba01477
- Failed to read memory at 0x1ff80054
- > mdw 0x1FF800D0 3
- SWD DPIDR 0x2ba01477
- Failed to read memory at 0x1ff800d4
- >
我们可以使用以下命令,借助该芯片数据手册中的闪存地址或上面链接的存储库,来获得闪存大小:
- > mdh 0x1FFF7A22
- 0x1fff7a22: 0100
现在我们已经知道了具体的目标,接下来就可以从配置文件中删除目标的swd、dap和target行,并在命令行中调用-f /usr/local/share/openocd/scripts/target/stm32f2x.cfg来替换它们。这样就可以正确地找出目标CPU。此外,我们现在还知道,这个STM32F2系列芯片具有0x100个1kb的闪存页。
- wrongbaud@wubuntu:~/blog/stm32-xbox$ sudo openocd -f openocd.cfg -f /usr/local/share/openocd/scripts/target/stm32f2x.cfg
- [sudo] password for wrongbaud:
- Open On-Chip Debugger 0.10.0+dev-01040-ge7e681ac (2020-01-27-18:55)
- Licensed under GNU GPL v2
- For bug reports, read
- http://openocd.org/doc/doxygen/bugs.html
- Info : FTDI SWD mode enabled
- adapter speed: 100 kHz
- Info : Listening on port 6666 for tcl connections
- Info : Listening on port 4444 for telnet connections
- Info : clock speed 1000 kHz
- Info : SWD DPIDR 0x2ba01477
- Info : stm32f2x.cpu: hardware has 6 breakpoints, 4 watchpoints
- Info : Listening on port 3333 for gdb connections
现在,我们就可以使用以下命令来转储内部闪存了:
- > flash list
- {name stm32f2x base 0 size 0 bus_width 0 chip_width 0} {name stm32f2x base 536836096 size 0 bus_width 0 chip_width 0}
- > flash read_bank 0 bank0.bin
- device id = 0x00016423
- flash size = 256 kbytes
- wrote 262144 bytes to file bank0.bin from flash bank 0 at offset 0x00000000 in 3.690861s (69.361 KiB/s)
- > flash read_bank 1 bank1.bin
- flash size = 512 bytes
- wrote 512 bytes to file bank1.bin from flash bank 1 at offset 0x00000000 in 0.007852s (63.678 KiB/s)
我们还可以使用下面的命令,利用gdb对控制器进行调试:
- wrongbaud@wubuntu:~/blog/stm32-xbox$ gdb-multiarch
- GNU gdb (Ubuntu 8.1-0ubuntu3.2) 8.1.0.20180409-git
- Copyright (C) 2018 Free Software Foundation, Inc.
- License GPLv3+: GNU GPL version 3 or later
- This is free software: you are free to change and redistribute it.
- There is NO WARRANTY, to the extent permitted by law. Type "show copying"
- and "show warranty" for details.
- This GDB was configured as "x86_64-linux-gnu".
- Type "show configuration" for configuration details.
- For bug reporting instructions, please see:
- Find the GDB manual and other documentation resources online at:
- For help, type "help".
- Type "apropos word" to search for commands related to "word".
- (gdb) set architecture arm
- The target architecture is assumed to be arm
- (gdb) target remote localhost:3333
- Remote debugging using localhost:3333
- warning: No executable has been specified and target does not support
- determining executable automatically. Try using the "file" command.
- 0x0800307e in ?? ()
- (gdb) x/10x 0x1FFF7A10
- 0x1fff7a10: 0x006c0028 0x31385114 0x30373639 0xc000fcc0
- 0x1fff7a20: 0x0100c000 0x67ff47d2 0x05dcf000 0x04a803b3
- 0x1fff7a30: 0x451744b1 0xffffffff
- (gdb)
因此,现在我们不仅可以转储闪存,还能以单步执行方式调试固件,但是……我们能够刷新MCU吗?
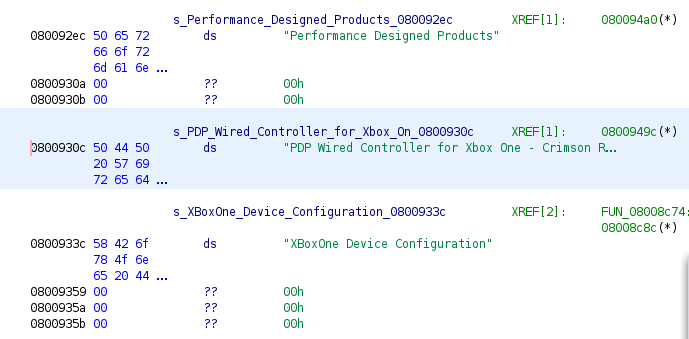
如果我们可以在固件映像中找到USB描述符字符串并进行相应的修改,则可以将其用作一种可见的方法来确定是否可以修补固件。现在,让我们使用GHIDRA加载固件,看看是否可以找到它们,为此,可以将固件映像加载到地址0x8000000处。需要注意的是,这里的固件加载地址是通过数据手册查到的,但是,如果没有数据手册的话,则可以通过OpenOCD发出reset halt命令,并单步执行第一条指令来确定该地址。幸运的是,这个固件映像其实很小,因此Ghidra可以快速对其进行处理。在dmesg输出中看到的字符串如下图所示:
让我们用产品字符串做一个简单的补丁,将其改为“Testing Firmware Patches”。我们可以在OpenOCD的telnet控制台中使用以下命令来覆盖闪存:
- wrongbaud@wubuntu:~/blog/stm32-xbox$ telnet localhost 4444
- Trying 127.0.0.1...
- Connected to localhost.
- Escape character is '^]'.
- Open On-Chip Debugger
- > flash read 0 bank0-orig.bin
- > flash read_bank 1 bank1-orig.bin
- flash size = 512 bytes
- wrote 512 bytes to file bank1-orig.bin from flash bank 1 at offset 0x00000000 in 0.007867s (63.557 KiB/s)
- > stm32f2x unlock 0
- Target not halted
- stm32f2x failed to unlock device
- > halt
- target halted due to debug-request, current mode: Handler External Interrupt(67)
- xPSR: 0x61000053 pc: 0x0800839c msp: 0x2000ff48
- > stm32f2x unlock 0
- stm32f2x unlocked.
- INFO: a reset or power cycle is required for the new settings to take effect.
- > reset halt
- target halted due to debug-request, current mode: Thread
- xPSR: 0x01000000 pc: 0x080002a4 msp: 0x20010000
- > stm32f2x mass_erase 0
- stm32x mass erase complete
- > flash write_bank 0 bank0-patch.bin
- wrote 262144 bytes from file bank0-patch.bin to flash bank 0 at offset 0x00000000 in 3.744948s (68.359 KiB/s)
- > reset
- >
这里有一些注意事项要说一下:
1. 在尝试刷新之前,请务必备份所有闪存映像。
2. 见上一条。
3. STM32闪存控制器有一个锁定位,可以防止意外的写入操作,我们可以在STM32的“Option bytes”中对其进行设置。
· 对我们来说幸运的是,我们能够解锁闪存,有时候根本无法解锁!
4. 对于STM32上的内部闪存,我们需要先执行擦除操作,然后再对其进行写入操作。
· 我要在这里补充一点,如果目标非常昂贵或特别重要,绝对不要这样做,除非您百分百确定可以将其恢复为原始状态。
5. 写入修改后的固件映像,然后重新启动CPU,以下内容会显示在dmesg中。
- [54691.886194] usb 1-6.4: new full-speed USB device number 14 using xhci_hcd
- [54691.992411] usb 1-6.4: New USB device found, idVendor=0e6f, idProduct=02a2, bcdDevice= 1.0f
- [54691.992417] usb 1-6.4: New USB device strings: Mfr=1, Product=2, SerialNumber=3
- [54691.992420] usb 1-6.4: Product: Testing Firmware Patches
- [54691.992423] usb 1-6.4: Manufacturer: Performance Designed Products
- [54691.992426] usb 1-6.4: SerialNumber: 0000AE38D7650465
- [54691.998102] input: Generic X-Box pad as /devices/pci0000:00/0000:00:14.0/usb1/1-6/1-6.4/1-6.4:1.0/input/input28
太好了!这说明我们已经将固件完整提取出来,并加载到了ghidra中,接下来,我们就可以根据需要对其进行相应的修改了。
小结
在对嵌入式系统进行安全评估时,您通常希望枚举并探索与目标交互的所有可能的接口和方法。无论您的最终目标是寻找漏洞、修改设备的正常操作,还是仅仅为了解其工作原理,硬件调试都是非常有用的。通过硬件调试,我们不仅能够从这个目标中提取固件,设置一个实时调试器,并且还可以修改固件。通过本练习,我们还了解了单线调试的工作方式,以及如何用硬件调试工具识别、枚举和调试未知CPU。实际上,OpenOCD还可以与基于FT2232H的接口一起使用,以提取固件映像并将新固件重新刷写到目标上。谢谢您的阅读,希望本文对您的学习有所帮助!
本文翻译自:https://wrongbaud.github.io/posts/stm-xbox-jtag/如若转载,请注明原文地址。


