本文转载自微信公众号「不知名宝藏程序媛 」,作者小土豆 。转载本文请联系不知名宝藏程序媛 公众号。
1. 前言
作为一名Vue开发者,虽然在项目中频繁使用过computed和watch,但从来没有系统的学习过,总觉着对这两个知识点有些一知半解。
如果你也和我一样,就一起来回顾和总结一下这两个知识点吧。
本篇非源码分析,只是从两者各自的用法、特性等做一些梳理。
2. Vue中的computed
Vue中的computed又叫做计算属性,Vue官网中给了下面这样一个示例。
模板中有一个message数据需要展示:
- <template>
- <div id="app">
- {{message}}
- </div>
- </template>
- <script>
- export default {
- name: 'App',
- data() {
- return {
- message: 'Hello'
- }
- }
- }
- </script>
假如此时有一个需求:对message进行反转并展示到模板中。
那最简单的实现方式就是直接在模板中做这样的转化:
- <template>
- <div id="app">
- <p>{{message}}</p>
- <p>{{message.split('').reverse().join('')}}</p>
- </div>
- </template>
那这个时候,Vue官方告诉我们:过多的逻辑运算会让模板变得重且难以维护,而且这种转化无法复用,并指导我们使用计算属性-computed来实现这个需求。
- export default {
- name: 'App',
- computed: {
- reverseMessage: function(){
- return this.message.split('').reverse().join('');
- }
- },
- data() {
- return {
- message: 'Hello'
- }
- }
- }
在以上代码中我们定义了一个计算属性:reverseMessage,其值为一个函数并返回我们需要的结果。
之后在模板中就可以像使用message一样使用reverseMessage。
- <template>
- <div id="app">
- <p>{{message}}</p>
- <p>{{reverseMessage}}</p>
- </div>
- </template>
那么此时有人肯定要说了,我用methods也能实现呀。确实使用methods也能实现此种需求,但是在这种情况下我们的计算属性相较于methods是有很大优势的,这个优势就是计算属性存在缓存。
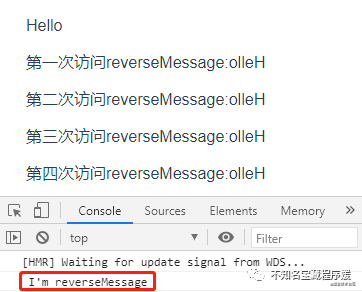
如果我们使用methods实现前面的需求,当message的反转结果有多个地方在使用,对应的methods函数会被调用多次,函数内部的逻辑也需要执行多次;而计算属性因为存在缓存,只要message数据未发生变化,则多次访问计算属性对应的函数只会执行一次。
- <template>
- <div id="app">
- <p>{{message}}</p>
- <p>第一次访问reverseMessage:{{reverseMessage}}</p>
- <p>第二次访问reverseMessage:{{reverseMessage}}</p>
- <p>第三次访问reverseMessage:{{reverseMessage}}</p>
- <p>第四次访问reverseMessage:{{reverseMessage}}</p>
- </div>
- </template>
- <script>
- export default {
- name: 'App',
- computed: {
- reverseMessage: function(value){
- console.log(" I'm reverseMessage" )
- return this.message.split('').reverse().join('');
- }
- },
- data() {
- return {
- message: 'Hello'
- }
- }
- }
- </script>
运行项目,查看结果,会发现计算属性reverseMessage对应的函数只执行了一次。
3. Vue中的watchVue
中的watch又名为侦听属性,它主要用于侦听数据的变化,在数据发生变化的时候执行一些操作。
- <template>
- <div id="app">
- <p>计数器:{{counter}}</p>
- <el-button type="primary" @click="counter++">
- Click
- </el-button>
- </div>
- </template>
- <script>
- export default {
- name: 'App',
- data() {
- return {
- counter: 0
- }
- },
- watch: {
- /**
- * @name: counter
- * @description:
- * 监听Vue data中的counter数据
- * 当counter发生变化时会执行对应的侦听函数
- * @param {*} newValue counter的新值
- * @param {*} oldValue counter的旧值
- * @return {*} None
- */
- counter: function(newValue, oldValue){
- if(this.counter == 10){
- this.counter = 0;
- }
- }
- }
- }
- </script>
我们定义了一个侦听属性counter,该属性侦听的是Vue data中定义counter数据,整个的逻辑就是点击按钮counter加1,当counter等于10的时候,将counter置为0。
上面的代码运行后的结果如下:
Vue官网很明确的建议我们这样使用watch侦听属性:当需要在数据变化时执行异步或开销较大的操作时,这个方式是最有用的。
4. computed和watch之间的抉择
看完以上两部分内容,关于Vue中computed和watch的基本用法算是掌握了。但实际上不止这些,所以接下来我们在来进阶学习一波。
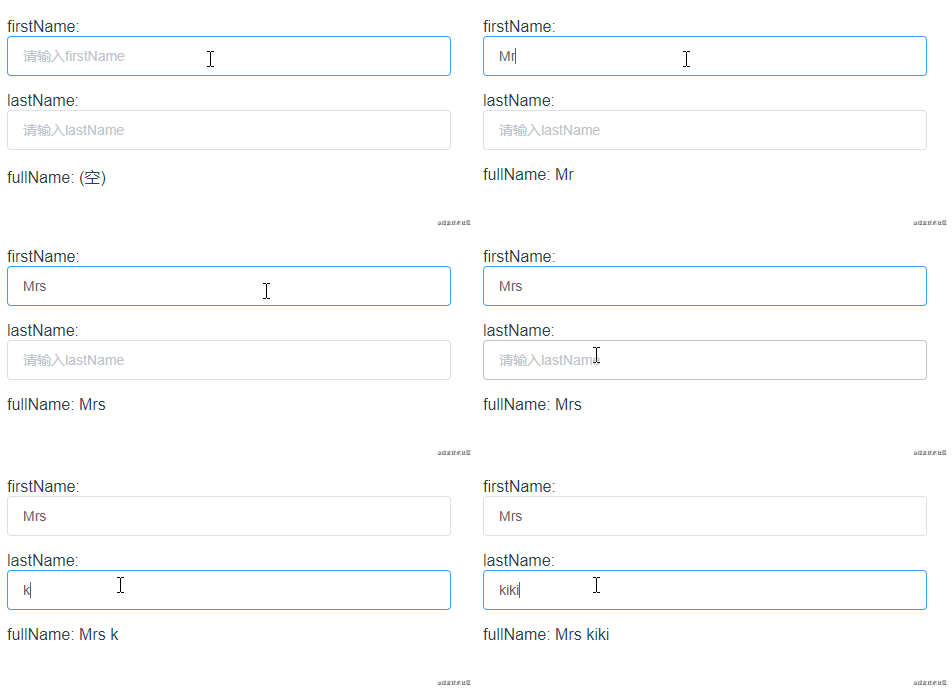
这里我们还原Vue官网中的一个示例,示例实现的功能大致如下:

该功能可以简单的描述为:在firstName和lastName数据发生变化时,对fullName进行更新,其中fullName的值为firstName和lastName的拼接。
首先我们使用watch来实现该功能:watch侦听firstName和lastName,当这两个数据发生变化时更新fullName的值。
- <template>
- <div id="app">
- <p>firstName: <el-input v-model="firstName" placeholder="请输入firstName"></el-input></p>
- <p>lastName: <el-input v-model="lastName" placeholder="请输入lastName"></el-input></p>
- <p>fullName: {{fullName}}</p>
- </div>
- </template>
- <script>
- export default {
- name: 'App',
- data() {
- return {
- firstName: '',
- lastName: '',
- fullName: '(空)'
- }
- },
- // 使用watch实现
- watch: {
- firstName: function(newValue) {
- this.fullName = newValue + ' ' + this.lastName;
- },
- lastName: function(newValue){
- this.fullName = this.firstName + ' ' + newValue;
- }
- }
- }
- </script>
接着我们在使用computed来实现:定义计算属性fullName,将firstName和lastName的值进行拼接并返回。
- <template>
- <div id="app">
- <p>firstName: <el-input v-model="firstName" placeholder="请输入firstName"></el-input></p>
- <p>lastName: <el-input v-model="lastName" placeholder="请输入lastName"></el-input></p>
- <p>fullName: {{fullName}}</p>
- </div>
- </template>
- <script>
- export default {
- name: 'App',
- data() {
- return {
- firstName: '',
- lastName: ''
- }
- }
- computed: {
- fullName: function() {
- return this.firstName + ' ' + this.lastName;
- }
- }
- }
- </script>
我们发现computed和watch都可以实现这个功能,但是我们在对比一下这两种不同的实现方式:
- // 使用computed实现
- computed: {
- fullName: function() {
- return this.firstName + ' ' + this.lastName;
- }
- },
- // 使用watch实现
- watch: {
- firstName: function(newValue) {
- this.fullName = newValue + ' ' + this.lastName;
- },
- lastName: function(newValue){
- this.fullName = this.firstName + ' ' + newValue;
- }
- }
对比之下很明显的会发现发现computed的实现方式更简洁高级。
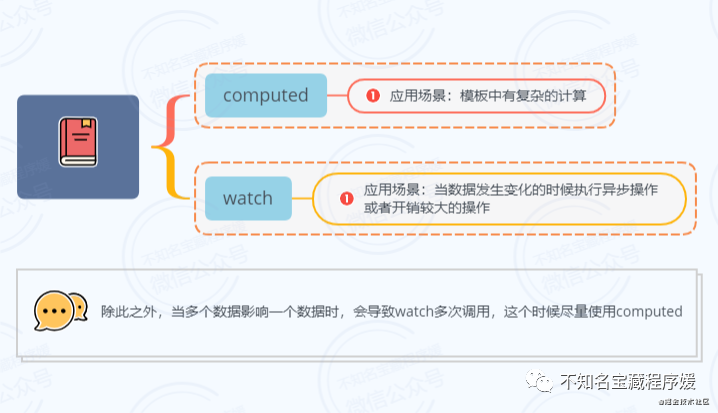
所以在日常项目开发中,对于computed和watch的使用要慎重选择:
这两者选择和使用没有对错之分,只是希望能更好的使用,而不是滥用。
5. 计算属性进阶
接下来我们在对计算属性的内容进行进阶学习。
>>> 5.1 计算属性不能和Vue Data属性同名
在声明计算属性的时候,计算属性是不能和Vue Data中定义的属性同名,否则会出现错误:The computed property "xxxxx" is already defined in data。
如果有阅读过Vue源码的同学对这个原因应该会比较清楚,Vue在初始化的时候会按照:initProps-> initMethods -> initData -> initComputed -> initWatch这样的顺序对数据进行初始化,并且会通过Object.definedProperty将数据定义到vm实例上,在这个过程中同名的属性会被后面的同名属性覆盖。
通过打印组件实例对象,可以很清楚的看到props、methods、data、computed会被定义到vm实例上。
>>> 5.2 计算属性的set函数
在前面代码示例中,我们的computed是这么实现的:
- computed: {
- reverseMessage: function(){
- return this.message.split('').reverse().join('');
- }
- },
这种写法实际上是给reverseMessage提供了一个get方法,所以上面的写法等同于:
- computed: {
- reverseMessage: {
- // 计算属性的get方法
- get: function(){
- return this.message.split('').reverse().join('');
- }
- }
- },
除此之外,我们也可以给计算属性提供一个set方法:
- computed: {
- reverseMessage: {
- // 计算属性的get方法
- get: function(){
- return this.message.split('').reverse().join('');
- },
- set: function(newValue){
- // set方法的逻辑
- }
- }
- },
只有我们主动修改了计算属性的值,set方法才会被触发。
关于计算属性的set方法在实际的项目开发中暂时还没有遇到,不过经过一番思考,做出来下面这样一个示例:

这个示例是分钟和小时之间的一个转化,利用计算属性的set方法就能很好实现:
- <template>
- <div id="app">
- <p>分钟<el-input v-model="minute" placeholder="请输入内容"></el-input></p>
- <p>小时<el-input v-model="hours" placeholder="请输入内容"></el-input></p>
- </div>
- </template>
- <script>
- export default {
- name: 'App',
- data() {
- return {
- minute: 60,
- }
- },
- computed: {
- hours:{
- get: function() {
- return this.minute / 60;
- },
- set: function(newValue) {
- this.minute = newValue * 60;
- }
- }
- }
- }
- </script>
>>> 5.3 计算属性的缓存
前面我们总结过计算属性存在缓存,并演示相关的示例。那计算属性的缓存是如何实现的呢?
关于计算属性的缓存这个知识点需要我们去阅读Vue的源码实现,所以我们一起来看看源码吧。
相信大家看到源码这个词就会有点胆战心惊,不过不用过分担心,文章写到这里的时候考虑到本篇文章的内容和侧重点,所以不会详细去解读计算属性的源码,着重学习计算属性的缓存实现,并且点到为止。
那如果你没有仔细解读过Vue的响应式原理,那建议忽略这一节的内容,等对源码中的响应式有一定了解之后在来看这一节的内容会更容易理解。(我自己之前也写过的一篇相关文章:1W字长文+多图,带你了解vue2.x的双向数据绑定源码实现,点击文末阅读原文即可查看)
关于计算属性的入口源代码如下:
- /*
- * Vue版本:v2.6.12
- * 代码位置:/vue/src/core/instance/state.js
- */
- export function initState (vm: Component) {
- // ......省略......
- const opts = vm.$options
- // ......省略......
- if (opts.computed) initComputed(vm, opts.computed)
- // ......省略 ......
- }
接着我们来看看initComputed:
- /*
- * Vue版本:v2.6.12
- * 代码位置:/vue/src/core/instance/state.js
- * @params: vm vue实例对象
- * @params: computed 所有的计算属性
- */
- function initComputed (vm: Component, computed: Object) {
- /*
- * Object.create(null):创建一个空对象
- * 定义的const watchers是用于保存所有计算属性的Watcher实例
- */
- const watchers = vm._computedWatchers = Object.create(null)
- // 遍历计算属性
- for (const key in computed) {
- const userDef = computed[key]
- /*
- * 获取计算属性的get方法
- * 计算属性可以是function,默认提供的是get方法
- * 也可以是对象,分别声明get、set方法
- */
- const getter = typeof userDef === 'function' ? userDef : userDef.get
- /*
- * 给计算属性创建watcher
- * @params: vm vue实例对象
- * @params: getter 计算属性的get方法
- * @params: noop
- noop是定义在 /vue/src/shared/util.js中的一个函数
- export function noop (a?: any, b?: any, c?: any) {}
- * @params: computedWatcherOptions
- * computedWatcherOptions是一个对象,定义在本文件的167行
- * const computedWatcherOptions = { lazy: true }
- */
- watchers[key] = new Watcher(
- vm,
- getter || noop,
- noop,
- computedWatcherOptions
- )
- // 函数调用
- defineComputed(vm, key, userDef)
- }
- }
在initComputed这个函数中,主要是遍历计算属性,然后在遍历的过程中做了下面两件事:
- 第一件:为计算属性创建watcher,即new Watcher
- 第二件:调用defineComputed方法
那首先我们先来看看new Watcher都做了什么。
为了方便大家看清楚new Watcher的作用,我将Watcher的源码进行了简化,保留了一些比较重要的代码。
同时代码中重要的部分都添加了注释,有些注释描述的可能有点重复或者啰嗦,但主要是想以这种重复的方式让大家可以反复琢磨并理解源码中的内容,方便后续的理解 ~
- /*
- * Vue版本:v2.6.12
- * 代码位置: /vue/src/core/observer/watcher.js
- * 为了看清楚Watcher的作用
- * 将源码进行简化,所以下面是一个简化版的Watcher类
- * 同时部分代码顺序有所调整
- */
- export default class Watcher {
- constructor (
- vm: Component,
- expOrFn: string | Function,
- cb: Function,
- options?: ?Object,
- ) {
- // vm为组件实例
- this.vm = vm
- // expOrFn在new Watcher时传递的参数为计算属性的get方法
- // 将计算属性的get方法赋值给watcher的getter属性
- this.getter = expOrFn
- // cb为noop:export function noop (a?: any, b?: any, c?: any) {}
- this.cb = cb
- // option在new Watcher传递的参数值为{lazy: true}
- // !!操作符即将options.lazy强转为boolean类型
- // 赋值之后this.lazy的值为true
- this.lazy = !!options.lazy
- // 赋值之后this.dirty的值true
- this.dirty = this.lazy
- /*
- * 在new Watcher的时候因为this.lazy的值为true
- * 所以this.value的值还是undefined
- */
- this.value = this.lazy ? undefined : this.get()
- }
- get () {
- const vm = this.vm
- /*
- * 在构造函数中,计算属性的get方法赋值给了watcher的getter属性
- * 所以该行代码即调用计算属性的get方法,获取计算属性的值
- */
- value = this.getter.call(vm, vm)
- return value
- }
- evaluate () {
- /*
- * 调用watcher的get方法
- * watcher的get方法逻辑为:调用计算属性的get方法获取计算属性的值并返回
- * 所以evaluate函数也就是获取计算属性的值,并赋值给watcher.value
- * 并且将watcher.dirty置为false,这个dirty是实现缓存的关键
- */
- this.value = this.get()
- this.dirty = false
- }
- }
看了这个简化版的Watcher以后,想必我们已经很清楚的知道了Watcher类的实现。
那接下来就是关于缓存的重点了,也就是遍历计算属性做的第二件事:调用defineComputed函数:
- /*
- * Vue版本:v2.6.12
- * 代码位置:/vue/src/core/instance/state.js
- * @params: target vue实例对象
- * @params: key 计算属性名
- * @params: userDef 计算属性定义的function或者object
- */
- export function defineComputed (
- target: any,
- key: string,
- userDef: Object | Function
- ) {
- // ......暂时省略有关sharedPropertyDefinition的代码逻辑......
- /*
- * sharedPropertyDefinition本身是一个对象,定义在本文件31行:
- * const sharedPropertyDefinition = {
- * enumerable: true,
- * configurable: true,
- * get: noop,
- * set: noop
- * }
- * 最后使用Object.defineProperty传入对应的参数使得计算属性变得可观测
- */
- Object.defineProperty(target, key, sharedPropertyDefinition)
- }
defineComputed方法最核心也只有一行代码,也就是使用Object.defineProperty将计算属性变得可观测。
那么接下来我们的关注点就是调用Object.defineProperty函数时传递的第三个参数:sharedPropertyDefinition。
sharedPropertyDefinition是定义在当前文件中的一个对象,默认值如下:
- const sharedPropertyDefinition = {
- enumerable: true,
- configurable: true,
- get: noop,
- set: noop
- }
前面贴出来的defineComputed源码中,我注释说明省略了一段有关sharedPropertyDefinition的代码逻辑,那省略的这段源代码就不展示了,它的主要作用就是在对sharedPropertyDefinition.get和sharedPropertyDefinition.set进行重写,重写之后sharedPropertyDefinition的值为:
- const sharedPropertyDefinition = {
- enumerable: true,
- configurable: true,
- get: function(){
- // 获取计算属性对应的watcher实例
- const watcher = this._computedWatchers && this._computedWatchers[key]
- if (watcher) {
- if (watcher.dirty) {
- watcher.evaluate()
- }
- if (Dep.target) {
- watcher.depend()
- }
- return watcher.value
- }
- }
- },
- // set对应的值这里写的是noop
- // 但是我们要知道set真正的值是我们为计算属性提供的set函数
- // 千万不要理解错了哦
- set: noop,
- }
那sharedPropertyDefinition.get函数的逻辑已经非常的清晰了,同时它的逻辑就是计算属性缓存实现的关键逻辑:在sharedPropertyDefinition.get函数中,先获取到计算属性对应的watcher实例;然后判断watcher.dirty的值,如果该值为false,则直接返回watcher.value;否则调用watcher.evaluate()重新获取计算属性的值。
关于计算属性缓存的源码分析就到这里,相信大家对计算属性的缓存实现已经有了一定的认识。不过仅仅是了解这些还不够,我们应该去通读计算属性的完整源码实现,才能对计算属性有一个更通透的认识。
6. 侦听属性进阶
>>> 6.1 handler
前面我们是这样实现侦听属性的:
- watch: {
- counter: function(newValue, oldValue){
- if(this.counter == 10){
- this.counter = 0;
- }
- }
- }
那上面的这种写法等同于给counter提供一个handler函数:
- watch: {
- counter: {
- handler: function(newValue, oldValue){
- if(this.counter == 10){
- this.counter = 0;
- }
- }
- }
- }
>>> 6.2 immediate
正常情况下,侦听属性提供的函数是不会立即执行的,只有在对应的vue data发生变化时,侦听属性对应的函数才会执行。
那如果我们需要侦听属性对应的函数立即执行一次,就可以给侦听属性提供一个immediate选项,并设置其值为true。
- watch: {
- counter: {
- handler: function(newValue, oldValue){
- if(this.counter == 10){
- this.counter = 0;
- }
- },
- immediate: true
- }
- }
>>> 6.3 deep
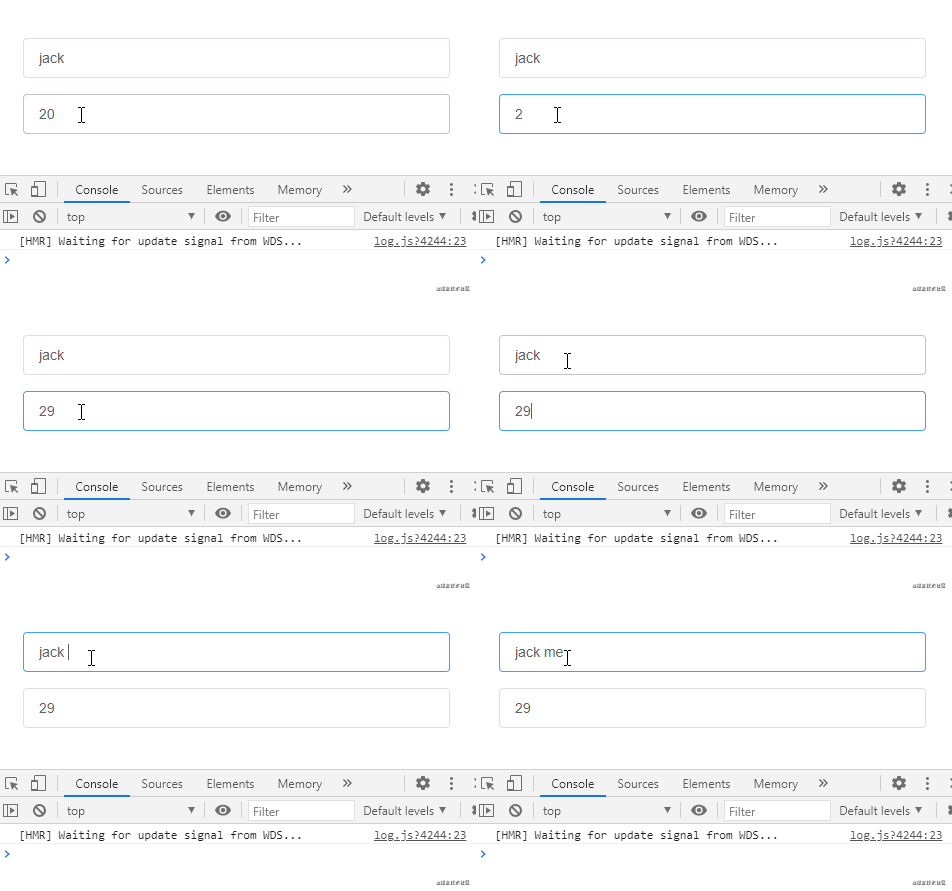
如果我们对一个对象类型的vue data进行侦听,当这个对象内的属性发生变化时,默认是不会触发侦听函数的。
- <template>
- <div id="app">
- <p><el-input v-model="person.name" placeholder="请输入姓名"></el-input></p>
- <p><el-input v-model="person.age" placeholder="请输入年龄"></el-input></p>
- </div>
- </template>
- <script>
- export default {
- name: 'App',
- data() {
- return {
- person: {
- name: 'jack',
- age: 20
- }
- }
- },
- watch: {
- person: function(newValue){
- console.log(newValue.name + ' ' + newValue.age);
- }
- }
- }
- </script>
监听对象类型的数据,侦听函数没有触发:
通过给侦听属性提供deep: true就可以侦听到对象内部属性的变化:
- watch: {
- person: {
- handler: function(newValue){
- console.log(newValue.name + ' ' + newValue.age);
- },
- deep: true
- }
- }
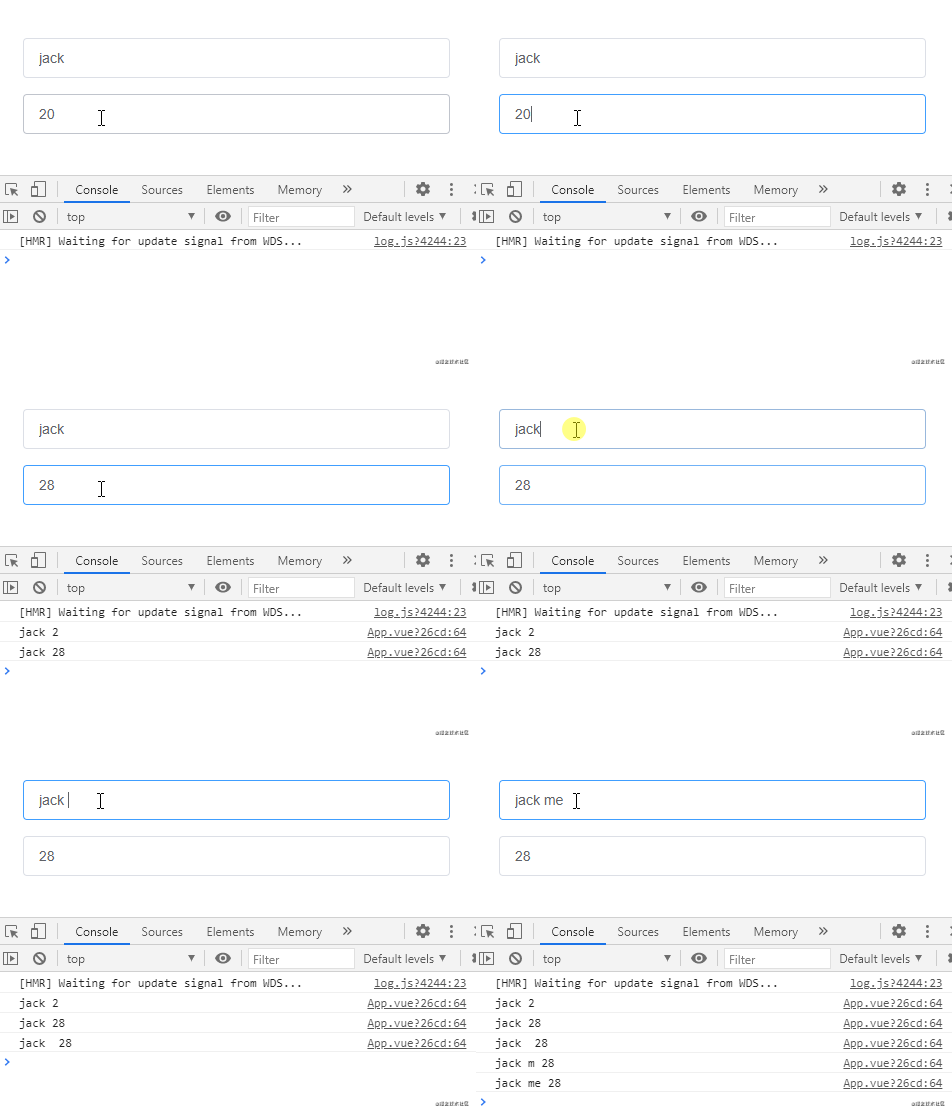
不过仔细观察上面的示例会发现这种方式去监听Object类型的数据,Object数据内部任一属性发生变化都会触发侦听函数,那如果我们想单独侦听对象中的某个属性,可以使用下面这样的方式:
- watch: {
- 'person.name': function(newValue, oldValue){
- // 逻辑
- }
- }
7.总结
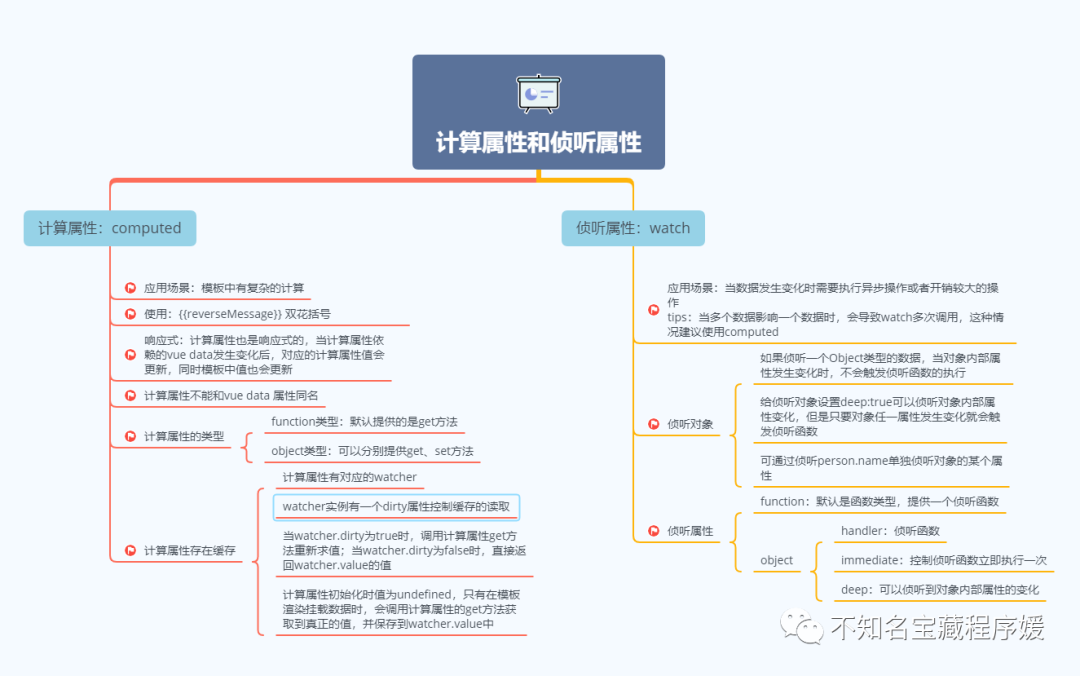
到此本篇文章就结束了,内容非常的简单易懂,在此将以上的内容做以总结:
学无止境,除了基础的内容之外,很多特性的实现原理也是我们应该关注的东西,但是介于本篇文章输出的初衷,所以对原理实现并没有完整的分析,后面有机会在总结~
原文链接:https://mp.weixin.qq.com/s/frWBXTa-EnhkGFn6c1X5NQ


