在使用TCP协议进行通信时,听到最多的也就是粘包和拆包问题。本文就来看看,如何解决粘包和拆包问题。
01一 TCP的粘包/拆包的问题以及解决
在解决TCP粘包和拆包,我们先看看一种思想。来看看读取一个Int数据的Demo,体会下这种思想。
1.1 ReplayingDecoder
1. 自定义解码器,从ByteBuf读取一个Int。(重点,一定要看懂这段代码)
- public class IntegerHeaderFrameDecoder extends ByteToMessageDecoder {
- @Override
- protected void decode(ChannelHandlerContext ctx, ByteBuf buf, List<Object> out) throws Exception {
- if (buf.readableBytes() < 4) {
- return;
- }
- buf.markReaderIndex();//标记下当前读指针。
- int length = buf.readInt();//从ByteBuf读出一个int
- if (buf.readableBytes() < length) {
- buf.resetReaderIndex();//恢复到刚才标记的读指针
- return;
- }
- out.add(buf.readBytes(length));
- }
- }
2. 使用ReplayingDecoder进行优化()
- public class IntegerHeaderFrameDecoder extends ReplayingDecoder<Void> {
- protected void decode(ChannelHandlerContext ctx, ByteBuf buf, List<Object> out) throws Exception {
- out.add(buf.readBytes(buf.readInt()));
- }
- }
3. ReplayingDecoder使用说明(重点,要理解的)
- a 使⽤了特殊的ByteBuf,叫做ReplayingDecoderByteBuf,扩展了ByteBuf
- b 重写了ByteBuf的readXxx()等⽅法,会先检查可读字节⻓度,⼀旦检测到不满⾜要求就直接抛出REPLAY(REPLAY继承ERROR)
- c ReplayingDecoder重写了ByteToMessageDecoder的callDecode()⽅法,捕获Signal并在catch块中重置ByteBuf的readerIndex。
- d 继续等待数据,直到有了数据后继续读取,这样就可以保证读取到需要读取的数据。
- e 类定义中的泛型S是⼀个⽤于记录解码状态的状态机枚举类,在state(S s)、checkpoint(S s)等⽅法中会⽤到。在简单解码时也可以⽤java.lang.Void来占位。
总结:
ReplayingDecoder是ByteToMessageDecoder的子类,扩展了ByteBuf。从写了readXxx()等⽅法,当前ByteBuf中数据小于代取数据,等待数据满足,才能取数据。就可以省略手动实现这段代码。
4. 注意
- 1 buffer的部分操作(readBytes(ByteBuffer dst)、retain()、release()等⽅法会直接抛出异常)
- 2 在某些情况下会影响性能(如多次对同⼀段消息解码)
继承ReplayingDecoder,错误示例和修改
- //这是⼀个错误的例⼦:
- //消息中包含了2个integer,代码中decode⽅法会被调⽤两次,此时队列size不等于2,这段代码达不到期望结果。
- public class MyDecoder extends ReplayingDecoder<Void> {
- private final Queue<Integer> values = new LinkedList<Integer>();
- @Override
- public void decode(ByteBuf buf, List<Object> out) throws Exception {
- // A message contains 2 integers.
- values.offer(buf.readInt());
- values.offer(buf.readInt());
- assert values.size() == 2;
- out.add(values.poll() + values.poll());
- }
- }
- //正确的做法:
- public class MyDecoder extends ReplayingDecoder<Void> {
- private final Queue<Integer> values = new LinkedList<Integer>();
- @Override
- public void decode(ByteBuf buf, List<Object> out) throws Exception {
- // Revert the state of the variable that might have been changed
- // since the last partial decode.
- values.clear();
- // A message contains 2 integers.
- values.offer(buf.readInt());
- values.offer(buf.readInt());
- // Now we know this assertion will never fail.
- assert values.size() == 2;
- out.add(values.poll() + values.poll());
- }
- }
ByteToIntegerDecoder2的实现
- public class ByteToIntegerDecoder2 extends ReplayingDecoder<Void> {
- /**
- * @param ctx 上下⽂
- * @param in 输⼊的ByteBuf消息数据
- * @param out 转化后输出的容器
- * @throws Exception
- */
- @Override
- protected void decode(ChannelHandlerContext ctx, ByteBuf in, List<Object> out) throws Exception {
- out.add(in.readInt()); //读取到int类型数据,放⼊到输出,完成数据类型的转化
- }
- }
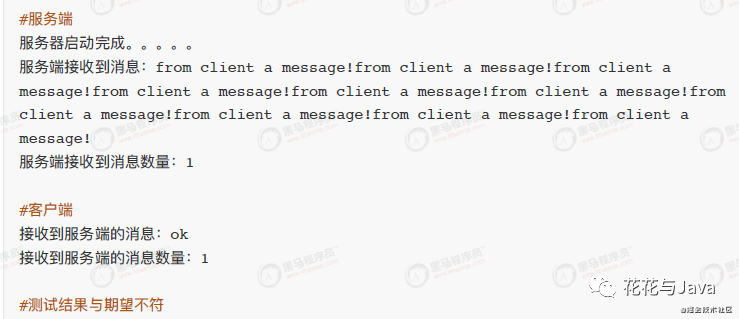
1.2 拆包和粘包问题重现(客户端向服务端发送十条数据)
1. 客户端启动类
- public class NettyClient {
- public static void main(String[] args) throws Exception{
- EventLoopGroup worker = new NioEventLoopGroup();
- try {
- // 服务器启动类
- Bootstrap bootstrap = new Bootstrap();
- bootstrap.group(worker);
- bootstrap.channel(NioSocketChannel.class);
- bootstrap.handler(new ChannelInitializer<SocketChannel>() {
- @Override
- protected void initChannel(SocketChannel ch) throws Exception {
- ch.pipeline().addLast(new ClientHandler());
- }
- });
- ChannelFuture future = bootstrap.connect("127.0.0.1", 5566).sync();
- future.channel().closeFuture().sync();
- } finally {
- worker.shutdownGracefully();
- }
- }
- }
2. 客户端ClientHandler
- public class ClientHandler extends SimpleChannelInboundHandler<ByteBuf> {
- private int count;
- @Override
- protected void channelRead0(ChannelHandlerContext ctx, ByteBuf msg) throws Exception {
- System.out.println("接收到服务端的消息:" +
- msg.toString(CharsetUtil.UTF_8));
- System.out.println("接收到服务端的消息数量:" + (++count));
- }
- @Override
- public void channelActive(ChannelHandlerContext ctx) throws Exception {
- for (int i = 0; i < 10; i++) {
- ctx.writeAndFlush(Unpooled.copiedBuffer("from client a message!",
- CharsetUtil.UTF_8));
- }
- }
- @Override
- public void exceptionCaught(ChannelHandlerContext ctx, Throwable cause) throws Exception {
- cause.printStackTrace();
- ctx.close();
- }
- }
3. 服务端NettyServer
- public class NettyServer {
- public static void main(String[] args) throws Exception {
- // 主线程,不处理任何业务逻辑,只是接收客户的连接请求
- EventLoopGroup boss = new NioEventLoopGroup(1);
- // ⼯作线程,线程数默认是:cpu*2
- EventLoopGroup worker = new NioEventLoopGroup();
- try {
- // 服务器启动类
- ServerBootstrap serverBootstrap = new ServerBootstrap();
- serverBootstrap.group(boss, worker);
- //配置server通道
- serverBootstrap.channel(NioServerSocketChannel.class);
- serverBootstrap.childHandler(new ChannelInitializer<SocketChannel>() {
- @Override
- protected void initChannel(SocketChannel ch) throws Exception {
- ch.pipeline()
- .addLast(new ServerHandler());
- }
- }); //worker线程的处理器
- ChannelFuture future = serverBootstrap.bind(5566).sync();
- System.out.println("服务器启动完成。。。。。");
- //等待服务端监听端⼝关闭
- future.channel().closeFuture().sync();
- } finally {
- //优雅关闭
- boss.shutdownGracefully();
- worker.shutdownGracefully();
- }
- }
- }
4. ServerHandler
- public class ServerHandler extends SimpleChannelInboundHandler<ByteBuf> {
- private int count;
- @Override
- protected void channelRead0(ChannelHandlerContext ctx, ByteBuf msg) throws Exception {
- System.out.println("服务端接收到消息:" +
- msg.toString(CharsetUtil.UTF_8));
- System.out.println("服务端接收到消息数量:" + (++count));
- ctx.writeAndFlush(Unpooled.copiedBuffer("ok", CharsetUtil.UTF_8));
- }
- }
1.3 什么是TCP的粘包和拆包问题
TCP是流传递的,所谓流,就是没有界限的数据。服务端接受客户端数据,并不知道是一条还是多条。服务端在读取数据的时候会出现粘包问题。
因此服务端和客户端进行数据传递的时候,要制定好拆包规则。客户端按照该规则进行粘包,服务端按照该规则拆包。如果有任意违背该规则,服务端就不能拿到预期的数据。
1. 解决思路(三种)
- 1. 在发送的数据包中添加头,在头⾥存储数据的⼤⼩,服务端就可以按照此⼤⼩来读取数据,这样就知道界限在哪⾥了。
- 2. 以固定的⻓度发送数据,超出的分多次发送,不⾜的以0填充,接收端就以固定⻓度接收即可。
- 3. 在数据包之间设置边界,如添加特殊符号,这样,接收端通过这个边界就可以将不同的数据包拆分开。
1.4 实战:解决TCP的粘包/拆包问题
1. 自定义协议
- public class MyProtocol {
- private Integer length; //数据头:⻓度
- private byte[] body; //数据体
- public Integer getLength() {
- return length;
- }
- public void setLength(Integer length) {
- this.length = length;
- }
- public byte[] getBody() {
- return body;
- }
- public void setBody(byte[] body) {
- this.body = body;
- }
2. 编码器
- public class MyEncoder extends MessageToByteEncoder<MyProtocol> {
- @Override
- protected void encode(ChannelHandlerContext ctx, MyProtocol msg, ByteBuf out) throws Exception {
- out.writeInt(msg.getLength());
- out.writeBytes(msg.getBody());
- }
- }
3. 解码器
- public class MyDecoder extends ReplayingDecoder<Void> {
- @Override
- protected void decode(ChannelHandlerContext ctx, ByteBuf in, List<Object> out) throws Exception {
- int length = in.readInt(); //获取⻓度
- byte[] data = new byte[length]; //根据⻓度定义byte数组
- in.readBytes(data); //读取数据
- MyProtocol myProtocol = new MyProtocol();
- myProtocol.setLength(length);
- myProtocol.setBody(data);
- out.add(myProtocol);
- }
- }
4. 客户端ClientHandler
- public class ClientHandler extends SimpleChannelInboundHandler<MyProtocol> {
- private int count;
- @Override
- protected void channelRead0(ChannelHandlerContext ctx, MyProtocol msg) throws Exception {
- System.out.println("接收到服务端的消息:" + new String(msg.getBody(),
- CharsetUtil.UTF_8));
- System.out.println("接收到服务端的消息数量:" + (++count));
- }
- @Override
- public void channelActive(ChannelHandlerContext ctx) throws Exception {
- for (int i = 0; i < 10; i++) {
- byte[] data = "from client a message!".getBytes(CharsetUtil.UTF_8);
- MyProtocol myProtocol = new MyProtocol();
- myProtocol.setLength(data.length);
- myProtocol.setBody(data);
- ctx.writeAndFlush(myProtocol);
- }
- }
- @Override
- public void exceptionCaught(ChannelHandlerContext ctx, Throwable cause)throws Exception {
- cause.printStackTrace();
- ctx.close();
- }
- }
5. NettyClient
- public class NettyClient {
- public static void main(String[] args) throws Exception{
- EventLoopGroup worker = new NioEventLoopGroup();
- try {
- // 服务器启动类
- Bootstrap bootstrap = new Bootstrap();
- bootstrap.group(worker);
- bootstrap.channel(NioSocketChannel.class);
- bootstrap.handler(new ChannelInitializer<SocketChannel>() {
- @Override
- protected void initChannel(SocketChannel ch) throws Exception {
- ch.pipeline().addLast(new MyEncoder());
- ch.pipeline().addLast(new MyDecoder());
- ch.pipeline().addLast(new ClientHandler());
- }
- });
- ChannelFuture future = bootstrap.connect("127.0.0.1", 5566).sync();
- future.channel().closeFuture().sync();
- } finally {
- worker.shutdownGracefully();
- }
- }
- }
6. ServerHandler
- public class ServerHandler extends SimpleChannelInboundHandler<MyProtocol> {
- private int count;
- @Override
- protected void channelRead0(ChannelHandlerContext ctx, MyProtocol msg) throws Exception {
- System.out.println("服务端接收到消息:" + new String(msg.getBody(),
- CharsetUtil.UTF_8));
- System.out.println("服务端接收到消息数量:" + (++count));
- byte[] data = "ok".getBytes(CharsetUtil.UTF_8);
- MyProtocol myProtocol = new MyProtocol();
- myProtocol.setLength(data.length);
- myProtocol.setBody(data);
- ctx.writeAndFlush(myProtocol);
- }
- }
7. NettyServer
- public class NettyServer {
- public static void main(String[] args) throws Exception {
- // 主线程,不处理任何业务逻辑,只是接收客户的连接请求
- EventLoopGroup boss = new NioEventLoopGroup(1);
- // ⼯作线程,线程数默认是:cpu*2
- EventLoopGroup worker = new NioEventLoopGroup();
- try {
- // 服务器启动类
- ServerBootstrap serverBootstrap = new ServerBootstrap();
- serverBootstrap.group(boss, worker);
- //配置server通道
- serverBootstrap.channel(NioServerSocketChannel.class);
- serverBootstrap.childHandler(new ChannelInitializer<SocketChannel>() {
- @Override
- protected void initChannel(SocketChannel ch) throws Exception {
- ch.pipeline()
- .addLast(new MyDecoder())
- .addLast(new MyEncoder())
- .addLast(new ServerHandler());
- }
- }); //worker线程的处理器
- ChannelFuture future = serverBootstrap.bind(5566).sync();
- System.out.println("服务器启动完成。。。。。");
- //等待服务端监听端⼝关闭
- future.channel().closeFuture().sync();
- } finally {
- //优雅关闭
- boss.shutdownGracefully();
- worker.shutdownGracefully();
- }
- }
- }
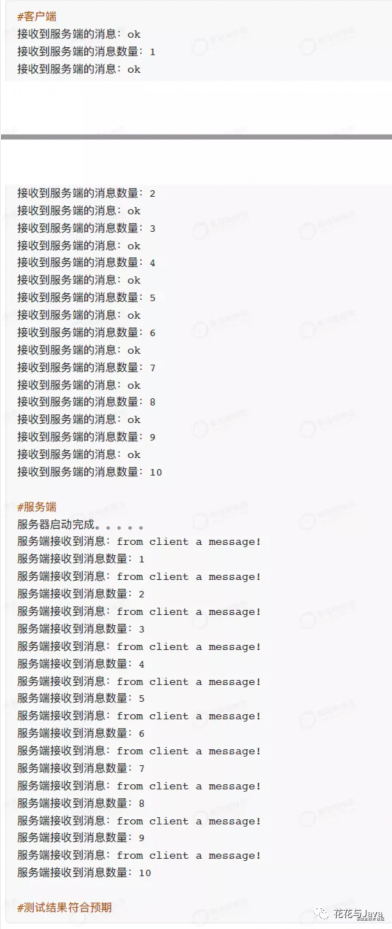
8. 测试
02二 Netty核心源码解析
2.1 服务端启动过程刨析
1. 创建服务端Channel
- 1 ServerBootstrap对象的bind()⽅法,也是⼊⼝⽅法
- 2 AbstractBootstrap中的initAndRegister()进⾏创建Channel
- 创建Channel的⼯作由ReflectiveChannelFactory反射类中的newChannel()⽅法完成。
- 3 NioServerSocketChannel中的构造⽅法中,通过jdk nio底层的SelectorProvider打开ServerSocketChannel。
- 4 在AbstractNioChannel的构造⽅法中,设置channel为⾮阻塞:ch.configureBlocking(false);
- 5 通过的AbstractChannel的构造⽅法,创建了id、unsafe、pipeline内容。
- 6 通过NioServerSocketChannelConfig获取tcp底层的⼀些参数
2. 初始化服务端Channel
- 1 AbstractBootstrap中的initAndRegister()进⾏初始化channel,代码:init(channel);
- 2 在ServerBootstrap中的init()⽅法设置channelOptions以及Attributes。
- 3 紧接着,将⽤户⾃定义参数、属性保存到局部变量currentChildOptions、currentChildAttrs,以
- 供后⾯使⽤
- 4 如果设置了serverBootstrap.handler()的话,会加⼊到pipeline中。
- 5 添加连接器ServerBootstrapAcceptor,有新连接加⼊后,将⾃定义的childHandler加⼊到连接的
- pipeline中:
- ch.eventLoop().execute(new Runnable() {
- @Override
- public void run() {
- pipeline.addLast(
- new ServerBootstrapAcceptor(ch, currentChildGroup,currentChildHandler, currentChildOptions, currentChildAttrs));
- }
- });
- @Override
- @SuppressWarnings("unchecked")
- public void channelRead(ChannelHandlerContext ctx, Object msg) {
- //当客户端有连接时才会执⾏
- final Channel child = (Channel) msg;
- //将⾃定义的childHandler加⼊到连接的pipeline中
- child.pipeline().addLast(childHandler);
- setChannelOptions(child, childOptions, logger);
- setAttributes(child, childAttrs);
- try {
- childGroup.register(child).addListener(new ChannelFutureListener(){
- @Override
- public void operationComplete(ChannelFuture future) throws Exception {
- if (!future.isSuccess()) {
- forceClose(child, future.cause());
- }
- }
- });
- } catch (Throwable t) {
- forceClose(child, t);
- }
- }
3. 注册selector
- //进⾏注册
- 1 initAndRegister()⽅法中的ChannelFuture regFuture = config().group().register(channel);
- 2 在io.netty.channel.AbstractChannel.AbstractUnsafe#register()中完成实际的注册
- 2.1 AbstractChannel.this.eventLoop = eventLoop; 进⾏eventLoop的赋值操作,后续的IO事件
- ⼯作将在由该eventLoop执⾏。
- 2.2 调⽤register0(promise)中的doRegister()进⾏实际的注册
- 3 io.netty.channel.nio.AbstractNioChannel#doRegister进⾏了⽅法实现
- //通过jdk底层进⾏注册多路复⽤器
- //javaChannel() --前⾯创建的channel
- //eventLoop().unwrappedSelector() -- 获取selector
- //注册感兴趣的事件为0,表明没有感兴趣的事件,后⾯会进⾏重新注册事件
- //将this对象以attachment的形式注册到selector,⽅便后⾯拿到当前对象的内容
- selectionKey = javaChannel().register(eventLoop().unwrappedSelector(), 0, this);
4. 绑定端口
- 1 ⼊⼝在io.netty.bootstrap.AbstractBootstrap#doBind0(),启动⼀个线程进⾏执⾏绑定端⼝操作
- 2 调⽤io.netty.channel.AbstractChannelHandlerContext#bind(java.net.SocketAddress,
- io.netty.channel.ChannelPromise)⽅法,再次启动线程执⾏
- 3 最终调⽤io.netty.channel.socket.nio.NioServerSocketChannel#doBind()⽅法进⾏绑定操作
- //通过jdk底层的channel进⾏绑定
- @SuppressJava6Requirement(reason = "Usage guarded by java version check")
- @Override
- protected void doBind(SocketAddress localAddress) throws Exception {
- if (PlatformDependent.javaVersion() >= 7) {
- javaChannel().bind(localAddress, config.getBacklog());
- } else {
- javaChannel().socket().bind(localAddress,
- config.getBacklog());
- }
- }
什么时候进⾏更新selector的主从事件?最终在io.netty.channel.nio.AbstractNioChannel#doBeginRead()⽅法中完成的
- protected void doBeginRead() throws Exception {
- // Channel.read() or ChannelHandlerContext.read() was called
- final SelectionKey selectionKey = this.selectionKey;
- if (!selectionKey.isValid()) {
- return;
- }
- readPending = true;
- final int interestOps = selectionKey.interestOps();
- if ((interestOps & readInterestOp) == 0) {
- selectionKey.interestOps(interestOps | readInterestOp); //设置
- 感兴趣的事件为OP_ACCEPT
- }
- }
- //在NioServerSocketChannel的构造⽅法中进⾏了赋值
- public NioServerSocketChannel(ServerSocketChannel channel) {
- super(null, channel, SelectionKey.OP_ACCEPT);
- config = new NioServerSocketChannelConfig(this,
- javaChannel().socket());
- }
2.2 连接请求过程源码刨析
1. 新连接接入
- 入口在
- io.netty.channel.nio.NioEventLoop#processSelectedKey(java.nio.channels.SelectionKey,
- io.netty.channel.nio.AbstractNioChannel)中
- 进⼊NioMessageUnsafe的read()⽅法
- 调⽤io.netty.channel.socket.nio.NioServerSocketChannel#doReadMessages() ⽅法,创建
- jdk底层的channel,封装成NioSocketChannel添加到List容器中
- @Override
- protected int doReadMessages(List<Object> buf) throws Exception {
- SocketChannel ch = SocketUtils.accept(javaChannel());
- try {
- if (ch != null) {
- buf.add(new NioSocketChannel(this, ch));
- return 1;
- }
- } catch (Throwable t) {
- logger.warn("Failed to create a new channel from an
- accepted socket.", t);
- try {
- ch.close();
- } catch (Throwable t2) {
- logger.warn("Failed to close a socket.", t2);
- }
- }
- return 0;
- }
- 创建NioSocketChannel对象
- new NioSocketChannel(this, ch),通过new的⽅式进⾏创建
- 调⽤super的构造⽅法
- 传⼊SelectionKey.OP_READ事件标识
- 创建id、unsafe、pipeline对象
- 设置⾮阻塞 ch.configureBlocking(false);
- 创建NioSocketChannelConfig对象
2. 注册读事件
- 在io.netty.channel.nio.AbstractNioMessageChannel.NioMessageUnsafe中的:
- for (int i = 0; i < size; i ++) {
- readPending = false;
- pipeline.fireChannelRead(readBuf.get(i)); //传播读事件
- }
- 在io.netty.channel.AbstractChannelHandlerContext#invokeChannelRead(java.lang.Object)⽅
- 法中
- private void invokeChannelRead(Object msg) {
- if (invokeHandler()) {
- try {
- //执⾏channelRead,需要注意的是,第⼀次执⾏是HeadHandler,第⼆次是
- ServerBootstrapAcceptor
- //通过ServerBootstrapAcceptor进⼊和 新连接接⼊的 注册selector相同的
- 逻辑进⾏注册以及事件绑定
- ((ChannelInboundHandler) handler()).channelRead(this, msg);
- } catch (Throwable t) {
- invokeExceptionCaught(t);
- }
- } else {
- fireChannelRead(msg);
- }
- }
03三 使用Netty优化点
在使用Netty,一些简单的建议点。值得看看。
3.1 零拷贝
- 1 Bytebuf使⽤⽤池化的DirectBuffer类型,不需要进⾏字节缓冲区的⼆次拷⻉。如果使⽤堆内存,JVM会先拷⻉到堆内,再写⼊Socket,就多了⼀次拷⻉。
- 2 CompositeByteBuf将多个ByteBuf封装成⼀个ByteBuf,在添加ByteBuf时不需要进程拷⻉。
- 3 Netty的⽂件传输类DefaultFileRegion的transferTo⽅法将⽂件发送到⽬标channel中,不需要进⾏循环拷⻉,提升了性能。
3.2 EventLoop的任务调度
- channel.eventLoop().execute(new Runnable() {
- @Override
- public void run() {
- channel.writeAndFlush(data)
- }
- });
而不是使用hannel.writeAndFlush(data);EventLoop的任务调度直接放入到channel所对应的EventLoop的执行队列,后者会导致线程切换。备注:在writeAndFlush的底层,如果没有通过eventLoop执行的话,就会启动新的线程。
3.3 减少ChannelPipline的调⽤⻓度
- public class YourHandler extends ChannelInboundHandlerAdapter {
- @Override
- public void channelActive(ChannelHandlerContext ctx) {
- //msg从整个ChannelPipline中⾛⼀遍,所有的handler都要经过。
- ctx.channel().writeAndFlush(msg);
- //从当前handler⼀直到pipline的尾部,调⽤更短。
- ctx.writeAndFlush(msg);
- }
- }
3.4 减少ChannelHandler的创建(基本上不会配置)
如果channelhandler是⽆状态的(即不需要保存任何状态参数),那么使⽤Sharable注解,并在 bootstrap时只创建⼀个实例,减少GC。否则每次连接都会new出handler对象。
- @ChannelHandler.Shareable
- public class StatelessHandler extends ChannelInboundHandlerAdapter {
- @Override
- public void channelActive(ChannelHandlerContext ctx) {}
- }
- public class MyInitializer extends ChannelInitializer<Channel> {
- private static final ChannelHandler INSTANCE = new StatelessHandler();
- @Override
- public void initChannel(Channel ch) {
- ch.pipeline().addLast(INSTANCE);
- }
- }
注意:
ByteToMessageDecoder之类的编解码器是有状态的,不能使⽤Sharable注解。
3.5 配置参数的设置
- 服务端的bossGroup只需要设置为1即可,因为ServerSocketChannel在初始化阶段,只会
- 注册到某⼀个eventLoop上,⽽这个eventLoop只会有⼀个线程在运⾏,所以没有必要设置为
- 多线程。⽽ IO 线程,为了充分利⽤ CPU,同时考虑减少线上下⽂切换的开销,通常workGroup
- 设置为CPU核数的两倍,这也是Netty提供的默认值。
- 在对于响应时间有⾼要求的场景,使⽤.childOption(ChannelOption.TCP_NODELAY, true)
- 和.option(ChannelOption.TCP_NODELAY, true)来禁⽤nagle算法,不等待,⽴即发送。
Netty相关的知识点也算是分享完毕了。后续我仍然分享Netty相关内容。主要是在工作中遇到问题,和新的感悟。


