Condition 是 JDK 1.5 中提供的用来替代 wait 和 notify 的线程通讯方法,那么一定会有人问:为什么不能用 wait 和 notify 了? 哥们我用的好好的。老弟别着急,听我给你细说...
之所以推荐使用 Condition 而非 Object 中的 wait 和 notify 的原因有两个:
- 使用 notify 在极端环境下会造成线程“假死”;
- Condition 性能更高。
接下来怎们就用代码和流程图的方式来演示上述的两种情况。
1.notify 线程“假死”
所谓的线程“假死”是指,在使用 notify 唤醒多个等待的线程时,却意外的唤醒了一个没有“准备好”的线程,从而导致整个程序进入了阻塞的状态不能继续执行。
以多线程编程中的经典案例生产者和消费者模型为例,我们先来演示一下线程“假死”的问题。
1.1 正常版本
在演示线程“假死”的问题之前,我们先使用 wait 和 notify 来实现一个简单的生产者和消费者模型,为了让代码更直观,我这里写一个超级简单的实现版本。我们先来创建一个工厂类,工厂类里面包含两个方法,一个是循环生产数据的(存入)方法,另一个是循环消费数据的(取出)方法,实现代码如下。
/**
 * 工厂类,消费者和生产者通过调用工厂类实现生产/消费
 */
class Factory {
    private int[] items = new int[1]; // 数据存储容器(为了演示方便,设置容量最多存储 1 个元素)
    private int size = 0;             // 实际存储大小

    /**
     * 生产方法
     */
    public synchronized void put() throws InterruptedException {
        // 循环生产数据
        do {
            while (size == items.length) { // 注意不能是 if 判断
                // 存储的容量已经满了,阻塞等待消费者消费之后唤醒
                System.out.println(Thread.currentThread().getName() + " 进入阻塞");
                this.wait();
                System.out.println(Thread.currentThread().getName() + " 被唤醒");
            }
            System.out.println(Thread.currentThread().getName() + " 开始工作");
            items[0] = 1; // 为了方便演示,设置固定值
            size++;
            System.out.println(Thread.currentThread().getName() + " 完成工作");
            // 当生产队列有数据之后通知唤醒消费者
            this.notify();

        } while (true);
    }

    /**
     * 消费方法
     */
    public synchronized void take() throws InterruptedException {
        // 循环消费数据
        do {
            while (size == 0) {
                // 生产者没有数据,阻塞等待
                System.out.println(Thread.currentThread().getName() + " 进入阻塞(消费者)");
                this.wait();
                System.out.println(Thread.currentThread().getName() + " 被唤醒(消费者)");
            }
            System.out.println("消费者工作~");
            size--;
            // 唤醒生产者可以添加生产了
            this.notify();
        } while (true);
    }
}
- 1.
- 2.
- 3.
- 4.
- 5.
- 6.
- 7.
- 8.
- 9.
- 10.
- 11.
- 12.
- 13.
- 14.
- 15.
- 16.
- 17.
- 18.
- 19.
- 20.
- 21.
- 22.
- 23.
- 24.
- 25.
- 26.
- 27.
- 28.
- 29.
- 30.
- 31.
- 32.
- 33.
- 34.
- 35.
- 36.
- 37.
- 38.
- 39.
- 40.
- 41.
- 42.
- 43.
- 44.
- 45.
- 46.
- 47.
- 48.
接下来我们来创建两个线程,一个是生产者调用 put 方法,另一个是消费者调用 take 方法,实现代码如下:
public class NotifyDemo {
    public static void main(String[] args) {
        // 创建工厂类
        Factory factory = new Factory();

        // 生产者
        Thread producer = new Thread(() -> {
            try {
                factory.put();
            } catch (InterruptedException e) {
                e.printStackTrace();
            }
        }, "生产者");
        producer.start();

        // 消费者
        Thread consumer = new Thread(() -> {
            try {
                factory.take();
            } catch (InterruptedException e) {
                e.printStackTrace();
            }
        }, "消费者");
        consumer.start();
    }
}
- 1.
- 2.
- 3.
- 4.
- 5.
- 6.
- 7.
- 8.
- 9.
- 10.
- 11.
- 12.
- 13.
- 14.
- 15.
- 16.
- 17.
- 18.
- 19.
- 20.
- 21.
- 22.
- 23.
- 24.
- 25.
- 26.
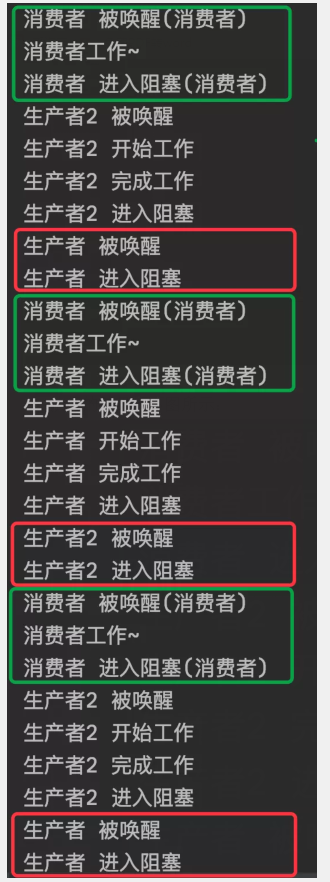
执行结果如下:
从上述结果可以看出,生产者和消费者在循环交替的执行任务,场面非常和谐,是我们想要的正确结果。
1.2 线程“假死”版本
当只有一个生产者和一个消费者时,wait 和 notify 方法不会有任何问题,然而**将生产者增加到两个时就会出现线程“假死”的问题了,**程序的实现代码如下:
public class NotifyDemo {
    public static void main(String[] args) {
  // 创建工厂方法(工厂类的代码不变,这里不再复述)
        Factory factory = new Factory();

        // 生产者
        Thread producer = new Thread(() -> {
            try {
                factory.put();
            } catch (InterruptedException e) {
                e.printStackTrace();
            }
        }, "生产者");
        producer.start();

        // 生产者 2
        Thread producer2 = new Thread(() -> {
            try {
                factory.put();
            } catch (InterruptedException e) {
                e.printStackTrace();
            }
        }, "生产者2");
        producer2.start();

        // 消费者
        Thread consumer = new Thread(() -> {
            try {
                factory.take();
            } catch (InterruptedException e) {
                e.printStackTrace();
            }
        }, "消费者");
        consumer.start();
    }
}
- 1.
- 2.
- 3.
- 4.
- 5.
- 6.
- 7.
- 8.
- 9.
- 10.
- 11.
- 12.
- 13.
- 14.
- 15.
- 16.
- 17.
- 18.
- 19.
- 20.
- 21.
- 22.
- 23.
- 24.
- 25.
- 26.
- 27.
- 28.
- 29.
- 30.
- 31.
- 32.
- 33.
- 34.
- 35.
- 36.
程序执行结果如下:
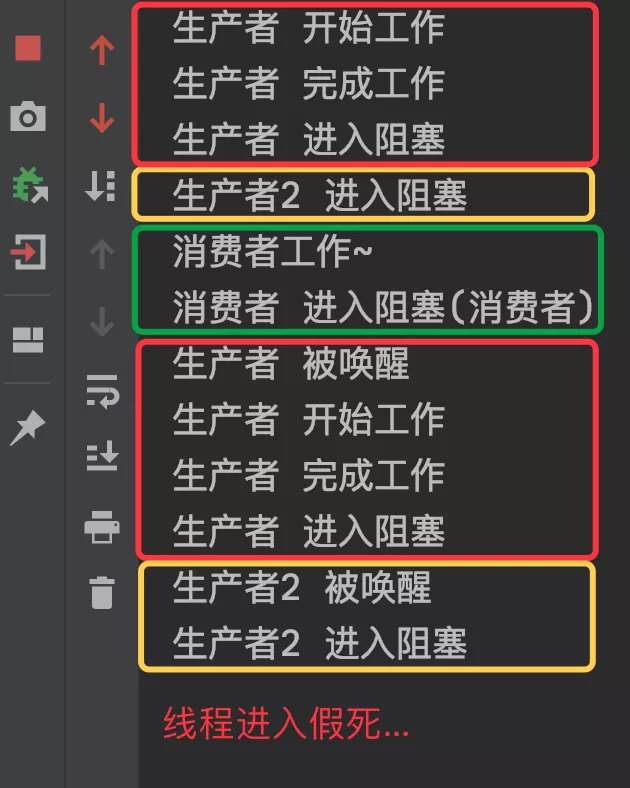
从以上结果可以看出,当我们将生产者的数量增加到 2 个时,就会造成线程“假死”阻塞执行的问题,当生产者 2 被唤醒又被阻塞之后,整个程序就不能继续执行了。
线程“假死”问题分析
我们先把以上程序的执行步骤标注一下,得到如下结果:
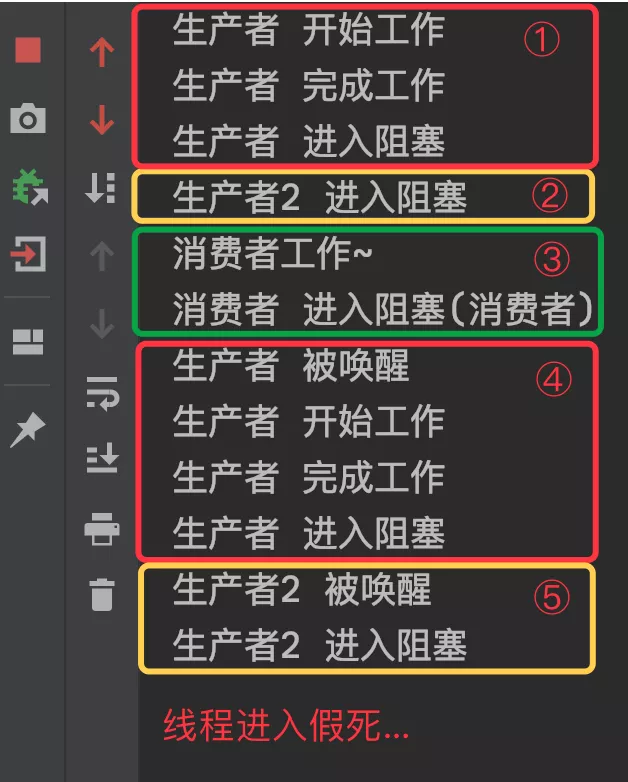
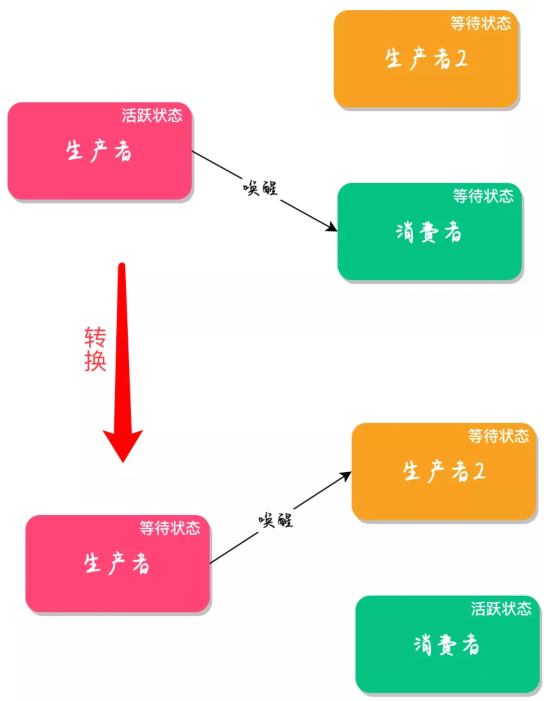
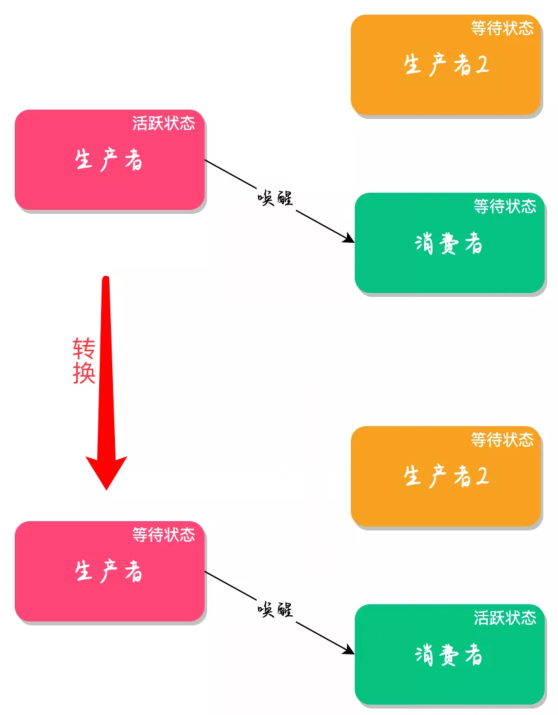
从上图可以看出:当执行到第 ④ 步时,此时生产者为工作状态,而生产者 2 和消费者为等待状态,此时正确的做法应该是唤醒消费着进行消费,然后消费者消费完之后再唤醒生产者继续工作;但此时生产者却错误的唤醒了生产者 2,而生产者 2 因为队列已经满了,所以自身并不具备继续执行的能力,因此就导致了整个程序的阻塞,流程图如下所示:
正确执行流程应该是这样的:
1.3 使用 Condition
为了解决线程的“假死”问题,我们可以使用 Condition 来尝试实现一下,Condition 是 JUC(java.util.concurrent)包下的类,需要使用 Lock 锁来创建,Condition 提供了 3 个重要的方法:
- await:对应 wait 方法;
- signal:对应 notify 方法;
- signalAll: notifyAll 方法。
Condition 的使用和 wait/notify 类似,也是先获得锁然后在锁中进行等待和唤醒操作,Condition 的基础用法如下:
// 创建 Condition 对象
Lock lock = new ReentrantLock();
Condition condition = lock.newCondition();
// 加锁
lock.lock();
try {
    // 业务方法....

    // 1.进入等待状态
    condition.await();

    // 2.唤醒操作
    condition.signal();
} catch (InterruptedException e) {
    e.printStackTrace();
} finally {
    lock.unlock();
}
- 1.
- 2.
- 3.
- 4.
- 5.
- 6.
- 7.
- 8.
- 9.
- 10.
- 11.
- 12.
- 13.
- 14.
- 15.
- 16.
- 17.
- 18.
小知识:Lock的正确使用姿势
切记 Lock 的 lock.lock() 方法不能放入 try 代码中,如果 lock 方法在 try 代码块之内,可能由于其它方法抛出异常,导致在 finally 代码块中, unlock 对未加锁的对象解锁,它会调用 AQS 的 tryRelease 方法(取决于具体实现类),抛出 IllegalMonitorStateException 异常。
回归主题
回到本文的主题,我们如果使用 Condition 来实现线程的通讯就可以避免程序的“假死”情况,因为 Condition 可以创建多个等待集,以本文的生产者和消费者模型为例,我们可以使用两个等待集,一个用做消费者的等待和唤醒,另一个用来唤醒生产者,这样就不会出现生产者唤醒生产者的情况了(生产者只能唤醒消费者,消费者只能唤醒生产者)这样整个流程就不会“假死”了,它的执行流程如下图所示:
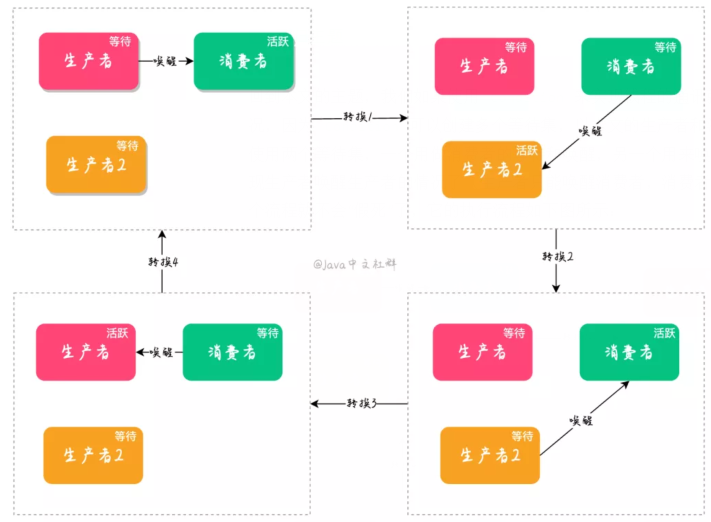
了解了它的基本流程之后,咱们来看具体的实现代码。
基于 Condition 的工厂实现代码如下:
class FactoryByCondition {
    private int[] items = new int[1]; // 数据存储容器(为了演示方便,设置容量最多存储 1 个元素)
    private int size = 0;             // 实际存储大小
    // 创建 Condition 对象
    private Lock lock = new ReentrantLock();
    // 生产者的 Condition 对象
    private Condition producerCondition = lock.newCondition();
    // 消费者的 Condition 对象
    private Condition consumerCondition = lock.newCondition();

    /**
     * 生产方法
     */
    public void put() throws InterruptedException {
        // 循环生产数据
        do {
            lock.lock();
            while (size == items.length) { // 注意不能是 if 判断
                // 生产者进入等待
                System.out.println(Thread.currentThread().getName() + " 进入阻塞");
                producerCondition.await();
                System.out.println(Thread.currentThread().getName() + " 被唤醒");
            }
            System.out.println(Thread.currentThread().getName() + " 开始工作");
            items[0] = 1; // 为了方便演示,设置固定值
            size++;
            System.out.println(Thread.currentThread().getName() + " 完成工作");
            // 唤醒消费者
            consumerCondition.signal();
            try {
            } finally {
                lock.unlock();
            }
        } while (true);
    }

    /**
     * 消费方法
     */
    public void take() throws InterruptedException {
        // 循环消费数据
        do {
            lock.lock();
            while (size == 0) {
                // 消费者阻塞等待
                consumerCondition.await();
            }
            System.out.println("消费者工作~");
            size--;
            // 唤醒生产者
            producerCondition.signal();
            try {
            } finally {
                lock.unlock();
            }
        } while (true);
    }
}
- 1.
- 2.
- 3.
- 4.
- 5.
- 6.
- 7.
- 8.
- 9.
- 10.
- 11.
- 12.
- 13.
- 14.
- 15.
- 16.
- 17.
- 18.
- 19.
- 20.
- 21.
- 22.
- 23.
- 24.
- 25.
- 26.
- 27.
- 28.
- 29.
- 30.
- 31.
- 32.
- 33.
- 34.
- 35.
- 36.
- 37.
- 38.
- 39.
- 40.
- 41.
- 42.
- 43.
- 44.
- 45.
- 46.
- 47.
- 48.
- 49.
- 50.
- 51.
- 52.
- 53.
- 54.
- 55.
- 56.
- 57.
- 58.
两个生产者和一个消费者的实现代码如下:
public class NotifyDemo {
    public static void main(String[] args) {
        FactoryByCondition factory = new FactoryByCondition();

        // 生产者
        Thread producer = new Thread(() -> {
            try {
                factory.put();
            } catch (InterruptedException e) {
                e.printStackTrace();
            }
        }, "生产者");
        producer.start();

        // 生产者 2
        Thread producer2 = new Thread(() -> {
            try {
                factory.put();
            } catch (InterruptedException e) {
                e.printStackTrace();
            }
        }, "生产者2");
        producer2.start();

        // 消费者
        Thread consumer = new Thread(() -> {
            try {
                factory.take();
            } catch (InterruptedException e) {
                e.printStackTrace();
            }
        }, "消费者");
        consumer.start();
    }
}
- 1.
- 2.
- 3.
- 4.
- 5.
- 6.
- 7.
- 8.
- 9.
- 10.
- 11.
- 12.
- 13.
- 14.
- 15.
- 16.
- 17.
- 18.
- 19.
- 20.
- 21.
- 22.
- 23.
- 24.
- 25.
- 26.
- 27.
- 28.
- 29.
- 30.
- 31.
- 32.
- 33.
- 34.
- 35.
程序的执行结果如下图所示:
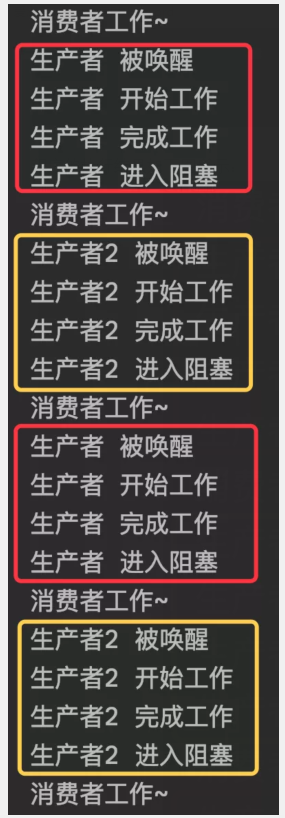
从上述结果可以看出,当使用 Condition 时,生产者、消费者、生产者 2 会一直交替循环执行,执行结果符合我们的预期。
2.性能问题
在上面我们演示 notify 会造成线程的“假死”问题的时候,一定有朋友会想到,如果把 notify 换成 notifyAll 线程就不会“假死”了。
这样做法确实可以解决线程“假死”的问题,但同时会到来新的性能问题,空说无凭,直接上代码展示。
以下是使用 wait 和 notifyAll 改进后的代码:
/**
 * 工厂类,消费者和生产者通过调用工厂类实现生产/消费功能.
 */
class Factory {
    private int[] items = new int[1];   // 数据存储容器(为了演示方便,设置容量最多存储 1 个元素)
    private int size = 0;               // 实际存储大小

    /**
     * 生产方法
     * @throws InterruptedException
     */
    public synchronized void put() throws InterruptedException {
        // 循环生产数据
        do {
            while (size == items.length) { // 注意不能是 if 判断
                // 存储的容量已经满了,阻塞等待消费者消费之后唤醒
                System.out.println(Thread.currentThread().getName() + " 进入阻塞");
                this.wait();
                System.out.println(Thread.currentThread().getName() + " 被唤醒");
            }
            System.out.println(Thread.currentThread().getName() + " 开始工作");
            items[0] = 1; // 为了方便演示,设置固定值
            size++;
            System.out.println(Thread.currentThread().getName() + " 完成工作");
            // 唤醒所有线程
            this.notifyAll();
        } while (true);
    }

    /**
     * 消费方法
     * @throws InterruptedException
     */
    public synchronized void take() throws InterruptedException {
        // 循环消费数据
        do {
            while (size == 0) {
                // 生产者没有数据,阻塞等待
                System.out.println(Thread.currentThread().getName() + " 进入阻塞(消费者)");
                this.wait();
                System.out.println(Thread.currentThread().getName() + " 被唤醒(消费者)");
            }
            System.out.println("消费者工作~");
            size--;
            // 唤醒所有线程
            this.notifyAll();
        } while (true);
    }
}
- 1.
- 2.
- 3.
- 4.
- 5.
- 6.
- 7.
- 8.
- 9.
- 10.
- 11.
- 12.
- 13.
- 14.
- 15.
- 16.
- 17.
- 18.
- 19.
- 20.
- 21.
- 22.
- 23.
- 24.
- 25.
- 26.
- 27.
- 28.
- 29.
- 30.
- 31.
- 32.
- 33.
- 34.
- 35.
- 36.
- 37.
- 38.
- 39.
- 40.
- 41.
- 42.
- 43.
- 44.
- 45.
- 46.
- 47.
- 48.
- 49.
依旧是两个生产者加一个消费者,实现代码如下:
public static void main(String[] args) {
    Factory factory = new Factory();
    // 生产者
    Thread producer = new Thread(() -> {
        try {
            factory.put();
        } catch (InterruptedException e) {
            e.printStackTrace();
        }
    }, "生产者");
    producer.start();

    // 生产者 2
    Thread producer2 = new Thread(() -> {
        try {
            factory.put();
        } catch (InterruptedException e) {
            e.printStackTrace();
        }
    }, "生产者2");
    producer2.start();

    // 消费者
    Thread consumer = new Thread(() -> {
        try {
            factory.take();
        } catch (InterruptedException e) {
            e.printStackTrace();
        }
    }, "消费者");
    consumer.start();
}
- 1.
- 2.
- 3.
- 4.
- 5.
- 6.
- 7.
- 8.
- 9.
- 10.
- 11.
- 12.
- 13.
- 14.
- 15.
- 16.
- 17.
- 18.
- 19.
- 20.
- 21.
- 22.
- 23.
- 24.
- 25.
- 26.
- 27.
- 28.
- 29.
- 30.
- 31.
- 32.
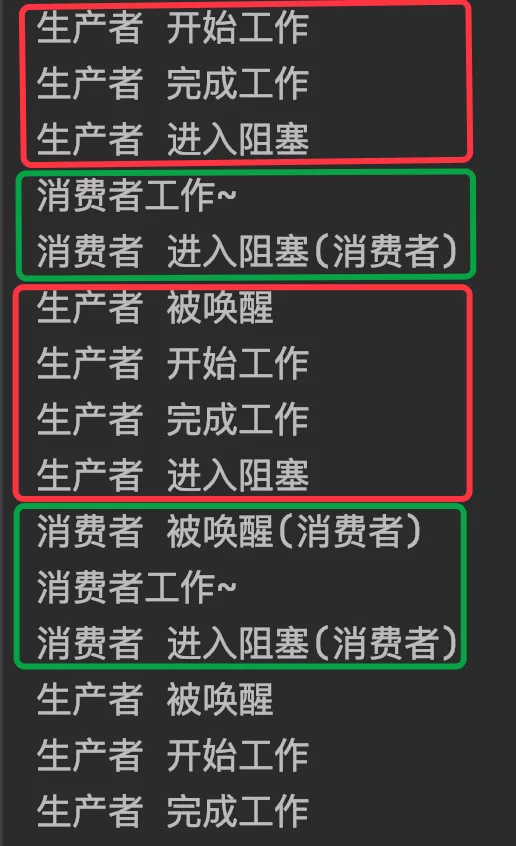
执行的结果如下图所示:
通过以上结果可以看出:当我们调用 notifyAll 时确实不会造成线程“假死”了,但会造成所有的生产者都被唤醒了,但因为待执行的任务只有一个,因此被唤醒的所有生产者中,只有一个会执行正确的工作,而另一个则是啥也不干,然后又进入等待状态,这种行为对于整个程序来说,无疑是多此一举,只会增加线程调度的开销,从而导致整个程序的性能下降。
反观 Condition 的 await 和 signal 方法,即使有多个生产者,程序也只会唤醒一个有效的生产者进行工作,如下图所示:

生产者和生产者 2 依次会被交替的唤醒进行工作,所以这样执行时并没有任何多余的开销,从而相比于 notifyAll 而言整个程序的性能会提升不少。
总结
本文我们通过代码和流程图的方式演示了 wait 方法和 notify/notifyAll 方法的使用缺陷,它的缺陷主要有两个,一个是在极端环境下使用 notify 会造成程序“假死”的情况,另一个就是使用 notifyAll 会造成性能下降的问题,因此在进行线程通讯时,强烈建议使用 Condition 类来实现。
PS:有人可能会问为什么不用 Condition 的 signalAll 和 notifyAll 进行性能对比?而使用 signal 和 notifyAll 进行对比?我只想说,既然使用 signal 可以实现此功能,为什么还要使用 signalAll 呢?这就好比在有暖气的 25 度的房间里,穿一件短袖就可以了,为什么还要穿一件棉袄呢?


