介绍
图像分类是计算机视觉的最重要应用之一。它的应用范围包括从自动驾驶汽车中的物体分类到医疗行业中的血细胞识别,从制造业中的缺陷物品识别到建立可以对戴口罩与否的人进行分类的系统。在所有这些行业中,图像分类都以一种或另一种方式使用。他们是如何做到的呢?他们使用哪个框架?
你必须已阅读很多有关不同深度学习框架(包括TensorFlow,PyTorch,Keras等)之间差异的信息。TensorFlow和PyTorch无疑是业内最受欢迎的框架。我相信你会发现无穷的资源来学习这些深度学习框架之间的异同。
在本文中,我们将了解如何在PyTorch和TensorFlow中建立基本的图像分类模型。我们将从PyTorch和TensorFlow的简要概述开始。然后,我们将使用MNIST手写数字分类数据集,并在PyTorch和TensorFlow中使用CNN(卷积神经网络)建立图像分类模型。
这将是你的起点,然后你可以选择自己喜欢的任何框架,也可以开始构建其他计算机视觉模型。
目录
- PyTorch概述
- TensorFlow概述
- 了解问题陈述:MNIST
- 在PyTorch中实现卷积神经网络(CNN)
- 在TensorFlow中实施卷积神经网络(CNN)
PyTorch概述
PyTorch在深度学习社区中越来越受欢迎,并且被深度学习从业者广泛使用,PyTorch是一个提供Tensor计算的Python软件包。此外,tensors是多维数组,就像NumPy的ndarrays也可以在GPU上运行一样。
PyTorch的一个独特功能是它使用动态计算图。PyTorch的Autograd软件包从张量生成计算图并自动计算梯度。而不是具有特定功能的预定义图形。
PyTorch为我们提供了一个框架,可以随时随地构建计算图,甚至在运行时进行更改。特别是,对于我们不知道创建神经网络需要多少内存的情况,这很有用。
你可以使用PyTorch应对各种深度学习挑战。以下是一些挑战:
- 图像(检测,分类等)
- 文字(分类,生成等)
- 强化学习
TensorFlow概述
TensorFlow由Google Brain团队的研究人员和工程师开发。它与深度学习领域最常用的软件库相距甚远(尽管其他软件库正在迅速追赶)。
TensorFlow如此受欢迎的最大原因之一是它支持多种语言来创建深度学习模型,例如Python,C ++和R。它提供了详细的文档和指南的指导。
TensorFlow包含许多组件。以下是两个杰出的代表:
- TensorBoard:使用数据流图帮助有效地可视化数据
- TensorFlow:对于快速部署新算法/实验非常有用
TensorFlow当前正在运行2.0版本,该版本于2019年9月正式发布。我们还将在2.0版本中实现CNN。
我希望你现在对PyTorch和TensorFlow都有基本的了解。现在,让我们尝试使用这两个框架构建深度学习模型并了解其内部工作。在此之前,让我们首先了解我们将在本文中解决的问题陈述。
了解问题陈述:MNIST
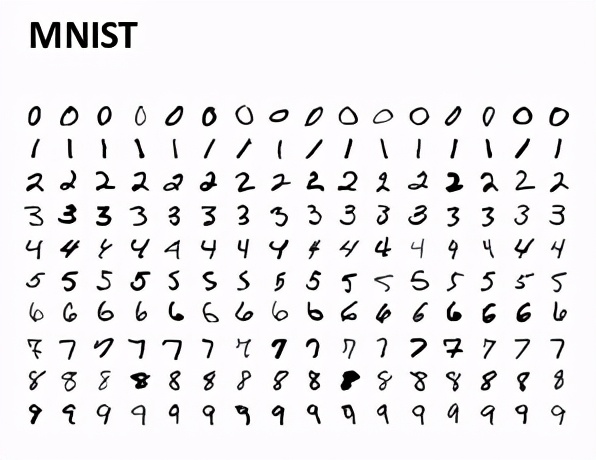
在开始之前,让我们了解数据集。在本文中,我们将解决流行的MNIST问题。这是一个数字识别任务,其中我们必须将手写数字的图像分类为0到9这10个类别之一。
在MNIST数据集中,我们具有从各种扫描的文档中获取的数字图像,尺寸经过标准化并居中。随后,每个图像都是28 x 28像素的正方形(总计784像素)。数据集的标准拆分用于评估和比较模型,其中60,000张图像用于训练模型,而单独的10,000张图像集用于测试模型。
现在,我们也了解了数据集。因此,让我们在PyTorch和TensorFlow中使用CNN构建图像分类模型。我们将从PyTorch中的实现开始。我们将在google colab中实现这些模型,该模型提供免费的GPU以运行这些深度学习模型。
在PyTorch中实现卷积神经网络(CNN)
让我们首先导入所有库:
# importing the libraries
import numpy as np
import torch
import torchvision
import matplotlib.pyplot as plt
from time import time
from torchvision import datasets, transforms
from torch import nn, optim
- 1.
- 2.
- 3.
- 4.
- 5.
- 6.
- 7.
- 8.
我们还要在Google colab上检查PyTorch的版本:
# version of pytorch
print(torch.__version__)
- 1.
- 2.
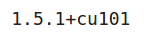
因此,我正在使用1.5.1版本的PyTorch。如果使用任何其他版本,则可能会收到一些警告或错误,因此你可以更新到此版本的PyTorch。我们将对图像执行一些转换,例如对像素值进行归一化,因此,让我们也定义这些转换:
# transformations to be applied on images
transform = transforms.Compose([transforms.ToTensor(),
                              transforms.Normalize((0.5,), (0.5,)),
                              ])
- 1.
- 2.
- 3.
- 4.
现在,让我们加载MNIST数据集的训练和测试集:
# defining the training and testing set
trainset = datasets.MNIST('./data', download=True, train=True, transform=transform)
testset = datasets.MNIST('./', download=True, train=False, transform=transform)
- 1.
- 2.
- 3.
接下来,我定义了训练和测试加载器,这将帮助我们分批加载训练和测试集。我将批量大小定义为64:
# defining trainloader and testloader
trainloader = torch.utils.data.DataLoader(trainset, batch_size=64, shuffle=True)
testloader = torch.utils.data.DataLoader(testset, batch_size=64, shuffle=True)
- 1.
- 2.
- 3.
首先让我们看一下训练集的摘要:
# shape of training data
dataiter = iter(trainloader)
images, labels = dataiter.next()

print(images.shape)
print(labels.shape)
- 1.
- 2.
- 3.
- 4.
- 5.
- 6.

因此,在每个批次中,我们有64个图像,每个图像的大小为28,28,并且对于每个图像,我们都有一个相应的标签。让我们可视化训练图像并查看其外观:
# visualizing the training images
plt.imshow(images[0].numpy().squeeze(), cmap='gray')
- 1.
- 2.
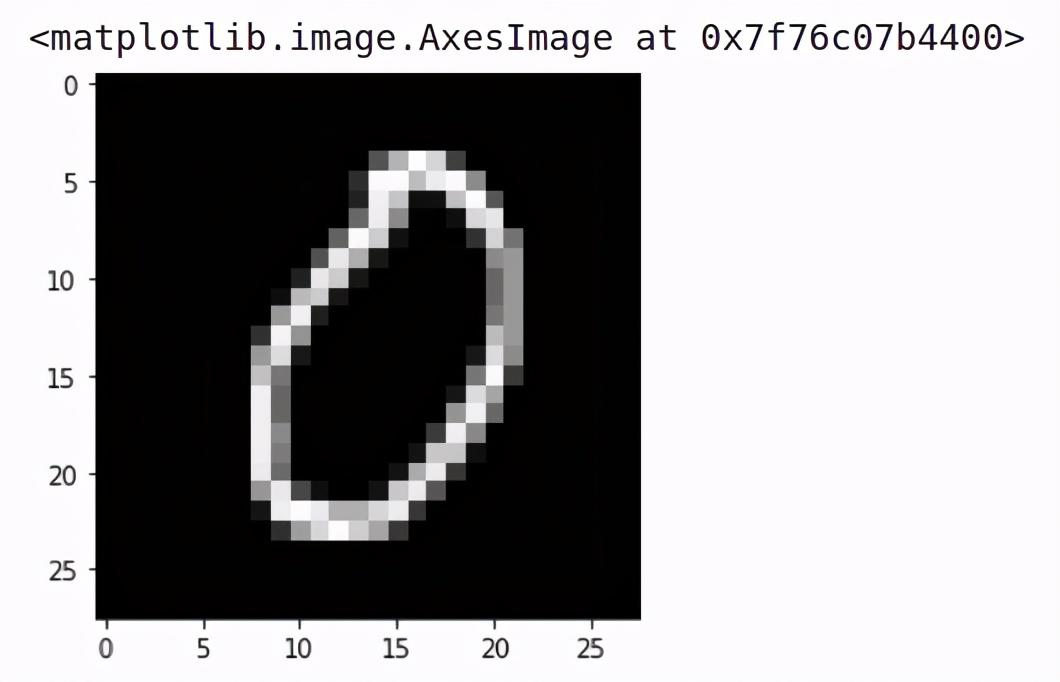
它是数字0的图像。类似地,让我们可视化测试集图像:
# shape of validation data
dataiter = iter(testloader)
images, labels = dataiter.next()

print(images.shape)
print(labels.shape)
- 1.
- 2.
- 3.
- 4.
- 5.
- 6.
在测试集中,我们也有大小为64的批次。现在让我们定义架构
定义模型架构
我们将在这里使用CNN模型。因此,让我们定义并训练该模型:
# defining the model architecture
class Net(nn.Module):
  def __init__(self):
      super(Net, self).__init__()

      self.cnn_layers = nn.Sequential(
          # Defining a 2D convolution layer
          nn.Conv2d(1, 4, kernel_size=3, stride=1, padding=1),
          nn.BatchNorm2d(4),
          nn.ReLU(inplace=True),
          nn.MaxPool2d(kernel_size=2, stride=2),
          # Defining another 2D convolution layer
          nn.Conv2d(4, 4, kernel_size=3, stride=1, padding=1),
          nn.BatchNorm2d(4),
          nn.ReLU(inplace=True),
          nn.MaxPool2d(kernel_size=2, stride=2),
      )

      self.linear_layers = nn.Sequential(
          nn.Linear(4 * 7 * 7, 10)
      )

  # Defining the forward pass
  def forward(self, x):
      x = self.cnn_layers(x)
      x = x.view(x.size(0), -1)
      x = self.linear_layers(x)
      return x
- 1.
- 2.
- 3.
- 4.
- 5.
- 6.
- 7.
- 8.
- 9.
- 10.
- 11.
- 12.
- 13.
- 14.
- 15.
- 16.
- 17.
- 18.
- 19.
- 20.
- 21.
- 22.
- 23.
- 24.
- 25.
- 26.
- 27.
- 28.
我们还定义优化器和损失函数,然后我们将看一下该模型的摘要:
# defining the model
model = Net()
# defining the optimizer
optimizer = optim.Adam(model.parameters(), lr=0.01)
# defining the loss function
criterion = nn.CrossEntropyLoss()
# checking if GPU is available
if torch.cuda.is_available():
    model = model.cuda()
    criterion = criterion.cuda()

print(model)
- 1.
- 2.
- 3.
- 4.
- 5.
- 6.
- 7.
- 8.
- 9.
- 10.
- 11.
- 12.
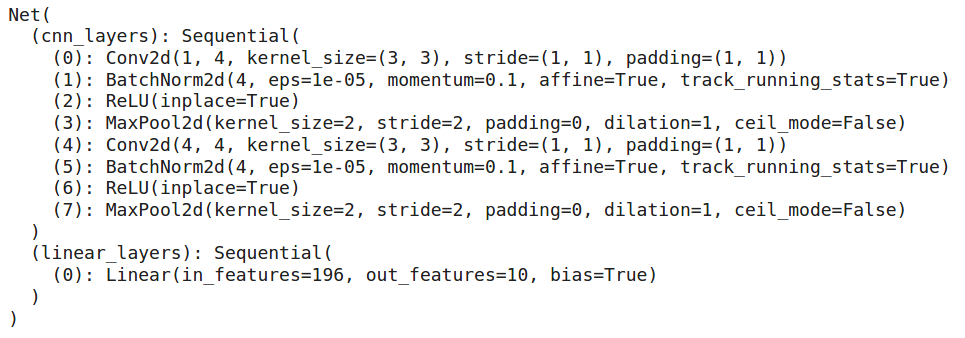
因此,我们有2个卷积层,这将有助于从图像中提取特征。这些卷积层的特征传递到完全连接的层,该层将图像分类为各自的类别。现在我们的模型架构已准备就绪,让我们训练此模型十个时期:
for i in range(10):
    running_loss = 0
    for images, labels in trainloader:

        if torch.cuda.is_available():
          images = images.cuda()
          labels = labels.cuda()

        # Training pass
        optimizer.zero_grad()

        output = model(images)
        loss = criterion(output, labels)

        #This is where the model learns by backpropagating
        loss.backward()

        #And optimizes its weights here
        optimizer.step()

        running_loss += loss.item()
    else:
        print("Epoch {} - Training loss: {}".format(i+1, running_loss/len(trainloader)))
- 1.
- 2.
- 3.
- 4.
- 5.
- 6.
- 7.
- 8.
- 9.
- 10.
- 11.
- 12.
- 13.
- 14.
- 15.
- 16.
- 17.
- 18.
- 19.
- 20.
- 21.
- 22.
- 23.
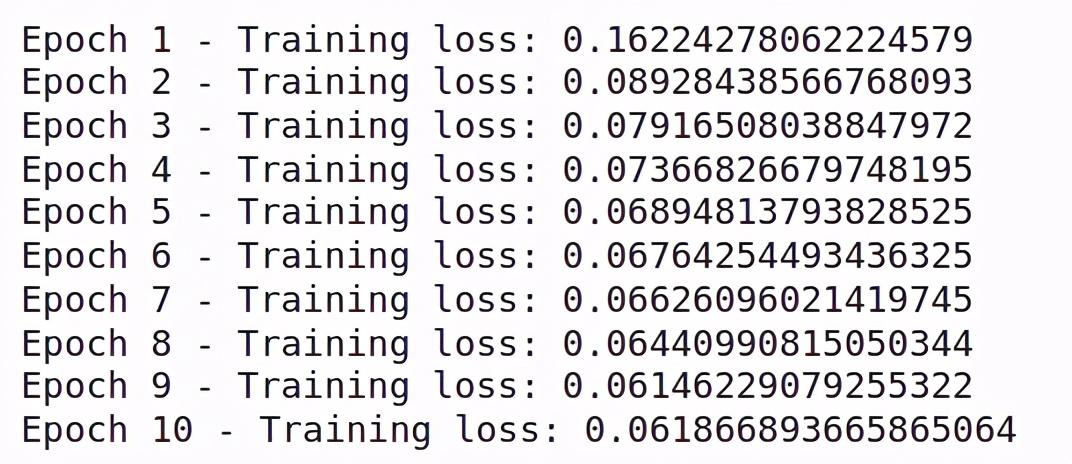
你会看到训练随着时期的增加而减少。这意味着我们的模型是从训练集中学习模式。让我们在测试集上检查该模型的性能:
# getting predictions on test set and measuring the performance
correct_count, all_count = 0, 0
for images,labels in testloader:
  for i in range(len(labels)):
    if torch.cuda.is_available():
        images = images.cuda()
        labels = labels.cuda()
    img = images[i].view(1, 1, 28, 28)
    with torch.no_grad():
        logps = model(img)


    ps = torch.exp(logps)
    probab = list(ps.cpu()[0])
    pred_label = probab.index(max(probab))
    true_label = labels.cpu()[i]
    if(true_label == pred_label):
      correct_count += 1
    all_count += 1

print("Number Of Images Tested =", all_count)
print("\nModel Accuracy =", (correct_count/all_count))
- 1.
- 2.
- 3.
- 4.
- 5.
- 6.
- 7.
- 8.
- 9.
- 10.
- 11.
- 12.
- 13.
- 14.
- 15.
- 16.
- 17.
- 18.
- 19.
- 20.
- 21.
- 22.
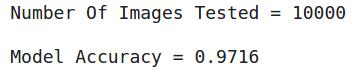
因此,我们总共测试了10000张图片,并且该模型在预测测试图片的标签方面的准确率约为96%。
这是你可以在PyTorch中构建卷积神经网络的方法。在下一节中,我们将研究如何在TensorFlow中实现相同的体系结构。
在TensorFlow中实施卷积神经网络(CNN)
现在,让我们在TensorFlow中使用卷积神经网络解决相同的MNIST问题。与往常一样,我们将从导入库开始:
# importing the libraries
import tensorflow as tf

from tensorflow.keras import datasets, layers, models
from tensorflow.keras.utils import to_categorical
import matplotlib.pyplot as plt
- 1.
- 2.
- 3.
- 4.
- 5.
- 6.
检查一下我们正在使用的TensorFlow的版本:
# version of tensorflow
print(tf.__version__)
- 1.
- 2.

因此,我们正在使用TensorFlow的2.2.0版本。现在让我们使用tensorflow.keras的数据集类加载MNIST数据集:
(train_images, train_labels), (test_images, test_labels) = datasets.mnist.load_data(path='mnist.npz')
# Normalize pixel values to be between 0 and 1
train_images, test_images = train_images / 255.0, test_images / 255.0
- 1.
- 2.
- 3.
在这里,我们已经加载了训练以及MNIST数据集的测试集。此外,我们已经将训练和测试图像的像素值标准化了。接下来,让我们可视化来自数据集的一些图像:
# visualizing a few images
plt.figure(figsize=(10,10))
for i in range(9):
    plt.subplot(3,3,i+1)
    plt.xticks([])
    plt.yticks([])
    plt.grid(False)
    plt.imshow(train_images[i], cmap='gray')
plt.show()
- 1.
- 2.
- 3.
- 4.
- 5.
- 6.
- 7.
- 8.
- 9.
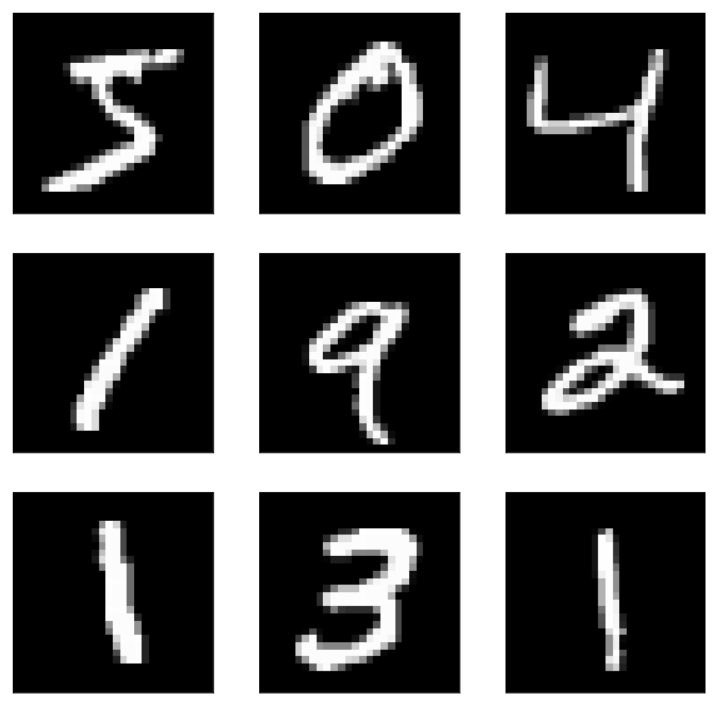
这就是我们的数据集的样子。我们有手写数字的图像。再来看一下训练和测试集的形状:
# shape of the training and test set
(train_images.shape, train_labels.shape), (test_images.shape, test_labels.shape)
- 1.
- 2.

因此,我们在训练集中有60,000张28乘28的图像,在测试集中有10,000张相同形状的图像。接下来,我们将调整图像的大小,并一键编码目标变量:
# reshaping the images
train_images = train_images.reshape((60000, 28, 28, 1))
test_images = test_images.reshape((10000, 28, 28, 1))

# one hot encoding the target variable
train_labels = to_categorical(train_labels)
test_labels = to_categorical(test_labels)
- 1.
- 2.
- 3.
- 4.
- 5.
- 6.
- 7.
定义模型体系结构
现在,我们将定义模型的体系结构。我们将使用Pytorch中定义的相同架构。因此,我们的模型将是具有2个卷积层,以及最大池化层的组合,然后我们将有一个Flatten层,最后是一个有10个神经元的全连接层,因为我们有10个类。
# defining the model architecture
model = models.Sequential()
model.add(layers.Conv2D(4, (3, 3), activation='relu', input_shape=(28, 28, 1)))
model.add(layers.MaxPooling2D((2, 2), strides=2))
model.add(layers.Conv2D(4, (3, 3), activation='relu'))
model.add(layers.MaxPooling2D((2, 2), strides=2))
model.add(layers.Flatten())
model.add(layers.Dense(10, activation='softmax'))
- 1.
- 2.
- 3.
- 4.
- 5.
- 6.
- 7.
- 8.
让我们快速看一下该模型的摘要:
# summary of the model
model.summary()
- 1.
- 2.
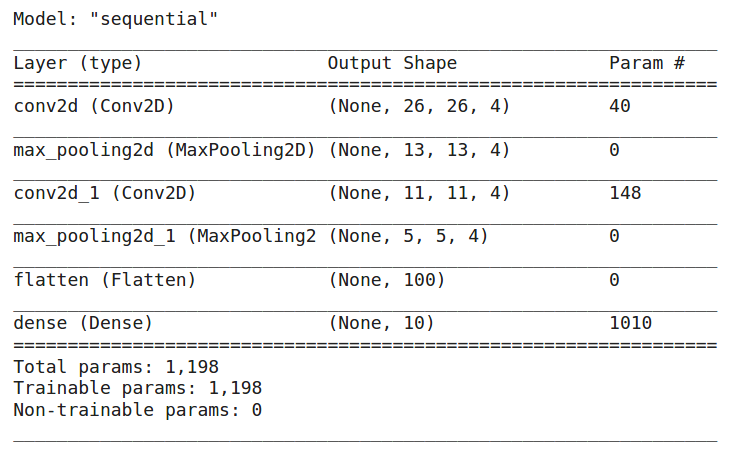
总而言之,我们有2个卷积层,2个最大池层,一个Flatten层和一个全连接层。模型中的参数总数为1198个。现在我们的模型已经准备好了,我们将编译它:
# compiling the model
model.compile(optimizer='adam',
              loss='categorical_crossentropy',
              metrics=['accuracy'])
- 1.
- 2.
- 3.
- 4.
我们正在使用Adam优化器,你也可以对其进行更改。损失函数被设置为分类交叉熵,因为我们正在解决一个多类分类问题,并且度量标准是‘accuracy’。现在让我们训练模型10个时期
# training the model
history = model.fit(train_images, train_labels, epochs=10, validation_data=(test_images, test_labels))
- 1.
- 2.
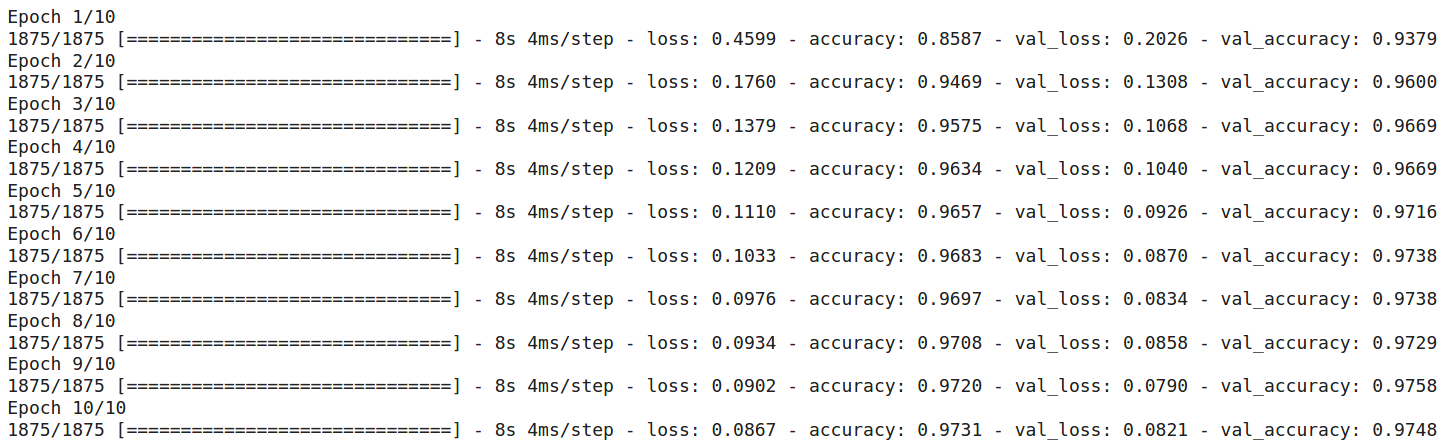
总而言之,最初,训练损失约为0.46,经过10个时期后,训练损失降至0.08。10个时期后的训练和验证准确性分别为97.31%和97.48%。
因此,这就是我们可以在TensorFlow中训练CNN的方式。
尾注
总而言之,在本文中,我们首先研究了PyTorch和TensorFlow的简要概述。然后我们了解了MNIST手写数字分类的挑战,最后,在PyTorch和TensorFlow中使用CNN(卷积神经网络)建立了图像分类模型。现在,我希望你熟悉这两个框架。下一步,应对另一个图像分类挑战,并尝试同时使用PyTorch和TensorFlow来解决。