下面,就写一下我自己对 redux 和 React-redux 的学习以及使用的心得,权当是对学习过程的一种记录和分享。
一、redux和React-redux的几个重要概念
1.1 action
Action 是把数据从应用(这里之所以不叫 view 是因为这些数据有可能是服务器响应,用户输入或其它非 view 的数据 )传到 store 的有效载荷。它是 store 数据的唯一来源。一般来说你会通过 store.dispatch() 将 action 传到 store。
1.2 reducer
Reducers 指定了应用状态的变化如何响应 actions并发送到 store 的,记住 actions 只是描述了有事情发生了这一事实,并没有描述应用如何更新 state。
1.3 store
store就是把action和reducer联系到一起的对象,store本质上是一个状态树,保存了所有对象的状态。任何UI组件都可以直接从store访问特定对象的状态。
在 Redux 中,所有的数据(比如state)被保存在一个store容器中 ,在一个应用程序中只能有一个store对象。当一个store接收到一个action,它将把这个action代理给相关的reducer。reducer是一个纯函数,它可以查看之前的状态,执行一个action并且返回一个新的状态。
1.4 Provider
Provider 其实就只是一个外层容器,它的作用就是通过配合 connect 来达到跨层级传递数据。使用时只需将Provider定义为整个项目最外层的组件,并设置好store。那么整个项目都可以直接获取这个store。它的原理其实是通过React中的[Context]()来实现的。它大致的核心代码如下:
- import React, {Component} from 'react'
- import {PropTypes} from 'prop-types'
- export default class Provider extends Component {
- getChildContext() {
- return {store: this.props.store}
- }
- constructor() {
- super()
- this.state = {}
- }
- render() {
- return this.props.children
- }
- }
- Provider.childContextTypes = {
- store: PropTypes.object
- }
1.5 connect
connect 的作用是连接React组件与 Redux store,它包在我们的容器组件的外一层,它接收上面 Provider 提供的 store 里面的 state 和 dispatch,传给一个构造函数,返回一个对象,以属性形式传给我们的容器组件。
它共有四个参数mapStateToProps, mapDispatchToProps, mergeProps以及options。
mapStateToProps 的作用是将store里的state(数据源)绑定到指定组件的props中 mapDispatchToProps 的作用是将store里的action(操作数据的方法)绑定到指定组件的props中 另外两个方法一般情况下使用不到,这里就不做介绍。。
那么 connect 是怎么将React组件与 Redux store连接起来的呢?其主要逻辑可以总结成以下代码:
- import {Component} from "react";
- import React from "react";
- import {PropTypes} from 'prop-types'
- const connect = (mapStateToProps, mapDispatchToProps) => (WrappedComponent => {
- class Connect extends Component {
- constructor() {
- super()
- this.state = {}
- }
- componentWillMount() {
- this.unSubscribe = this.context.store.subscribe(() => {
- this.setState(mapStateToProps(this.context.store.getState()))
- })
- }
- componentWillUnmount() {
- this.unSubscribe()
- }
- render() {
- return <WrappedComponent {...this.state}
- {...mapDispatchToProps(this.context.store.dispatch)}/>
- }
- }
- Connect.contextTypes = {
- store: PropTypes.object
- }
- return Connect
- })
- export default connect
二、redux和React-redux的使用
项目中关于redux的文件夹目录如下
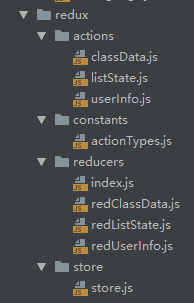
拿管理用户信息数据的需求来举例
第一步,编写操作用户信息的action
- import {USER_INFO} from "../constants/actionTypes";
- import store from '../store/store'
- export const switchUser = (data) => {
- console.log("switchUser()",data);
- return () => {
- store.dispatch({
- type: USER_INFO,
- ...data
- })
- }
- }
第二步,编写改变用户信息并返回新state的reducer
- import {USER_INFO} from "../constants/actionTypes";
- const redUserInfo = (state = {
- userId: 10001,
- userName: '',
- userOpenid: '',
- userPhone: '',
- userRole: 0
- }, action) => {
- if (action === undefined) {
- return state
- }
- switch (action.type) {
- case USER_INFO:
- return {
- ...state,
- ...action
- }
- default:
- return state
- }
- }
第三步,完成store的创建
- import {createStore} from 'redux'
- import reducers from '../reducers/index'
- let store = createStore(reducers)
- export default store
第四步,获取用户信息
- //配置代码,通过connect将组件和store连接起来
- let mapStateToProps = (state) => ({
- userInfo: {...state.redUserInfo}
- })
- let mapDispatchToProps = (dispatch) => ({})
- export default connect(mapStateToProps, mapDispatchToProps)(PageClass)
- //通过props获取用户信息
- this.props.userInfo
第五步,修改用户信息
- import {switchUser} from '../../redux/actions/userInfo'
- switchUser({
- userId: 10001,
- userName: '',
- userOpenid: '',
- userPhone: '',
- userRole: 2
- })();
至此就完成了redux+React-redux的一个简单使用流程