递归更新的实现
React 15 的递归更新逻辑是先将需要更新的组件放入脏组件队列(这里在上篇文章已经介绍过,没看过的可以先看看《React 架构的演变 - 从同步到异步》),然后取出组件进行一次递归,不停向下寻找子节点来查找是否需要更新。
下面使用一段代码来简单描述一下这个过程:
- updateComponent (prevElement, nextElement) {
- if (
- // 如果组件的 type 和 key 都没有发生变化,进行更新
- prevElement.type === nextElement.type &&
- prevElement.key === nextElement.key
- ) {
- // 文本节点更新
- if (prevElement.type === 'text') {
- if (prevElement.value !== nextElement.value) {
- this.replaceText(nextElement.value)
- }
- }
- // DOM 节点的更新
- else {
- // 先更新 DOM 属性
- this.updateProps(prevElement, nextElement)
- // 再更新 children
- this.updateChildren(prevElement, nextElement)
- }
- }
- // 如果组件的 type 和 key 发生变化,直接重新渲染组件
- else {
- // 触发 unmount 生命周期
- ReactReconciler.unmountComponent(prevElement)
- // 渲染新的组件
- this._instantiateReactComponent(nextElement)
- }
- },
- updateChildren (prevElement, nextElement) {
- var prevChildren = prevElement.children
- var nextChildren = nextElement.children
- // 省略通过 key 重新排序的 diff 过程
- if (prevChildren === null) { } // 渲染新的子节点
- if (nextChildren === null) { } // 清空所有子节点
- // 子节点对比
- prevChildren.forEach((prevChild, index) => {
- const nextChild = nextChildren[index]
- // 递归过程
- this.updateComponent(prevChild, nextChild)
- })
- }
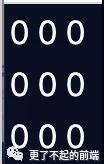
为了更清晰的看到这个过程,我们还是写一个简单的Demo,构造一个 3 * 3 的 Table 组件。
Table
- // https://codesandbox.io/embed/react-sync-demo-nlijf
- class Col extends React.Component {
- render() {
- // 渲染之前暂停 8ms,给 render 制造一点点压力
- const start = performance.now()
- while (performance.now() - start < 8)
- return <td>{this.props.children}</td>
- }
- }
- export default class Demo extends React.Component {
- state = {
- val: 0
- }
- render() {
- const { val } = this.state
- const array = Array(3).fill()
- // 构造一个 3 * 3 表格
- const rows = array.map(
- (_, row) => <tr key={row}>
- {array.map(
- (_, col) => <Col key={col}>{val}</Col>
- )}
- </tr>
- )
- return (
- <table className="table">
- <tbody>{rows}</tbody>
- </table>
- )
- }
- }
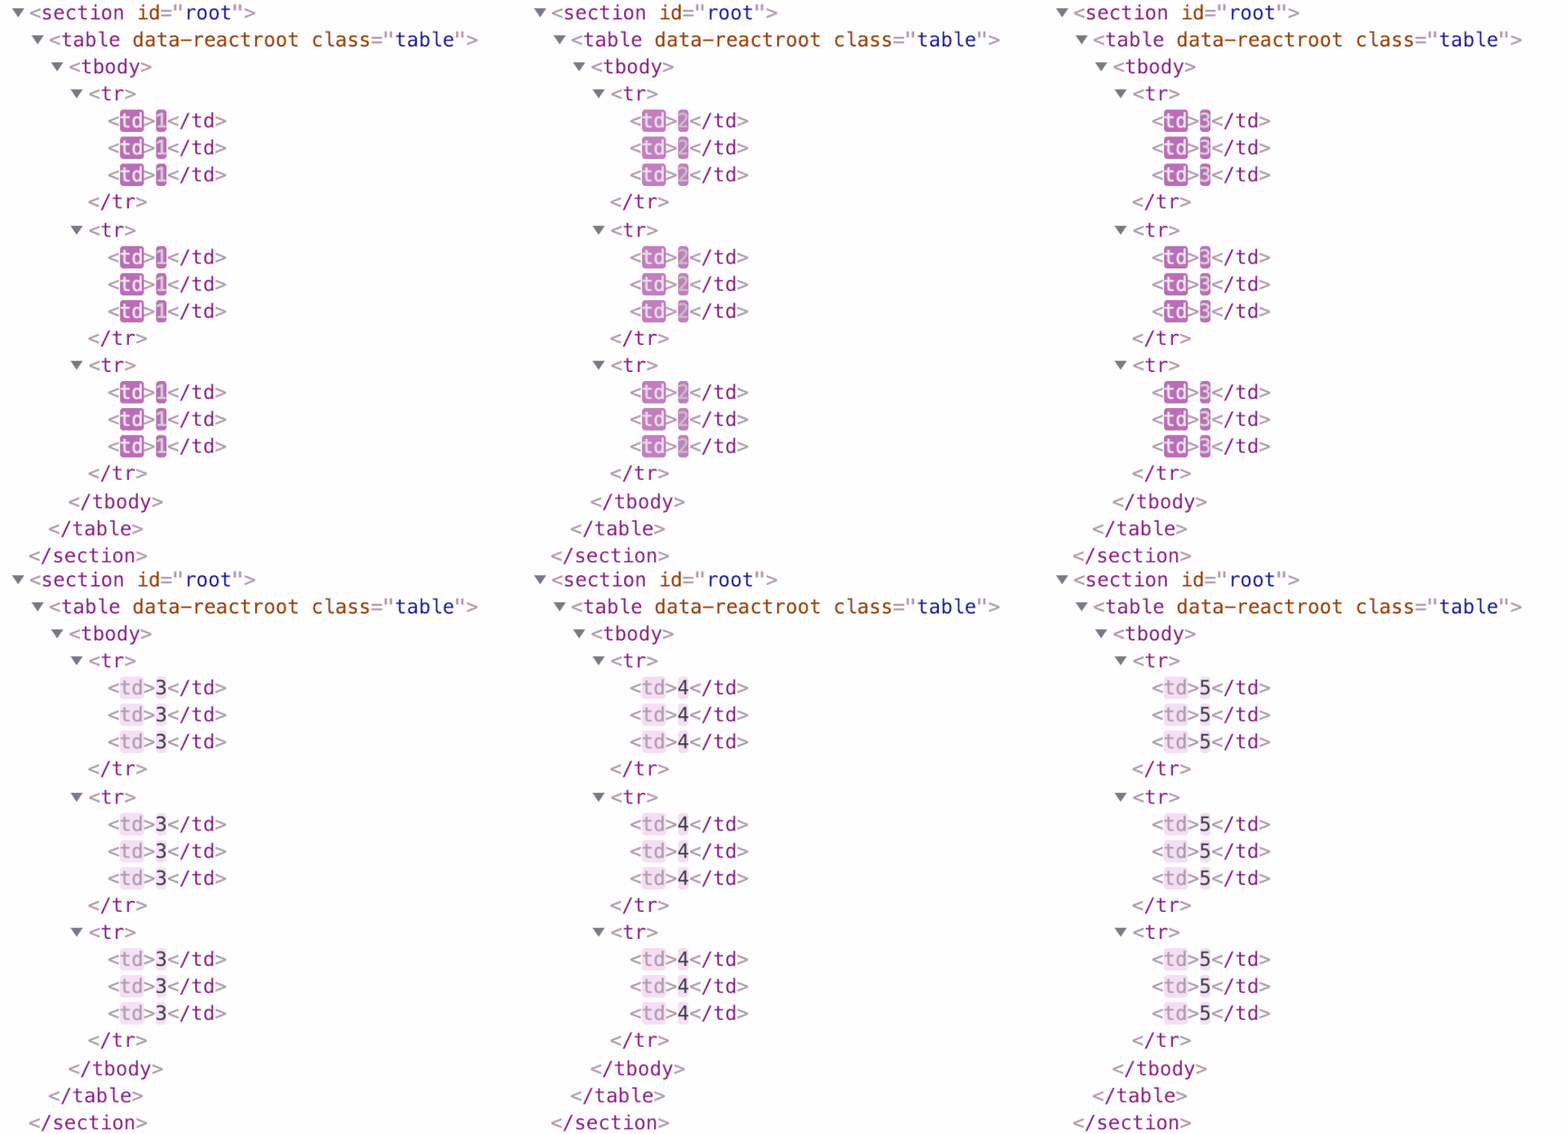
然后每秒对 Table 里面的值更新一次,让 val 每次 + 1,从 0 ~ 9 不停循环。
Table Loop
- // https://codesandbox.io/embed/react-sync-demo-nlijf
- export default class Demo extends React.Component {
- tick = () => {
- setTimeout(() => {
- this.setState({ val: next < 10 ? next : 0 })
- this.tick()
- }, 1000)
- }
- componentDidMount() {
- this.tick()
- }
- }
完整代码的线上地址:https://codesandbox.io/embed/react-sync-demo-nlijf。Demo 组件每次调用 setState,React 会先判断该组件的类型有没有发生修改,如果有就整个组件进行重新渲染,如果没有会更新 state,然后向下判断 table 组件,table 组件继续向下判断 tr 组件,tr 组件再向下判断 td 组件,最后发现 td 组件下的文本节点发生了修改,通过 DOM API 更新。
Update
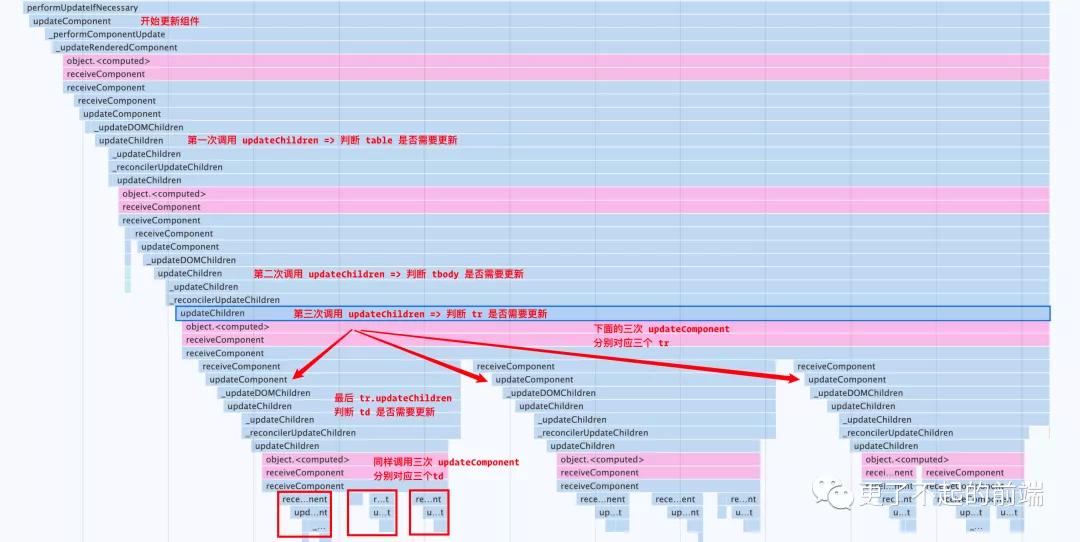
通过 Performance 的函数调用堆栈也能清晰的看到这个过程,updateComponent 之后 的 updateChildren 会继续调用子组件的 updateComponent,直到递归完所有组件,表示更新完成。
调用堆栈
递归的缺点很明显,不能暂停更新,一旦开始必须从头到尾,这与 React 16 拆分时间片,给浏览器喘口气的理念明显不符,所以 React 必须要切换架构,将虚拟 DOM 从树形结构修改为链表结构。
可循环的 Fiber
这里说的链表结构就是 Fiber 了,链表结构最大的优势就是可以通过循环的方式来遍历,只要记住当前遍历的位置,即使中断后也能快速还原,重新开始遍历。
我们先看看一个 Fiber 节点的数据结构:
- function FiberNode (tag, key) {
- // 节点 key,主要用于了优化列表 diff
- this.key = key
- // 节点类型;FunctionComponent: 0, ClassComponent: 1, HostRoot: 3 ...
- this.tag = tag
- // 子节点
- this.child = null
- // 父节点
- this.return = null
- // 兄弟节点
- this.sibling = null
- // 更新队列,用于暂存 setState 的值
- this.updateQueue = null
- // 节点更新过期时间,用于时间分片
- // react 17 改为:lanes、childLanes
- this.expirationTime = NoLanes
- this.childExpirationTime = NoLanes
- // 对应到页面的真实 DOM 节点
- this.stateNode = null
- // Fiber 节点的副本,可以理解为备胎,主要用于提升更新的性能
- this.alternate = null
- }
下面举个例子,我们这里有一段普通的 HTML 文本:
- <table class="table">
- <tr>
- <td>1</td>
- <td>1</td>
- </tr>
- <tr>
- <td>1</td>
- </tr>
- </table>
在之前的 React 版本中,jsx 会转化为 createElement 方法,创建树形结构的虚拟 DOM。
- const VDOMRoot = {
- type: 'table',
- props: { className: 'table' },
- children: [
- {
- type: 'tr',
- props: { },
- children: [
- {
- type: 'td',
- props: { },
- children: [{type: 'text', value: '1'}]
- },
- {
- type: 'td',
- props: { },
- children: [{type: 'text', value: '1'}]
- }
- ]
- },
- {
- type: 'tr',
- props: { },
- children: [
- {
- type: 'td',
- props: { },
- children: [{type: 'text', value: '1'}]
- }
- ]
- }
- ]
- }
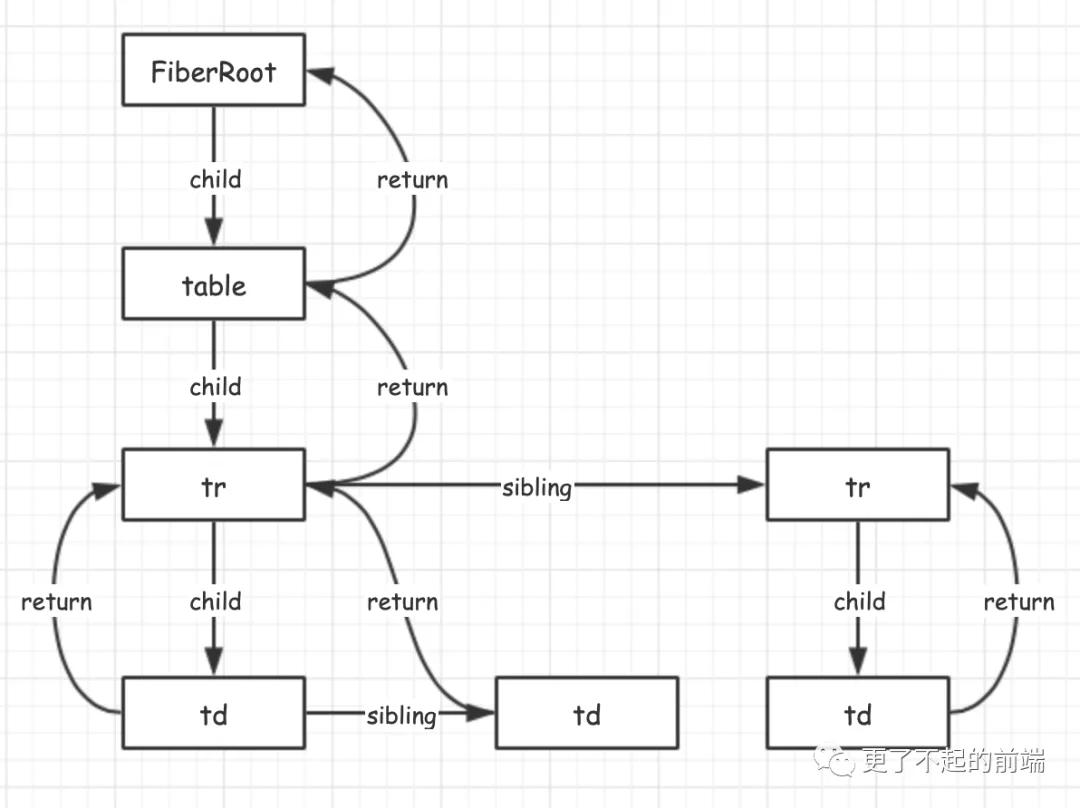
Fiber 架构下,结构如下:
- // 有所简化,并非与 React 真实的 Fiber 结构一致
- const FiberRoot = {
- type: 'table',
- return: null,
- sibling: null,
- child: {
- type: 'tr',
- return: FiberNode, // table 的 FiberNode
- sibling: {
- type: 'tr',
- return: FiberNode, // table 的 FiberNode
- sibling: null,
- child: {
- type: 'td',
- return: FiberNode, // tr 的 FiberNode
- sibling: {
- type: 'td',
- return: FiberNode, // tr 的 FiberNode
- sibling: null,
- child: null,
- text: '1' // 子节点仅有文本节点
- },
- child: null,
- text: '1' // 子节点仅有文本节点
- }
- },
- child: {
- type: 'td',
- return: FiberNode, // tr 的 FiberNode
- sibling: null,
- child: null,
- text: '1' // 子节点仅有文本节点
- }
- }
- }
Fiber
循环更新的实现
那么,在 setState 的时候,React 是如何进行一次 Fiber 的遍历的呢?
- let workInProgress = FiberRoot
- // 遍历 Fiber 节点,如果时间片时间用完就停止遍历
- function workLoopConcurrent() {
- while (
- workInProgress !== null &&
- !shouldYield() // 用于判断当前时间片是否到期
- ) {
- performUnitOfWork(workInProgress)
- }
- }
- function performUnitOfWork() {
- const next = beginWork(workInProgress) // 返回当前 Fiber 的 child
- if (next) { // child 存在
- // 重置 workInProgress 为 child
- workInProgress = next
- } else { // child 不存在
- // 向上回溯节点
- let completedWork = workInProgress
- while (completedWork !== null) {
- // 收集副作用,主要是用于标记节点是否需要操作 DOM
- completeWork(completedWork)
- // 获取 Fiber.sibling
- let siblingFiber = workInProgress.sibling
- if (siblingFiber) {
- // sibling 存在,则跳出 complete 流程,继续 beginWork
- workInProgress = siblingFiber
- return;
- }
- completedWork = completedWork.return
- workInProgress = completedWork
- }
- }
- }
- function beginWork(workInProgress) {
- // 调用 render 方法,创建子 Fiber,进行 diff
- // 操作完毕后,返回当前 Fiber 的 child
- return workInProgress.child
- }
- function completeWork(workInProgress) {
- // 收集节点副作用
- }
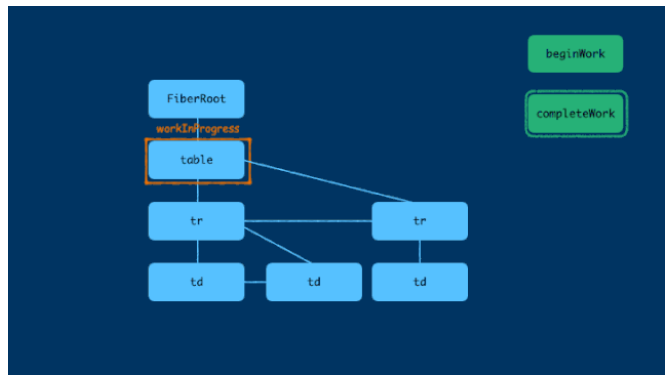
Fiber 的遍历本质上就是一个循环,全局有一个 workInProgress 变量,用来存储当前正在 diff 的节点,先通过 beginWork 方法对当前节点然后进行 diff 操作(diff 之前会调用 render,重新计算 state、prop),并返回当前节点的第一个子节点( fiber.child)作为新的工作节点,直到不存在子节点。然后,对当前节点调用 completedWork 方法,存储 beginWork 过程中产生的副作用,如果当前节点存在兄弟节点( fiber.sibling),则将工作节点修改为兄弟节点,重新进入 beginWork 流程。直到 completedWork 重新返回到根节点,执行 commitRoot将所有的副作用反应到真实 DOM 中。
Fiber work loop
在一次遍历过程中,每个节点都会经历 beginWork、completeWork ,直到返回到根节点,最后通过 commitRoot 将所有的更新提交,关于这部分的内容可以看:《React 技术揭秘》。
时间分片的秘密
前面说过,Fiber 结构的遍历是支持中断恢复,为了观察这个过程,我们将之前的 3 * 3 的 Table 组件改成 Concurrent 模式,线上地址:https://codesandbox.io/embed/react-async-demo-h1lbz。由于每次调用 Col 组件的 render 部分需要耗时 8ms,会超出了一个时间片,所以每个 td 部分都会暂停一次。
- class Col extends React.Component {
- render() {
- // 渲染之前暂停 8ms,给 render 制造一点点压力
- const start = performance.now();
- while (performance.now() - start < 8);
- return <td>{this.props.children}</td>
- }
- }
在这个 3 * 3 组件里,一共有 9 个 Col 组件,所以会有 9 次耗时任务,分散在 9 个时间片进行,通过 Performance 的调用栈可以看到具体情况:
异步模式的调用栈
在非 Concurrent 模式下,Fiber 节点的遍历是一次性进行的,并不会切分多个时间片,差别就是在遍历的时候调用了 workLoopSync 方法,该方法并不会判断时间片是否用完。
- // 遍历 Fiber 节点
- function workLoopSync() {
- while (workInProgress !== null) {
- performUnitOfWork(workInProgress)
- }
- }
同步模式的调用栈
通过上面的分析可以看出, shouldYield 方法决定了当前时间片是否已经用完,这也是决定 React 是同步渲染还是异步渲染的关键。如果去除任务优先级的概念,shouldYield 方法可以说很简单,就是判断了当前的时间,是否已经超过了预设的 deadline。
- function getCurrentTime() {
- return performance.now()
- }
- function shouldYield() {
- // 获取当前时间
- var currentTime = getCurrentTime()
- return currentTime >= deadline
- }
deadline 又是如何得的呢?可以回顾上一篇文章(《React 架构的演变 - 从同步到异步》)提到的 ChannelMessage,更新开始的时候会通过 requestHostCallback(即:port2.send)发送异步消息,在 performWorkUntilDeadline (即:port1.onmessage)中接收消息。performWorkUntilDeadline 每次接收到消息时,表示已经进入了下一个任务队列,这个时候就会更新 deadline。
异步调用栈
- var channel = new MessageChannel()
- var port = channel.port2
- channel.port1.onmessage = function performWorkUntilDeadline() {
- if (scheduledHostCallback !== null) {
- var currentTime = getCurrentTime()
- // 重置超时时间
- deadline = currentTime + yieldInterval
- var hasTimeRemaining = true
- var hasMoreWork = scheduledHostCallback()
- if (!hasMoreWork) {
- // 已经没有任务了,修改状态
- isMessageLoopRunning = false;
- scheduledHostCallback = null;
- } else {
- // 还有任务,放到下个任务队列执行,给浏览器喘息的机会
- port.postMessage (null);
- }
- } else {
- isMessageLoopRunning = false;
- }
- }
- requestHostCallback = function (callback) {
- //callback 挂载到 scheduledHostCallback
- scheduledHostCallback = callback
- if (!isMessageLoopRunning) {
- isMessageLoopRunning = true
- // 推送消息,下个队列队列调用 callback
- port.postMessage (null)
- }
- }
超时时间的设置就是在当前时间的基础上加上了一个 yieldInterval, 这个 yieldInterval的值,默认是 5ms。
- deadline = currentTime + yieldInterval
同时 React 也提供了修改 yieldInterval 的手段,通过手动指定 fps,来确定一帧的具体时间(单位:ms),fps 越高,一个时间分片的时间就越短,对设备的性能要求就越高。
- forceFrameRate = function (fps) {
- if (fps < 0 || fps > 125) {
- // 帧率仅支持 0~125
- return
- }
- if (fps > 0) {
- // 一般 60 fps 的设备
- // 一个时间分片的时间为 Math.floor(1000/60) = 16
- yieldInterval = Math.floor(1000 / fps)
- } else {
- // reset the framerate
- yieldInterval = 5
- }
- }
总结
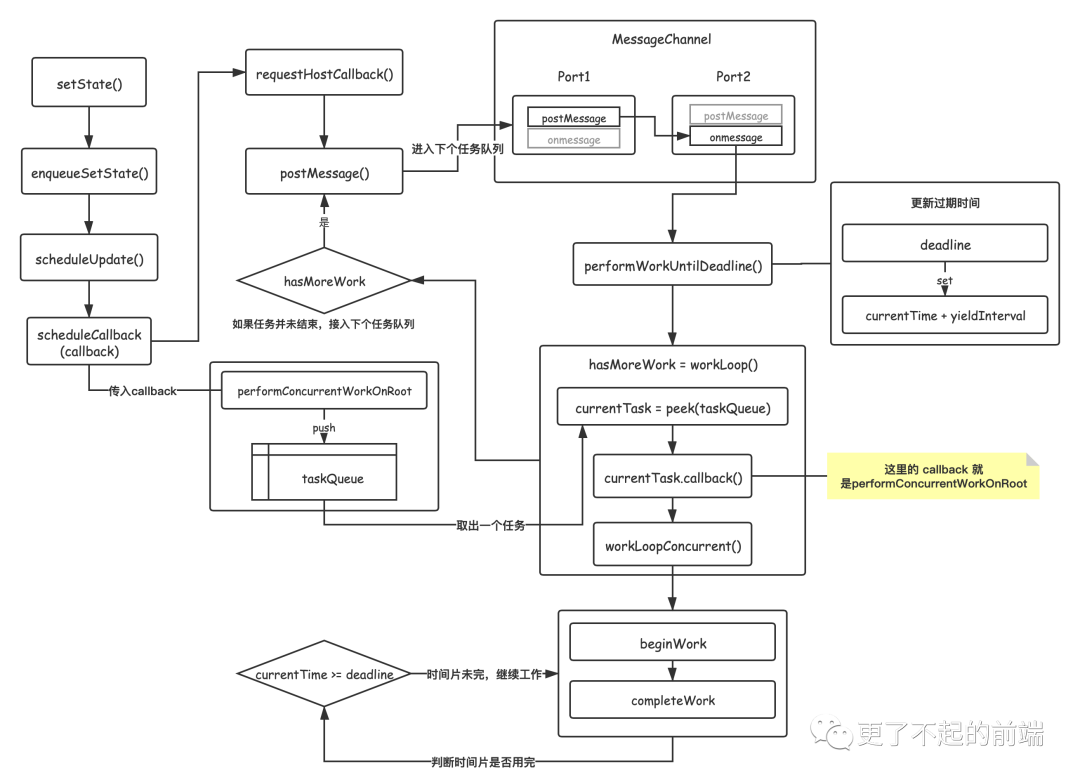
下面我们将异步逻辑、循环更新、时间分片串联起来。先回顾一下之前的文章讲过,Concurrent 模式下,setState 后的调用顺序:
- Component.setState()
- => enqueueSetState()
- => scheduleUpdate()
- => scheduleCallback(performConcurrentWorkOnRoot)
- => requestHostCallback()
- => postMessage()
- => performWorkUntilDeadline()
scheduleCallback 方法会将传入的回调(performConcurrentWorkOnRoot)组装成一个任务放入 taskQueue 中,然后调用 requestHostCallback 发送一个消息,进入异步任务。performWorkUntilDeadline 接收到异步消息,从 taskQueue 取出任务开始执行,这里的任务就是之前传入的 performConcurrentWorkOnRoot 方法,这个方法最后会调用workLoopConcurrent(workLoopConcurrent 前面已经介绍过了,这个不再重复)。如果 workLoopConcurrent 是由于超时中断的,hasMoreWork 返回为 true,通过 postMessage 发送消息,将操作延迟到下一个任务队列。
流程图
到这里整个流程已经结束,希望大家看完文章能有所收获,下一篇文章会介绍 Fiber 架构下 Hook 的实现。
本文转载自微信公众号「更了不起的前端」,可以通过以下二维码关注。转载本文请联系更了不起的前端公众号。


