示例
<template>
  <div>{{count}}</div>
  <button @click="addCount">添加</button>
</template>

<script lang="ts">
import { defineComponent, ref, onMounted } from 'vue';

export default defineComponent({
  name: 'App',
  setup () {
    const count = ref(0)
    const getCount = () => {
      count.value = Math.floor(Math.random() * 10)
    }
    const addCount = () => {
      count.value++
    }
    onMounted(() => {
      getCount()
    })

    return {
      count,
      addCount
    }
  }
});
</script>
- 1.
- 2.
- 3.
- 4.
- 5.
- 6.
- 7.
- 8.
- 9.
- 10.
- 11.
- 12.
- 13.
- 14.
- 15.
- 16.
- 17.
- 18.
- 19.
- 20.
- 21.
- 22.
- 23.
- 24.
- 25.
- 26.
- 27.
- 28.
- 29.
Composition API顾名思义就是不再传入data、mounted等参数,通过引入的ref、onMounted等方法实现数据的双向绑定、生命周期函数的执行。
为什么需要
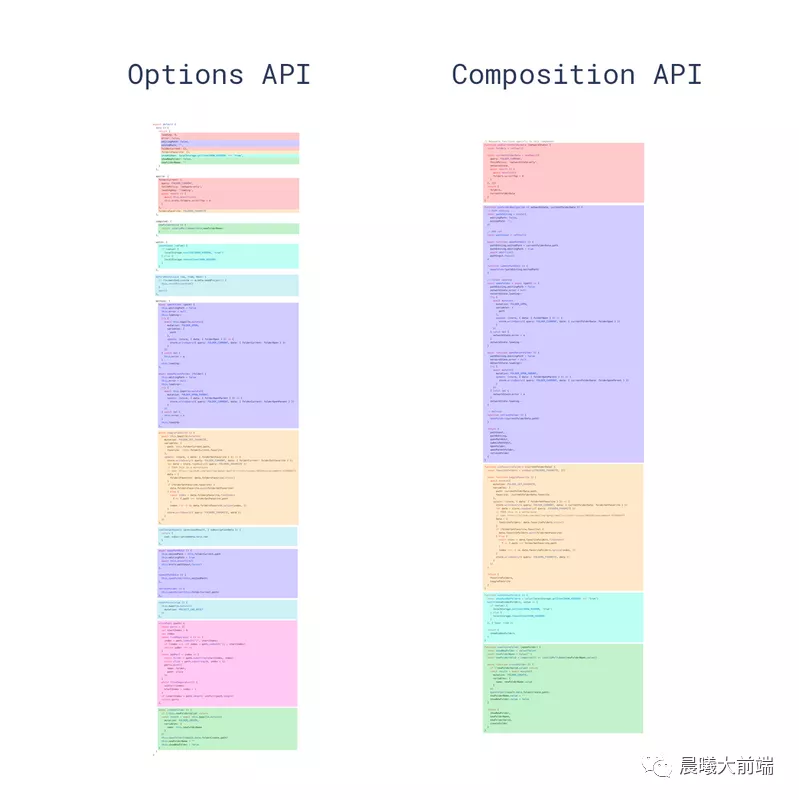
在组件比较复杂的情况下,可以将逻辑代码合到一起去,而不会被option强行分隔。这提高了代码质量的上限,同时也拉低了代码质量的下限。来自官方的一张对比图:
2.更好的进行复用。
在vue2中,想要复用部分逻辑的代码,都是通过mixin进去。但mixin进去的内容实际上很不直观,而且相同命名会被覆盖。而通过composition API,因为所有的方法都是引入的,可以将单独某个逻辑进行封装。例如对发送验证码倒计时功能进行封装。
<template>
  <input type="number" placeholder="请输入验证码">
  <button v-if="count">{{count}}秒后可重新发送</button>
  <button v-else @click="startCount">发送验证码</button>
</template>

<script lang="ts">
import { defineComponent, ref, reactive } from 'vue';

const userCountDown = () => {
  const count = ref(0)
  const countDown = (num: number) => {
    count.value = num
    num--
    if (num > 0) {
      setTimeout(() => {
        countDown(num)
      }, 1000)
    }
  }
  const startCount = () => {
    // get verifyCode
    countDown(60)
  }

  return { count, startCount }
}

export default defineComponent({
  name: 'Home',
  setup () {
    const { count, startCount } = userCountDown()
    return { count, startCount }
  }
});
</script>
- 1.
- 2.
- 3.
- 4.
- 5.
- 6.
- 7.
- 8.
- 9.
- 10.
- 11.
- 12.
- 13.
- 14.
- 15.
- 16.
- 17.
- 18.
- 19.
- 20.
- 21.
- 22.
- 23.
- 24.
- 25.
- 26.
- 27.
- 28.
- 29.
- 30.
- 31.
- 32.
- 33.
- 34.
- 35.
- 36.
3.更好的typescript支持。不会再往vue原型上添加很多内容,而是通过引入的方式,类型定义会更清晰。
setup
setup是vue新增的一个选项,它是组件内使用Composition API的入口。setup是在创建vue组件实例并完成props的初始化之后执行。因为setup会在option api解析之前被调用,所以setup中的this会与options中得完全不一样。为了避免混乱,在setup中不使用this。同时setup返回的值,可以在模板和其他option中使用。从设计上来说,vue官方是将所有的事情在setup里完成。setup返回值连接的是template模板与方法。
ref、reactive
既然不在传入data,那么将数据创建和监听响应式就需要通过vue暴露出来的功能 ref或reactive。两者有所区别,ref用于基础赋值类型的数据,而reactive用于引用类型的数据。
其中基础赋值类型的值,在setup方法中,需要用 .value的方式进行获取和修改。因为赋值类型的值如果return出去返回值,就失去了数据的双绑定。但是在template中,可以进行直接访问。
<template>
  <div>{{count}}
    <button @click="changeCount">添加</button>
  </div>
  <div>学生的姓名是:{{student.name}}</div>
  <div>学生的年龄是:{{student.age}}
    <button @click="changeStudentAge(20)">添加</button>
  </div>
</template>

<script lang="ts">
import { defineComponent, ref, reactive } from 'vue';

export default defineComponent({
  name: 'Home',
  setup () {
    const count = ref(0)
    const changeCount = () => {
      count.value = count.value + 1
    }
    const student = reactive({
      name: 'Bob',
      age: 12
    })
    const changeStudentAge = (age: number) => {
      student.age = age
    }
    return {
      count,
      changeCount,
      student,
      changeStudentAge
    }
  }
});
</script>
- 1.
- 2.
- 3.
- 4.
- 5.
- 6.
- 7.
- 8.
- 9.
- 10.
- 11.
- 12.
- 13.
- 14.
- 15.
- 16.
- 17.
- 18.
- 19.
- 20.
- 21.
- 22.
- 23.
- 24.
- 25.
- 26.
- 27.
- 28.
- 29.
- 30.
- 31.
- 32.
- 33.
- 34.
- 35.
- 36.
computed与watch
<template>
  <div>{{count}}</div>
  <div>{{doubleCount}}</div>
  <button @click="addCount">添加</button>
</template>

<script lang="ts">
import { defineComponent, ref, computed, watchEffect, watch } from 'vue';

export default defineComponent({
  name: 'App',
  setup () {
    const count = ref(0)
    watch(count, () => { // 如多个则用数组的方式传入[count, count1]
      console.log('watch', count.value)
    })
    watchEffect(() => {
      console.log('watchEffect', count.value)
    })
    const addCount = () => {
      count.value++
    }
    const doubleCount = computed(() => {
      return count.value * 2
    })
    return {
      count,
      doubleCount,
      addCount
    }
  }
});
</script>
- 1.
- 2.
- 3.
- 4.
- 5.
- 6.
- 7.
- 8.
- 9.
- 10.
- 11.
- 12.
- 13.
- 14.
- 15.
- 16.
- 17.
- 18.
- 19.
- 20.
- 21.
- 22.
- 23.
- 24.
- 25.
- 26.
- 27.
- 28.
- 29.
- 30.
- 31.
- 32.
- 33.
watch与watchEffect的差别是,watchEffect会立马执行,执行中被读取的响应式 数据会被观测。而watch只有在watch对象有变化时才会执行。
生命周期
beforeCreate -> 使用 setup()
created -> 使用 setup()
beforeMount -> onBeforeMount
mounted -> onMounted
beforeUpdate -> onBeforeUpdate
updated -> onUpdated
beforeDestroy -> onBeforeUnmount
destroyed -> onUnmounted
errorCaptured -> onErrorCaptured
- 1.
- 2.
- 3.
- 4.
- 5.
- 6.
- 7.
- 8.
- 9.


