作者个人研发的在高并发场景下,提供的简单、稳定、可扩展的延迟消息队列框架,具有精准的定时任务和延迟队列处理功能。自开源半年多以来,已成功为十几家中小型企业提供了精准定时调度方案,经受住了生产环境的考验。为使更多童鞋受益,现给出开源框架地址:https://github.com/sunshinelyz/mykit-delay
写在前面
金九银十的跳槽黄金期已拉开序幕,相信很多小伙伴也在摩拳擦掌,想换一个新的工作环境。然而,由于今年疫情的影响,很多企业对于招聘的要求是越来越严格。之前,很多不被问及的知识点,最近面试时都会被问到了。这不,有些面试官竟然让面试者现场搭建一个AOP测试环境。那怎么办呢?那就给他搭建一个呗!
什么是AOP?
AOP (Aspect Orient Programming),直译过来就是 面向切面编程。AOP 是一种编程思想,是面向对象编程(OOP)的一种补充。面向对象编程将程序抽象成各个层次的对象,而面向切面编程是将程序抽象成各个切面。
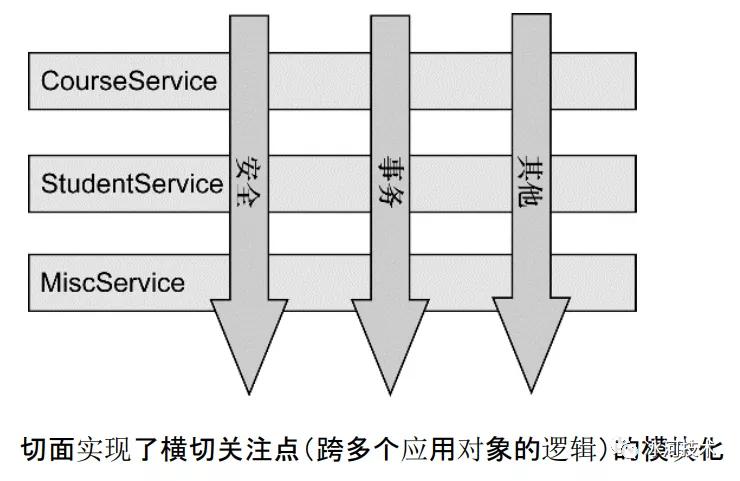
比如,在《Spring实战(第4版)》中有如下一张图描述了AOP的大体模型。
从这张图中,我们可以看出:所谓切面,相当于应用对象间的横切点,我们可以将其单独抽象为单独的模块。
总之一句话:AOP是指在程序的运行期间动态的将某段代码切入到指定方法、指定位置进行运行的编程方式。AOP的底层是使用动态代理实现的。
搭建环境
1.导入AOP依赖
要想搭建AOP环境,首先,我们就需要在项目的pom.xml文件中引入AOP的依赖,如下所示。
- <properties>
- <spring.version>5.2.6.RELEASE</spring.version>
- </properties>
- <dependency>
- <groupId>org.springframework</groupId>
- <artifactId>spring-aspects</artifactId>
- <version>${spring.version}</version>
- </dependency>
2.定义目标类
在io.mykit.spring.plugins.register.aop包下创建一个MathHandler类,用于处理数学计算上的一些逻辑。比如,我们在MathHandler类中定义了一个加法操作,返回两个整数类型值的和,如下所示。
- package io.mykit.spring.plugins.register.aop;
- /**
- * @author binghe
- * @version 1.0.0
- * @description 定义一个数据处理器类,用于测试AOP
- */
- public class MathHandler {
- public int add(int i, int j){
- System.out.println("目标方法执行");
- return i + j;
- }
- }
3.定义切面类
在io.mykit.spring.plugins.register.aspect包下创建一个LogAspect切面类,在LogAspect类中定义了几个打印日志的方法,以这些方法来感知MathHandler类中的add()方法的运行情况。如果需要切面类来感知目标类方法的运行情况,则需要使用Spring AOP中的通知方法。
AOP中的通知方法及其注解与含义如下:
- 前置通知(@Before):在目标方法运行之前运行。
- 后置通知(@After):在目标方法运行结束之后运行,不管是正常结束还是异常结束都会执行。
- 返回通知(@AfterReturning):在目标方法正常返回之后运行。
- 异常通知(@AfterThrowing):在目标方法抛出异常后运行。
- 环绕通知(@Around):动态代理,手动推进目标方法运行。
综上,LogAspect类中的具体方法定义如下所示。
- package io.mykit.spring.plugins.register.aspect;
- import org.aspectj.lang.annotation.*;
- /**
- * @author binghe
- * @version 1.0.0
- * @description 打印日志的切面类
- */
- @Aspect
- public class LogAspect {
- @Pointcut("execution(public int io.mykit.spring.plugins.register.aop.MathHandler.*(..))")
- public void pointCut(){
- }
- @Before("pointCut()")
- public void logStart(){
- System.out.println("加法运行开始,参数列表是:{}");
- }
- @After("pointCut()")
- public void logEnd(){
- System.out.println("加法运行结束");
- }
- @AfterReturning("pointCut()")
- public void logReturn(){
- System.out.println("加法正常返回,运行结果:{}");
- }
- @AfterThrowing("pointCut()")
- public void logException(){
- System.out.println("加法异常,异常信息:{}");
- }
- }
- logStart()方法:MathHandler类的add()方法运行之前运行。
- logEnd()方法:MathHandler类的add()方法运行结束之后运行。
- logReturn()方法:MathHandler类的add()方法正常返回之后运行。
- logException()方法:MathHandler类的add()方法抛出异常后执行。
4.将目标类和切面类加入到IOC容器
在io.mykit.spring.plugins.register.config包中,新建AopConfig类,并使用@Configuration注解标注这是一个Spring的配置类,同时使用@EnableAspectJAutoProxy注解开启基于注解的AOP模式。在AopConfig类中,使用@Bean注解将MathHandler类和LogAspect类加入到IOC容器中,如下所示。
- package io.mykit.spring.plugins.register.config;
- import io.mykit.spring.plugins.register.aop.MathHandler;
- import io.mykit.spring.plugins.register.aspect.LogAspect;
- import org.springframework.context.annotation.Bean;
- import org.springframework.context.annotation.Configuration;
- import org.springframework.context.annotation.EnableAspectJAutoProxy;
- /**
- * @author binghe
- * @version 1.0.0
- * @description 测试AOP
- */
- @Configuration
- @EnableAspectJAutoProxy
- public class AopConfig {
- @Bean
- public MathHandler mathHandler(){
- return new MathHandler();
- }
- @Bean
- public LogAspect logAspect(){
- return new LogAspect();
- }
- }
5.创建测试类
在 io.mykit.spring.test包中创建AopTest测试类,并在AopTest类中创建testAop01()方法,如下所示。
- package io.mykit.spring.test;
- import io.mykit.spring.plugins.register.aop.MathHandler;
- import io.mykit.spring.plugins.register.config.AopConfig;
- import org.junit.Test;
- import org.springframework.context.annotation.AnnotationConfigApplicationContext;
- /**
- * @author binghe
- * @version 1.0.0
- * @description 测试切面
- */
- public class AopTest {
- @Test
- public void testAop01(){
- AnnotationConfigApplicationContext context = new AnnotationConfigApplicationContext(AopConfig.class);
- MathHandler mathHandler = context.getBean(MathHandler.class);
- mathHandler.add(1, 2);
- context.close();
- }
- }
运行AopTest类中的testAop01()方法,输出的结果信息如下所示。
- 加法运行开始,参数列表是:{}
- 目标方法执行
- 加法运行结束
- 加法正常返回,运行结果:{}
可以看到,执行了切面类中的方法,并打印出了相关信息。但是没有打印参数列表和运行结果。
6.在切面类中打印参数列表和返回结果
那如果需要打印出参数列表和运行结果,该怎么办呢?别急,我们继续往下看。
要想打印出参数列表和运行结果,就需要对LogAspect类中的方法进行优化,优化后的结果如下所示。
- package io.mykit.spring.plugins.register.aspect;
- import org.aspectj.lang.JoinPoint;
- import org.aspectj.lang.annotation.*;
- import java.util.Arrays;
- /**
- * @author binghe
- * @version 1.0.0
- * @description 打印日志的切面类
- */
- @Aspect
- public class LogAspect {
- @Pointcut("execution(public int io.mykit.spring.plugins.register.aop.MathHandler.*(..))")
- public void pointCut(){
- }
- @Before("pointCut()")
- public void logStart(JoinPoint joinPoint){
- System.out.println(joinPoint.getSignature().getName() + " 运行开始,参数列表是:{"+ Arrays.asList(joinPoint.getArgs()) +"}");
- }
- @After("pointCut()")
- public void logEnd(JoinPoint joinPoint){
- System.out.println(joinPoint.getSignature().getName() + " 运行结束");
- }
- @AfterReturning(value = "pointCut()", returning = "result")
- public void logReturn(JoinPoint joinPoint, Object result){
- System.out.println(joinPoint.getSignature().getName() + " 正常返回,运行结果:{"+result+"}");
- }
- @AfterThrowing(value = "pointCut()", throwing = "exception")
- public void logException(JoinPoint joinPoint, Exception exception){
- System.out.println(joinPoint.getSignature().getName() + " 异常,异常信息:{"+exception+"}");
- }
- }
这里,需要注意的是:JoinPoint参数一定要放在参数的第一位。
此时,我们再次运行AopTest类中的testAop01()方法,输出的结果信息如下所示。
- add 运行开始,参数列表是:{[1, 2]}
- 目标方法执行
- add 运行结束
- add 正常返回,运行结果:{3}
7.目标方法抛出异常
我们在MathHandler类的add()方法中抛出一个异常,来测试下异常情况,如下所示。
- package io.mykit.spring.plugins.register.aop;
- /**
- * @author binghe
- * @version 1.0.0
- * @description 定义一个数据处理器类,用于测试AOP
- */
- public class MathHandler {
- public int add(int i, int j){
- System.out.println("目标方法执行");
- throw new RuntimeException();
- //return i + j;
- }
- }
此时,我们再次运行AopTest类中的testAop01()方法,输出的结果信息如下所示。
- add 运行开始,参数列表是:{[1, 2]}
- 目标方法执行
- add 运行结束
- add 异常,异常信息:{java.lang.RuntimeException}
可以看到,正确的输出了切面中打印的信息。
至此,我们的AOP测试环境就搭建成功了。
本文转载自微信公众号「冰河技术」,可以通过以下二维码关注。转载本文请联系冰河技术公众号。


