说明
虚拟化的 SRX 支持 dns 代理、ip in ip tunnel、ipsec VPN 等功能,在要求不高的情况下,可以部署在虚拟化环境中使用。
本文介绍如何在 kvm 中部署,并且测试了部分功能。
主要涉及知识点 openvswitch、kvm、junos 的基本配置
环境部署
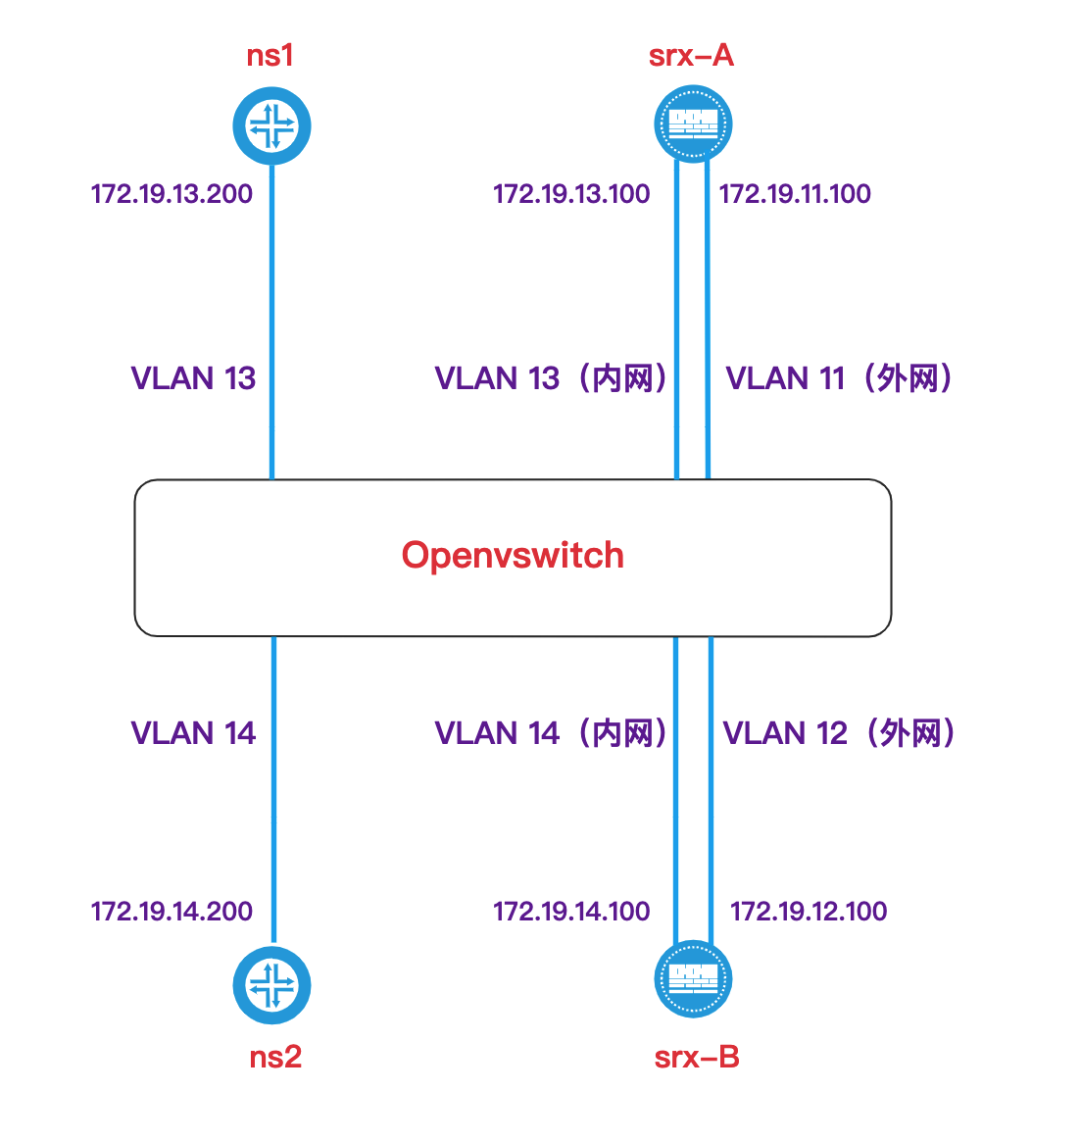
拓扑
拓扑描述
- 需要一台 Linux 主机,安装好 kvm 和 openvswitch(以下简称 ovs)
- 两台 srx 部署在 kvm 中,每台使用 2 个端口连接 ovs
- 添加两个 namespace,使用 iperf3 测试稳定性
kvm 部署 srx
ovs 与 kvm 网络的配置
1.添加 ovs 网桥
- ovs-vsctl add-br example-ovsbr0
定义 kvm 网络
编辑 xml 文件如下
- vim example-ovsbr0.xml
- <network>
- <name>example-ovsbr0</name>
- <forward mode='bridge'/>
- <bridge name='example-ovsbr0'/>
- <virtualport type='openvswitch'/>
- <portgroup name='VLAN11'>
- <vlan>¡
- <tag id='11'/>
- </vlan>
- </portgroup>
- <portgroup name='VLAN12'>
- <vlan>
- <tag id='12'/>
- </vlan>
- </portgroup>
- <portgroup name='VLAN13'>
- <vlan>
- <tag id='13'/>
- </vlan>
- </portgroup>
- <portgroup name='VLAN14'>
- <vlan>
- <tag id='14'/>
- </vlan>
- </portgroup>
- </network>
3.创建 kvm 网络
- virsh net-define example-ovsbr0.xml
4.启动网络并设置为自动启动
- virsh net-start example-ovsbr0
- virsh net-autostart example-ovsbr0
注意事项
- 将网卡类型改为 e1000,否则会不识别
- 需要添加 3 个网卡,分别对应 srx 的端口 ge0/0/0、ge0/0/1、ge0/0/2,其中 ge0/0/0 不使用
- 命令如下所示
virt-install 命令
- virt-install \
- --virt-type=kvm \
- --name=srx-A \
- --vcpus=2 \
- --memory=2048 \
- --network=network=example-ovsbr0,portgroup=VLAN11,model=e1000 \
- --network=network=example-ovsbr0,portgroup=VLAN11,model=e1000 \
- --network=network=example-ovsbr0,portgroup=VLAN13,model=e1000 \
- --disk path=/data/example/vmfiles/srx-A.qcow2,size=40,format=qcow2 \
- --import \
- --graphics none \
- --force
- # 另外一台
- virt-install \
- --virt-type=kvm \
- --name=srx-B \
- --vcpus=2 \
- --memory=2048 \
- --network=network=example-ovsbr0,portgroup=VLAN12,model=e1000 \
- --network=network=example-ovsbr0,portgroup=VLAN12,model=e1000 \
- --network=network=example-ovsbr0,portgroup=VLAN14,model=e1000 \
- --disk path=/data/example/vmfiles/srx-B.qcow2,size=40,format=qcow2 \
- --import \
- --graphics none \
- --force
srx 配置
为了方便,我这里将所有使用到的网口都放在了 trust 区域
srx-A
- # 基本信息配置
- set system services ssh
- set routing-options static route 0.0.0.0/0 next-hop 172.19.11.254
- set interfaces ge-0/0/1 unit 0 family inet address 172.19.11.100/24
- set system root-authentication plain-text-password # 这里会提示设置两遍密码
- set routing-options static route 0.0.0.0/0 next-hop 172.19.11.254
- # dns proxy 配置
- set system services dns forwarders 114.114.114.114
- set system services dns dns-proxy interface ge-0/0/1.0
- set system services dns dns-proxy cache test.houm01.cn inet 99.99.99.99 # 本地DNS A 记录配置
- # ip ip tunnel 配置
- set interfaces ip-0/0/0 unit 0 tunnel source 172.19.11.100
- set interfaces ip-0/0/0 unit 0 tunnel destination 172.19.12.100
- set interfaces ip-0/0/0 unit 0 family inet address 1.1.1.1/30
- set routing-options static route 172.19.14.0/24 next-hop ip-0/0/0.0
- # 接口区域配置
- set security zones security-zone trust interfaces ge-0/0/1.0 host-inbound-traffic system-services all
- set security zones security-zone trust interfaces ip-0/0/0.0 host-inbound-traffic system-services all
- set security zones security-zone trust interfaces ge-0/0/0.0 host-inbound-traffic system-services all
- # 提交配置
- commit
srx-B
- # 基本信息配置
- set system services ssh
- set routing-options static route 0.0.0.0/0 next-hop 172.19.12.254
- set interfaces ge-0/0/1 unit 0 family inet address 172.19.12.100/24
- set system root-authentication plain-text-password # 这里会提示设置两遍密码
- set routing-options static route 0.0.0.0/0 next-hop 172.19.12.254
- # ip ip tunnel 配置
- set interfaces ip-0/0/0 unit 0 tunnel source 172.19.12.100
- set interfaces ip-0/0/0 unit 0 tunnel destination 172.19.11.100
- set interfaces ip-0/0/0 unit 0 family inet address 1.1.1.2/30
- set routing-options static route 172.19.14.0/24 next-hop ip-0/0/0.0
- # 接口区域配置
- set security zones security-zone trust interfaces ge-0/0/1.0 host-inbound-traffic system-services all
- set security zones security-zone trust interfaces ip-0/0/0.0 host-inbound-traffic system-services all
- set security zones security-zone trust interfaces ge-0/0/0.0 host-inbound-traffic system-services all
- # 提交配置
- commit
namespace 配置
- # 添加 ns
- ip netns add ns1
- ip netns add ns2
- # 添加两条网线
- # 以下命令会创建两对,分别是 veth0~veth1、veth2~veth3
- ip link add type veth
- ip link add type veth
- # 将两条网线的两端添加到 namespace 中
- ip link set veth1 netns ns1
- ip link set veth3 netns ns2
- # 配置地址
- ip netns exec ns1 ip addr add 172.19.13.200/24 dev veth1
- ip netns exec ns2 ip addr add 172.19.14.200/24 dev veth3
- # up 端口
- ip netns exec ns1 ip link set dev veth1 up
- ip netns exec ns2 ip link set dev veth3 up
- # 添加默认路由
- # 下一跳指向 srx 的内网口
- ip netns exec ns1 ip route add default via 172.19.13.100
- ip netns exec ns2 ip route add default via 172.19.14.100
功能测试
DNS 解析测试
在其他主机使用 dig 命令测试
- dig www.baidu.com @172.19.11.100
- ; <<>> DiG 9.11.4-P2-RedHat-9.11.4-16.P2.el7_8.3 <<>> www.baidu.com @172.19.11.100
- ;; global options: +cmd
- ;; Got answer:
- ;; ->>HEADER<<- opcode: QUERY, status: NOERROR, id: 40389
- ;; flags: qr rd ra; QUERY: 1, ANSWER: 3, AUTHORITY: 13, ADDITIONAL: 1
- ;; OPT PSEUDOSECTION:
- ; EDNS: version: 0, flags:; udp: 4096
- ;; QUESTION SECTION:
- ;www.baidu.com.INA
- ;; ANSWER SECTION:
- www.baidu.com.1038INCNAMEwww.a.shifen.com.
- www.a.shifen.com.146INA163.177.151.110
- www.a.shifen.com.146INA163.177.151.109
- ;; AUTHORITY SECTION:
- .2276INNSj.root-servers.net.
- .2276INNSf.root-servers.net.
- .2276INNSc.root-servers.net.
- .2276INNSk.root-servers.net.
- .2276INNSl.root-servers.net.
- .2276INNSg.root-servers.net.
- .2276INNSm.root-servers.net.
- .2276INNSe.root-servers.net.
- .2276INNSd.root-servers.net.
- .2276INNSi.root-servers.net.
- .2276INNSa.root-servers.net.
- .2276INNSh.root-servers.net.
- .2276INNSb.root-servers.net.
- ;; Query time: 55 msec
- ;; SERVER: 172.19.11.100#53(172.19.11.100)
- ;; WHEN: Sun May 17 16:56:14 CST 2020
- ;; MSG SIZE rcvd: 312
- --------------------------------
- dig test.houm01.cn @172.19.11.100
- ; <<>> DiG 9.11.4-P2-RedHat-9.11.4-16.P2.el7_8.3 <<>> test.houm01.cn @172.19.11.100
- ;; global options: +cmd
- ;; Got answer:
- ;; ->>HEADER<<- opcode: QUERY, status: NOERROR, id: 49291
- ;; flags: qr aa rd ra; QUERY: 1, ANSWER: 1, AUTHORITY: 1, ADDITIONAL: 1
- ;; OPT PSEUDOSECTION:
- ; EDNS: version: 0, flags:; udp: 4096
- ;; QUESTION SECTION:
- ;test.houm01.cn.INA
- ;; ANSWER SECTION:
- test.houm01.cn.86400INA99.99.99.99
- ;; AUTHORITY SECTION:
- test.houm01.cn.86400INNStest.houm01.cn.
- ;; Query time: 8 msec
- ;; SERVER: 172.19.11.100#53(172.19.11.100)
- ;; WHEN: Sun May 17 16:57:01 CST 2020
- ;; MSG SIZE rcvd: 73
可以看到,解析公网域名和自定义的域名都没有问题
ip ip tunnel 测试
从 ns1 ping ns2
- ip netns exec ns1 ping 172.19.14.200
- PING 172.19.14.200 (172.19.14.200) 56(84) bytes of data.
- 64 bytes from 172.19.14.200: icmp_seq=1 ttl=62 time=66.5 ms
- 64 bytes from 172.19.14.200: icmp_seq=2 ttl=62 time=51.7 ms
- ^C
- --- 172.19.14.200 ping statistics ---
- 2 packets transmitted, 2 received, 0% packet loss, time 1002ms
- rtt min/avg/max/mdev = 51.769/59.155/66.542/7.390 ms
性能测试
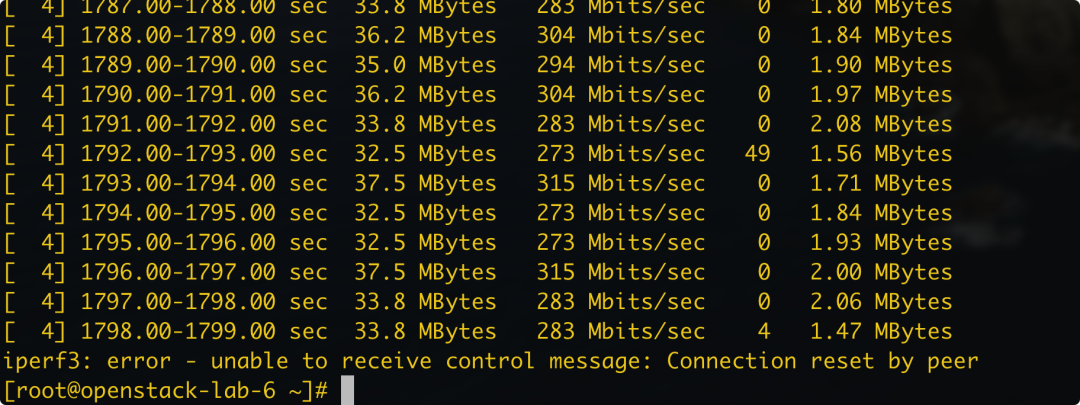
iperf 测试
执行如下命令测试
- # 将 ns1 作为服务器端侦听
- ip netns exec ns1 iperf3 -s
- # 将 ns2 作为客户端,测试半小时
- ip netns exec ns2 iperf3 -c 172.19.13.100 -t 1800
参考资料
http://www.iwan.wiki/Virtual_router_instances_Juniper_vSRX,_Juniper_vMX_and_GNS3
https://kb.juniper.net/InfoCenter/index?page=content&id=KB23986


